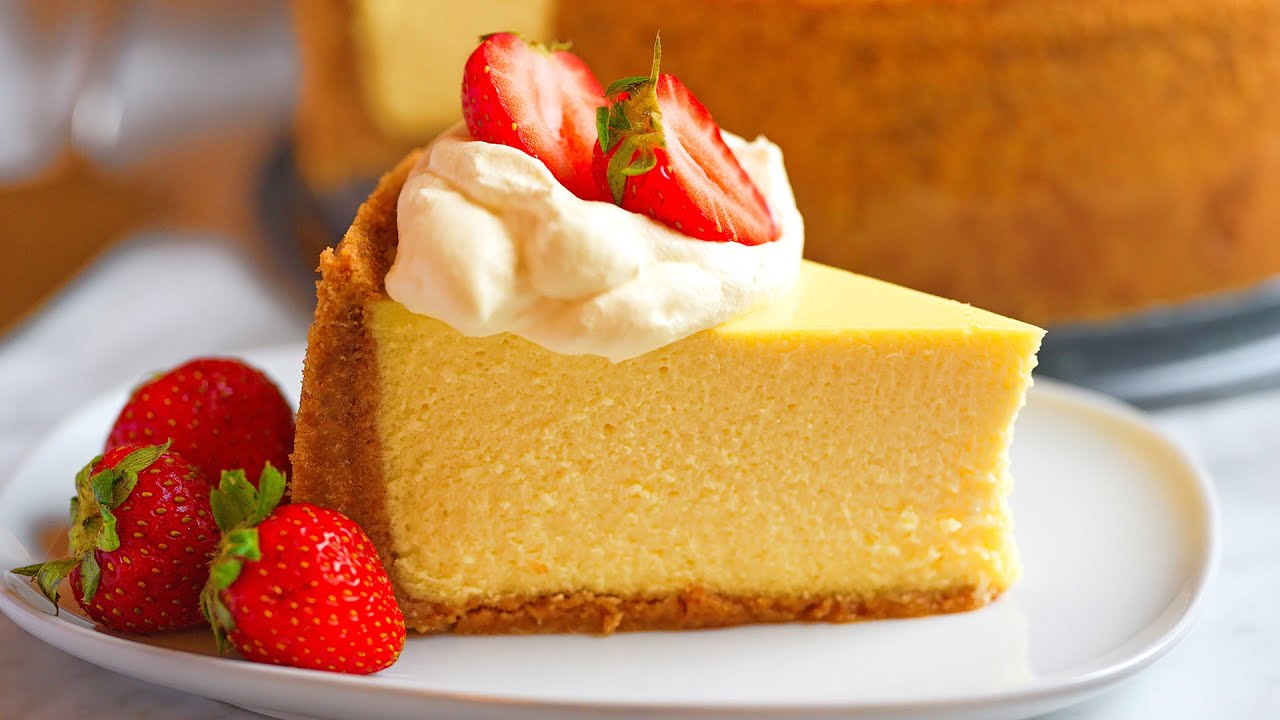
Cream Cheese Cake Recipe: Cream cheese cake, better known as cheesecake, is a luscious dessert that combines a crunchy crust with a rich, creamy filling made primarily of cream cheese. Unlike traditional cakes, cheesecake isn’t about light and fluffy textures—it’s about decadence. The rich filling melts in your mouth, leaving behind a smooth, velvety finish that’s hard to resist.
Historically, cheesecakes have roots tracing back to ancient Greece, but the version we know and love today—with a cream cheese base—originated in the United States. Whether baked or no-bake, this dessert has become a beloved classic in households around the globe.
Why You’ll Love This Recipe
What makes this recipe stand out? First, it’s foolproof. Whether you’re a baking novice or a seasoned pro, this step-by-step guide ensures perfect results. Second, the ingredients are simple—no need to hunt for exotic items. And third, the flavor? Divine. You get a delightful contrast between the buttery crust and the rich, tangy filling.
And let’s not forget versatility. Want to add fruit? Go for it. Prefer it plain? Still heavenly. It’s the kind of dessert that works for birthdays, holidays, or just because you’re craving something indulgent.
Ingredients Needed
Essential Ingredients for the Crust
The base of any great cheesecake is the crust, and this one is both easy and delicious. You’ll need:
- 1 ½ cups of crushed graham crackers (you can also use digestive biscuits)
- ¼ cup of granulated sugar
- ½ cup of unsalted butter (melted)
Graham crackers offer the ideal balance of sweetness and crunch, but feel free to experiment with other cookies like Oreos or vanilla wafers for a twist.
Mix these together until the crumbs are fully coated with butter, creating a sand-like consistency. Press this mixture into the bottom of your springform pan to form a solid base.
Ingredients for the Creamy Cheese Filling
Now for the star of the show: the cream cheese filling. Here’s what you’ll need:
- 4 (8 oz) packages of cream cheese (room temperature)
- 1 cup of granulated sugar
- 1 teaspoon of vanilla extract
- 4 large eggs
- 1 cup of sour cream
- ½ cup of heavy cream
- 2 tablespoons of all-purpose flour (optional for thickening)
Use full-fat cream cheese for the best texture and taste. The sour cream and heavy cream add an extra layer of richness that sets this recipe apart.
Beat the cream cheese until it’s smooth before adding any other ingredients. This ensures a silky, lump-free batter.
Optional Toppings and Garnishes
Want to elevate your cheesecake even further? Consider these:
- Fresh berries (strawberries, blueberries, raspberries)
- Fruit compote or preserves
- Chocolate ganache
- Whipped cream
- Caramel drizzle
- Crushed nuts or cookie crumbles
These extras not only add flavor but also make your dessert visually stunning. You can tailor the toppings to suit the season or your personal taste.
Tools You’ll Need
Baking Equipment Checklist
Having the right tools makes baking more enjoyable and less stressful. For this recipe, make sure you have:
- 9-inch springform pan
- Mixing bowls (large and medium)
- Electric mixer or stand mixer
- Measuring cups and spoons
- Rubber spatula
- Aluminum foil (for the water bath)
- Roasting pan (for water bath)
The springform pan is crucial because it allows for easy removal without damaging the cheesecake’s structure. A roasting pan and aluminum foil help create a moist environment, preventing the top from cracking.
Tips for Perfect Mixing and Baking
- Room Temperature Ingredients: Make sure all your dairy products are at room temperature. This ensures smooth blending and prevents lumps.
- Don’t Overmix: Overmixing adds too much air, leading to cracks. Mix just until combined.
- Use a Water Bath: Also known as a bain-marie, this baking method uses steam to keep the cheesecake moist and prevent cracking.
- Check Doneness: Your cheesecake is ready when the center is slightly jiggly but the edges are set.
Step-by-Step Guide to Making Cream Cheese Cake
Step 1: Preparing the Crust
Start by preheating your oven to 325°F (160°C). Mix the crushed graham crackers, sugar, and melted butter in a bowl until well combined. Pour the mixture into a 9-inch springform pan, pressing it firmly into the base with the back of a spoon.
Bake the crust for 10 minutes, then set aside to cool. This step helps the crust stay firm and not become soggy once you add the filling.
A solid crust foundation is key. It should be golden brown and slightly firm to the touch.
Step 2: Making the Cream Cheese Filling
Now it’s time to whip up the star of the show—the creamy, dreamy filling. First things first: make sure your cream cheese is at room temperature. This helps it blend smoothly without lumps. Place the cream cheese in a large mixing bowl and beat it until it’s completely smooth and fluffy. This takes about 3-4 minutes with a hand or stand mixer on medium speed.
Next, add the granulated sugar and continue beating until fully combined. The sugar crystals will break down and help create that silky texture we’re aiming for. Add in the vanilla extract to infuse your filling with that classic sweet and aromatic flavor.
Once that’s well incorporated, start adding the eggs—one at a time. Beat on low after each egg until it’s just combined. Overmixing at this stage can add too much air to your batter, which can cause cracks during baking.
Finally, add the sour cream and heavy cream. The sour cream brings a tangy richness, while the heavy cream adds depth and smoothness. For extra stability, mix in a tablespoon or two of flour or cornstarch—especially if you’re concerned about your cheesecake holding its shape.
Give everything one final gentle mix. The batter should be thick, creamy, and silky smooth. Pour it over your cooled crust, using a spatula to smooth out the top.
Step 3: Baking the Cake
Before sliding your cheesecake into the oven, let’s talk about water baths. This step might seem extra, but trust us—it makes a world of difference. Wrap the outside of your springform pan with a double layer of heavy-duty aluminum foil. Place the pan into a large roasting dish and pour hot water into the outer dish, about halfway up the sides of the springform pan.
This setup creates steam during baking, which keeps the cheesecake moist and prevents unsightly cracks from forming.
Now, bake the cheesecake at 325°F (160°C) for about 60 to 70 minutes. You’ll know it’s done when the edges are set, but the center still has a gentle jiggle—kind of like Jell-O.
Turn the oven off, crack the door open, and let the cheesecake sit inside for another hour. This slow cooling process helps the cake set evenly and avoids sudden temperature changes that can cause cracks.
Step 4: Cooling and Chilling
Once your cheesecake has cooled in the oven, remove it from the water bath and foil, and place it on a wire rack to continue cooling at room temperature for another hour. Don’t skip this step; rushing the cooling process can ruin the texture.
After it’s cooled completely, transfer the cheesecake to the fridge and chill for at least 6 hours, but preferably overnight. This is where the magic happens. During this time, the flavors deepen, and the texture firms up beautifully.
Cover the cheesecake with plastic wrap or a cake dome to prevent it from absorbing fridge odors. When you’re ready to serve, run a thin knife around the edge of the pan before unlocking the springform sides. This helps release the cake cleanly.
Step 5: Adding the Topping
Here’s where you can let your creativity shine. A plain cheesecake is great, but toppings take it to the next level. Here are a few crowd-pleasing options:
- Fruit Compote: Simmer fresh or frozen berries with sugar and a splash of lemon juice until thickened. Spoon over the cheesecake for a tart contrast.
- Chocolate Ganache: Heat heavy cream and pour over chopped chocolate, then stir until smooth. Pour this luscious sauce over the cake and let it drip down the sides.
- Caramel Drizzle: A buttery caramel sauce with a pinch of salt turns this dessert into an indulgent dream.
- Fresh Fruit: Strawberries, blueberries, or kiwi slices add freshness and color.
- Whipped Cream Swirls: Pipe some whipped cream along the edge or in decorative rosettes.
Whether you go for elegant simplicity or over-the-top toppings, your cheesecake will look and taste amazing.
Pro Tips for the Perfect Cream Cheese Cake
Avoiding Cracks and Overbaking
Nobody wants a cheesecake that looks like the Grand Canyon. Cracks typically come from overbaking or rapid cooling. To avoid them, bake your cheesecake gently in a water bath and allow it to cool slowly in the oven with the door slightly open.
Don’t keep opening the oven door during baking—that temperature drop can cause issues. Also, remember to mix the batter just until ingredients are incorporated. Overmixing adds air, which leads to puffing and cracking.
If your cheesecake still cracks, don’t panic! Just add a generous topping, and no one will know.
Making it Extra Creamy
If you’re after that ultra-smooth, melt-in-your-mouth texture, a few simple tricks can help elevate your cheesecake from good to extraordinary.
First, always use full-fat ingredients. This includes full-fat cream cheese, sour cream, and heavy cream. Low-fat alternatives just don’t have the same richness and can affect the final consistency.
Second, beat the cream cheese thoroughly before adding any other ingredients. You want it light and fluffy, free of any lumps. But once the eggs are added, switch to low speed. Overmixing at this point will incorporate too much air and lead to a spongy texture, not the creamy silkiness we’re aiming for.
Third, never skip the chilling step. Letting the cheesecake rest in the fridge for at least 6 hours (preferably overnight) allows the fats to firm up and the flavors to develop. A properly chilled cheesecake cuts cleanly and has that signature dense, creamy bite.
Lastly, for an ultra-luxurious texture, you can add a tablespoon of cornstarch or all-purpose flour to the batter. It helps bind the ingredients together without affecting the flavor, offering just a little extra structural integrity.
Serving and Storing Your Cheesecake
Best Ways to Serve
When it’s finally time to enjoy your cheesecake, presentation matters almost as much as taste. Use a sharp, thin knife and dip it in hot water before each slice. This gives you clean cuts that look professionally done.
For serving ideas:
- Classic Style: A plain slice with a sprig of mint or a few fresh berries on the side.
- Party-Perfect: Add a topping bar with sauces, fruits, and nuts so guests can customize their own.
- Mini Cheesecakes: Make the recipe in muffin tins for easy individual servings.
Pair it with a cup of coffee, a glass of dessert wine, or even a scoop of ice cream if you’re feeling extra indulgent.
How to Store for Maximum Freshness
Cheesecake is one of those desserts that actually gets better after a day or two in the fridge, making it a great make-ahead treat.
To refrigerate: Cover the cheesecake loosely with plastic wrap or store it in an airtight container. It will stay fresh for up to 5 days.
To freeze: You can also freeze cheesecake. Wrap individual slices or the whole cake in plastic wrap, then in foil. Store it in a freezer-safe bag or container for up to 2 months. Thaw in the fridge overnight before serving.
Pro Tip: Don’t freeze with toppings. Add fresh toppings after thawing for the best texture and flavor.
FAQs about Cream Cheese Cake Recipe
Can I use low-fat cream cheese?
Yes, but the texture and flavor won’t be quite as rich or creamy. Full-fat cream cheese is best for that classic cheesecake consistency.
How long should the cheesecake chill?
At least 6 hours, but overnight is ideal. This allows the filling to fully set and develop its flavor.
Can I freeze cream cheese cake?
Absolutely. Wrap it well in plastic wrap and foil, then freeze for up to 2 months. Thaw in the fridge before serving.
What toppings go well with cream cheese cake?
Try fresh berries, fruit compote, chocolate ganache, caramel sauce, whipped cream, or even crushed nuts.
Why did my cheesecake crack?
Common causes include overmixing, overbaking, or cooling too quickly. A water bath and gradual cooling can help prevent this.
Conclusion
Making a cream cheese cake from scratch may seem intimidating at first, but once you break it down step-by-step, it’s totally doable—and so worth it. From the buttery, crunchy crust to the silky, rich filling, and whatever toppings your heart desires, every bite is a little piece of heaven.
This is the kind of dessert that turns ordinary days into special ones and makes celebrations even sweeter. Whether you’re baking for family, friends, or just for yourself (we won’t judge), this recipe is sure to impress.
So, roll up those sleeves, gather your ingredients, and get ready to create your new favorite dessert. Happy baking!