Cream Cheese Ball Recipe: Who doesn’t love a good party snack? And when it comes to crowd-pleasers, the cream cheese ball ranks high. It’s creamy, flavorful, and so versatile that you can dress it up or down depending on the occasion. Whether you’re hosting a holiday dinner, bringing a dish to a potluck, or just craving a delicious homemade spread, a cream cheese ball is the perfect go-to. Not only is it easy to make, but it’s also a fun and creative way to showcase flavors. You can make it spicy, sweet, savory, or all of the above—it’s up to you!
Think of a cheese ball as a fancy, edible snowball of flavor. You mix in your favorite ingredients, shape it, roll it in a topping, and boom—it’s done! Even if you’re a beginner in the kitchen, this recipe will guide you every step of the way.
Ingredients You’ll Need
Let’s get started with what you’ll need. A great cheese ball starts with a short list of core ingredients, and from there, the sky’s the limit.
Basic Ingredients
- 2 packages (8 oz each) of cream cheese, softened
- 1 to 2 cups of shredded cheddar cheese (sharp is best for flavor)
- 1 teaspoon garlic powder
- 1/2 teaspoon onion powder
- 1/2 teaspoon salt
- 1/2 teaspoon black pepper
- 2 tablespoons chopped green onions or chives
- 1 tablespoon Worcestershire sauce
Optional Add-Ins
- Cooked and crumbled bacon
- Chopped olives
- Diced bell peppers
- Sun-dried tomatoes
- Dill pickles
- Fresh herbs like parsley or dill
Toppings for Coating
- Chopped pecans, almonds, or walnuts
- Crushed pretzels
- Crushed tortilla chips
- Fresh herbs
- Everything bagel seasoning
You probably already have most of these in your kitchen, which is the beauty of this recipe!
Choosing the Right Cream Cheese
All cream cheese is not created equal. Your choice will directly affect the taste and texture of the cheese ball.
Full-Fat vs Low-Fat
While low-fat cream cheese might sound like a good idea, it often results in a thinner, less creamy texture. For the best flavor and shape, go with full-fat cream cheese. It’s richer and holds up better when mixed with other ingredients and molded into a ball.
Flavor Options
You can also use flavored cream cheese as a base. Think veggie cream cheese, chive and onion, or even jalapeño. These pre-flavored bases can save you time and add a burst of flavor without needing extra ingredients.
Pro tip: Always let your cream cheese soften to room temperature before mixing. This helps everything blend smoothly and evenly.
Step-by-Step Guide to Making a Cream Cheese Ball
Let’s break it down step by step. You’re only five steps away from cheese ball greatness.
Step 1: Softening the Cream Cheese
Start by taking your cream cheese out of the fridge at least 30–45 minutes before you begin. This makes it easier to mix and gives you that smooth, spreadable texture. If you’re short on time, pop it in the microwave for 10 seconds—but be careful not to melt it.
Step 2: Mixing the Base Ingredients
Place the softened cream cheese in a mixing bowl. Add in your shredded cheese, garlic powder, onion powder, Worcestershire sauce, salt, pepper, and any optional add-ins (bacon, herbs, olives). Use a hand mixer or sturdy spoon to combine everything until it’s creamy and well-blended.
Make sure everything is evenly distributed. You don’t want one slice loaded with onions while another gets all the bacon, right?
Step 3: Shaping the Cheese Ball
Once it’s well mixed, it’s time to shape. Scrape the mixture out of the bowl and place it on a piece of plastic wrap. Use your hands (with the wrap around it) to form a ball. Don’t worry if it’s not perfectly round—you can fine-tune it later.
Wrap it up tightly and pop it into the fridge.
Step 4: Chilling the Cheese Ball
Refrigerate for at least 1 hour, or up to 24 hours. This lets the flavors develop and makes the cheese ball firm enough to hold its shape.
You’ll notice the flavors are even better after it chills. It’s like magic!
Step 5: Coating with Toppings
Unwrap your cheese ball and roll it in your desired coating—nuts, herbs, crushed chips—whatever you’re in the mood for. Press gently so the toppings stick.
Now it’s ready to serve!
Popular Flavor Variations
One of the best things about a cream cheese ball is how easy it is to customize. You can turn a simple recipe into a flavor explosion with just a few creative twists. Here are some mouthwatering variations you can try:
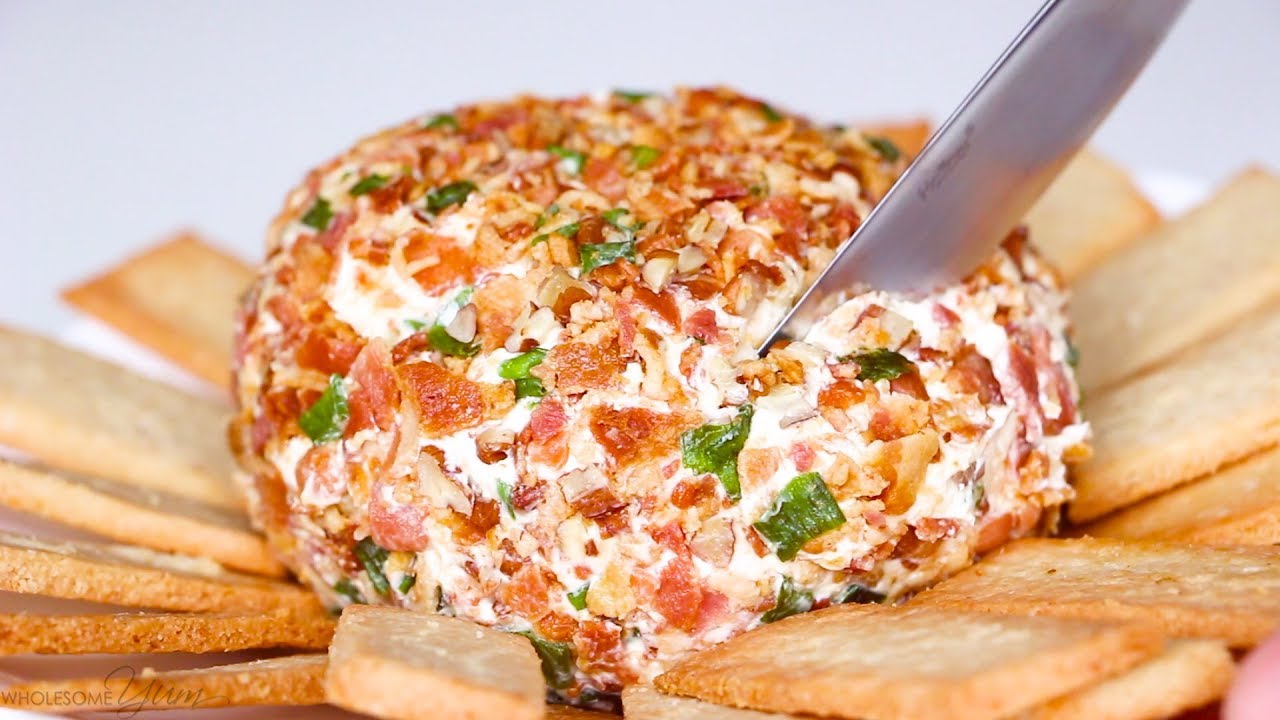
Bacon Cheddar Ranch
This version is a classic for a reason. It combines sharp cheddar, crispy bacon, and ranch seasoning to create a tangy, smoky, and savory bite.
Ingredients to Add:
- 1 packet ranch dressing mix
- 1 cup shredded sharp cheddar cheese
- ½ cup cooked and crumbled bacon
- Chopped green onions
Roll it in crushed bacon or more shredded cheddar before serving. Serve with pretzels or pita chips for extra crunch.
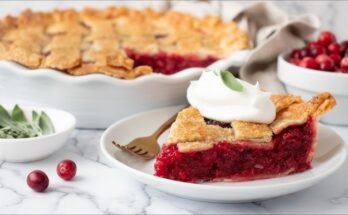
Sweet and Savory (Cranberry & Nuts)
Looking for something a little more elegant? Try a sweet and savory version that pairs wonderfully with crackers or sliced apples.
Ingredients to Add:
- ½ cup dried cranberries
- ½ cup chopped pecans or walnuts
- 1 tablespoon honey
- A pinch of cinnamon (optional)
Roll it in crushed nuts or a mixture of cranberries and nuts for that festive finish. Perfect for holiday spreads!
Spicy Jalapeño Cheese Ball
If you like heat, this one’s for you. The kick from the jalapeños balances the creamy cheese beautifully.
Ingredients to Add:
- 2–3 tablespoons chopped pickled or fresh jalapeños
- ½ teaspoon smoked paprika
- ½ cup pepper jack cheese
Roll it in crushed spicy chips for a bold and crunchy bite.
Creative Coating Ideas
The coating isn’t just for decoration—it adds texture, flavor, and visual appeal. Think beyond just nuts and try these fun options.
Classic Nut Coating
The go-to option. Chopped pecans, almonds, or walnuts give your cheese ball a nice crunch and a rich, toasty flavor.
Tip: Toast the nuts in a dry skillet for a few minutes before coating for an extra flavor boost.
Herb and Spice Blend
Fresh herbs like parsley, dill, or chives make your cheese ball look vibrant and taste fresh. You can also mix in dried spices like paprika or black pepper for color and a little bite.
Crushed Chips or Pretzels
Want something a little more unexpected? Crush up tortilla chips, pretzels, or even flavored crackers and roll the cheese ball in them. This adds a salty crunch and a pop of flavor with every bite.
Bonus idea: Use everything bagel seasoning for a trendy, savory twist.
Serving Suggestions
Alright, so you’ve made your beautiful, delicious cheese ball. Now, how should you serve it?
Best Crackers and Dippers
Your cheese ball deserves a tasty partner. Try:
- Buttery crackers (like Ritz)
- Whole wheat or seeded crackers
- Crostini or toasted baguette slices
- Pretzel sticks or pretzel chips
- Sliced veggies (carrots, celery, bell peppers)
Pairing with Meats and Cheeses
Hosting a party? Add the cheese ball to a larger charcuterie board. Surround it with:
- Cured meats like salami or prosciutto
- Cubes of other cheeses
- Nuts and dried fruits
- Olives or pickles
The contrast of flavors and textures makes it irresistible.
Make-Ahead and Storage Tips
Cheese balls are amazing for make-ahead prep. In fact, they often taste even better the next day.
How Long to Refrigerate
Make your cheese ball up to 2–3 days in advance. Just wrap it tightly in plastic wrap and store it in an airtight container in the fridge. Don’t add the coating until just before serving so it stays crisp and fresh.
Can You Freeze a Cheese Ball?
Yes, you can freeze it! Wrap it tightly in plastic wrap, then again in foil. It will keep in the freezer for up to 1 month. To use, thaw in the fridge overnight and then roll in your coating before serving.
Keep in mind that some coatings (like fresh herbs) don’t freeze well, so wait to add those after thawing.
Tips for Perfect Texture and Flavor
Making the perfect cheese ball isn’t just about throwing ingredients together. A few simple tricks can make a huge difference.
Balancing Flavors
Too salty? Add a bit of honey or dried fruit. Too bland? Sprinkle in more garlic powder, onion powder, or a dash of hot sauce. Taste as you go—it’s totally okay to sample a little before shaping it!
Getting a Smooth Mix
Use a hand mixer if you can—it makes blending much easier and gives you a smoother texture. Don’t forget to scrape the sides of the bowl so everything gets incorporated evenly.
Mistakes to Avoid
Nobody’s perfect, but let’s save you some frustration with these common cheese ball mistakes:
Overmixing
Too much mixing can cause the mixture to get overly soft or even separate. Mix just until everything’s combined.
Not Chilling Long Enough
If you skip the chilling time, your cheese ball won’t hold its shape and the flavors won’t have time to blend. Be patient—it’s worth it!
Overloading with Ingredients
Less is more. Don’t go overboard with add-ins or it’ll get too chunky and hard to shape. Aim for balance and texture.
Serving for Special Occasions
Cream cheese balls aren’t just for game day—they’re great for any event.
Holiday Cheese Balls
Make your cheese ball festive by shaping it like a Christmas tree, pumpkin, or wreath. Use colored toppings or herbs to decorate it accordingly. It’s a showstopper at any table.
Game Day and Parties
Shape mini cheese balls and stick them with pretzel sticks for easy grab-and-go appetizers. You can also make a football-shaped cheese ball and coat it with crushed bacon or pretzels for that game day vibe.
How to Transport a Cheese Ball
Bringing your cheese ball to a party or potluck? You’ll want to make sure it arrives looking just as good as when you made it. Here’s how to keep it safe and intact during transport:
Use the Right Container
Place your chilled cheese ball into a shallow, hard-sided container with a tight-fitting lid. This prevents it from being squished during the trip and helps maintain its shape.
You can also place it on a serving plate, cover it with plastic wrap, and then slide the plate into a large zip-top bag or wrap it in foil.
Keep It Cold
Cheese balls are best served slightly chilled. If it’s a hot day or you’ll be traveling for more than 30 minutes, pack an ice pack or cold gel pad underneath the container. This keeps it from getting too soft or melty.
Add Toppings Later (if needed)
If you’re worried about coatings like nuts or herbs getting soggy, bring them separately in a ziplock bag and roll the cheese ball just before serving. It only takes a minute and keeps everything crisp and fresh.
Kids-Friendly Cheese Ball Ideas
Got picky eaters? No worries. Kids love cheese, and you can easily make a cheese ball that even the little ones will enjoy.
Milder Flavors
Skip the spicy stuff and go for kid-approved flavors like:
- Mild cheddar
- Cream cheese with a touch of honey
- Finely diced ham or turkey
- A bit of ranch seasoning (lightly!)
Avoid strong ingredients like raw onions or garlic if you’re aiming for a kid-friendly version.
Fun Shapes and Colors
Make snack time more exciting by shaping your cheese ball like:
- A mini snowman (stack two cheese balls and use olives for eyes!)
- A pumpkin (using orange cheddar and scoring lines with a knife)
- Animals or cartoon characters using cut-up veggies and cheese
You can even make mini cheese balls and serve them on sticks—like cheesy lollipops! Use crushed cheese crackers or goldfish as a coating for extra appeal.
Low-Carb or Keto-Friendly Version
If you’re on a low-carb or keto diet, the good news is that cheese balls are naturally low in carbs, especially when you leave out sugary add-ins or high-carb dippers.
Substitutes and Alternatives
- Use full-fat cream cheese for a keto-friendly base.
- Add low-carb mix-ins like:
- Cooked bacon
- Chopped herbs
- Jalapeños
- Cheddar, blue cheese, or goat cheese
Keto-Friendly Coatings
Skip the crushed crackers and use:
- Chopped almonds, pecans, or sunflower seeds
- Everything bagel seasoning
- Crumbled bacon
Serve with Low-Carb Dippers
- Cucumber slices
- Celery sticks
- Bell pepper strips
- Pork rinds
- Cheese crisps
This way, you can enjoy the full experience without breaking your diet!
FAQs about Cream Cheese Ball Recipe
1. Can I make a cheese ball without nuts?
Absolutely! Use crushed pretzels, chips, herbs, or even bacon bits as a topping instead. You’ll still get plenty of flavor and crunch.
2. How long does a cheese ball last?
A cheese ball will stay fresh in the fridge for up to 5–7 days if stored properly in an airtight container. Just don’t leave it out too long during serving.
3. What can I use instead of cream cheese?
You can substitute cream cheese with Neufchâtel cheese, goat cheese, or even blended cottage cheese if you’re going for a lighter option. Just note, the texture and flavor will be slightly different.
4. Can I make it sweet instead of avory?
Yes! Use cream cheese with powdered sugar, vanilla extract, and mini chocolate chips. Roll it in crushed graham crackers for a dessert-style cheese ball—great for dipping cookies or fruit!
5. Is it okay to freeze cheese balls?
Yes, but freeze them before coating. Wrap tightly and freeze for up to a month. Thaw in the fridge overnight, then roll in your toppings right before serving.
Conclusion
There you have it—the ultimate guide to making the perfect cream cheese ball. From choosing the right ingredients to adding your own creative twist, you now have everything you need to whip up an appetizer that’s delicious, customizable, and sure to impress.
Whether you’re making it for a holiday party, game night, or just because—you can’t go wrong with this creamy, flavorful dish. Remember to chill it well, roll it in something fun, and serve it up with your favorite dippers. Simple, satisfying, and absolutely irresistible.