Cracker Recipe: Have you ever looked at a box of store-bought crackers and wondered what exactly you’re eating? Long lists of ingredients, preservatives, and mystery flavors often fill those labels. That’s why homemade crackers are not only a fun kitchen experiment—they’re a healthier, tastier alternative.
Making your own crackers means you control the ingredients. Want something gluten-free? No problem. Craving a cheesy twist? Easy. Need a nut-free version for school lunches? You’ve got it. Plus, they taste way better—fresh, crisp, and perfectly customized to your flavor cravings.
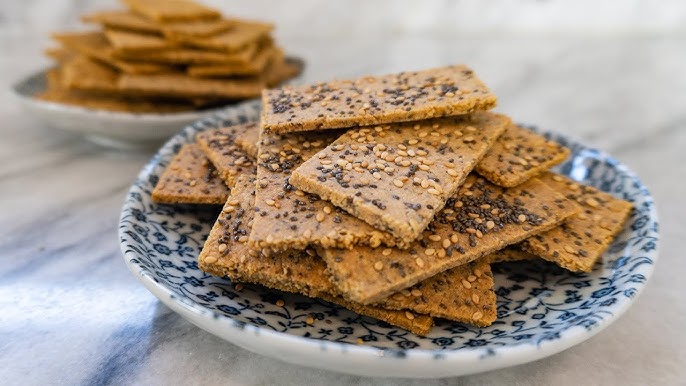
Homemade crackers are also a fantastic way to elevate any snack platter or charcuterie board. Whether you’re pairing them with cheese, dips, or eating them solo, the crunch and satisfaction of something made from scratch is unbeatable.
What You’ll Learn in This Guide
This guide is designed to walk you through the entire cracker-making process. From simple ingredients to baking techniques, and even flavor variations, by the time you’re done reading, you’ll be ready to whip up a batch of gourmet crackers that rival anything you’ve bought in a store.
We’ll start with the basics—what you need, both in your pantry and in your kitchen. Then we’ll dive into the step-by-step instructions, and finally, offer you a few creative twists to take your homemade cracker game to the next level.
Ingredients Needed for Basic Crackers
Core Ingredients
At the heart of every great cracker recipe are just a few pantry staples. Here’s what you need:
- All-Purpose Flour – This forms the base of your crackers. You can substitute with whole wheat, gluten-free blends, or even almond flour depending on your dietary needs.
- Water – Keeps the dough moist and helps combine the ingredients smoothly.
- Olive Oil or Butter – Adds richness and helps the crackers crisp up nicely in the oven.
- Salt – Essential for flavor; don’t skimp on this.
- Baking Powder (optional) – A touch of leavening for a lighter texture.
You’ll be amazed that such simple ingredients can create such delicious results. The real magic is in how you handle the dough and bake the crackers.
Optional Add-Ins for Flavor
Want to make your crackers more exciting? Try incorporating these ingredients:
- Cheese (Parmesan, Cheddar, Gouda)
- Herbs (Rosemary, Thyme, Oregano)
- Spices (Garlic powder, Paprika, Cumin)
- Seeds (Sesame, Flax, Chia, Sunflower)
- Sweet Variations (Cinnamon, Sugar, Vanilla)
Mix and match to your heart’s content. Once you master the basic dough, the flavor combinations are limitless.
Essential Tools and Equipment
Baking Tools You’ll Need
To ensure your crackers come out just right, you’ll want to have the following tools on hand:
- Mixing Bowl – A medium-sized bowl is perfect for mixing your dough.
- Rolling Pin – Essential for getting your dough thin and even.
- Baking Sheet – A standard baking tray works, but make sure it’s flat and large enough for your cracker layout.
- Parchment Paper – Helps prevent sticking and makes cleanup easier.
- Pizza Cutter or Knife – For slicing your crackers into uniform shapes.
Optional Tools for Better Results
- Pastry Blender – Helps mix butter into flour evenly.
- Cookie Cutters – Great for fun shapes if you’re making crackers for kids or a themed event.
- Pastry Brush – For brushing oil or egg wash for that glossy, golden finish.
Being prepared with the right tools makes the entire process more enjoyable—and your results more professional.
How to Make Cracker – Step by Step Guide
Step 1: Mixing the Dough
Start by whisking together your dry ingredients: 1 cup of flour, ½ tsp salt, and ½ tsp baking powder (if using). Slowly add in 2 tbsp olive oil and about 4–5 tbsp of water, mixing with a fork until the dough starts to come together.
Once it’s shaggy, turn it out onto a lightly floured surface and knead gently until smooth—about 2–3 minutes. The dough should be soft but not sticky. If it feels too dry, add a tiny bit more water. Too wet? Add a sprinkle of flour.
Let the dough rest for 5–10 minutes under a clean towel while you preheat your oven to 400°F (200°C).
Step 2: Rolling Out the Dough
Place your rested dough on a floured surface and roll it out thin—really thin. Aim for about 1/16 of an inch. The thinner the dough, the crispier the cracker.
If the dough starts to stick, sprinkle more flour on top or underneath. For even rolling, turn the dough 90 degrees occasionally and roll in multiple directions.
Once rolled, transfer the sheet of dough onto a parchment-lined baking sheet.
Step 3: Cutting and Designing the Crackers
Now that your dough is rolled out thin and even, it’s time to slice it into cracker shapes. This is where you can get a little creative.
Use a pizza cutter or a sharp knife to cut the dough into squares, rectangles, diamonds, or even triangles. Want round crackers? Grab a small cookie cutter or the rim of a small glass. Just remember—uniform sizes ensure even baking.
If you want that classic cracker look, use a fork to prick each cracker a couple of times. This not only gives them that authentic appearance but also prevents them from puffing up during baking.
If you’re brushing with olive oil or an egg wash for a golden finish, now’s the time. You can also sprinkle a little extra salt, grated cheese, sesame seeds, or herbs on top for added flavor and texture.
Step 4: Baking to Perfection
Slide your tray into the preheated oven at 400°F (200°C). Bake for about 10 to 15 minutes, but keep a close eye on them after the 10-minute mark. Crackers can go from golden to burnt in the blink of an eye.
You’re looking for crisp edges and a light golden color. If your crackers are different sizes, some may bake faster than others. Feel free to remove the crispy ones early and let the rest continue baking.
If you’re baking more than one tray, swap them halfway through for even browning. This step is crucial for that perfect crunch.
Once baked, remove from the oven and let them cool on a wire rack. They’ll crisp up even more as they cool, so don’t panic if they feel slightly soft at first.
Step 5: Cooling and Storing
Cooling might seem like an easy step to rush through, but don’t skip it. Let your crackers cool completely before storing them. This prevents moisture from building up in your container, which would make them soggy.
Once cool, store them in an airtight container. They’ll stay fresh and crisp for up to a week at room temperature. For longer storage, toss a dry paper towel in the container to help absorb any excess moisture.
Want to keep them even longer? Freeze them! Yes, crackers freeze beautifully. Just pop them in a zip-top bag and freeze for up to 2 months. Re-crisp them in a warm oven before serving.
Flavor Variations to Try
Cheese Crackers
Who doesn’t love a good cheesy cracker? For a cheesy version, add about ½ cup of finely grated sharp cheddar or parmesan to your flour before adding the liquids. Cheese adds flavor, color, and a delightful crumbly texture.
You can also sprinkle extra cheese on top before baking for that irresistible cheesy crust. Want them extra decadent? Add a pinch of cayenne pepper or paprika for a spicy twist.
Cheese crackers pair beautifully with dips, soups, or even a cold beer. They’re a guaranteed hit at parties or afternoon snacks.
Herb-Infused Crackers
Love herbs? Infuse your dough with finely chopped rosemary, thyme, or basil. Add about 1 tablespoon of fresh herbs or 1 teaspoon of dried herbs to your dry mix.
These crackers are perfect for pairing with cheese boards, charcuterie platters, or light dips like hummus or tzatziki. They bring an aromatic, earthy flavor that’s especially appealing for savory snack lovers.
For an extra touch, brush the tops with olive oil and sprinkle with a mix of sea salt and more herbs before baking.
Spicy Crackers
Craving something with a little heat? Spice up your crackers with ½ teaspoon of chili powder, cumin, cayenne pepper, or even crushed red pepper flakes.
Mix the spice right into the flour or dust it on top before baking for a double dose of flavor. These are awesome for fans of bold flavors and pair well with creamy dips like guacamole or ranch.
Don’t forget—spicy doesn’t mean inedible. Start small and taste the dough before baking to adjust the heat level to your liking.
Tips for Perfect Crackers Every Time
Keep Your Dough Thin and Even
The secret to consistently crispy crackers? Thin, even dough. If your dough is too thick in some spots, you’ll end up with uneven crackers—some may be burnt while others stay soft or chewy. Always aim for uniform thickness, ideally about 1/16 of an inch. Use a ruler if you have to. Rolling out the dough between two sheets of parchment paper can also help maintain evenness and prevent sticking.
Don’t Overwork the Dough
Much like with pie crust or biscuits, overworking your cracker dough can make the final product tough instead of crispy. Mix and knead just until the ingredients come together. You don’t need a perfectly smooth dough—just one that holds together well and is easy to roll out.
Experiment with Seasonings
Plain crackers are great, but seasonings are where the fun really begins. You can customize your crackers to suit your meal or occasion. Try garlic and parmesan for Italian night, chili-lime for taco Tuesday, or cinnamon sugar for a sweet treat. Don’t be afraid to get creative and try different seasoning blends—just sprinkle them on top before baking for an extra layer of flavor.
Serving Suggestions
Pairing Ideas for Crackers
Homemade crackers are incredibly versatile. Here are a few ideas to inspire you:
- Cheese Boards – Pair your crackers with an assortment of cheeses, fruits, and nuts for a gourmet snack platter.
- Dips – Hummus, guacamole, spinach-artichoke dip, and creamy cheeses are all perfect companions for crunchy crackers.
- Soups – Use crackers as a crunchy topping or side for creamy soups like tomato, pumpkin, or broccoli cheddar.
- On-the-Go Snacks – Pack a handful in a reusable snack bag for a healthy alternative to chips.
- DIY Lunchables – Combine with sliced meats, cheeses, and fruit for a kid-friendly, lunchbox-ready meal.
Crackers aren’t just for snacking—they’re an awesome addition to almost any meal or gathering.
Healthier Alternatives and Dietary Tweaks
Make It Gluten-Free
Going gluten-free? No problem. Just substitute your flour with a gluten-free flour blend that includes xanthan gum (to help bind the dough). Almond flour, chickpea flour, or oat flour can also be used, though you may need to tweak the moisture content slightly.
Try Whole Grain Flours
Want a boost in fiber and nutrients? Use whole wheat flour, spelt flour, or even rye. Whole grain flours add a nutty flavor and a denser texture, which works beautifully in crackers.
Reduce Salt or Oil
If you’re watching your sodium or fat intake, you can reduce the amount of salt or oil in the recipe. Just know that this may slightly affect flavor and texture. Try using unsalted spices and herbs to compensate for the lower salt content.
Storing and Reheating Tips
How to Keep Crackers Fresh
To maintain their crispness, make sure your crackers are fully cooled before storing. Keep them in an airtight container, preferably lined with a paper towel to absorb any residual moisture. A tightly sealed glass jar or Tupperware works great.
If they lose some of their crunch after a few days, simply reheat them in a 300°F oven for 5–7 minutes. Let them cool again before sealing back up.
Common Mistakes to Avoid
Skipping the Resting Time
Letting your dough rest—even for just 10 minutes—relaxes the gluten and makes it easier to roll out. Skipping this step can result in tough, chewy crackers that are hard to shape and cook unevenly.
Overloading with Toppings
Toppings are great, but don’t go overboard. Too much cheese or spice can weigh down the dough, make it greasy, or cause uneven baking. Use a light hand, especially with oil-based toppings.
Not Watching Closely While Baking
Crackers bake fast, and your oven might have hot spots. Always keep an eye on them in the last few minutes. Rotate your tray if needed, and pull out any that look done early to avoid burning.
FAQs about Cracker Recipe
Q1: What ingredients are commonly used to make homemade crackers?
Most homemade cracker recipes use a few pantry staples like all-purpose flour, water, olive oil or butter, and salt. You can also add herbs, cheese, or seeds for flavor and texture.
Q2: Can I make crackers without a rolling pin?
Yes, you can press the dough flat using a clean bottle, glass, or even your hands. Just ensure the dough is evenly thin for crisp results.
Q3: How do I make my crackers crispy?
To get crispy crackers, roll the dough thin and bake at a consistent medium-high temperature. Allow them to cool completely on a wire rack to retain their crunch.
Q4: Are homemade crackers healthier than store-bought ones?
Generally, yes. Homemade crackers allow you to control the ingredients, reduce sodium, avoid preservatives, and use whole grains or gluten-free options.
Q5: How should I store homemade crackers?
Keep your crackers in an airtight container at room temperature. They typically stay fresh and crispy for up to a week.
Q6: Can I freeze cracker dough?
Absolutely! Cracker dough can be wrapped tightly and frozen for up to 2 months. Thaw in the fridge before rolling out and baking.
Q7: What are the best toppings or flavorings for crackers?
Popular additions include rosemary, thyme, garlic powder, parmesan cheese, sesame seeds, poppy seeds, or cracked black pepper.
Q8: Can I make gluten-free crackers?
Yes, simply substitute the flour with a gluten-free blend. Almond flour, oat flour, or chickpea flour work well in many cracker recipes.
Q9: Why are my crackers soft after baking?
This could be due to thick dough, underbaking, or humidity during storage. Try baking a few minutes longer and storing them in a dry, sealed container.
Q10: Can I use whole wheat flour instead of all-purpose flour?
Definitely! Whole wheat flour adds a nutty flavor and extra fiber. You might need a little more water since it absorbs more moisture than white flour.
Conclusion
Making homemade crackers is easier than it seems and way more satisfying than grabbing a box from the store. With just a few basic ingredients and simple steps, you can create crispy, flavorful, and totally customizable crackers that suit any taste or dietary need. Whether you’re making a savory rosemary-parmesan batch for a wine night or going sweet with a cinnamon sugar twist, this guide gives you the tools and confidence to do it all.
So grab your rolling pin and a few pantry staples—you’re just minutes away from the best crackers you’ve ever had!

