Cracker Barrel Pancake Recipe: There’s nothing quite like waking up on a lazy Sunday morning, craving a stack of warm, fluffy pancakes. And if you’ve ever been to Cracker Barrel, you know exactly the kind of golden, buttery, melt-in-your-mouth goodness we’re talking about. What if you could bring that diner-style deliciousness right into your own kitchen? Good news—you absolutely can!
This step-by-step guide will walk you through how to make Cracker Barrel pancakes from scratch. We’re going beyond just a basic recipe. You’ll get the exact ingredients, tools, tips, and tricks to nail that authentic flavor and texture. Whether you’re cooking for your family, hosting brunch, or simply treating yourself, this is the only pancake recipe you’ll ever need.
Ready to flip some flapjacks? Let’s dive into the Cracker Barrel pancake magic!
Why Cracker Barrel Pancakes Are So Loved
Cracker Barrel has built a reputation on comfort food done right. And while everything on their menu is packed with Southern charm, their pancakes are a true standout. What makes them so special? It’s a blend of texture and taste—soft on the inside with a light crisp on the edges, buttery flavor in every bite, and a touch of that griddle magic you just can’t replicate with frozen pancakes.
These pancakes aren’t too sweet or too dense. They’re just right. You can eat them solo or load them with your favorite toppings—maple syrup, butter, or even fresh fruit. Each bite feels like a cozy hug.
More importantly, these pancakes aren’t just breakfast—they’re a vibe. They remind you of warm conversations, the smell of coffee brewing, and the comfort of home. That’s the magic we’re going to recreate in your kitchen.
What Makes Them Unique?
Cracker Barrel pancakes differ from your typical homemade or boxed pancake mix in a few key ways:
- Buttermilk is a big player. It adds a tangy flavor and creates a tender texture.
- Simple ingredients – no fluff, no extras, just the basics done right.
- High-heat griddling for that golden-brown crust.
- Rested batter – letting the batter sit helps develop flavor and ensures fluffiness.
All of this comes together to create a pancake that’s rich, soft, and has just the right amount of chew. If you’re ready to master the art, let’s start with the basics.
Ingredients You’ll Need
To whip up the perfect Cracker Barrel pancake, you’ll want to have all the right ingredients ready to go. Here’s the complete list so you can shop or double-check your pantry.
Dry Ingredients
- 2 cups all-purpose flour – Go for a high-quality brand for the best texture.
- 2 tablespoons sugar – Not too much, just a light sweetness.
- 1 ½ teaspoons baking soda – Helps create that lift.
- 1 teaspoon salt – Essential to bring out flavor.
- ½ teaspoon baking powder – Works with baking soda to add fluff.
These dry ingredients are the backbone of your pancake batter. Make sure they’re fresh, especially the leavening agents. Expired baking soda or powder means flat pancakes, and we don’t want that.
Wet Ingredients
- 2 cups buttermilk – The star ingredient. It adds flavor and activates the baking soda.
- 2 large eggs – Bind everything and add richness.
- ¼ cup melted butter – Unsalted is best. Adds that buttery, diner-style depth.
If you don’t have buttermilk, you can make your own by mixing 2 cups of milk with 2 tablespoons of white vinegar or lemon juice and letting it sit for 5-10 minutes.
Optional Add-ins for a Flavor Twist
- 1 tsp vanilla extract – Adds a soft sweetness.
- 1 tsp cinnamon – For a warm, cozy vibe.
- Blueberries or chocolate chips – For a fun twist on the classic.
Feel free to personalize the recipe with your own creative spins. These pancakes are a great base for experimentation.
Tools and Equipment Required
- Mixing bowls – One for dry, one for wet.
- Whisk or hand mixer – To combine the batter smoothly.
- Griddle or non-stick skillet – A large surface lets you make more pancakes at once.
- Spatula – Preferably a wide, flat one for easy flipping.
- Measuring cups and spoons – Accuracy matters in baking!
A well-heated and greased griddle is key to getting those crispy golden edges. Don’t skip this part!
Preparing for the Recipe
Before we start pouring batter, let’s talk prep. Pancakes are simple, but precision is everything if you want that Cracker Barrel perfection.
Tips for Best Results
- Use room-temperature ingredients. Eggs and buttermilk blend more smoothly when not cold.
- Don’t overmix the batter. Mix until combined, a few lumps are okay. Overmixing = tough pancakes.
- Let the batter rest. About 10 minutes allows the flour to hydrate and the leavening agents to activate.
- Preheat your griddle. The right temperature is around 375°F (or medium-high heat). A drop of water should sizzle immediately.
Keep these in mind, and you’re already halfway to pancake glory.
How to Measure Ingredients Accurately
Baking is a science, and the wrong measurements can make your pancakes fall flat—literally.
- Flour: Spoon it into the cup and level it off with a knife. Don’t scoop directly from the bag.
- Butter: Melt it and measure it in a liquid measuring cup.
- Buttermilk: Shake it well before pouring, and use a clear measuring jug.
Measuring with care ensures consistency, and that’s the secret to mastering this (or any) recipe.
Step-by-Step Guide to Making Cracker Barrel Pancakes
Step 1 – Prepping the Batter
Start by combining all your dry ingredients in a large mixing bowl: flour, sugar, baking soda, baking powder, and salt. Whisk them gently to evenly distribute everything—this ensures that your pancakes cook evenly and rise beautifully.
In a separate bowl, whisk together your wet ingredients: buttermilk, eggs, and melted butter. If you’re using vanilla extract or cinnamon, add them here.
Now comes the most important part—combining the wet and dry ingredients. Slowly pour the wet mix into the dry ingredients, whisking gently as you go. Do not overmix! It’s okay if the batter has a few lumps. Overmixing causes the gluten in the flour to develop too much, leading to dense, chewy pancakes—not the Cracker Barrel fluff we’re aiming for.
Once everything’s incorporated, let the batter rest for at least 10 to 15 minutes. This gives the baking soda and buttermilk time to react, creating those tiny air bubbles that lead to a light and fluffy texture.
Step 2 – Letting the Batter Rest
This step is so simple but often overlooked—and it’s the key to the perfect pancake. When you let your batter rest, the flour absorbs the liquid, and the leavening agents begin working their magic. You’ll start to see tiny bubbles forming on the surface—that’s a good thing.
During this time, you can preheat your griddle or skillet, lay out your plates, and get your toppings ready. It’s all about working smarter, not harder.
One pro tip? Cover your batter bowl with a clean kitchen towel or plastic wrap while it rests to keep it from drying out. You’ll be rewarded with a smooth, fluffy batter that’s ready to perform.
Step 3 – Preheating and Greasing the Griddle
The right temperature is everything when it comes to getting that golden-brown finish. Set your griddle or skillet to medium-high heat, around 375°F. Not sure if it’s ready? Drop a small splash of water onto the surface. If it dances and evaporates quickly, you’re good to go.
Lightly grease your cooking surface with butter or cooking spray. Butter adds flavor, but be careful not to burn it. If you’re cooking multiple batches, you might want to wipe the surface and re-grease every couple of pancakes to avoid scorching or sticking.
Remember, if the griddle’s too hot, the pancakes will burn before the inside cooks. If it’s too cool, you won’t get that crisp, golden crust. Find that sweet spot and stick to it!
Step 4 – Pouring and Flipping Pancakes
Use a ¼ cup measuring cup or ladle to scoop and pour the batter onto the hot griddle. Leave enough space between pancakes so they don’t run into each other. Pancakes expand a bit as they cook.
Watch carefully. After 2-3 minutes, small bubbles will start to appear on the surface, and the edges will begin to look set. That’s your cue—it’s time to flip!
Use a wide spatula to gently lift the pancake and flip it in one smooth motion. Cook the second side for another 1-2 minutes. You’re looking for a golden brown finish on both sides with a soft, fluffy inside.
Stack ’em up as you go and keep them warm in a low oven (about 200°F) if you’re making a big batch.
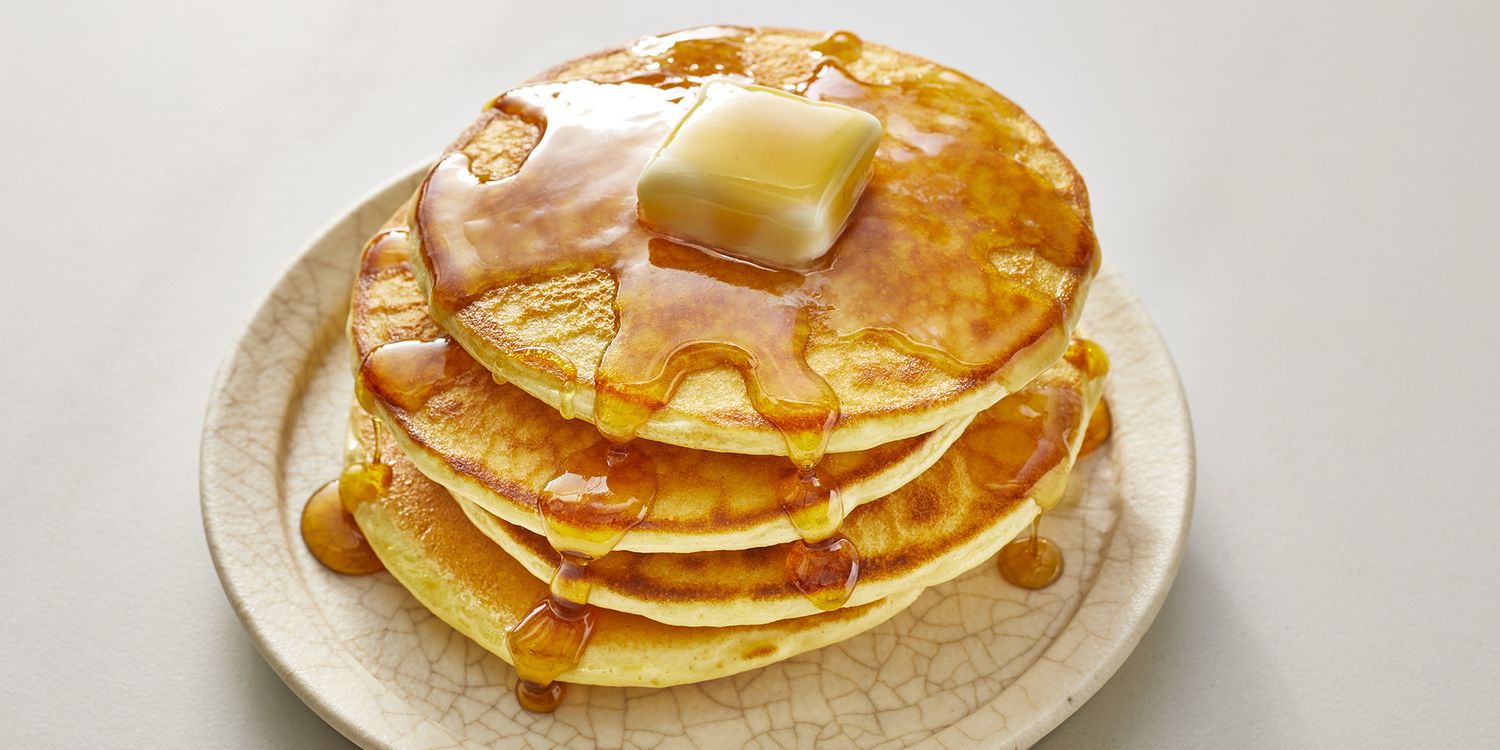
Step 5 – Serving and Garnishing
This is where the magic really comes together. Once your pancakes are ready, serve them up immediately for the best taste and texture.
Top them the Cracker Barrel way:
- A pat of butter melting on top
- Warm maple syrup drizzled generously
- A sprinkle of powdered sugar for a diner-style finish
Want to get creative? Try topping them with:
- Fresh berries
- Whipped cream
- Banana slices and Nutella
- Peanut butter drizzle
- Or even chicken strips for a sweet-and-savory combo
Presentation matters too. Stack 3 or 4 pancakes high on a warm plate, add your favorite toppings, and serve with hot coffee or fresh juice for the full experience.
Pro Tips for Perfect Pancakes
Common Mistakes to Avoid
Even with the best recipe, a few missteps can sabotage your pancakes. Here’s what to watch out for:
- Overmixing the batter – As mentioned, this makes pancakes dense and chewy.
- Not letting the batter rest – Skipping this step results in flat, rubbery pancakes.
- Cooking on the wrong heat – Too hot, and they burn. Too low, and they’re pale and undercooked.
- Using old baking soda or baking powder – Expired leavening agents won’t help your pancakes rise.
- Flipping too soon – Wait for those bubbles to form and the edges to firm up.
- Pressing down with the spatula – This squeezes out air and flattens your pancakes.
Avoiding these common traps ensures that every bite of your Cracker Barrel pancakes is as fluffy and delicious as the original.
How to Get Fluffy Pancakes Every Time
Let’s be real—no one wants flat, soggy pancakes. You want them tall, airy, and melt-in-your-mouth tender. Here’s how to guarantee it:
- Use buttermilk instead of regular milk. The acidity activates the baking soda and makes your pancakes rise.
- Don’t skip the rest time – this is where the fluffiness is born.
- Resist the urge to flatten while cooking. Flipping once and letting them do their thing is best.
- Check your flour – a high-quality all-purpose flour can make a difference.
Bonus tip: separate the egg whites, beat them until soft peaks form, and fold them into the batter gently. It’s an extra step, but it creates the fluffiest pancakes imaginable.
Serving Suggestions
Classic Toppings
Sometimes, simple is best. These classic pancake toppings never go out of style and complement the rich, buttery Cracker Barrel flavor perfectly:
- Butter – Always serve pancakes hot with a pat of butter melting into every crevice.
- Maple Syrup – Go for 100% pure maple syrup if you can. The flavor is richer and more authentic.
- Powdered Sugar – A light dusting adds a diner-style finish.
- Honey – A natural alternative that brings its own unique sweetness.
You can even go Cracker Barrel style and add a side of breakfast sausage, bacon, or scrambled eggs for a full Southern breakfast plate.
Creative Serving Ideas
Feeling a little adventurous? Here are some creative ways to serve your pancakes that’ll turn a regular breakfast into a memorable meal:
- Fruit Explosion: Top with strawberries, blueberries, bananas, and a drizzle of fruit syrup.
- Nutty Banana Bliss: Add sliced bananas, chopped walnuts, and a honey drizzle.
- Pancake Sandwiches: Layer pancakes with bacon and eggs in between for a breakfast-on-the-go.
- Dessert Pancakes: Add chocolate chips to the batter, top with whipped cream and caramel sauce.
- Savory Stack: Add a sunny-side-up egg and shredded cheese for a sweet-meets-savory experience.
The beauty of pancakes is that they’re a blank canvas. Whatever your craving, there’s a way to customize your stack to match.
Making Cracker Barrel Pancakes Healthier
Gluten-Free Version
Want to enjoy Cracker Barrel-style pancakes but need to go gluten-free? No problem. Here’s how to adapt the recipe:
Substitute all-purpose flour with:
- 2 cups of gluten-free all-purpose flour blend (with xanthan gum)
- Or 1 ½ cups almond flour + ½ cup tapioca flour for a low-carb twist
Important tips:
- Let the batter rest longer (20–30 minutes) for better hydration.
- Add an extra egg or a tablespoon of yogurt to bind everything.
The texture will be slightly different—more tender and a little less fluffy—but the taste? Still incredible.
Low-Calorie Swaps
Want a lighter version of this indulgent favorite? Here are a few healthier swaps that won’t sacrifice flavor:
- Use low-fat buttermilk or a non-dairy milk + vinegar combo.
- Swap butter with unsweetened applesauce or light olive oil.
- Reduce sugar or use a sugar substitute like stevia or monk fruit.
- Use egg whites instead of whole eggs.
And instead of syrup, top with fresh fruit or a dollop of Greek yogurt. It’s just as satisfying, and way easier on the waistline.
Storage and Reheating Tips
How to Store Leftover Pancakes
Got leftovers? Lucky you. Pancakes store surprisingly well when handled properly.
- Refrigerator: Stack cooled pancakes with a small piece of parchment paper between each. Store in an airtight container for up to 3 days.
- Freezer: Freeze pancakes in a single layer on a baking sheet. Once frozen, transfer to a freezer-safe bag. They’ll keep for up to 2 months.
Label your containers so you know how long they’ve been in storage, and always let pancakes cool completely before refrigerating or freezing to prevent sogginess.
Best Ways to Reheat Without Losing Texture
Nobody wants rubbery pancakes. Here’s how to bring your leftovers back to life:
- Oven (best method): Preheat to 350°F, wrap pancakes in foil, and heat for 8-10 minutes.
- Toaster: Great for a quick, crispy finish.
- Microwave: 15–20 seconds on a plate with a damp paper towel on top (this keeps them moist).
- Skillet: Reheat with a tiny bit of butter on medium heat for crispy edges.
Avoid overcooking, or you’ll lose that fluffy texture. Done right, your reheated pancakes will taste almost as good as fresh-off-the-griddle.
Cracker Barrel Pancake Recipe – Full Printable Recipe Card
Here’s a quick summary for when you want to jump straight into cooking:
Ingredients:
- 2 cups all-purpose flour
- 2 tbsp sugar
- 1½ tsp baking soda
- 1 tsp salt
- ½ tsp baking powder
- 2 cups buttermilk
- 2 eggs
- ¼ cup melted butter
- (Optional) 1 tsp vanilla, cinnamon, or mix-ins like blueberries or chocolate chips
Instructions:
- Mix all dry ingredients in a large bowl.
- In a separate bowl, whisk wet ingredients.
- Gently combine wet and dry—do not overmix.
- Let batter rest for 10–15 minutes.
- Preheat griddle to 375°F and lightly grease.
- Pour batter in ¼ cup portions.
- Flip when bubbles form and edges look set.
- Cook second side for 1–2 minutes.
- Serve warm with your favorite toppings.
This card is your go-to cheat sheet. Keep it handy and you’ll never be more than 15 minutes away from pancake perfection.
Nutritional Information
Wondering what’s in your stack? Here’s a general breakdown for one medium pancake (made with the standard recipe and no toppings):
| Nutrient | Amount per Pancake |
|---|---|
| Calories | 145 |
| Total Fat | 6g |
| Saturated Fat | 3.5g |
| Cholesterol | 35mg |
| Sodium | 350mg |
| Carbohydrates | 20g |
| Sugar | 2g |
| Protein | 4g |
Note: Toppings and variations will change the totals. If you’re watching your intake, be mindful of syrup, butter, and add-ins like chocolate chips.
FAQs about Cracker Barrel Pancake Recipe
1. Can I freeze the batter?
Absolutely! If you want to prep in advance or have leftover batter, you can freeze it for up to 1 month. Pour the batter into a freezer-safe ziplock bag or airtight container. When you’re ready to use it, thaw it overnight in the fridge and give it a gentle stir before cooking. The leavening power may reduce slightly after freezing, so you might want to add a small pinch of baking powder before cooking to restore some fluffiness.
2. What’s the best griddle temperature?
The ideal griddle temperature for pancakes is 375°F (190°C). If you’re using a stovetop skillet, aim for medium-high heat. To test if it’s ready, sprinkle a few drops of water on the surface—if they sizzle and evaporate quickly, it’s go-time. Maintaining the right temperature is key to achieving that classic golden crust and soft interior without burning.
3. Can I add fruits or chocolate chips?
Yes, and they taste incredible! If you’re going fruity, consider blueberries, sliced bananas, or chopped strawberries. For a sweet touch, try chocolate chips, white chocolate chunks, or even peanut butter chips. For best results, add these to the pancake after pouring the batter onto the griddle. This keeps them from sinking to the bottom of the bowl and ensures even distribution.
4. How close is this to the real Cracker Barrel pancakes?
Pretty darn close! While Cracker Barrel keeps their exact recipe a secret, this version has been carefully crafted to mimic the taste, texture, and look of the original. The use of buttermilk, the balanced leavening agents, and the correct cooking method all come together to give you a nearly identical pancake experience. Many home cooks who’ve made this recipe agree—it’s as good as, if not better than, the real thing.
5. What flour is best?
All-purpose flour is the best choice for this recipe. It strikes the perfect balance between texture and structure. If you’re feeling fancy, you could try cake flour for an ultra-soft bite or a blend with whole wheat flour for a nuttier, slightly denser option. Avoid using bread flour, as it has too much gluten and will make the pancakes chewy rather than fluffy.
Conclusion
There you have it—the ultimate, step-by-step guide to making Cracker Barrel-style pancakes right in your own kitchen. From the perfectly mixed batter to the golden flip, this recipe gives you everything you need to master one of the most iconic American breakfasts out there.
Whether you’re making a special Sunday brunch or a quick weekday treat, these pancakes will hit the spot every single time. They’re warm, fluffy, buttery, and full of that classic Southern comfort that Cracker Barrel is known for.
Now that you’ve got the know-how, it’s your turn to impress. Whip up a batch, stack them high, pour on that syrup, and dig in. Don’t forget to personalize them with your favorite toppings or healthier twists—you’re the chef now!