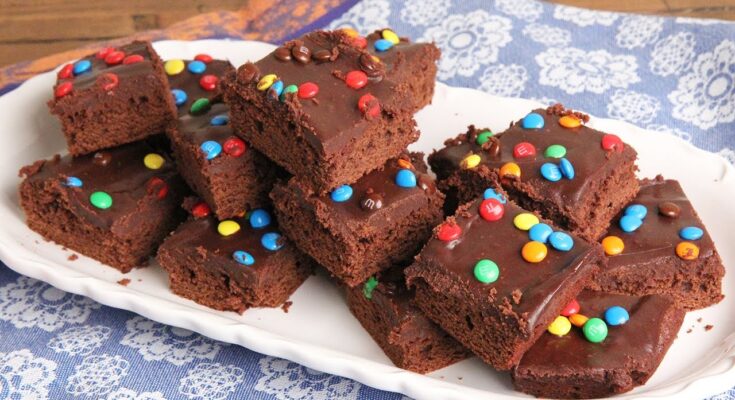
Cosmic Brownie Recipe: Cosmic Brownies are one of those nostalgic treats that instantly take you back to childhood lunchboxes and after-school snacks. They are rich, fudgy brownies topped with a smooth layer of chocolate ganache and sprinkled with colorful rainbow candies. Originally made famous by Little Debbie, these brownies have gained a cult following because of their chewy texture and vibrant toppings.
But here’s the fun part—you don’t need to buy them from the store anymore. With just a few simple ingredients and some baking basics, you can make them at home, and they taste even better than the packaged version. Imagine sinking your teeth into a soft, chocolatey square, coated in a silky ganache that melts in your mouth, with a slight crunch from rainbow sprinkles on top. That’s the magic of homemade Cosmic Brownies.
Homemade versions allow you to control the sweetness, richness, and size. You can make them thicker, fudgier, and more chocolatey than the factory-made ones. Plus, baking them yourself adds a personal touch that store-bought simply can’t replicate. Whether you’re making them for a family dessert, a kid’s birthday party, or simply to satisfy your own sweet tooth, this recipe will guide you step by step.
By the end of this article, you’ll know not just how to make these brownies but also how to store them, customize them, and avoid common mistakes. So, roll up your sleeves, grab your ingredients, and let’s dive into this deliciously cosmic journey.
Ingredients You’ll Need for Homemade Cosmic Brownies
Before we start baking, let’s lay out all the ingredients. Think of this as your “mission checklist” before liftoff to brownie heaven. Having everything ready will make the process smooth and fun.
Dry Ingredients
These form the base of your brownie batter:
- 1 cup all-purpose flour
- 1 cup granulated sugar
- ½ cup unsweetened cocoa powder (preferably Dutch-process for richer flavor)
- ½ teaspoon baking powder
- ¼ teaspoon salt
Wet Ingredients
These bring moisture and richness:
- 2 large eggs (room temperature)
- ½ cup unsalted butter (melted)
- ½ cup vegetable oil
- 2 teaspoons vanilla extract
- ½ cup whole milk
Ganache Ingredients
The iconic chocolate topping requires just two simple ingredients:
- 1 cup semi-sweet chocolate chips
- ½ cup heavy cream
Decoration Ingredients (Rainbow Candies)
To give it that signature “cosmic” look:
- Mini rainbow-coated chocolate candies (similar to mini M&Ms)
- Colorful sprinkles (optional for extra fun)
Having all these ready before you start will save time and prevent last-minute stress. Remember, baking is both a science and an art—precision matters.
Tools and Equipment You’ll Need
You don’t need a professional bakery setup to make Cosmic Brownies, but having the right tools will make your baking smoother and yield better results. Here’s what you’ll need:
- Mixing bowls: At least two (one for dry ingredients, one for wet).
- Whisk & spatula: For mixing and folding the batter.
- Measuring cups & spoons: Accuracy is key in baking.
- 8×8 or 9×9 inch baking pan: This ensures your brownies are thick enough for that fudgy texture.
- Parchment paper: Makes it easy to lift the brownies out of the pan.
- Oven thermometer (optional): Ensures your oven temperature is accurate.
- Microwave-safe bowl or double boiler: For melting chocolate for the ganache.
- Knife or bench scraper: For slicing clean brownie squares.
If you want picture-perfect brownies, invest in a good non-stick baking pan. It makes a huge difference in both baking time and clean-up.
Step-by-Step Guide to Making Cosmic Brownies
Now comes the exciting part—baking! Let’s break down the process into simple, manageable steps. Follow along carefully, and you’ll have a tray of fudgy brownies ready to impress.
Step 1 – Preparing the Baking Pan
Start by preheating your oven to 350°F (175°C). Line your 8×8-inch baking pan with parchment paper, leaving a little overhang on the sides. This overhang will act like handles, making it easier to lift the brownies out later. Lightly grease the paper with butter or non-stick spray.
This step might seem small, but it’s crucial. If you skip lining the pan, your brownies may stick, tear, or crumble when you try to remove them. A smooth release means clean, bakery-style squares.
Step 2 – Mixing the Dry Ingredients
In a large mixing bowl, whisk together the flour, cocoa powder, sugar, baking powder, and salt. Whisking not only combines everything evenly but also helps break up clumps in the cocoa powder.
Think of this step like laying the foundation of a building. If your dry mixture is smooth and consistent, your brownies will bake evenly and have that perfect texture—fudgy but not too dense.
Step 3 – Combining the Wet Ingredients
In a separate bowl, whisk the eggs until slightly frothy. Add the melted butter, vegetable oil, vanilla extract, and milk. Mix until everything is smooth and well combined.
The combination of butter and oil is what gives Cosmic Brownies their signature moistness. Butter adds richness and flavor, while oil ensures the brownies stay soft even after cooling. Skipping one or the other changes the final texture.
Step 4 – Mixing Everything Together
Now it’s time to bring the wet and dry ingredients together. Slowly pour the wet mixture into the dry bowl while stirring gently with a spatula or wooden spoon. Be careful not to overmix. You want the batter to be thick and smooth, but over-stirring can lead to tough brownies instead of soft, fudgy ones.
The trick here is to fold, not whisk. Folding keeps the air bubbles intact, which helps the brownies rise just enough without turning cakey. You should end up with a glossy, chocolate-rich batter that looks irresistible. At this point, you might be tempted to eat it straight from the bowl—but trust me, the baked version will be worth the wait.
Once combined, pour the batter into the prepared pan. Use a spatula to spread it evenly into all corners, ensuring a smooth top for even baking. If you want extra chocolate goodness, you can sprinkle in a handful of chocolate chips before baking.
Step 5 – Baking the Brownies
Place the pan into your preheated oven and bake at 350°F (175°C) for about 25–30 minutes. Keep a close eye on them starting at the 25-minute mark. The best way to test if they’re done is the “toothpick test.” Insert a toothpick into the center—if it comes out with a few moist crumbs, your brownies are perfect. If it comes out clean, they may be slightly overbaked and less fudgy.
One important tip: resist the urge to cut into them immediately after baking. Hot brownies continue cooking in the pan even after being removed from the oven. Let them cool completely before adding the ganache, otherwise, the topping will melt and slide off. Patience here pays off—you’ll be rewarded with a neat, beautiful brownie base.
Step 6 – Making the Chocolate Ganache
The ganache is what transforms an ordinary brownie into a “cosmic” one. To make it, place the chocolate chips in a heatproof bowl. Heat the heavy cream in a small saucepan over medium heat until it just begins to simmer. Don’t let it boil, or it may scorch.
Pour the hot cream over the chocolate chips and let it sit for about 2–3 minutes. Then, stir gently until smooth and glossy. This creamy chocolate mixture is rich, silky, and absolutely heavenly.
Once your brownies have cooled completely, spread the ganache evenly over the top with a spatula. Aim for a thick, luscious layer—it should coat the brownies generously without being runny. This topping locks in moisture, giving you that melt-in-your-mouth experience with every bite.
Step 7 – Decorating with Rainbow Sprinkles
Now comes the fun part—decorating! While the ganache is still soft, sprinkle mini rainbow chocolate candies evenly across the top. You can also add extra sprinkles if you want a more vibrant, festive look.
This step doesn’t just add color—it creates that nostalgic “cosmic” feel we all remember. The slight crunch of the candies contrasts perfectly with the fudgy brownie and creamy ganache.
After decorating, refrigerate the brownies for about 30 minutes to allow the ganache to set. Once firm, lift the brownies out of the pan using the parchment paper handles and place them on a cutting board. Use a sharp knife to slice into even squares. For cleaner cuts, wipe the knife with a warm, damp cloth between each slice.
And there you have it—homemade Cosmic Brownies that are not only delicious but also prettier than the store-bought version.
Tips for the Best Homemade Cosmic Brownies
Making brownies seems simple, but a few pro tips can take yours from good to absolutely unforgettable:
- Don’t overbake. The secret to fudgy brownies is pulling them out of the oven when they still look slightly underdone. They’ll set as they cool.
- Use quality chocolate. Since chocolate is the star, go for good-quality cocoa powder and real chocolate chips. It makes a huge difference in flavor.
- Room temperature eggs. Cold eggs can shock the melted butter and cause it to seize. Let them sit out for about 30 minutes before baking.
- Slice with a hot knife. Dip your knife in hot water, wipe it dry, then cut. This ensures smooth, bakery-style slices.
- Chill before serving. Cosmic Brownies taste even better when slightly chilled because the ganache firms up beautifully.
These small details may seem minor, but they’ll give you that professional, bakery-level result at home.
Variations of Cosmic Brownies
The beauty of homemade desserts is flexibility. Once you’ve mastered the classic version, you can easily customize Cosmic Brownies to suit your taste. Here are a few fun variations:
Nutty Cosmic Brownies
Add chopped walnuts, pecans, or almonds to the batter for a crunchy texture. The nuts balance the sweetness and give a rustic twist.
Extra Chocolate Cosmic Brownies
Mix in chocolate chunks or drizzle melted white chocolate over the ganache. Perfect for hardcore chocolate lovers.
Vegan Cosmic Brownies
Swap eggs with flaxseed eggs, butter with vegan margarine or coconut oil, and use plant-based milk. For the ganache, replace heavy cream with coconut cream.
Gluten-Free Cosmic Brownies
Use a 1:1 gluten-free baking flour blend. Make sure to check that your sprinkles and candies are gluten-free too.
With just a few swaps, you can create brownies that everyone can enjoy, no matter their dietary needs.
Storing and Serving Suggestions
Brownies are best enjoyed fresh, but if stored properly, they can last for days without losing their rich flavor and fudgy texture. Here’s how to keep your Cosmic Brownies tasting amazing:
- Room Temperature Storage: Place your brownies in an airtight container lined with parchment paper. They’ll stay fresh for up to 3–4 days at room temperature.
- Refrigeration: If you want them to last longer, refrigerate them. Properly sealed, they’ll stay good for up to a week. The ganache will firm up in the fridge, giving the brownies a denser bite.
- Freezing: For long-term storage, wrap each brownie square individually in plastic wrap, then place them in a freezer bag. They can last up to 2–3 months. To serve, thaw at room temperature for a couple of hours or microwave for 10–15 seconds.
When it comes to serving, Cosmic Brownies are versatile. You can cut them into neat squares for a classic look, slice them into fun shapes using cookie cutters for parties, or serve them slightly warm with a scoop of vanilla ice cream for a decadent dessert.
If you want to impress your guests, drizzle caramel sauce or sprinkle some sea salt on top before serving. That sweet-and-salty combo takes these brownies to the next level.
Nutritional Breakdown of Cosmic Brownies
While brownies aren’t exactly a health food, it’s good to know what’s in them. Here’s an approximate nutritional breakdown for one serving (1 square, assuming 12 servings from the batch):
| Nutrient | Amount (per serving) |
|---|---|
| Calories | ~280–300 kcal |
| Total Fat | 15g |
| Saturated Fat | 8g |
| Carbohydrates | 36g |
| Sugars | 25g |
| Protein | 3g |
| Fiber | 2g |
| Sodium | 120mg |
Of course, the exact numbers will vary depending on the ingredients you use and the portion size. If you’re making vegan or gluten-free variations, those numbers will shift too.
These treats are indulgent, so they’re best enjoyed in moderation. But hey, life is all about balance—sometimes a fudgy, chocolate-loaded brownie is exactly what you need to brighten your day.
Common Mistakes to Avoid
Even experienced bakers can trip up when making brownies. Here are the most common mistakes and how to avoid them:
- Overmixing the Batter
Stirring too much after combining wet and dry ingredients can overdevelop the gluten, leading to tough, cake-like brownies. Mix until just combined. - Overbaking
This is the biggest culprit. Brownies should come out slightly underdone. Remember, they’ll keep cooking in the pan as they cool. - Cutting Too Early
If you slice while the brownies are warm, they’ll crumble and the ganache will smear. Always wait until they’re completely cooled and the ganache is set. - Using the Wrong Pan Size
A pan that’s too large will make thin, dry brownies; too small, and the middle might not bake through. Stick with an 8×8 or 9×9 pan. - Skipping Parchment Paper
Trying to dig brownies out of the pan without parchment is a recipe for disaster. Always line your pan—it saves stress later.
Avoiding these mistakes ensures you’ll get fudgy, chewy, bakery-quality brownies every single time.
Why Homemade Cosmic Brownies Are Better than Store-Bought
Let’s be honest—the nostalgia of opening a Little Debbie wrapper is fun, but the homemade version wins hands down in every category. Here’s why:
- Better Flavor: Store-bought brownies often contain preservatives and artificial flavors. Homemade ones use real butter, chocolate, and cream for a richer taste.
- Customizable: Want extra chocolate? More sprinkles? A vegan version? You’re in control.
- Fresher: Homemade brownies don’t sit on a shelf for weeks. They’re made fresh and enjoyed within days.
- Thicker & Fudgier: Store-bought Cosmic Brownies tend to be thin and slightly dry. Homemade ones are thick, moist, and melt-in-your-mouth.
- Healthier (in a way): While still a treat, homemade brownies let you reduce sugar, use high-quality cocoa, or even swap in healthier fats if you choose.
At the end of the day, homemade Cosmic Brownies aren’t just dessert—they’re an experience. Baking them brings joy, the aroma fills your home, and the final result is a treat that tastes as good as the memories they carry.
FAQs about Cosmic Brownie Recipe
1. Can I make Cosmic Brownies without ganache?
Yes, you can, but the ganache is what gives them their signature taste. Without it, they’ll be regular brownies. If you’re short on time, you can top them with a dusting of powdered sugar or a quick drizzle of melted chocolate instead.
2. How do I keep my brownies from getting dry?
The key is to avoid overbaking. Pull them out when a toothpick comes out with moist crumbs, not clean. Also, store them in an airtight container to lock in moisture.
3. Can I double the recipe for a bigger crowd?
Absolutely! Simply double the ingredients and bake in a 9×13-inch pan. The baking time may increase slightly—check around the 35–40 minute mark.
4. Are Cosmic Brownies safe to freeze with ganache on top?
Yes, they freeze well. Just be sure to let the ganache set before wrapping them. Wrap each square individually to prevent sticking, then freeze.
5. Can I use candy-coated chocolates other than M&Ms?
Of course! Any small, colorful candy will work. You can even try crushed Skittles, Nerds, or fun sprinkles for a playful twist.
Conclusion
Cosmic Brownies are more than just a sweet snack—they’re a trip down memory lane, a burst of color, and a fudgy chocolate dream all rolled into one. With this step-by-step guide, you can recreate the magic of the iconic treat right in your own kitchen. From preparing the perfect brownie base to spreading that silky ganache and adding those vibrant rainbow candies, every step is simple yet rewarding.
What makes homemade Cosmic Brownies special is the freedom to adjust them to your taste. Want them extra fudgy? Bake them a little less. Love crunch? Toss in some nuts. Need a healthier or allergen-friendly option? Swap ingredients as needed. The beauty lies in making them your own.
So, the next time you crave a nostalgic, chocolatey treat, skip the store-bought version and bake a batch at home. They’re fresher, richer, and filled with love—the perfect recipe for smiles all around.


