Condensed Milk Recipe: Condensed milk is a silky-smooth, sweet, thick milk product often used in desserts and beverages. While the store-bought version is convenient, nothing beats the flavor and purity of homemade condensed milk. Whether you’re baking a decadent dessert or sweetening your morning coffee, learning how to make condensed milk from scratch is a game-changer.
This guide will walk you through the entire process—ingredients, tools, step-by-step instructions, and storage tips. Let’s get right into the creamy details.
What is Condensed Milk?
Condensed milk is essentially milk that has had most of its water content removed and sugar added to preserve and sweeten it. The result is a thick, syrupy liquid that enhances recipes by adding sweetness, creaminess, and richness. It’s different from evaporated milk, which is also reduced but contains no added sugar.
Think of condensed milk as milk’s rich, indulgent cousin. From Indian sweets like barfi and rasgulla to Latin American treats like tres leches cake and flan, this versatile ingredient bridges culinary cultures around the globe.
Why Make Condensed Milk at Home?
So, why bother making it yourself when you can grab a can from the grocery store? Here’s why:
- No Preservatives or Additives: Homemade means clean, simple ingredients.
- Custom Sweetness: Control how sweet you want it to be.
- Diet-Friendly Options: Perfect for dairy-free, sugar-free, or keto versions.
- Cost-Effective: Make more for less.
- Fresh Taste: Homemade condensed milk tastes richer and fresher.
Let’s be honest—anything homemade just feels more special. It’s also a fun way to understand what really goes into the ingredients you use.
Types of Condensed Milk: Sweetened vs Unsweetened
It’s easy to get confused between condensed milk and evaporated milk. Here’s the simple difference:
| Type | Water Content Reduced | Sugar Added | Taste | Usage |
|---|---|---|---|---|
| Sweetened Condensed Milk | Yes | Yes | Very sweet, thick | Desserts, coffee |
| Evaporated Milk | Yes | No | Creamy, not sweet | Savory recipes, sauces |
In this guide, we’re focusing on sweetened condensed milk—the kind used in desserts.
List of Ingredients You’ll Need
Basic Two-Ingredient Condensed Milk
You only need two ingredients to make traditional sweetened condensed milk:
- Whole milk – 2 cups (or any milk of your choice)
- Granulated sugar – ⅔ cup
That’s it! Just milk and sugar. It’s that simple.
Optional Ingredients for Enhanced Flavor
If you want to take your condensed milk to the next level, consider adding:
- Butter – Adds richness and shine (1 tablespoon)
- Vanilla extract – For flavor depth (½ teaspoon)
- Salt – Balances the sweetness (a pinch)
These are totally optional but can significantly enhance the flavor and texture of your final product.
Tools and Equipment Required
Before you start, gather the following tools:
- Heavy-bottomed saucepan or non-stick skillet
- Wooden spoon or silicone spatula
- Measuring cups and spoons
- Fine-mesh sieve (optional, for straining)
- Clean jar or airtight container for storage
Make sure your pan is heavy enough to distribute heat evenly. Thin pans can scorch the milk and ruin the batch.
Step-by-Step Guide to Making Condensed Milk
Step 1: Measure Your Ingredients
Start by accurately measuring out your milk and sugar. Too much sugar can cause crystallization, and too little might not give you the thick, creamy texture you want.
- 2 cups of whole milk
- ⅔ cup of granulated sugar
For smaller batches, you can halve the quantity.
Step 2: Combine Ingredients
Pour the milk and sugar into your saucepan and set the heat to medium-low. Stir well to dissolve the sugar.
If you’re adding butter or a pinch of salt, now’s the time.
Step 3: Simmer Slowly
Let the mixture come to a gentle simmer. Avoid boiling—this can cause the milk to scorch or curdle. The goal is a low, steady heat that evaporates water slowly and evenly.
You’ll start to see tiny bubbles forming around the edges. That’s your cue that the process is working.
Step 4: Stir Frequently
Stir every few minutes with a silicone spatula or wooden spoon. Scrape the sides and bottom to prevent burning.
This stage can take 30–45 minutes depending on how thick you want your condensed milk to be.
Patience is key. The more water evaporates, the thicker it gets.
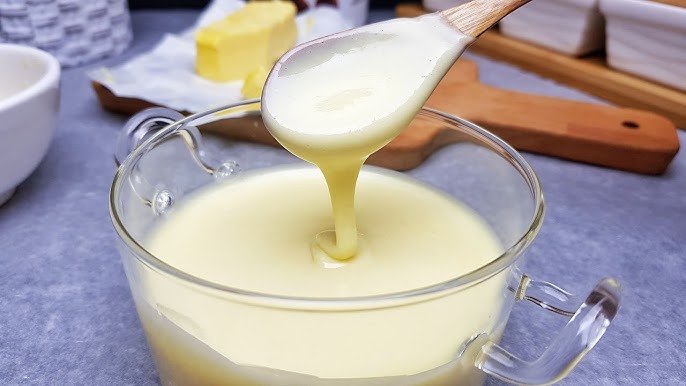
Step 5: Reduce to Desired Consistency
You’re aiming for a thick, syrupy texture that clings to the spoon. It should reduce by about 50%. The final volume should be about 1 cup.
Want it thicker? Let it simmer a little longer. Just remember, it thickens more as it cools.
Step 6: Cool and Store
Once it reaches the right consistency, remove it from the heat. Let it cool for 10–15 minutes. You can strain it through a sieve to remove any milk solids or foam.
Pour into a clean glass jar and refrigerate. It will thicken even more in the fridge.
Alternative Method: Condensed Milk with Milk Powder
Want an even quicker way to make condensed milk without simmering for an hour? Use milk powder! This method is faster, requires no long cooking, and still delivers great results.
Ingredients:
- 1 cup full cream milk powder
- ½ cup granulated sugar
- ⅓ cup hot water
- 2 tablespoons unsalted butter
Instructions:
- In a blender, combine the hot water and sugar. Blend until the sugar dissolves.
- Add the milk powder and butter. Blend again until smooth and creamy.
- Let it sit for a few minutes to thicken. You can use it immediately or refrigerate it.
This method is perfect if you’re in a rush or don’t want to heat up your kitchen.
Dairy-Free or Vegan Condensed Milk Options
Yes, you can still enjoy condensed milk if you’re vegan or lactose-intolerant. Here’s how to make a dairy-free condensed milk using plant-based milk.
Ingredients:
- 2 cups full-fat coconut milk or almond milk
- ½ cup coconut sugar or maple syrup
Instructions:
- Combine the milk and sweetener in a saucepan.
- Simmer on low, stirring occasionally, for 30–40 minutes until reduced by half.
- Cool and store in an airtight container.
Coconut milk works best because of its richness, but other milks like oat, soy, or cashew also work. The result? A thick, creamy, vegan-friendly version that works in almost any dessert recipe.
Tips for Perfect Condensed Milk Every Time
- Use low and slow heat: Rushing the process can burn the milk.
- Stir regularly: Prevents sticking and gives an even texture.
- Use a heavy pan: Lightweight pans can cause uneven heating.
- Don’t over-reduce: It thickens more as it cools.
- Strain for smoothness: A fine-mesh sieve removes any graininess.
Making perfect condensed milk is a bit of an art and a science. But once you’ve done it a few times, it becomes second nature.
How to Store Homemade Condensed Milk
Storing it properly ensures it lasts longer and stays fresh.
- In the refrigerator: Store in a clean, airtight glass jar or container. It’ll last up to 2 weeks.
- In the freezer: Pour into ice cube trays, freeze, then transfer cubes to a freezer bag. Thaw as needed. Lasts up to 3 months.
Before using stored condensed milk, give it a good stir or gentle reheat if it’s too thick.
How Long Does Homemade Condensed Milk Last?
Homemade condensed milk typically lasts:
- In the fridge: 10–14 days
- In the freezer: 2–3 months
It may thicken more in the fridge, but that’s normal. If it smells sour or develops mold, it’s time to toss it.
Tip: Always use a clean spoon when scooping it out to avoid contamination.
Common Mistakes to Avoid
- Boiling instead of simmering: This can scorch the milk.
- Using low-fat milk: You’ll get a thinner result.
- Not stirring enough: Leads to uneven texture or burnt milk.
- Overcooking: The milk becomes too thick and can caramelize.
The biggest mistake? Leaving it unattended. This process needs some babysitting, but it’s totally worth it.
Uses of Condensed Milk in Recipes
Condensed milk is a secret weapon in the kitchen. Here’s how you can use it:
Desserts
- Fudge
- Tres Leches Cake
- Key Lime Pie
- Banoffee Pie
- Caramel Sauce (Dulce de Leche)
Beverages
- Thai Iced Tea
- Vietnamese Coffee
- Milkshakes
- Bubble Tea
- Horchata
Savory Dishes (Yes, really!)
- Some curry bases
- Rich sauces
- Cheese spreads (with a hint of sweetness)
It adds creaminess, sweetness, and that delicious milky depth that elevates even the simplest recipes.
Nutritional Information of Condensed Milk
Here’s a rough nutritional breakdown per tablespoon (15g) of homemade sweetened condensed milk:
| Nutrient | Amount |
|---|---|
| Calories | 60–70 kcal |
| Total Fat | 2–3g |
| Saturated Fat | 1.5g |
| Carbohydrates | 10–11g |
| Sugars | 10g |
| Protein | 1–2g |
| Calcium | 4–6% DV |
Note: Values vary slightly depending on your milk and sugar choice.
Is Condensed Milk the Same as Evaporated Milk?
Nope, they’re not interchangeable.
| Feature | Condensed Milk | Evaporated Milk |
|---|---|---|
| Sweetened | Yes | No |
| Thickness | Thicker | Thinner |
| Flavor | Very sweet | Creamy but plain |
| Use in Recipes | Desserts | Savory or baking |
If you mistakenly swap them, you might end up with an overly sweet or underwhelming dish. Always double-check your recipe!
FAQs about Condensed Milk Recipe
1. Can I use brown sugar instead of white sugar?
Yes! It will give your condensed milk a deeper, caramel-like flavor and a slightly darker color.
2. Why is my condensed milk grainy?
This usually happens if the sugar didn’t dissolve completely or it cooked too quickly. Always stir and cook on low heat.
3. Is there a sugar-free version of condensed milk?
Yes. Use sugar substitutes like stevia, erythritol, or monk fruit. The result may vary slightly in texture.
4. Can I use skim milk instead of whole milk?
Technically yes, but it won’t be as rich or thick. Whole milk is highly recommended.
5. How do I turn condensed milk into caramel?
Simply simmer or bake the sealed can (or your homemade batch) for 2–3 hours, or cook over low heat until it thickens and browns. Voila—Dulce de Leche!
Conclusion
Making homemade condensed milk is easier than you might think—and so worth it. With just two simple ingredients and a bit of patience, you get a rich, creamy, sweet product that elevates everything from your coffee to your cakes. Plus, you can tailor it to suit your taste and dietary needs.
Whether you’re whipping up a batch for baking or just want a spoonful of something sweet, homemade condensed milk is a small effort with a big reward.