Coconut Whipped Cream Recipe: Coconut whipped cream is one of the most useful dairy-free toppings we can make in the kitchen. It is light, smooth, naturally rich, and versatile enough for everything from cakes and pies to pancakes, fruit bowls, hot chocolate, and iced coffee. When prepared correctly, it delivers a fluffy texture and a clean coconut finish that feels indulgent without being overly heavy. The key is not complexity, but precision. With the right ingredients, the correct chilling method, and a careful whipping process, we can achieve a stable, beautifully textured topping that looks elegant and tastes fresh.
This guide covers everything needed to make a reliable coconut whipped cream recipe from scratch, including the best ingredients, the exact method, troubleshooting tips, flavor variations, storage advice, and practical serving ideas.
What Is Coconut Whipped Cream?
Coconut whipped cream is a whipped topping made from the solid cream portion of full-fat canned coconut milk or canned coconut cream. After the can is chilled, the rich coconut solids separate from the liquid. Those solids are then whipped until airy and smooth, often with a touch of sweetener and vanilla for flavor.
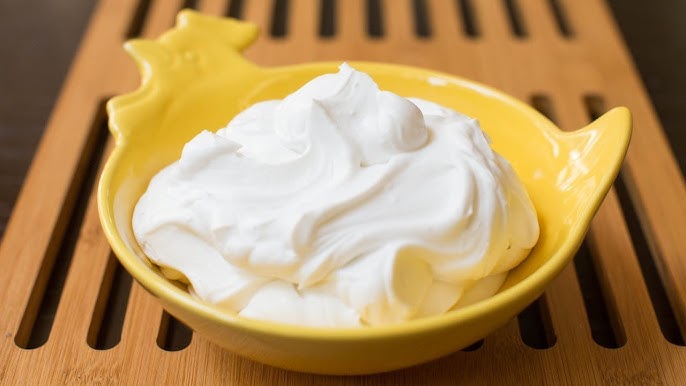
Unlike traditional whipped cream made from dairy, this version is naturally dairy-free, often vegan, and perfect for people who want a plant-based alternative that still feels luxurious. When done properly, it forms soft peaks or medium peaks and can be piped or spooned over desserts with excellent visual appeal.
Why This Coconut Whipped Cream Recipe Works
A good coconut whipped cream recipe depends on a few non-negotiable details. The first is using the right canned product. The second is chilling it long enough for the fat to separate fully. The third is whipping only the solid part, not the watery liquid.
This method works because it respects the structure of the coconut fat. Cold coconut solids whip more effectively, trap air more easily, and hold shape better. The added sweetener improves flavor, while vanilla rounds out the coconut taste and makes the final result more dessert-friendly.
Ingredients You’ll Need
For a classic batch of coconut whipped cream, we need only a few ingredients:
- 1 can full-fat coconut milk or coconut cream
- 2 to 4 tablespoons powdered sugar or maple syrup
- 1 teaspoon vanilla extract
- A pinch of salt (optional)
Best Ingredient Notes
Full-Fat Coconut Milk or Coconut Cream
Use full-fat canned coconut milk or canned coconut cream. Avoid boxed coconut milk, refrigerated beverage-style coconut milk, or low-fat versions. These do not contain enough fat to whip properly.
Coconut cream usually gives a thicker, more stable result. Full-fat coconut milk also works well, provided it contains enough solid cream after chilling.
Powdered Sugar
Powdered sugar is one of the best sweeteners for coconut whipped cream because it dissolves quickly and helps create a smoother texture. Maple syrup can be used for a more natural sweetness, though it may make the cream slightly softer.
Vanilla Extract
A little vanilla extract enhances the flavor and softens the stronger coconut notes. It brings balance and makes the topping more versatile.
Pinch of Salt
This is optional, but a tiny amount of salt sharpens the flavor and keeps the sweetness from tasting flat.
How to Choose the Best Coconut Milk for Whipping
Not every canned coconut milk behaves the same way. Some brands contain stabilizers or have a thinner fat content, which can affect the final texture. For the best results, choose cans that feel heavy and contain minimal ingredients. Ideally, the label should list coconut, water, and maybe a stabilizer like guar gum, though even simpler is better.
The best cans are the ones that separate clearly after refrigeration. When opened, the thick cream should sit on top, with a watery liquid underneath. That separation is exactly what we want.
Step-by-Step Guide for Coconut Whipped Cream
Step 1: Chill the Coconut Milk Overnight
Place the can of full-fat coconut milk or coconut cream in the refrigerator for at least 12 to 24 hours. Do not shake the can. Keep it upright the entire time.
This step is essential because it allows the cream to harden and rise above the liquid. Without proper chilling, the solids and liquid remain blended, and the mixture will not whip correctly.
For even better results, place your mixing bowl and beaters in the refrigerator or freezer for 10 to 15 minutes before whipping.
Step 2: Open the Can Carefully
Remove the chilled can from the refrigerator and open it without shaking. Scoop out the thick solid coconut cream from the top and transfer it into a cold mixing bowl.
Leave the watery liquid behind in the can. That liquid is not needed for the whipped cream itself, though it can be saved for smoothies, soups, oatmeal, curries, or baking.
At this stage, the coconut solids should look dense and creamy. If the contents are still fully liquid, the can likely did not chill long enough or did not contain enough fat to begin with.
Step 3: Add Sweetener and Flavoring
Add powdered sugar, vanilla extract, and a small pinch of salt to the bowl with the coconut cream.
Start with the smaller amount of sweetener, then adjust later if needed. This keeps the flavor controlled and prevents the cream from becoming overly sweet.
Step 4: Whip Until Light and Fluffy
Using a hand mixer or stand mixer, whip the coconut cream on medium speed for about 2 to 5 minutes.
As it whips, the texture changes from dense and heavy to lighter and more airy. Scrape down the sides of the bowl as needed to keep the mixture even.
Stop whipping once the cream becomes fluffy and forms soft to medium peaks. Do not overwhip. Coconut cream can become grainy or too dense if beaten too long.
Step 5: Taste and Adjust
Taste the whipped cream and adjust the sweetness or vanilla if needed. If you want a sweeter dessert topping, add a little more powdered sugar. For a richer aroma, increase the vanilla slightly.
Whip briefly again just until incorporated.
Step 6: Serve Immediately or Chill Briefly
Coconut whipped cream is best used right away when it is fresh, airy, and easy to spoon or pipe. If needed, refrigerate it for 15 to 30 minutes to firm it slightly before serving.
Use it on pies, cupcakes, fruit, waffles, pancakes, pudding, parfaits, or chilled desserts.
Texture Tips for Perfect Coconut Whipped Cream
Texture is everything in a strong coconut whipped cream recipe. The final result should be soft, fluffy, and creamy, not runny, gritty, or stiff. These tips help produce a better texture every time:
- Use a cold bowl and cold beaters
- Work quickly once the coconut solids are scooped out
- Avoid adding too much liquid sweetener
- Whip only until peaks form
- Chill the finished cream if it softens too much
If the room is especially warm, the cream may loosen faster. In that case, brief refrigeration helps restore structure.
Common Mistakes to Avoid
Using the Wrong Coconut Product
Light coconut milk, coconut beverage cartons, and shelf-stable drink-style coconut milk will not whip. Only full-fat canned coconut milk or canned coconut cream should be used.
Skipping the Chilling Step
Warm or room-temperature coconut milk does not separate properly. Without separation, there is no thick cream to whip.
Mixing in the Liquid
The watery liquid in the can weakens the structure of the whipped cream. Using too much of it creates a runny result.
Overwhipping
Too much mixing can break down the texture. Stop once the cream looks fluffy and holds shape.
Adding Too Much Sweetener
Excess syrup or liquid flavoring can make the cream too loose. Add sweetener gradually and keep the recipe balanced.
How to Fix Coconut Whipped Cream Problems
If It Is Too Runny
Place the bowl in the refrigerator for 20 to 30 minutes, then whip again briefly. The cream may simply need to be colder.
If It Will Not Whip
The coconut milk may not have enough fat, or it may not have chilled long enough. Try another can or switch to canned coconut cream.
If It Looks Grainy
This usually means it was overwhipped or the coconut solids were very firm and uneven. Let it sit for a few minutes, then gently stir or whip on low speed.
If It Is Too Thick
Add a very small amount of the reserved coconut liquid, one teaspoon at a time, until the desired consistency returns.
Flavor Variations
One of the best things about coconut whipped cream is how easy it is to customize.
Vanilla Coconut Whipped Cream
Use extra vanilla for a soft, bakery-style flavor that pairs beautifully with cakes and berries.
Chocolate Coconut Whipped Cream
Add 1 to 2 tablespoons cocoa powder and a little extra sweetener for a rich chocolate version.
Citrus Coconut Whipped Cream
Mix in a little orange zest or lemon zest for a brighter finish that works well with tarts and fruit desserts.
Maple Coconut Whipped Cream
Use maple syrup instead of powdered sugar for a deeper, warmer sweetness.
Spiced Coconut Whipped Cream
Add a pinch of cinnamon, nutmeg, or pumpkin spice for a seasonal version.
What to Serve with Coconut Whipped Cream
This topping works across a wide range of desserts and breakfast dishes. Serve it with:
- Fresh berries
- Fruit salad
- Chocolate cake
- Pumpkin pie
- Apple crisp
- Cupcakes
- Waffles
- Pancakes
- French toast
- Chia pudding
- Parfaits
- Hot chocolate
- Iced coffee
- Vegan pies and tarts
Because it has a naturally rich profile, it pairs especially well with desserts that need a cool, light contrast.
How to Store Coconut Whipped Cream
Store leftover coconut whipped cream in an airtight container in the refrigerator for up to 3 to 4 days. It may firm up as it sits. Before serving again, stir gently or re-whip briefly to restore its fluffy texture.
Do not leave it out at room temperature for too long, especially in warm kitchens. Since coconut fat softens quickly, the cream is best kept cold until needed.
Freezing is possible, but the texture may change after thawing. For the best consistency, refrigeration is the preferred storage method.
FAQs about Coconut Whipped Cream Recipe
1. What is coconut whipped cream?
Coconut whipped cream is a dairy-free topping made from the thick, solid part of chilled full-fat coconut milk or coconut cream. It is light, creamy, and often used as a substitute for regular whipped cream.
2. Do I need to chill the coconut milk first?
Yes. Chilling helps the thick coconut cream separate from the liquid, which makes it possible to whip into a fluffy texture.
3. Can I use any canned coconut milk?
It is best to use full-fat canned coconut milk or canned coconut cream. Light coconut milk usually does not contain enough fat to whip properly.
4. Why didn’t my coconut whipped cream get fluffy?
This can happen if the coconut milk was not cold enough or if the can did not contain enough solid cream. Using a well-chilled can of full-fat coconut milk usually gives the best result.
5. Can I sweeten coconut whipped cream?
Yes. You can add powdered sugar, maple syrup, honey, or another sweetener. Vanilla extract is also a popular addition for extra flavor.
6. Does coconut whipped cream taste like coconut?
Yes, it usually has a mild coconut flavor. The taste can be stronger or lighter depending on the brand you use.
7. What can I serve it with?
Coconut whipped cream goes well with pies, cakes, fruit, pancakes, waffles, hot drinks, and other desserts. It is especially popular in dairy-free and vegan recipes.
8. How should I store coconut whipped cream?
Store it in an airtight container in the refrigerator for up to 3 to 4 days. If it firms up too much, stir or whip it again lightly before serving.
Final Thoughts
A dependable coconut whipped cream recipe is built on quality ingredients, cold preparation, and careful whipping. Once those basics are in place, the process becomes easy, repeatable, and highly rewarding. The finished topping is silky, airy, and attractive enough for elegant desserts while still being simple enough for everyday use.
Whether we are topping a slice of pie, finishing a breakfast plate, or adding a creamy layer to a dairy-free dessert, coconut whipped cream offers a beautiful balance of richness and lightness. With the right method, it becomes more than a substitute. It becomes a staple.