Coconut Pie Recipe: Craving something sweet, creamy, and tropical? Coconut pie is that perfect dessert that brings a slice of paradise straight to your plate. It’s rich, custardy, packed with shredded coconut, and boasts a golden, flaky crust that holds it all together. Whether you’re serving it after Sunday dinner or bringing it to a potluck, coconut pie always steals the show.
The beauty of this pie is its simplicity. Even if you’re a beginner in the kitchen, this step-by-step guide will walk you through the entire process. No fancy culinary skills required—just a love for good dessert and a willingness to follow along. Let’s get baking!
Ingredients Needed for Coconut Pie
Getting your ingredients right is half the battle won when it comes to baking. Here’s everything you’ll need to whip up a delicious coconut pie.
For the Pie Filling
- 1 cup of shredded sweetened coconut
- 3 large eggs
- 1 cup of granulated sugar
- ½ cup of all-purpose flour
- 1 ½ cups of whole milk
- ½ cup of melted unsalted butter
- 1 teaspoon of vanilla extract
- ¼ teaspoon of salt
These ingredients make a rich, custard-like filling that bakes into a golden, delicious treat with a slightly crisp top thanks to the coconut.
For the Pie Crust (Optional Homemade Version)
If you want to go the extra mile with a homemade crust:
- 1 ¼ cups of all-purpose flour
- ½ teaspoon salt
- ½ cup (1 stick) of cold unsalted butter, cubed
- 3 to 5 tablespoons of ice water
Of course, if you’re short on time, a store-bought pie crust works just as well.
Tools and Equipment You’ll Need
Make sure you’ve got the right tools ready. Here’s what you’ll need:
- Mixing bowls (medium and large)
- Whisk or electric mixer
- Measuring cups and spoons
- Pie dish (9-inch)
- Spatula
- Cooling rack
- Oven
Having these tools handy will make the baking process smooth and hassle-free.
Step-by-Step Instructions to Make Coconut Pie
Now that we’ve got our ingredients and tools ready, it’s time to dive into the actual pie-making process. Follow these steps closely and you’ll end up with a mouthwatering coconut pie.
Step 1: Preparing the Pie Crust
If you’re using a pre-made crust, you can skip this part. For a homemade crust:
- Combine the flour and salt in a mixing bowl.
- Add in the cold butter cubes and use a pastry cutter or your fingers to cut the butter into the flour until the mixture looks like coarse crumbs.
- Slowly add the ice water, one tablespoon at a time, mixing until the dough comes together.
- Form the dough into a disk, wrap in plastic wrap, and refrigerate for at least 30 minutes.
- Once chilled, roll out the dough on a floured surface and transfer it to your pie dish. Trim the edges and crimp them to make it look nice.
This crust will be buttery, flaky, and totally worth the effort!
Step 2: Mixing the Coconut Pie Filling
Now onto the filling:
- In a large bowl, whisk the eggs until smooth and fluffy.
- Add in the sugar and whisk until fully incorporated.
- Stir in the flour and salt.
- Gradually add the melted butter while stirring continuously.
- Pour in the milk and vanilla extract, mixing well until smooth.
- Finally, fold in the shredded coconut until evenly distributed.
You’ll end up with a slightly thick but pourable batter that’s sweet, creamy, and fragrant with vanilla and coconut.
Step 3: Pouring and Baking the Pie
- Preheat your oven to 350°F (175°C).
- Pour the filling into the prepared pie crust.
- Place the pie on the middle rack of your oven.
- Bake for 45–55 minutes or until the top is golden brown and the center is set (a knife inserted should come out mostly clean).
- Once done, transfer to a cooling rack and let it cool for at least 1 hour before serving.
The aroma that fills your kitchen while this pie bakes is absolutely divine—warm, buttery, and coconutty.
Cooling and Serving Tips
After baking, cooling your coconut pie properly is key to achieving the best texture and flavor. Fresh out of the oven, the filling will be puffed and a bit jiggly, but as it cools, it will settle and firm up into that rich, creamy custard you’re aiming for.
Here’s how to cool and serve it perfectly:
- Place the pie on a wire cooling rack for at least an hour at room temperature.
- For a firmer texture, refrigerate it for 2–4 hours before serving.
- Use a sharp knife to slice cleanly. For extra clean cuts, wipe the knife with a damp towel between each slice.
- Serve as-is or add a dollop of whipped cream or a scoop of vanilla ice cream for extra indulgence.
- Sprinkle a little toasted coconut on top for a touch of crunch and added visual appeal.
This pie can be enjoyed warm, at room temperature, or chilled—each way offering a slightly different (but equally delicious) experience.
Variations and Twists on the Classic Coconut Pie
Coconut pie is a classic, but there’s always room to play and personalize it to your tastes or dietary needs. Here are a few creative takes:
1. Chocolate Coconut Pie
- Add ½ cup of mini chocolate chips to the filling for a coconut-chocolate combo that tastes like a Mounds bar in pie form.
2. Pineapple Coconut Pie
- Mix in ½ cup of crushed pineapple (well-drained) to the filling for a tropical twist that adds juiciness and a slight tang.
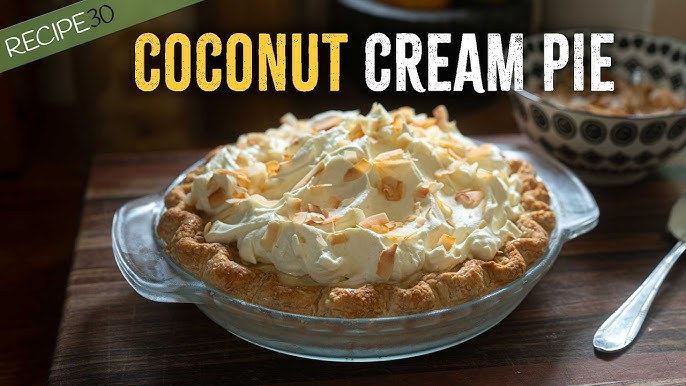
3. Coconut Cream Pie
- Instead of baking, make a stovetop custard and pour it into a baked pie shell. Top with whipped cream and toasted coconut.
4. Gluten-Free Coconut Pie
- Use gluten-free flour or almond flour in the filling, and opt for a gluten-free pie crust or make a crustless version.
5. Crustless Coconut Pie
- Skip the crust entirely and pour the filling directly into a greased pie plate. The flour in the filling forms a light crust as it bakes.
These twists let you keep things fresh every time you bake—and you never know, you might discover a new family favorite!
Tips for the Perfect Coconut Pie
Baking can be tricky sometimes, especially when you’re aiming for perfection. Here are a few tried-and-true tips to make sure your coconut pie turns out flawless:
- Use room temperature ingredients. Cold eggs or milk can cause the filling to mix unevenly.
- Don’t overbake. The center should still have a slight jiggle when it comes out—it’ll firm up as it cools.
- Protect your crust. If the crust edges brown too quickly, cover them with foil halfway through baking.
- Use high-quality coconut. Fresh, sweetened coconut gives the best texture and flavor. Avoid overly dry or stale coconut.
- Let it cool completely. Patience is key! Slicing too early can lead to a runny filling.
Perfecting coconut pie is all about attention to detail—and once you’ve nailed it, you’ll keep coming back to this recipe.
Storage and Reheating Instructions
Wondering what to do with leftovers (if there are any)? Coconut pie stores beautifully and tastes even better the next day.
Here’s how to store it properly:
- Refrigerator: Wrap the pie in plastic wrap or store slices in an airtight container. It’ll keep fresh for 3–4 days.
- Freezer: You can freeze it for up to a month. Wrap it tightly in foil and then place in a freezer-safe bag. Thaw overnight in the fridge before eating.
Reheating Tips:
- To enjoy warm, place a slice in the microwave for 15–20 seconds.
- For a crispier crust, reheat in the oven at 300°F for about 10 minutes.
Proper storage helps preserve that lovely custard texture and ensures your pie is ready to enjoy anytime.
Nutritional Information
Here’s a rough estimate for one slice (based on 8 slices per pie):
| Nutrient | Amount per Slice |
|---|---|
| Calories | 390 |
| Fat | 22g |
| Saturated Fat | 15g |
| Carbohydrates | 45g |
| Sugar | 30g |
| Protein | 5g |
| Fiber | 2g |
Note: Nutritional content may vary depending on ingredients and portions.
FAQs about Coconut Pie Recipe
1. Can I use sweetened shredded coconut instead of unsweetened?
Yes, you can! Just reduce the amount of sugar in your recipe slightly to avoid an overly sweet pie.
2. How do I store leftover coconut pie?
Wrap it tightly in plastic wrap or foil and store it in the refrigerator. It stays fresh for up to 4 days.
3. Can coconut pie be frozen?
Absolutely. Let the pie cool completely, wrap it well, and freeze it for up to 2 months. Thaw in the fridge overnight before serving.
4. What type of crust works best for coconut pie?
A traditional buttery pie crust or a graham cracker crust both pair wonderfully with the creamy coconut filling.
5. Is it okay to use canned coconut milk?
Yes! Full-fat canned coconut milk adds a rich flavor and creamy texture—perfect for this pie.
6. Can I make this pie dairy-free?
Sure. Use plant-based butter and swap regular milk with almond or coconut milk. It still turns out deliciously creamy.
7. Why did my coconut pie filling turn watery?
This usually happens when it’s underbaked or if too much liquid was used. Make sure to follow the measurements carefully and bake until set.
8. Can I toast the coconut before adding it to the pie?
Definitely! Toasted coconut adds a lovely nutty flavor and extra crunch to the pie.
9. Do I need to blind-bake the crust?
If your filling is very wet or you’re using a homemade crust, blind baking helps prevent sogginess. It’s optional but recommended for best texture.
10. What’s the difference between coconut cream pie and coconut pie?
Coconut cream pie has a custard base and is often topped with whipped cream, while coconut pie is usually more custard-like throughout and sometimes baked with eggs.
Conclusion
There’s something magical about a slice of homemade coconut pie. It’s creamy, comforting, and effortlessly impressive. Whether you’re an experienced baker or just starting out, this step-by-step guide gives you everything you need to bake a pie that’ll wow your family and friends.
From gathering your ingredients to that first warm, sweet bite—every step is a labor of love. Plus, with so many ways to customize it, this classic dessert can become a versatile staple in your baking arsenal. So roll up your sleeves, preheat that oven, and treat yourself to the bliss that is homemade coconut pie.