Coconut Milk Recipe: Coconut milk has become one of the most popular dairy alternatives in the world. Whether you’re vegan, lactose-intolerant, or simply looking for a healthy and flavorful addition to your meals, coconut milk is a kitchen staple you don’t want to miss. Store-bought versions are convenient, but nothing beats the freshness, richness, and purity of homemade coconut milk. The best part? It’s easier to make than you think!
In this detailed guide, we’ll walk you through everything you need to know about coconut milk—its benefits, ingredients, and a complete step-by-step process to prepare it at home. By the end of this article, you’ll not only have a delicious batch of creamy coconut milk ready but also the confidence to make it whenever you want.
What is Coconut Milk?
Coconut milk is a creamy, white liquid made from the flesh of mature coconuts. Unlike coconut water, which is the clear liquid found naturally inside young green coconuts, coconut milk is extracted by blending and straining the grated coconut meat with water. It has a rich, nutty flavor and a smooth texture, making it a versatile ingredient in both sweet and savory recipes.
You’ll often see two kinds of coconut milk: thick and thin. Thick coconut milk is made from the first press of grated coconut and is creamier, often used in desserts and curries. Thin coconut milk comes from re-soaking the grated coconut and pressing again, which makes it lighter and perfect for soups and stews.
Coconut milk is a traditional ingredient in many Asian, Caribbean, and African cuisines. From Thai curries to Indian kormas and Caribbean rice dishes, its use has spread globally thanks to its ability to enhance flavor and add richness.
Why Make Coconut Milk at Home?
While supermarket shelves are filled with canned and carton coconut milk, many of these products contain preservatives, stabilizers, or added sugar. Homemade coconut milk, on the other hand, is:
- Pure and fresh – No chemicals, just coconut and water.
- Customizable – Adjust the thickness and flavor to suit your recipe.
- Cost-effective – One coconut can make enough milk for multiple dishes.
- Eco-friendly – Reduce packaging waste by making it at home.
Plus, making coconut milk at home gives you peace of mind knowing exactly what’s going into your food. And let’s be honest—the aroma and taste of freshly made coconut milk are unbeatable!
Health Benefits of Coconut Milk
Nutritional Value of Coconut Milk
Coconut milk is not just delicious; it’s also loaded with nutrients. A cup of fresh coconut milk typically contains:
- Healthy fats – Mainly medium-chain triglycerides (MCTs) that provide quick energy.
- Vitamins – Such as vitamin C, E, B vitamins, and folate.
- Minerals – Including magnesium, potassium, phosphorus, and iron.
- Protein and fiber – In smaller amounts but still beneficial.
Unlike dairy milk, coconut milk is naturally lactose-free, making it an excellent option for people with lactose intolerance.
Health Advantages of Including Coconut Milk in Your Diet
- Boosts Energy Levels – Thanks to MCTs, coconut milk provides an instant energy source that your body metabolizes faster than other fats.
- Supports Heart Health – In moderation, coconut milk may help maintain healthy cholesterol levels.
- Promotes Weight Management – MCTs may increase satiety and help with fat burning.
- Strengthens Immunity – Lauric acid in coconut milk has antimicrobial and anti-inflammatory properties.
- Good for Skin and Hair – Many people even use coconut milk as a natural moisturizer and conditioner.
Of course, coconut milk is calorie-dense, so balance is key. Adding it to your meals in moderation can give you both taste and nutrition.
Ingredients You’ll Need
Fresh Coconut vs. Dried Coconut – Which One to Use?
The star ingredient of this recipe is coconut, but the type you use makes a difference.
- Fresh Coconut: Best for authentic flavor and creaminess. You’ll need to crack open a mature brown coconut, scoop out the flesh, and grate it.
- Dried Shredded Coconut or Desiccated Coconut: A convenient alternative if fresh coconuts are not available. Just soak it in warm water before blending.
- Frozen Grated Coconut: A time-saver often available in Asian or Indian grocery stores. It gives almost the same taste as fresh coconut.
For the best results, fresh coconut is always recommended, but dried or frozen versions work well when you’re short on time.
Other Essential Ingredients and Tools
Besides coconut, here’s what you’ll need:
- Water: Use filtered warm water for best extraction.
- Blender or Food Processor: To grind the coconut flesh smoothly.
- Cheesecloth or Nut Milk Bag: For straining the mixture.
- Large Bowl and Strainer: To separate the milk from the pulp.
- Glass Jar or Bottle: For storing your fresh coconut milk.
That’s it—just simple, wholesome ingredients and a few basic kitchen tools.
Step-by-Step Guide to Making Coconut Milk at Home
Step 1 – Selecting and Preparing the Coconut
The journey to perfect coconut milk starts with picking the right coconut. Look for a mature brown coconut, as they contain thick, rich flesh. Shake it near your ear—you should hear water sloshing inside. That’s a sign it’s fresh.
Once home, crack open the coconut by hitting it along the middle with a hammer or the back of a heavy knife. Drain the coconut water (you can drink it fresh—it’s delicious and hydrating). Then, using a sturdy knife, carefully separate the flesh from the shell. Rinse the flesh well to remove any bits of shell or husk.
A mature coconut will give you plenty of firm, white meat, which is the base of your creamy coconut milk.
Step 2 – Grating or Shredding the Coconut
After separating the white flesh from the hard coconut shell, the next step is to grate it. Traditionally, people used a hand grater or a special coconut scraper, but you can easily do this with a food processor to save time and effort.
If you’re using fresh coconut, cut the flesh into small pieces so your blender or grater can handle it more efficiently. If you opted for frozen grated coconut, simply let it thaw at room temperature. For dried desiccated coconut, soak it in warm water for about 15–20 minutes to soften it before blending.
The finer you grate or shred the coconut, the easier it will be to extract the milk later. Think of it like squeezing juice from a fruit—smaller, softer pieces give you more liquid with less effort.
At this stage, you’ll notice a sweet, nutty aroma filling your kitchen. That’s the natural fragrance of coconut oil being released—a hint of the rich, creamy milk you’re about to create.
Step 3 – Blending with Water
Now that your coconut is grated or shredded, it’s time to blend it with water. This step is where the magic happens. Place the grated coconut into your blender and add warm, filtered water. The ratio is usually 1 cup of coconut to 2 cups of water, but you can adjust it depending on whether you want thicker or thinner milk.
- For thick coconut milk: Use less water, around 1 cup for every 1 cup of coconut.
- For thin coconut milk: Use more water, about 3 cups for every 1 cup of coconut.
Blend on high speed for 2–3 minutes until the mixture turns into a smooth, frothy paste. The heat from the warm water helps release more natural oils and flavor from the coconut, making the milk creamier and more aromatic.
Pro tip: Don’t overblend, or the mixture might get slightly bitter. A couple of minutes is enough to extract maximum flavor and nutrients.
Step 4 – Straining the Mixture
After blending, pour the mixture into a large bowl lined with a cheesecloth, nut milk bag, or a fine-mesh strainer. This step separates the rich coconut milk from the fibrous pulp.
Here’s how to do it properly:
- Gather the edges of the cheesecloth or bag and twist it tightly.
- Squeeze firmly with clean hands to extract as much milk as possible.
- Transfer the liquid into a clean container.
The creamy liquid you just squeezed is thick coconut milk, perfect for curries, desserts, and creamy sauces. If you want thin coconut milk, simply return the leftover coconut pulp to the blender, add more warm water, blend again, and strain once more.
Don’t discard the leftover pulp—it’s full of fiber and can be dried in the oven to make coconut flour, which is a great gluten-free alternative for baking. Nothing goes to waste here!
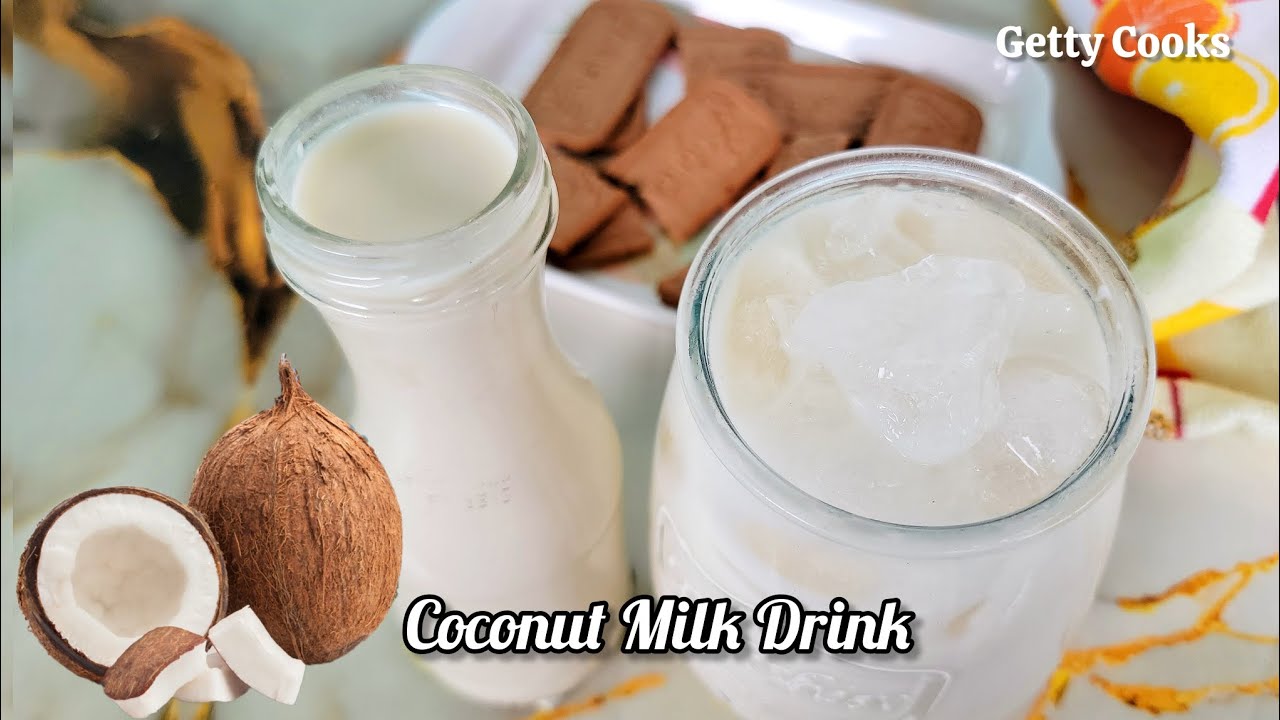
Step 5 – Storing Your Fresh Coconut Milk
Homemade coconut milk is fresh and free of preservatives, which means it won’t last as long as the store-bought kind. However, if stored correctly, you can keep it for several days.
- In the Refrigerator: Pour the milk into a glass jar with a tight lid and refrigerate. It will stay fresh for about 3–4 days. You may notice it separating into a thick cream on top and watery liquid at the bottom—don’t worry, that’s natural. Just stir or shake it before using.
- In the Freezer: For longer storage, freeze the milk in ice cube trays. Once frozen, transfer the cubes to a freezer bag. This way, you can use small portions whenever you need them, and they’ll last up to 3 months.
One thing to note: homemade coconut milk doesn’t undergo homogenization like store-bought milk, so separation is normal. A quick shake or stir brings it back to its creamy consistency.
Now that you’ve mastered the basic recipe, you can experiment with using your fresh coconut milk in countless dishes—whether savory curries or sweet tropical desserts.
Different Types of Coconut Milk
Thick Coconut Milk vs. Thin Coconut Milk
Coconut milk comes in two forms—thick and thin—and both have unique roles in cooking.
- Thick Coconut Milk: This is the first extraction, rich and creamy, with a higher fat content. It’s often used in desserts, puddings, smoothies, and rich gravies. When you want a luxurious, velvety texture, thick coconut milk is the way to go.
- Thin Coconut Milk: This is the second extraction, lighter and more watery, with a milder taste. It’s perfect for soups, stews, and lighter curries where you want flavor without overwhelming creaminess.
Knowing which type to use can completely change the outcome of a dish. For example, Thai curries often start with thick coconut milk for depth of flavor, then finish with thin coconut milk for balance.
How to Use Each Type in Cooking
- Thick milk: Great for coconut cream pie, kheer, panna cotta, and rich sauces.
- Thin milk: Perfect for lentil soups, light curries, and coconut rice.
By understanding how to use thick and thin coconut milk, you can elevate your cooking to restaurant-quality levels.
Tips and Tricks for Best Results
How to Get Creamier Coconut Milk
If you’re after coconut milk that’s extra rich and creamy, a few small tweaks can make a big difference. First, always use warm water when blending the coconut. Warm water helps extract more of the natural oils from the flesh, which gives the milk a smooth, velvety texture. Second, blend in short bursts instead of continuously. This prevents overheating while ensuring maximum extraction.
Another trick is to let the blended mixture rest for a few minutes before straining. This allows the coconut solids to absorb water fully, releasing more milk when squeezed. If you want an even richer result, repeat the straining process twice—your second press will still have plenty of creamy goodness.
You can also add a small pinch of sea salt while blending. It won’t change the flavor noticeably but enhances the natural sweetness and nuttiness of the coconut.
Mistakes to Avoid When Making Coconut Milk
- Using cold water: It won’t extract as much creaminess as warm water.
- Overblending: This can release bitterness and make the milk less smooth.
- Skipping the straining step: You’ll end up with a grainy texture instead of silky milk.
- Improper storage: Leaving coconut milk uncovered in the fridge makes it absorb odors and spoil faster.
- Using immature coconuts: Young green coconuts are great for coconut water but lack the thick flesh needed for milk.
By avoiding these common mistakes, you’ll always get high-quality coconut milk that rivals the best store-bought versions.
How to Store Coconut Milk Properly
Refrigerating Coconut Milk
Homemade coconut milk is perishable, so refrigeration is key. Store it in a clean glass jar with an airtight lid. It can last up to 4 days in the fridge, though it’s best consumed within 2–3 days for peak freshness.
You’ll often notice a thick cream forming on top—this is natural separation. Instead of pouring it out, stir it back in to make the milk smooth again. If you want to use just the cream (for whipped cream or desserts), scoop off the top layer after chilling for a few hours.
Freezing Coconut Milk for Long-Term Use
If you’ve made more coconut milk than you can use, freezing is the best option. Pour the milk into ice cube trays and freeze overnight. Once solid, transfer the cubes to a freezer-safe bag. This way, you can thaw only the amount you need. Frozen coconut milk lasts up to 3 months without losing much flavor.
One thing to keep in mind: frozen coconut milk may separate once thawed. Simply blend it again for a few seconds, and it will return to its creamy consistency.
Culinary Uses of Coconut Milk
Coconut Milk in Curries and Soups
Coconut milk is a game-changer in savory dishes. Its rich, velvety texture adds depth and balances out strong spices. In Thai, Indian, and Caribbean cuisines, it’s almost impossible to imagine a curry without coconut milk.
- Thai Curries: Red, green, and yellow Thai curries often start by frying curry paste in thick coconut milk before thinning with lighter milk.
- Indian Curries: South Indian dishes like Kerala-style fish curry or vegetable korma rely heavily on coconut milk for their signature flavor.
- Soups and Stews: Add coconut milk to pumpkin soup, lentil stew, or even chicken soup for a creamy, slightly sweet twist.
The natural sweetness of coconut milk helps mellow the heat of chilies, making spicy dishes more enjoyable without overpowering them.
Coconut Milk in Desserts and Smoothies
Coconut milk isn’t just for savory dishes—it shines in sweets too! Its creamy texture and tropical taste make it ideal for desserts, drinks, and baked goods.
- Desserts: Coconut panna cotta, rice pudding, kheer, and coconut ice cream are crowd favorites.
- Smoothies: Blend coconut milk with pineapple, mango, or banana for a tropical smoothie.
- Baking: Use it in cakes, muffins, or bread for added richness and moisture.
If you love experimenting, try making dairy-free whipped cream by chilling thick coconut milk and whisking it until fluffy. It’s a delicious topping for fruit, pies, or hot chocolate.
Vegan and Dairy-Free Benefits
Coconut Milk as a Dairy Alternative
For people avoiding dairy, coconut milk is a lifesaver. It has the creaminess of cow’s milk without lactose, making it perfect for vegans and those with lactose intolerance. It can replace dairy milk in almost any recipe, from coffee and smoothies to sauces and baked goods.
Unlike almond or oat milk, coconut milk has a naturally higher fat content, which makes it richer and closer to heavy cream in texture. This makes it ideal for creamy soups, curries, and desserts where other plant-based milks might fall flat.
Comparing Coconut Milk with Other Plant-Based Milks
- Coconut Milk vs. Almond Milk: Almond milk is lighter and nuttier, while coconut milk is creamier and richer.
- Coconut Milk vs. Oat Milk: Oat milk is naturally sweet and good for lattes, but coconut milk has a more tropical flavor.
- Coconut Milk vs. Soy Milk: Soy milk is high in protein, but coconut milk is higher in healthy fats.
Each plant-based milk has its strengths, but coconut milk stands out for its versatility in both sweet and savory cooking.
FAQs about Coconut Milk Recipe
Can You Drink Coconut Milk Daily?
Yes, you can drink coconut milk daily, but moderation is key. Coconut milk is rich in healthy fats, especially medium-chain triglycerides (MCTs), which provide quick energy and support metabolism. However, it’s also calorie-dense, so drinking large amounts every day may lead to unwanted weight gain. A small glass added to smoothies, coffee, or cereals can be a healthy daily habit. If you’re aiming for a balanced diet, pair coconut milk with fresh fruits, whole grains, and lean proteins to maximize its benefits without overdoing it.
Is Coconut Milk Good for Weight Loss?
Coconut milk can actually support weight management when consumed in moderation. The MCTs it contains are known to increase satiety, meaning you’ll feel full for longer and be less likely to snack unnecessarily. Additionally, these fats are metabolized quickly by the liver, providing instant energy instead of being stored as body fat. That said, since coconut milk is high in calories, portion control is crucial. If weight loss is your goal, use it wisely—add a splash to smoothies or soups instead of drinking it in large quantities.
Can Coconut Milk Replace Dairy in Baking?
Absolutely! Coconut milk is one of the best dairy substitutes for baking. Its creamy consistency and subtle sweetness make it a great replacement for regular milk, cream, or even butter in many recipes. For cakes, muffins, and bread, it keeps the texture moist and soft. In frostings or puddings, it adds richness without overpowering the flavor. Just remember that coconut milk does have a distinct taste, so it works especially well in recipes where a tropical note is welcome.
Does Homemade Coconut Milk Taste Different from Store-Bought?
Yes, homemade coconut milk tastes fresher, richer, and more natural compared to most store-bought versions. Packaged coconut milk often contains preservatives, stabilizers, and sometimes added sugar. Homemade coconut milk, on the other hand, is pure—just coconut and water—so it has a more authentic and creamy flavor. If you’ve only tried canned versions, making it at home will be a game-changer for your cooking.
What Can I Do with Leftover Coconut Pulp?
Don’t throw away the coconut pulp after straining! It’s full of fiber and nutrients. You can dry it in the oven at a low temperature and grind it into coconut flour, which is perfect for gluten-free baking. You can also add it directly to smoothies, granola, or energy balls for extra texture and nutrition. Some people even use it in skincare as a gentle body scrub. In short, nothing goes to waste when you make coconut milk at home.
Conclusion
By choosing homemade over store-bought, you get pure, preservative-free milk, tailored to your preferred thickness and taste. Plus, it’s cost-effective and eco-friendly, making it a win-win for your health and the planet. Whether you’re vegan, lactose-intolerant, or just someone who loves experimenting in the kitchen, coconut milk is a must-have ingredient that opens up endless culinary possibilities.
So, the next time you pick up a coconut, remember—you’re just a few steps away from creamy, fresh, and wholesome coconut milk. Try this recipe once, and you’ll never want to go back to canned versions again.