Coconut Chutney Recipe: Coconut chutney is a creamy, flavorful condiment that’s a staple in South Indian kitchens. It’s made using freshly grated coconut blended with a mix of green chilies, roasted chana dal (split chickpeas), ginger, and seasoned with a tempering of mustard seeds, curry leaves, and red chilies. This chutney is typically served with dosa, idli, vada, and other popular South Indian breakfasts. But beyond breakfast, it’s a versatile side that adds richness and zing to any Indian meal. The beauty of coconut chutney lies in its simplicity—few ingredients, quick preparation, and loads of flavor.
Why Coconut Chutney is a Must-Have in South Indian Cuisine
Coconut chutney holds a special place in the hearts (and plates) of many Indians. It’s more than just a dip—it’s a cultural icon. For generations, families have passed down their own unique variations. It’s a recipe rooted in tradition but flexible enough for modern tweaks. In many South Indian households, a meal of dosa or idli feels incomplete without a generous spoonful of this cooling, tangy chutney. Besides being delicious, it balances the heat from spicy curries and masalas. Its creamy texture complements crunchy dosas or soft idlis perfectly. If you’ve ever had a South Indian breakfast, chances are you’ve dipped into this delightful condiment. And if not, you’re in for a treat.
Ingredients You’ll Need
Main Ingredients
To create an authentic, flavorful coconut chutney, gather the following main ingredients:
- Fresh grated coconut – 1 cup (you can also use frozen coconut if fresh isn’t available)
- Green chilies – 2 to 3 (adjust as per spice level)
- Roasted chana dal – 2 tablespoons
- Ginger – 1 small piece (about 1 inch)
- Salt – to taste
- Water – as needed to blend
These are your basic building blocks. Each ingredient plays a key role: coconut for creaminess, chana dal for thickness, ginger and chilies for that flavor punch.
Optional Ingredients for Added Flavor
Want to level up your chutney game? Try adding these optional ingredients:
- Tamarind pulp – for tanginess
- Garlic – for a bolder flavor
- Coriander leaves – adds freshness
- Mint leaves – for a cooling aftertaste
These ingredients aren’t mandatory, but they help you tweak the chutney to match your personal taste or meal type.
Tools Required in the Kitchen
Here’s what you’ll need to whip up your coconut chutney with ease:
- Mixer grinder or blender – for blending the chutney ingredients smoothly
- Tempering pan or small skillet – for preparing the tadka
- Spatula – to scrape out every bit of that goodness
- Bowl – to serve the chutney
A powerful blender is key because it gives you that silky-smooth texture that good coconut chutney is known for. Make sure to use a small jar to ensure even blending if you’re making a small batch.
Step-by-Step Guide to Make Coconut Chutney
Step 1 – Grating the Fresh Coconut
Start with the freshest coconut you can find. Break open the coconut and use a grater to extract the white part, avoiding the brown husk attached to the shell. If you’re using frozen coconut, make sure to thaw it at room temperature. Fresh coconut gives your chutney that milky richness and natural sweetness, which really enhances the final taste.
Be generous—1 cup of grated coconut is a good amount for 2-3 servings. You can store leftover grated coconut in the freezer for future use. Just remember, fresh always trumps frozen in flavor.
Step 2 – Blending the Ingredients
Now comes the fun part—blending! In your mixer jar, add:
- 1 cup grated coconut
- 2 tablespoons roasted chana dal
- 2-3 green chilies
- 1 inch piece of ginger
- Salt to taste
- A small splash of water (start small—you can always add more)
Blend until smooth. The consistency should be thick yet pourable. If it’s too dry, add more water in small increments. Taste and adjust the seasoning as needed. Want it spicier? Add another chili. Want a little tang? A few drops of lemon juice or a pinch of tamarind does the trick.
Step 3 – Tempering (Tadka) the Chutney
Tempering is where the magic happens. In a small skillet, heat 1 tablespoon of oil. Add:
- 1 teaspoon mustard seeds
- 1 dried red chili
- 5-6 curry leaves
- A pinch of hing (asafoetida)
Let the mustard seeds pop and the curry leaves sizzle. Pour this hot tempering over your blended chutney. You’ll hear a satisfying sizzle, and the aroma is simply mouthwatering. This step elevates the chutney from good to restaurant-style amazing.
Variations of Coconut Chutney
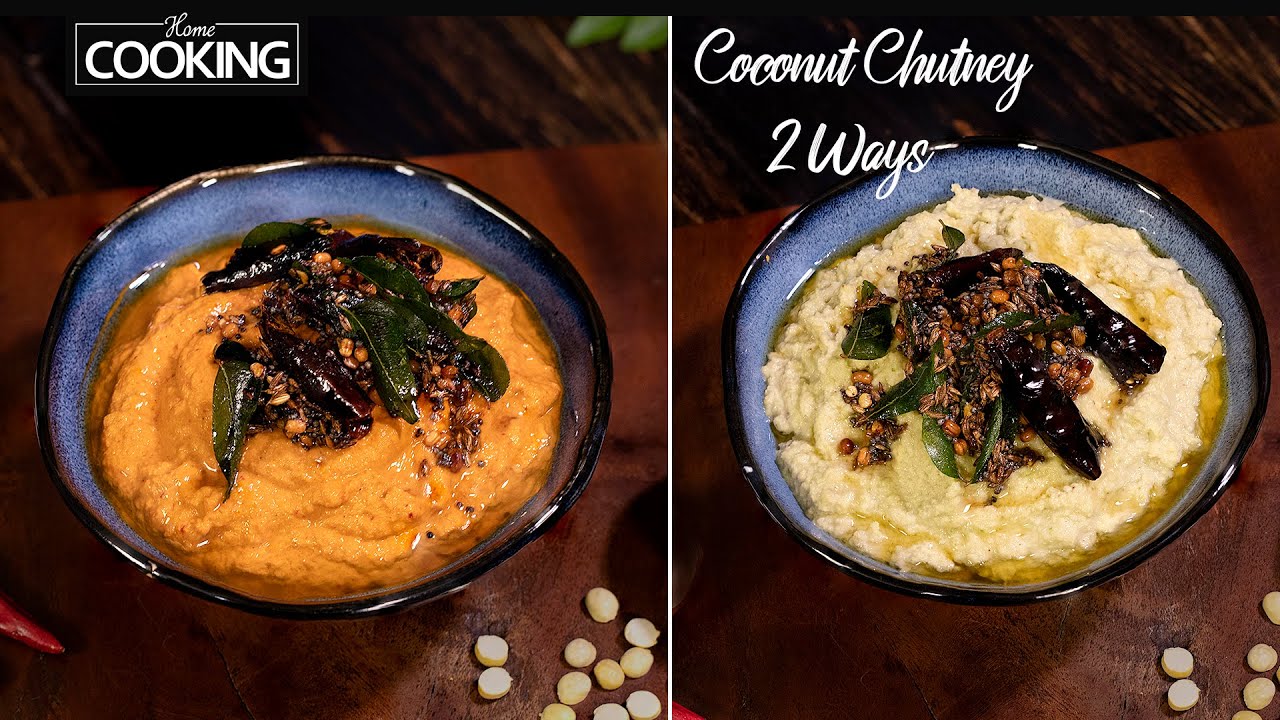
Green Coconut Chutney
Green coconut chutney is a popular variation that blends fresh herbs with the classic coconut base. To make it, you add a generous handful of fresh coriander leaves (cilantro) and a few mint leaves while blending the main ingredients. These herbs not only give the chutney a vibrant green color but also infuse it with a fresh, zesty flavor.
The method is the same—grate the coconut, toss in roasted chana dal, green chilies, ginger, salt, and a bit of water. Then add your green herbs and blend everything until smooth. The result? A chutney that’s not only eye-catching but also bursts with flavor. It pairs especially well with spicy dosas or masala vadas, balancing the heat with its herbaceous freshness. If you’re hosting guests or want to add variety to your breakfast spread, this version is a colorful, crowd-pleasing choice.
Red Coconut Chutney
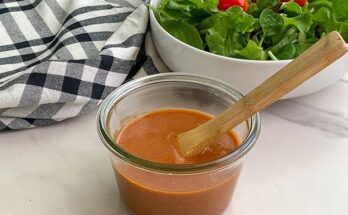
Craving something spicier? Enter the red coconut chutney. This version replaces green chilies with dried red chilies and adds a touch of tamarind for a sharp, tangy twist. You can also include a small piece of tomato while blending to enhance the reddish hue and give the chutney a slightly tangy-sweet undertone.
To prepare, soak 2-3 dried red chilies in warm water for 10 minutes to soften them. Then, blend with grated coconut, roasted chana dal, tamarind pulp (or a small piece of tamarind), salt, and water. Optionally, you can sauté a small tomato and add it while blending. Finish with the usual tempering of mustard seeds, curry leaves, and hing. This bold, fiery chutney pairs beautifully with medu vada, upma, or onion uttapam. It’s the go-to for spice lovers who want an extra kick on their plates.
Tips and Tricks for the Best Coconut Chutney
- Use fresh coconut whenever possible – The flavor difference between fresh and frozen is noticeable. Fresh gives a sweeter, creamier result.
- Don’t skip roasted chana dal – It adds texture and thickness. Without it, your chutney may turn out too runny.
- Adjust spice levels to your taste – Start with fewer chilies and add more after tasting.
- Tempering makes all the difference – A good tadka not only enhances aroma but also deepens the chutney’s flavor profile.
- Don’t overblend – Especially with herbs in green chutney, overblending can make it bitter.
- Add garlic for a flavor punch – A small clove can transform the chutney if you love garlicky notes.
- Balance flavors – If the chutney tastes flat, a tiny bit of lemon juice or tamarind can brighten it up.
- Serve immediately – Coconut chutney tastes best when fresh. It tends to lose its vibrancy over time.
Keep these in mind, and you’ll have a creamy, flavorful chutney that’s restaurant-worthy every single time.
How to Store Coconut Chutney
Coconut chutney is best served fresh, but if you have leftovers, proper storage can help retain its taste and texture.
- Refrigerate promptly – Store in an airtight container as soon as it cools to room temperature. It will stay good for about 1 to 2 days.
- Avoid storing at room temperature – Due to its high coconut content, it can spoil quickly, especially in warm climates.
- Add tempering later if storing – If you plan to store the chutney, consider doing the tempering just before serving. This keeps the tadka fresh and flavorful.
- Freezing isn’t ideal – While you can freeze coconut chutney, it often separates and loses flavor after thawing. If you must, freeze only the blended chutney (without tempering) and stir well after reheating.
- Use airtight glass containers – These are best for preserving freshness and avoiding odors from other foods.
Reheat gently or serve chilled—just give it a good mix and adjust seasoning before serving again.
What to Serve With Coconut Chutney
Coconut chutney is incredibly versatile. Here’s a list of classic and creative pairings:
- Idli – A soft, steamed rice cake that’s almost always served with coconut chutney.
- Dosa – Especially masala dosa or plain dosa; the chutney complements its crispy edges perfectly.
- Vada – The crunchy medu vada tastes amazing with the creamy coolness of the chutney.
- Uttapam – Whether onion, tomato, or mixed vegetable uttapam, this chutney adds a zesty side.
- Pongal – A mild, comforting dish that gets an instant flavor boost with chutney.
- Chapati or paratha – A less traditional combo, but surprisingly delicious.
- Sandwiches – Use it as a spicy spread for South Indian-style sandwiches.
- Pakoras – Pair it with fritters for a fun party dip.
Basically, coconut chutney is a flavor enhancer—it brightens up whatever it touches!
Health Benefits of Coconut Chutney
You might think of coconut chutney as just a tasty side dish, but it actually packs quite a few health benefits—especially when made with the right ingredients in the right proportions.
1. Rich in Healthy Fats: Coconut is full of medium-chain triglycerides (MCTs), a type of fat that can be quickly used by your body for energy. These fats are known to improve cholesterol levels and support weight management when consumed in moderation.
2. Boosts Digestive Health: The fiber in coconut aids digestion and promotes gut health. If you add ginger and hing (asafoetida) in your chutney or tempering, you’re giving your digestive system an extra helping hand.
3. Full of Antioxidants: The green chilies, ginger, curry leaves, and coriander (if used) are rich in antioxidants that help fight free radicals and inflammation. This is especially helpful in reducing oxidative stress and supporting immune health.
4. Protein from Chana Dal: Roasted chana dal is a great source of plant-based protein and adds to the satiety value of the chutney. It also helps in balancing blood sugar levels.
5. Cooling Effect: Coconut is naturally cooling for the body, making this chutney especially beneficial in hot climates or during the summer months. It helps soothe the stomach and prevent overheating.
6. Gluten-Free and Vegan Friendly: If you’re following a specific diet, coconut chutney fits right in. It’s naturally gluten-free and vegan (just make sure the tempering oil is plant-based).
Like anything, moderation is key. But overall, this humble chutney delivers more than just flavor—it offers a subtle health boost too.
Common Mistakes to Avoid
Coconut chutney is easy to make, but a few simple errors can affect the taste and texture. Here are common mistakes you’ll want to dodge:
1. Using Too Much Water: One of the easiest ways to mess up coconut chutney is by adding too much water during blending. This makes it runny and bland. Always start with a little and add more if needed.
2. Overblending: Overblending, especially when using herbs like coriander or mint, can release bitterness. Blend just until smooth for the best results.
3. Not Adjusting Salt Properly: People often forget to taste and adjust the salt. This minor detail can make a big difference in flavor. A pinch too much or too little can throw things off.
4. Skipping the Tempering: Tempering adds the signature South Indian aroma and depth. Skipping it leaves the chutney flat. Always finish with a tadka of mustard seeds, red chili, and curry leaves.
5. Not Using Fresh Coconut: Old or spoiled coconut can ruin the entire dish. Use fresh or good-quality frozen coconut and make sure it smells sweet, not sour or rancid.
6. Storing for Too Long: Coconut chutney spoils quickly. Leaving it out or storing it too long in the fridge can affect both flavor and safety. Consume it within 24–48 hours max.
Avoiding these common pitfalls ensures your chutney turns out smooth, flavorful, and perfectly balanced every time.
FAQs about Coconut Chutney Recipe
Can I make coconut chutney without coconut?
Technically yes, though the flavor changes drastically. You can substitute with roasted peanuts or cashews, but it won’t be traditional coconut chutney. Still tasty though!
How long can I store coconut chutney?
Refrigerated in an airtight container, it stays good for 1–2 days. For best flavor and safety, consume within 24 hours.
Is coconut chutney healthy?
Absolutely. It’s rich in good fats, fiber, and antioxidants. Just watch the portion size if you’re on a calorie-restricted diet.
Can I freeze coconut chutney?
You can, but it’s not ideal. Coconut tends to separate and change texture when thawed. If you must freeze, blend without tempering and add tadka after reheating.
What can I use instead of tamarind?
If you’re out of tamarind, a few drops of lemon juice or a tiny piece of raw mango can bring that tangy note. But use sparingly!
Conclusion
Coconut chutney isn’t just a side dish—it’s a staple that elevates every meal it touches. From fluffy idlis to crispy dosas, this creamy, flavorful condiment adds a refreshing contrast and an explosion of taste. With its minimal ingredients and quick prep time, it’s one of those recipes you’ll find yourself going back to again and again. The best part? It’s completely customizable. Whether you like it spicy, tangy, garlicky, or herb-packed, coconut chutney can be tailored to suit your palate and dish. Follow the step-by-step guide, avoid common mistakes, and use the right proportions—and you’ll have a batch of chutney that’s restaurant-level delicious in your own kitchen. So the next time you’re whipping up a South Indian breakfast, don’t forget to make a bowl of this creamy magic. Your dosas and idlis will thank you!