Cocoa Milkshake Recipe: There’s nothing quite like the refreshing taste of a cold, creamy cocoa milkshake. This classic drink has been a household favorite for generations, loved by kids and adults alike. Whether you’re looking for a quick summer treat, a comforting winter drink, or a dessert to impress guests, a cocoa milkshake fits the bill perfectly.
Why is this drink so special? Well, it combines the richness of cocoa with the creaminess of milk and the sweetness of sugar or ice cream. It’s a versatile recipe—you can keep it simple with just three ingredients or get creative with whipped cream, chocolate chips, or even a dash of cinnamon.
A cocoa milkshake is also incredibly easy to make. In just five minutes, you can prepare a chilled, frothy drink that tastes like something straight out of a café. Best of all, you don’t need fancy equipment—just a blender and a handful of ingredients.
In this guide, we’ll break down everything you need: the ingredients, the tools, and a step-by-step process to make the perfect cocoa milkshake every single time. Ready to sip on some chocolaty goodness? Let’s dive in!
Why Cocoa Milkshake is a Timeless Classic
Milkshakes have been around since the late 19th century, but the cocoa milkshake has stood out as a classic because of its rich flavor and simplicity. Unlike overly sweet milkshakes that rely on syrups, a cocoa milkshake highlights the natural taste of cocoa. It’s balanced—not too bitter, not too sweet.
Think of it as comfort in a glass. On hot days, it cools you down with its frosty texture. On cooler evenings, it pairs beautifully with a warm brownie or a plate of cookies. Plus, it’s a universal favorite—you can serve it at kids’ birthday parties, family gatherings, or even as a romantic dessert for two.
Another reason for its timelessness? It’s customizable. You can make it light and refreshing with skim milk or indulgent with full cream and extra chocolate syrup. You can even make a vegan version with almond or oat milk. No matter how you spin it, the cocoa milkshake always feels special.
The Perfect Drink for All Ages
Unlike coffee-based shakes or energy drinks, a cocoa milkshake is safe for everyone. Kids love it because of its sweet, chocolaty flavor. Teens often enjoy it as a quick treat after school, and adults appreciate it as a nostalgic reminder of childhood.
The best part is that it can be as healthy—or as indulgent—as you want it to be. Parents can make a healthier version by controlling the sugar levels, while dessert lovers can turn it into a decadent drink topped with whipped cream, caramel drizzle, and crushed cookies.
Cocoa milkshakes are also versatile in timing. They make a great breakfast smoothie when mixed with bananas and oats, a refreshing midday drink, or a late-night indulgence. It’s truly the kind of beverage that suits every mood and occasion.
Ingredients You’ll Need for Cocoa Milkshake
Before you begin blending, let’s go over the essentials. A good cocoa milkshake doesn’t require a long list of ingredients—just a few staples from your kitchen will do the trick.
Basic Ingredients for a Simple Cocoa Milkshake
Here are the must-have ingredients for the classic recipe:
- Cocoa Powder – Unsweetened cocoa powder gives that rich chocolaty flavor.
- Milk – Whole milk is best for creaminess, but you can use any type.
- Sugar or Sweetener – Adjust based on your taste preference.
- Ice Cubes – For a chilled, frothy texture.
These four ingredients alone can give you a perfectly delicious cocoa milkshake.
Optional Add-ons for Extra Flavor
Want to elevate your shake? Try adding:
- A scoop of vanilla or chocolate ice cream
- A drizzle of chocolate syrup
- A pinch of cinnamon or nutmeg
- Whipped cream topping
- Chocolate chips or sprinkles
These add-ons turn a simple shake into a dessert-worthy masterpiece.
Substitutions for Healthier Alternatives
If you want a lighter or healthier option, here are some swaps:
- Use almond, soy, or oat milk instead of dairy milk.
- Replace sugar with honey, maple syrup, or stevia.
- Add a tablespoon of peanut butter for protein and flavor.
- Swap ice cream with frozen bananas for creaminess.
These substitutions make your cocoa milkshake guilt-free while still keeping it delicious.
Essential Kitchen Tools for Making Cocoa Milkshake
Making a cocoa milkshake doesn’t require professional chef skills, but having the right tools ensures a smooth, creamy, and enjoyable result.
Blender or Mixer – Which is Better?
A blender is your best friend here. It combines the cocoa, milk, and ice evenly while giving that frothy texture we all love. However, if you don’t own a blender, a hand mixer or even a whisk can work—it just takes a little more effort.
Measuring Tools for Perfect Ratios
To avoid overly bitter or overly sweet milkshakes, use:
- Measuring cups for milk
- Measuring spoons for cocoa and sugar
- Ice cube trays for consistency
This ensures your shake comes out perfect every single time.
Serving Glasses and Presentation Tips
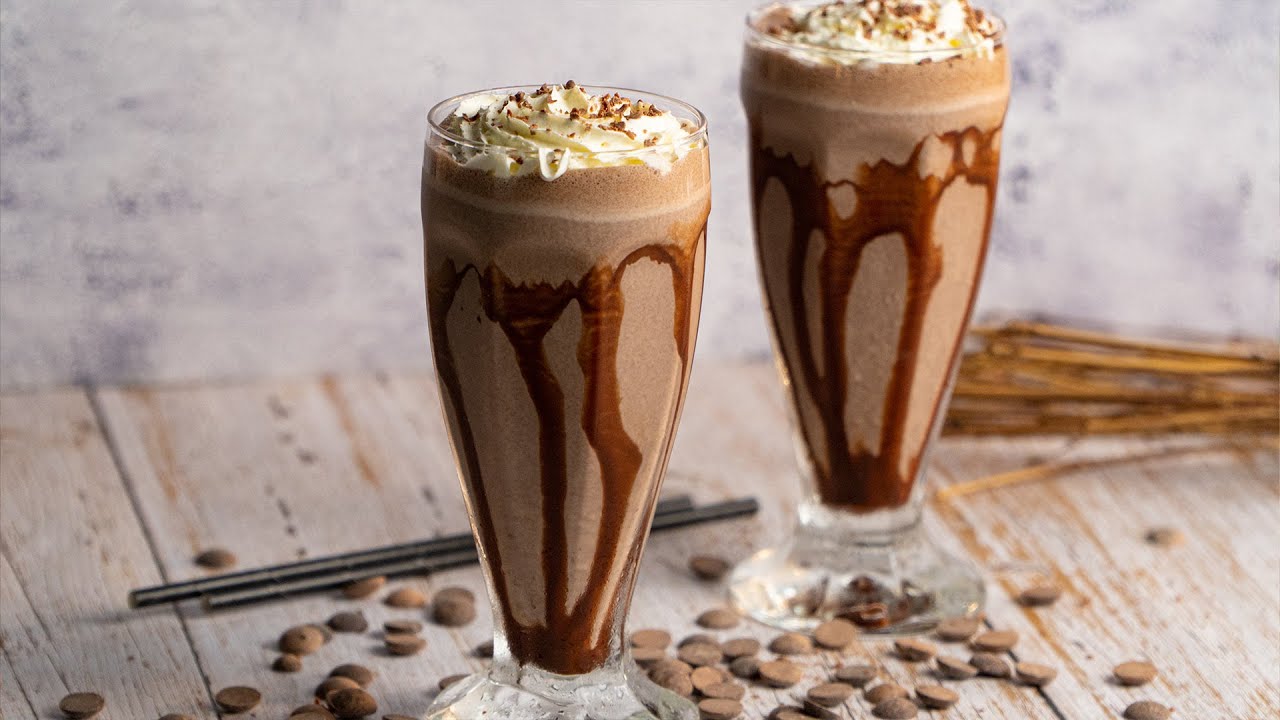
Presentation matters! Use tall glasses for that classic milkshake look. You can also chill your glass in the freezer for 10 minutes before pouring the shake—it keeps the drink colder for longer. Add whipped cream, chocolate drizzle, or sprinkles for a café-style finish.
Step-by-Step Guide to Making Cocoa Milkshake
Now comes the fun part—making your cocoa milkshake! The process is simple, but each step makes a big difference in flavor and texture. Follow these instructions to get a creamy, frothy, and delicious drink every time.
Step 1 – Gather All Ingredients
Start by getting everything ready on your kitchen counter. This includes cocoa powder, milk, sugar (or sweetener), and optional add-ons like ice cream or whipped cream. Having all your ingredients in one place saves time and ensures you don’t miss anything.
Pro tip: Use chilled milk straight from the refrigerator. Cold milk helps create a naturally refreshing milkshake without relying too much on ice cubes, which can water down the flavor.
Step 2 – Blend the Cocoa and Milk Together
Add 2 tablespoons of cocoa powder to your blender, followed by 2 cups of milk. Blend for 15–20 seconds. This step ensures the cocoa dissolves completely into the milk, avoiding any lumps.
If you prefer a stronger chocolaty flavor, feel free to add an extra spoon of cocoa powder. For a lighter version, stick with one spoon.
Step 3 – Add Sweeteners and Ice Cream
Next, add 2–3 tablespoons of sugar or your preferred sweetener. For a richer texture, toss in a scoop of vanilla or chocolate ice cream. The ice cream makes your milkshake creamier and adds that dessert-like feel.
If you’re going for a healthier version, replace ice cream with frozen bananas or Greek yogurt. This gives a smooth texture without the extra calories.
Step 4 – Blend Until Smooth and Creamy
Blend all the ingredients together for 40–60 seconds. You want the mixture to look silky, thick, and frothy. If you like a thicker shake, add more ice cream. For a lighter, more refreshing version, toss in a few more ice cubes.
Keep an eye on the consistency—you don’t want it too watery or too dense. The perfect cocoa milkshake should flow smoothly but still feel rich when you sip it.
Step 5 – Pour and Garnish
Once blended, pour your cocoa milkshake into a tall, chilled glass. For presentation, top it with whipped cream, chocolate syrup, or even a sprinkle of cocoa powder. A straw or long spoon makes it café-style, perfect for sipping slowly.
And there you have it—the perfect homemade cocoa milkshake, ready to enjoy in less than five minutes.
Tips for the Perfect Cocoa Milkshake
Even though this recipe is simple, a few tricks can elevate your milkshake from good to unforgettable.
Choosing the Right Cocoa Powder
Not all cocoa powders are the same. For a rich and authentic taste, go for unsweetened, high-quality cocoa powder. Brands that use pure, natural cocoa tend to give a deeper, smoother flavor compared to cheap, processed options.
If you prefer a slightly sweet base, you can also use hot cocoa mix, but remember it already contains sugar—so adjust accordingly.
Balancing Sweetness and Creaminess
The biggest challenge with milkshakes is getting the flavor balance right. Too much sugar makes it overly sweet, while too little leaves it bitter. Start small, then adjust to taste.
For creaminess, whole milk and ice cream do the trick. But if you want a lighter shake, stick to low-fat milk or plant-based alternatives like almond or oat milk. Adding frozen fruits like bananas can also boost creaminess without extra fat.
Presentation Hacks for Instagram-Worthy Drinks
Want your cocoa milkshake to look as good as it tastes? Try these tricks:
- Drizzle chocolate syrup around the inside of the glass before pouring.
- Top with whipped cream and crushed cookies for a café-style finish.
- Add colorful straws, sprinkles, or even a small scoop of ice cream on top.
Not only will your milkshake taste amazing, but it’ll also look like it came straight out of a fancy dessert bar.
Variations of Cocoa Milkshake
One of the best things about cocoa milkshakes is their versatility. You can tweak the recipe to match your mood, diet, or occasion.
Vegan Cocoa Milkshake Recipe
If you’re avoiding dairy, don’t worry—you can still enjoy a rich and creamy milkshake. Use almond, oat, or soy milk instead of dairy milk. For creaminess, blend in frozen bananas or dairy-free ice cream. Sweeten with maple syrup or agave instead of sugar.
Protein-Boosted Cocoa Milkshake
Looking for a post-workout treat? Add a scoop of chocolate protein powder to your milkshake. Blend it with milk, cocoa powder, and a frozen banana for a creamy, muscle-friendly shake. This version not only tastes good but also fuels your body with protein and energy.
Chocolate-Banana Cocoa Milkshake
Bananas and cocoa are a match made in heaven. Add one ripe banana to the blender along with your cocoa mix. The banana adds natural sweetness, reduces the need for extra sugar, and makes the shake extra thick and smooth.
This version is especially great for kids or anyone looking for a more wholesome milkshake option.
Nutritional Value of Cocoa Milkshake
Cocoa milkshakes are delicious, but what about their nutrition? The answer depends on the ingredients you use.
Calories and Macros
A standard cocoa milkshake with milk, cocoa powder, sugar, and ice cream contains:
- Calories: 250–400 (depending on serving size and add-ons)
- Carbs: 30–50g
- Protein: 6–10g
- Fat: 8–15g
The numbers change based on your milk choice, sweeteners, and toppings.
Health Benefits of Cocoa
Cocoa isn’t just tasty—it’s also packed with health benefits. It contains antioxidants called flavonoids, which improve heart health, reduce inflammation, and even boost mood. Cocoa is also known to improve blood circulation and brain function.
Things to Watch Out For
While cocoa itself is healthy, the sugar and ice cream can quickly turn this treat into a calorie bomb. If you’re health-conscious, keep portions moderate and try healthier swaps like stevia, frozen bananas, or low-fat milk.
Common Mistakes to Avoid
Making a cocoa milkshake is simple, but small mistakes can ruin the taste or texture. Here’s what to watch out for so your milkshake always turns out perfect.
Over-Blending or Under-Blending
Blending is key to a smooth milkshake. If you blend too long, the ice cream melts and makes your shake watery. Blend too little, and you’ll end up with lumps of cocoa powder or chunks of ice. The sweet spot is around 40–60 seconds—just enough for a creamy, frothy texture.
Using Low-Quality Cocoa Powder
Cocoa powder is the star of the recipe, so don’t compromise on quality. Cheap, overly processed cocoa can taste flat and bitter. Always go for pure, unsweetened cocoa powder for a rich, authentic flavor. If you want extra indulgence, try Dutch-processed cocoa for a smoother taste.
Adding Too Much Sugar
It’s tempting to dump in lots of sugar, but too much can overpower the natural cocoa flavor and make your shake sickly sweet. Start with a small amount, then taste-test. Remember, if you’re adding ice cream, syrup, or whipped cream, those already contain sugar—so balance accordingly.
Serving Suggestions for Cocoa Milkshake
A cocoa milkshake is delicious on its own, but pairing it with the right foods and serving it the right way takes it to the next level.
Pairing with Desserts
Milkshakes and desserts go hand in hand. Try serving your cocoa milkshake with:
- Cookies – Chocolate chip or oatmeal cookies pair beautifully.
- Brownies – The fudgy texture and extra chocolate hit are perfect.
- Cakes – A slice of vanilla or red velvet cake balances the shake.
- Donuts – Dip them into your shake for a fun twist.
The creamy drink complements baked goods perfectly.
Best Times to Enjoy Cocoa Milkshake
There’s really no wrong time to sip a cocoa milkshake, but here are some great occasions:
- Hot summer afternoons – A cold milkshake is the ultimate refreshment.
- Movie nights – Swap soda for a cocoa milkshake and enjoy a cozy treat.
- Parties – Serve in mini glasses with straws for a crowd-pleasing dessert.
- After workouts – A protein-boosted version makes a great recovery drink.
Kid-Friendly Serving Ideas
If you’re making cocoa milkshakes for children, make it fun! Use colorful straws, sprinkle rainbow sprinkles on top, or serve with a cookie stuck into the whipped cream. Presentation makes kids even more excited to drink it.
Storage and Make-Ahead Tips
Sometimes you want to prep ahead of time, or maybe you made too much. Here’s how to store your cocoa milkshake properly without losing flavor.
How Long Cocoa Milkshake Lasts in the Fridge
A freshly made cocoa milkshake tastes best right away, but if you need to store it, keep it in the fridge for up to 24 hours. Store it in a sealed glass bottle or jar to prevent it from absorbing other fridge odors. Before drinking, shake or stir well since ingredients may separate.
Freezing Cocoa Milkshake – Is It Possible?
Yes, you can freeze cocoa milkshake, but it won’t have the same frothy texture when thawed. Instead, it turns into a milkshake-ice-cream hybrid. If you like slushies, you might enjoy this version. To restore creaminess, re-blend with a little extra milk after thawing.
Prepping for Parties or Gatherings
If you’re making cocoa milkshakes for a group, prepare the base (milk, cocoa, sugar) in advance and refrigerate it. When guests arrive, just toss in ice cream and blend—it saves time and keeps the drink fresh.
Cocoa Milkshake vs Chocolate Milkshake
Many people confuse cocoa milkshakes with chocolate milkshakes, but there are key differences that set them apart.
Key Differences in Taste and Ingredients
- Cocoa Milkshake – Uses unsweetened cocoa powder mixed with milk and sweetener. It has a richer, more natural chocolate flavor.
- Chocolate Milkshake – Uses chocolate syrup or melted chocolate. It’s sweeter, creamier, and often more indulgent.
Cocoa shakes taste more “homemade” while chocolate shakes often feel like a dessert splurge.
Which One Is Healthier?
Generally, cocoa milkshakes are the healthier option. Since cocoa powder is less processed and has fewer additives than syrup, you can control the sugar level more easily. Chocolate shakes tend to be higher in sugar and calories due to syrup or melted chocolate.
Which One Is Easier to Make?
Both are simple, but cocoa milkshakes require just pantry basics: cocoa powder, milk, and sugar. Chocolate milkshakes might require syrup, melted chocolate, or chocolate ice cream. So if you want a quick, no-fuss recipe, cocoa milkshake wins.
Fun Facts About Cocoa and Milkshakes
Before we wrap up, here are some fun tidbits that make enjoying your cocoa milkshake even more interesting.
Origin of Milkshakes
Milkshakes first appeared in the late 1800s, but back then, they were often made with eggs and whiskey—more of a tonic than a dessert. By the 1920s, the electric blender made frothy, creamy milkshakes possible, and they quickly became a soda shop favorite.
Cocoa Through History
Cocoa has an even longer history. Ancient Mayans and Aztecs used cocoa beans to make a bitter chocolate drink mixed with spices. It wasn’t sweetened until Europeans added sugar centuries later. What was once a luxury for royalty is now an everyday treat for everyone.
Modern Twist on Traditional Milkshakes
Today, milkshakes have evolved beyond the basics. From freakshakes topped with candy bars and donuts to vegan protein shakes, there’s a version for everyone. Yet, the humble cocoa milkshake remains a timeless favorite—simple, comforting, and always satisfying.
FAQs about Cocoa Milkshake Recipe
Can I Use Hot Cocoa Mix Instead of Cocoa Powder?
Yes, but remember that hot cocoa mix already contains sugar and sometimes milk powder. If you use it, cut back on added sugar in the recipe to avoid an overly sweet shake.
What’s the Best Milk to Use?
Whole milk gives the creamiest texture, but you can use low-fat milk, skim milk, or plant-based options like almond, oat, or soy milk. Each one changes the flavor slightly—experiment to see what you like best.
How Do I Make It Extra Creamy?
For a creamier shake, add a scoop of ice cream, frozen bananas, or a splash of heavy cream. Blending longer also helps make it smoother.
Can I Add Coffee to My Cocoa Milkshake?
Absolutely! A shot of espresso or some cold brew turns your cocoa milkshake into a mocha milkshake. It’s perfect for coffee lovers who want an extra kick.
Is Cocoa Milkshake Good for Kids?
Yes, it’s a kid-friendly drink. Just keep sugar levels moderate, and use healthy add-ons like bananas instead of too much ice cream.
Conclusion
The cocoa milkshake is more than just a drink—it’s comfort, nostalgia, and indulgence all in one glass. With just a few ingredients and a blender, you can whip up a café-style shake at home in minutes. Whether you keep it simple or go all out with toppings and add-ons, this timeless recipe never disappoints.
From its versatility in variations to its nutritional benefits (thanks to cocoa’s antioxidants), the cocoa milkshake truly deserves a spot in your kitchen. So the next time you’re craving something sweet, refreshing, and chocolaty, skip the store-bought shakes and make your own—it’ll taste better, cost less, and bring a smile with every sip.


