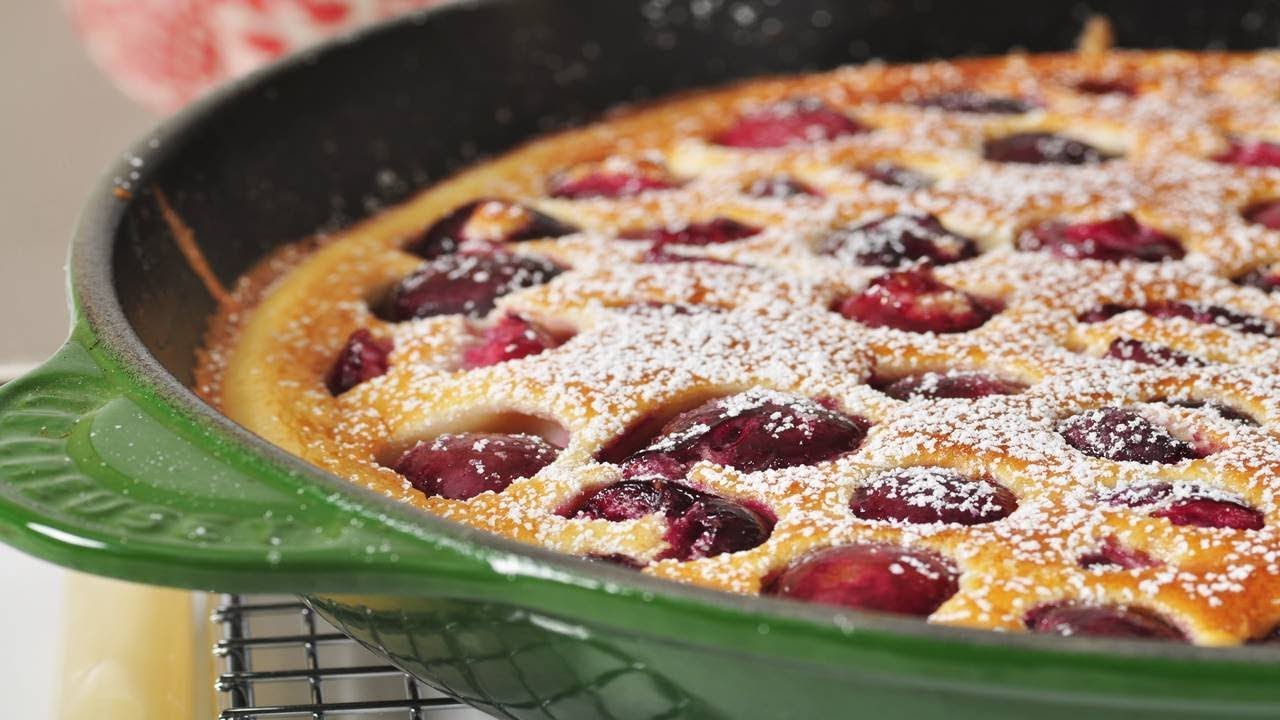
Clafoutis Recipe: Clafoutis is that irresistible hybrid of cake and custard that France gifted the dessert world. Think of it as the lovechild of a pancake and a soufflé, baked up with sweet, juicy fruit (traditionally cherries) and served with a dusting of powdered sugar. It’s surprisingly easy to make but gives the impression of something you’d only order in a fancy Parisian café. The beauty of clafoutis lies in its rustic charm—it’s messy, delicious, and soul-warming.
When baked, the batter puffs around the fruit, creating a golden, slightly crisp edge with a soft, almost custard-like center. It’s versatile too—you can whip one up for brunch, dinner parties, or even just a midweek treat. And here’s the kicker: you probably already have all the ingredients in your kitchen.
Origins and History of the Dessert
Clafoutis hails from the Limousin region of France and has been a staple in French households since the 19th century. Back in the day, it was made during cherry season to use up a bounty of fresh fruit. Interestingly, traditionalists insist that the cherries shouldn’t be pitted—the pits are said to add a slight almond flavor during baking. While modern versions often pit the cherries (for obvious reasons), purists still debate this point fiercely.
Over time, clafoutis has evolved. While cherries remain the go-to, other fruits like plums, peaches, or berries often make an appearance. When fruits other than cherries are used, the dish is technically called a “flognarde,” but let’s be honest—most people still call it clafoutis.
Essential Ingredients for Clafoutis
Choosing the Right Fruit
Classic clafoutis is made with fresh, sweet black cherries. However, don’t let that limit your creativity. You can use pretty much any fruit you love—as long as it’s not too watery. Think raspberries, sliced pears, apricots, blueberries, or even figs.
For cherries, fresh is best. If you’re using frozen, be sure to thaw and drain them thoroughly. Otherwise, the excess moisture can mess with your batter. Pitting the cherries is optional, but unless you’re entertaining guests with dental insurance, it’s probably wise to remove the pits.
Key Pantry Staples You’ll Need
One of the best things about clafoutis is its simplicity. You don’t need any special ingredients, and there’s a good chance you already have most of them:
- Eggs: The foundation of the batter. They provide structure and help it puff up.
- Milk: Adds moisture and contributes to the custard-like texture.
- All-purpose flour: Gives the clafoutis a bit of body.
- Sugar: Granulated sugar is fine; it sweetens the batter and helps caramelize the top.
- Vanilla extract: For that irresistible aroma and depth of flavor.
- Salt: Just a pinch to balance out the sweetness.
- Butter: Used to grease the baking dish and adds richness.
Optional but recommended: powdered sugar for dusting, and a splash of cream for an extra-indulgent finish.
Tools You’ll Need to Make Clafoutis
You don’t need any fancy gadgets to whip up this French classic. Here’s what you’ll want on hand:
- Mixing bowls: One large bowl for the batter, and another for the fruit.
- Whisk: To mix everything together until smooth.
- Baking dish: A ceramic or glass dish works great—about 9-inch round or similar size.
- Oven: Of course, this baby is getting baked to golden perfection.
That’s it—no stand mixers, food processors, or complicated setups. It’s just you, your ingredients, and some good old-fashioned whisking.
Step-by-Step Instructions
Step 1 – Preparing the Fruit
Start with about 2 cups of fresh cherries. Wash them thoroughly, and if you’re going the extra mile, pit them. If you’re using other fruit, slice them evenly so they cook uniformly.
Dry the fruit with paper towels to prevent sogginess, then lightly toss them with a tablespoon of sugar. This helps bring out their natural juices and flavor.
Next, grease your baking dish generously with butter. Scatter the fruit across the bottom in a single layer. Don’t overcrowd—the batter needs room to flow around the fruit.
Step 2 – Making the Batter
In a large mixing bowl, whisk together 3 large eggs until frothy. Add 1/2 cup of granulated sugar and whisk again until it’s fully dissolved and the mixture is pale yellow.
Add 1 cup of whole milk, 1/2 cup of all-purpose flour, 1 teaspoon of vanilla extract, and a pinch of salt. Mix until the batter is smooth and free of lumps. It should be thinner than pancake batter but thicker than milk—think somewhere in between crepe and cake batter.
Let the batter rest for about 10 minutes. This allows the flour to hydrate and helps with the final texture.
Step 3 – Assembling the Clafoutis
Pour the batter slowly over the fruit in your greased dish. It’s okay if the fruit shifts around a bit—the batter will rise and settle during baking.
For an extra decadent touch, dot the top with small bits of butter or sprinkle with a tablespoon of sugar. This helps form a beautiful golden crust.
Step 4 – Baking it to Perfection
Preheat your oven to 350°F (175°C). Place the baking dish on the center rack and bake for 35–45 minutes. You’ll know it’s done when the top is puffed and golden, and a toothpick inserted in the center comes out clean.
Once it’s out of the oven, let it cool for at least 15 minutes. It will deflate slightly—that’s normal. Dust with powdered sugar just before serving.
Tips for the Perfect Clafoutis
Avoiding Common Mistakes
Even though clafoutis is a relatively simple dessert, a few missteps can keep it from achieving perfection. Let’s make sure that doesn’t happen to you. First, always grease your baking dish thoroughly with butter. Skipping this step can cause sticking, which ruins both the texture and presentation. It also adds that signature golden crust you’re aiming for.
Second, don’t overload your clafoutis with fruit. While it’s tempting to cram as much fruit in as possible, too much can overwhelm the batter and lead to sogginess. Stick with around 2 cups of fruit. Also, dry the fruit well if it’s especially juicy or previously frozen. Excess moisture will mess with your batter’s consistency and prevent it from setting correctly.
And perhaps most importantly—don’t overbake it. You’re not making a cake here. Clafoutis should be just set, with a slight jiggle in the middle. Overbaking leads to a rubbery texture, while underbaking means raw batter. Use the toothpick test for guidance, and aim for golden brown edges with a soft, custard-like center.
Customizing Your Clafoutis
This French dessert is forgiving and endlessly adaptable. Want a deeper flavor? Add a splash of brandy, rum, or almond extract to your batter. Feeling fancy? Throw in a pinch of cinnamon or nutmeg for a warm, spiced touch.
For a gluten-free version, swap the all-purpose flour with almond flour or a gluten-free blend. Just note that the texture might vary slightly. If you’re vegan, you can use plant-based milk and egg substitutes, but the traditional clafoutis relies heavily on eggs for structure and lift, so results may differ.
You can also play around with different fruit combos. Peach and raspberry? Divine. Pear and chocolate? Yes, please. Blueberry and lemon zest? A summery dream. Don’t be afraid to make it your own.
Serving and Storing
Best Ways to Serve
Clafoutis is best served slightly warm, straight from the oven with a light dusting of powdered sugar. That warm, custardy interior pairs beautifully with a scoop of vanilla ice cream or a dollop of whipped cream. If you really want to treat yourself, a drizzle of warm chocolate or a spoonful of crème fraîche can take it over the top.
It’s also a fantastic brunch option. Imagine it served with coffee, alongside scrambled eggs and a crisp green salad. Elegant and effortless.
If you’re serving it later, you can reheat clafoutis in the oven at 300°F (150°C) for about 10 minutes. Avoid microwaving—it can make the texture rubbery.
How to Store Leftovers
Got leftovers? Clafoutis stores surprisingly well. Once it cools completely, cover the dish tightly with plastic wrap or transfer slices into an airtight container. It will keep in the fridge for up to 3 days.
When storing, keep in mind that the texture may become denser over time. It’s still delicious, just a bit firmer. For best results, enjoy it fresh or within 24 hours.
You can also freeze clafoutis, though it’s not ideal. Wrap it tightly in plastic and foil, and it’ll last up to a month. Reheat in the oven without thawing for best texture.
FAQs about Clafoutis Recipe
1. What is clafoutis?
Clafoutis is a classic French dessert made by baking fresh fruit—traditionally cherries—covered with a flan-like batter. It’s creamy, custardy, and slightly cake-like around the edges.
2. Can I use fruits other than cherries?
Yes! While cherries are traditional, you can substitute with other fruits like blueberries, raspberries, plums, peaches, or apples. Just make sure to adjust for moisture content.
3. Do I need to pit the cherries?
Traditionally, clafoutis is made with unpitted cherries to enhance flavor, but for ease of eating and safety, it’s best to remove the pits before baking.
4. Can I make clafoutis ahead of time?
Absolutely. Clafoutis can be made a day in advance and stored in the refrigerator. Just reheat gently or serve it cold—the flavors develop beautifully overnight.
5. Is clafoutis served hot or cold?
It’s delicious both warm and chilled. Some prefer it slightly warm with a dusting of powdered sugar or a scoop of ice cream, while others enjoy it straight from the fridge.
6. What kind of dish should I use?
A ceramic or glass baking dish works best for even baking. Avoid metal pans, which can alter the flavor and texture slightly.
7. Is clafoutis gluten-free?
The traditional recipe includes flour, but you can easily make it gluten-free by using almond flour or a gluten-free flour blend.
8. Can I freeze clafoutis?
Freezing is not recommended, as the texture may become rubbery once thawed. It’s best enjoyed fresh or refrigerated for up to 2–3 days.
9. What can I serve with clafoutis?
Serve it with whipped cream, crème fraîche, or vanilla ice cream for an indulgent treat. A drizzle of honey or fruit syrup also adds a tasty twist.
10. How do I know when clafoutis is done baking?
The top should be golden brown, and the center set but slightly jiggly. Insert a toothpick—it should come out mostly clean when done.
Conclusion
Clafoutis is proof that you don’t need fancy ingredients or complicated steps to make something truly magical. It’s humble, homey, and endlessly satisfying. Whether you stick to the traditional cherry version or mix things up with your own fruity twist, the result is always comforting and elegant.
With just a handful of pantry staples, a bowl, and a whisk, you can bring a bit of French countryside charm into your kitchen. So go ahead—grab those eggs, toss in some fruit, and bake up a little joy. Clafoutis is one of those recipes that feels like a gift every time you make it. And now that you know the ropes, it’s time to make it your own.
Bon appétit!