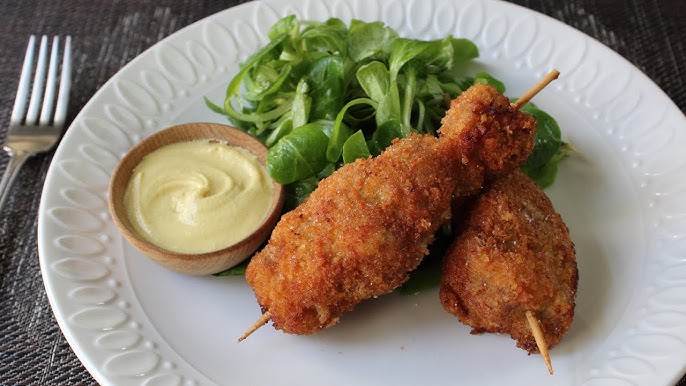
City Chicken Recipe: City Chicken is a bit of a culinary paradox. Despite the name, there’s often no chicken involved at all. Traditionally made with cubes of pork or veal, this dish got its quirky name during the Great Depression when chicken was more expensive and harder to come by than pork in urban areas. So, home cooks would skewer pork pieces, bread them, and cook them to mimic the look and flavor of fried chicken. The result? A crispy, golden exterior with tender, juicy meat inside—a comfort food classic with a rich, nostalgic history.
While you may now find versions that do use chicken, the heart of the recipe still lies in its ability to imitate traditional fried chicken using more affordable ingredients. The dish is especially popular in cities like Pittsburgh, Cleveland, and Detroit, where it became a staple in Polish and Eastern European communities.
The History Behind City Chicken
The origins of City Chicken trace back to the early 1900s in the Rust Belt cities of the United States. During the Great Depression, poultry was a luxury item in many urban households. Pork, on the other hand, was abundant and much cheaper. This economic contrast birthed an ingenious creation—City Chicken. Immigrant communities, especially Polish and Eastern Europeans, were the pioneers of this inventive dish.
This “mock chicken” quickly became a family favorite, and the recipe was passed down through generations. It was commonly seen at Sunday dinners, church picnics, and community potlucks. Over time, it gained a loyal following, not just for its affordability but also for its delicious taste and satisfying texture. Its roots may lie in frugality, but its legacy is one of culinary ingenuity.
Ingredients Needed
Meat Selection: Pork vs. Veal vs. Chicken
The meat is the star of the show, so choosing the right cut is crucial. Traditionally, City Chicken is made with pork, specifically from tender cuts like pork loin or sirloin. Veal was also commonly used in the early recipes for its tenderness, though it’s less popular today due to cost and availability. You can use real chicken if you prefer, especially boneless thighs for their juiciness.
Here’s a quick breakdown of your options:
| Meat Type | Pros | Cons |
|---|---|---|
| Pork Loin | Affordable, tender | Can dry out if overcooked |
| Veal | Very tender, traditional | Expensive, hard to find |
| Chicken Thighs | Juicy, flavorful | Not traditional |
| Chicken Breast | Lean | May turn dry easily |
Mixing pork and veal is a common old-school approach. However, using a single meat type simplifies the process and still delivers amazing flavor.
Breading and Coating Essentials
The breading is what gives City Chicken its mouthwatering crunch. A good breading station includes:
- Flour – for the initial dusting, helps the egg stick.
- Egg wash – whisked eggs (you can add a splash of milk).
- Breadcrumbs – use seasoned or panko for extra crunch.
Season the flour with salt, pepper, garlic powder, and paprika to build flavor from the ground up. The breadcrumbs can also be jazzed up with Italian herbs, grated Parmesan, or a dash of cayenne for heat.
Oils and Seasonings
You’ll need oil for frying. Choose oils with a high smoke point, like:
- Vegetable oil
- Canola oil
- Peanut oil
These ensure your breading crisps up beautifully without burning. For baking, you might also want a bit of butter or spray oil to keep things moist and golden.
Seasoning isn’t just for the meat—season every layer. Sprinkle a bit of salt and pepper after frying and before baking to lock in flavor. You can even add a dash of smoked paprika or a drizzle of hot honey before serving for a modern twist.
Kitchen Tools and Equipment
Skewers: Wooden or Metal?
Skewers are an essential part of what gives City Chicken its signature look and name. The original presentation mimicked a chicken drumstick by skewering meat cubes onto sticks.
Wooden Skewers:
- More traditional
- Require soaking in water for 30 minutes to prevent burning
- Inexpensive and disposable
Metal Skewers:
- Reusable and durable
- Can be hot to the touch
- Sometimes too slick for holding meat cubes in place
For authentic City Chicken, wooden skewers give a more rustic, homemade feel, especially if you’re going for visual appeal. Just make sure to soak them first!
Frying and Baking Tools
Here’s what you’ll need to make City Chicken like a pro:
- Large skillet or frying pan (preferably cast iron for even heat)
- Oven-safe baking dish or sheet pan
- Tongs for turning skewers
- Paper towels or wire rack for draining excess oil
- Aluminum foil (to cover while baking for moisture)
A meat thermometer can also be handy. Pork and veal should be cooked to an internal temperature of about 145°F, but you can go up to 160°F for a more well-done bite. Just be careful not to dry it out.
Step-by-Step Cooking Instructions
Step 1 – Prepping the Meat
Start by selecting your meat—traditionally, pork is used for City Chicken, but veal or chicken can also be alternatives. Cut the meat into uniform 1½-inch cubes to ensure even cooking. Season the cubes generously with salt, pepper, and any other preferred spices such as garlic powder or paprika.
Step 2 – Skewering Like a Pro
Thread 3 to 4 meat cubes onto each skewer, pressing them tightly together to mimic the appearance of a drumstick. This not only gives the dish its characteristic look but also helps in even cooking.
Step 3 – Coating and Breading
Prepare three separate bowls: one with flour, one with beaten eggs (you can add a splash of milk for richness), and one with seasoned breadcrumbs. Dredge each skewer first in flour, then dip into the egg mixture, and finally coat with breadcrumbs. For an extra crispy crust, repeat the egg and breadcrumb steps.
Step 4 – Pan Frying to Golden Perfection
Heat a generous amount of oil in a skillet over medium-high heat. Once hot, carefully place the skewers in the oil, frying them until all sides are golden brown—about 2 to 3 minutes per side. This step seals in the juices and creates a crispy exterior.
Step 5 – Baking Until Tender
Preheat your oven to 350°F (175°C). Place the fried skewers in a baking dish. To keep them moist, you can add a bit of water or broth to the bottom of the dish and cover it with foil. Bake for 20 minutes, then remove the foil and bake for an additional 10 minutes to crisp up the coating.
Tips and Tricks for the Best City Chicken
How to Keep It Juicy
- Use tender cuts: Opt for pork loin or tenderloin for the best texture.
- Don’t overcook: Monitor the internal temperature to ensure it doesn’t exceed 145°F (63°C).
- Moisture retention: Covering the dish during baking helps retain moisture.
Making It Extra Crispy
- Double breading: As mentioned, repeating the egg and breadcrumb steps adds extra crunch.
- Proper oil temperature: Ensure the oil is hot enough before frying to prevent soggy coating.
- Final bake: The last 10 minutes of uncovered baking re-crisps the exterior.
Serving Suggestions
Perfect Side Dishes
- Mashed potatoes: Creamy mashed potatoes complement the crispy City Chicken well.
- Steamed vegetables: Green beans, carrots, or broccoli add a healthy balance.
- Coleslaw: A tangy coleslaw can provide a refreshing contrast.
Ideal Sauces and Gravies
- Gravy: A simple pan gravy made from the drippings enhances the flavor.
- Honey mustard: For a sweet and tangy kick.
- Barbecue sauce: Adds a smoky depth to the dish.
FAQs about City Chicken Recipe
Q1: What is City Chicken made of?
City Chicken is traditionally made with cubes of pork or veal (or a combination of both), skewered onto sticks, breaded, and then baked or fried to mimic the appearance of fried chicken.
Q2: Why is it called “City Chicken” if there’s no chicken in it?
The name originated during the Great Depression when chicken was more expensive than pork or veal in many cities. People used these cheaper meats to create a dish that resembled fried chicken—hence the clever name.
Q3: Can I use chicken instead of pork or veal?
Yes, you can! While it’s not traditional, using chicken is absolutely fine—just ensure the meat is tender and juicy after cooking.
Q4: Do I have to use skewers for City Chicken?
Skewers are part of the dish’s signature presentation. However, if you don’t have skewers, you can still prepare the meat the same way and bake or fry it without them.
Q5: What’s the best way to cook City Chicken—bake or fry?
Both methods work well. Baking is healthier and still gives a crispy texture, especially if you broil the skewers at the end. Frying gives a crunchier exterior but adds more calories.
Q6: Can I make City Chicken ahead of time?
Yes! You can prepare and assemble the skewers in advance. Store them in the fridge for up to 24 hours before cooking or freeze them for later use.
Q7: What side dishes go well with City Chicken?
Mashed potatoes, green beans, coleslaw, and macaroni salad are all classic sides that pair wonderfully with City Chicken.
Q8: How do I store and reheat leftovers?
Store leftovers in an airtight container in the fridge for up to 3 days. Reheat in an oven or air fryer to maintain crispiness.
Q9: Is City Chicken gluten-free?
Not typically, since it uses breadcrumbs or flour. To make it gluten-free, use gluten-free breadcrumbs or crushed rice crackers.
Q10: Can I air fry City Chicken?
Absolutely! Air frying is a great way to get that crispy coating with less oil. Cook at 375°F (190°C) for about 15–18 minutes, flipping halfway through.
Conclusion
City Chicken is a delightful dish that brings comfort and nostalgia. Its unique preparation and delicious taste make it a favorite for many. Whether you’re revisiting a family classic or trying it for the first time, this recipe is sure to impress.


