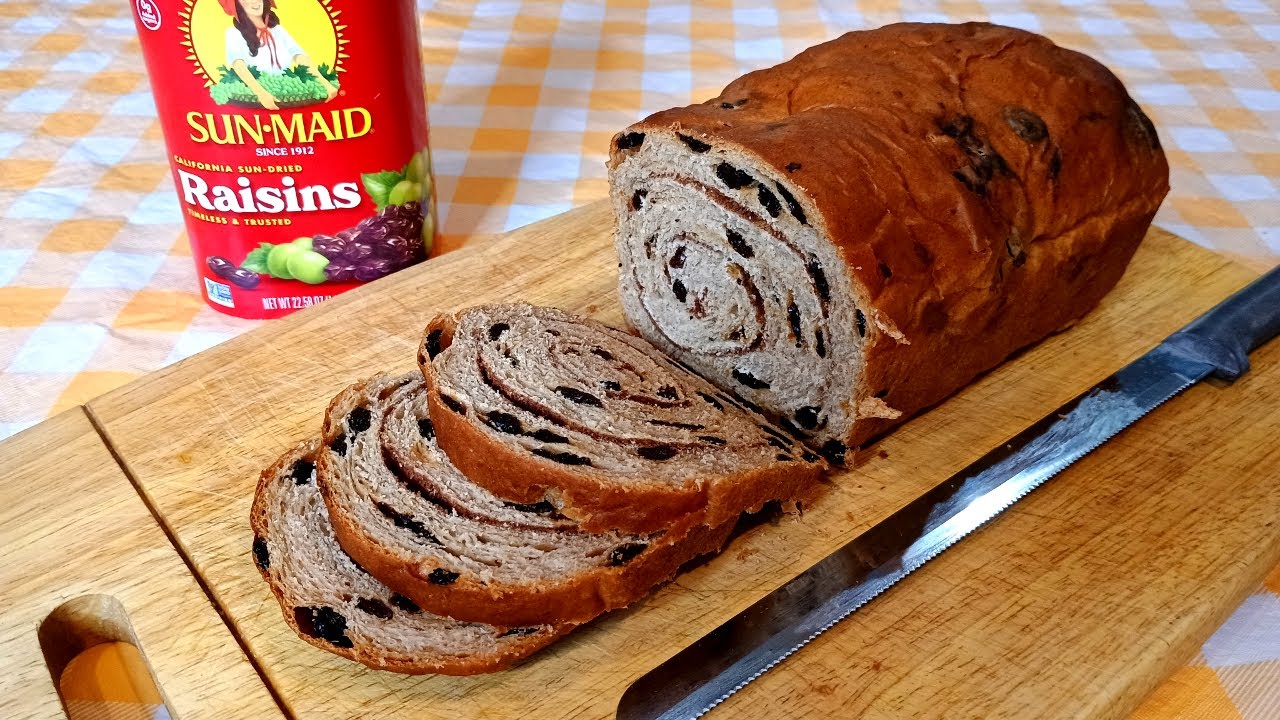
Cinnamon Raisin Bread Recipe: There’s something magical about the smell of fresh bread baking in the oven—it’s like a warm hug for your senses. And when it’s cinnamon raisin bread? Oh, it’s pure nostalgia. That blend of sweet, spicy cinnamon and chewy raisins baked into a soft, fluffy loaf takes you straight back to cozy mornings, maybe even grandma’s kitchen. This classic loaf isn’t just a breakfast treat; it’s a slice of comfort.
Making homemade bread may seem like a laborious process, but once you start, you’ll realize it’s more about patience than difficulty. And the results? Far superior to store-bought versions that often skimp on flavor and freshness. Plus, your house will smell like a bakery—bonus points!
Why Cinnamon and Raisins Are the Perfect Combo
Cinnamon and raisins are a match made in heaven. Cinnamon brings a warming, slightly spicy note that elevates the sweetness of raisins. Raisins, on the other hand, provide a natural sugary burst with every bite. Together, they create a balanced flavor profile that satisfies your sweet tooth without being overpowering.
What makes this duo especially good in bread is the way the cinnamon melts into the dough and the raisins become soft and juicy during baking. Every bite is loaded with texture and flavor. This combination isn’t just popular in bread—think cinnamon rolls, scones, even rice pudding. But cinnamon raisin bread remains a favorite because it’s versatile, comforting, and absolutely delicious.
Ingredients You’ll Need
Dry Ingredients
Before you dive in, let’s talk ingredients. Start with the dry elements. You’ll need:
- 3 ½ cups bread flour (or all-purpose flour)
- ¼ cup granulated sugar
- 1 teaspoon salt
- 2 teaspoons ground cinnamon
- 2 ¼ teaspoons instant yeast (1 packet)
Bread flour is ideal for a slightly chewier texture, but if you don’t have it on hand, all-purpose will work just fine. The sugar adds a touch of sweetness, while cinnamon provides that signature spice. Yeast is your rising agent—make sure it’s fresh.
Wet Ingredients
Here’s what goes into the wet mixture:
- 1 cup warm milk (110°F)
- 2 tablespoons unsalted butter, melted
- 1 large egg
- 1 teaspoon vanilla extract (optional but recommended)
The milk should be warm to the touch—not hot—or you risk killing the yeast. The butter makes the dough soft and rich, while the egg helps with binding and adds structure. Vanilla extract isn’t essential, but it adds depth to the flavor.
Optional Add-ins and Variations
Want to jazz things up? Here are a few tweaks you can try:
- Soak your raisins in warm water or rum for 10 minutes to plump them up.
- Add chopped nuts like walnuts or pecans for crunch.
- Mix brown sugar with cinnamon for the filling to create a swirl effect.
This recipe is flexible—feel free to get creative based on your taste preferences.
Step-by-Step Instructions to Make Cinnamon Raisin Bread
Step 1: Preparing the Dough
Start by activating the yeast. In a large bowl, mix warm milk and a pinch of sugar, then sprinkle the yeast on top. Let it sit for 5-10 minutes until foamy. That’s how you know your yeast is alive and ready to work.
Next, add the egg, melted butter, and vanilla extract to the mixture. Stir well. Gradually incorporate the dry ingredients—flour, sugar, salt, and cinnamon—until a soft dough forms. You can mix this with a stand mixer using a dough hook or do it the old-fashioned way by hand.
Knead the dough for about 8–10 minutes until it’s smooth and elastic. If it’s too sticky, add a bit more flour, one tablespoon at a time. If it’s too dry, add a splash of milk.
Finally, gently fold in the raisins. Try not to overwork the dough at this point—you just want them evenly distributed.
Step 2: First Rise
Place your dough in a lightly greased bowl and cover it with a damp cloth or plastic wrap. Let it rise in a warm place for 1–1.5 hours, or until it has doubled in size. This is where the magic happens—the yeast feeds on the sugars and releases gases that puff up the dough.
Pro tip: If your kitchen is cold, place the bowl in the oven with just the light on, or near a warm appliance. A consistent, warm environment will help your dough rise beautifully.
Step 3: Rolling and Filling the Dough
Once your dough has doubled in size, it’s time to shape it. First, punch down the dough gently to release the gas. Then, transfer it to a lightly floured surface and roll it out into a rectangle—about 8 by 14 inches should do the trick.
Now comes the flavor boost. Mix together ¼ cup brown sugar and 1 tablespoon of ground cinnamon. Sprinkle this mixture evenly over the dough. You can even add a few more raisins if you’re feeling generous. For a gooey swirl, lightly brush the dough with melted butter before sprinkling on the cinnamon-sugar mix.
Next, roll up the dough tightly, starting from the short end. Pinch the seams to seal and tuck the ends under. This helps ensure your bread keeps its shape while baking and doesn’t unravel.
Place your shaped dough seam-side down into a greased 9×5-inch loaf pan. If you’re using a swirl filling, make sure to tuck it tight so you don’t end up with gaps.
Step 4: Second Rise
Cover the pan loosely with a clean kitchen towel and let it rise again for 45–60 minutes. This second rise, or proofing, helps develop that light, fluffy texture inside the loaf.
During this time, preheat your oven to 350°F (175°C). By the time the dough finishes rising, your oven should be at the perfect temperature for baking.
You’ll know the dough is ready when it’s puffed up about 1 inch above the edge of the pan. Gently poke it—if the dent springs back slowly, it’s go time.
Step 5: Baking to Perfection
Place the pan in the center of the oven and bake for 35–40 minutes. The top should be a lovely golden brown, and the loaf should sound hollow when tapped. If it starts browning too quickly, tent it with foil for the last 10–15 minutes.
Once done, remove the bread from the oven and let it cool in the pan for 10 minutes. Then, carefully transfer it to a wire rack to cool completely. This helps prevent soggy bottoms and keeps the crust nice and crisp.
Let it rest for at least an hour before slicing. We know it’s hard to wait, but cutting too early can make your bread gummy instead of fluffy.
Tips for the Best Cinnamon Raisin Bread
Using Bread Flour vs. All-Purpose Flour
While both types of flour can work, bread flour has a higher protein content which helps develop more gluten. This gives the bread a chewier texture—ideal for toasting and slathering with butter. All-purpose flour will yield a slightly softer loaf. It all comes down to personal preference, so experiment with both to see which one you like best.
If you’re after a really hearty loaf, you can even do a mix—half bread flour and half whole wheat for extra fiber and flavor.
Soaking Raisins for Extra Juiciness
One pro tip that makes a huge difference: soak your raisins before adding them to the dough. You can use warm water, apple juice, or even a splash of rum for a boozy twist. Let them sit for about 10 minutes, then drain and pat dry.
This not only makes the raisins plumper and juicier but also prevents them from pulling moisture out of the dough during baking. The result? A more tender, flavorful loaf.
You can also toss the raisins in a bit of flour before mixing them in—this helps them distribute more evenly throughout the dough rather than sinking to the bottom.
Serving Suggestions and Storage
Best Ways to Serve It
Cinnamon raisin bread is incredibly versatile. Toast it and slather with butter for a simple yet indulgent breakfast. Spread on some cream cheese or peanut butter for a quick snack. Want something more dessert-like? Try it with a drizzle of honey or a sprinkle of powdered sugar.
It also makes a fantastic base for French toast. Just dip slices in a mix of eggs, milk, and vanilla, then fry until golden brown. Add syrup and you’ve got yourself a five-star brunch.
Feeling adventurous? Use it to make a bread pudding or even a sweet-and-savory grilled cheese. The sweet cinnamon paired with sharp cheddar is surprisingly delicious.
How to Store and Freeze the Bread
To keep your cinnamon raisin bread fresh, store it in an airtight container or plastic wrap at room temperature. It should last about 3–4 days.
For longer storage, freeze it. Wrap the loaf tightly in plastic and then foil, or use a zip-top freezer bag. It will stay fresh for up to 3 months. Just thaw it at room temperature or pop a slice in the toaster straight from the freezer.
You can also pre-slice the loaf before freezing. That way, you can grab a slice or two whenever you crave that sweet, cinnamon-kissed goodness.
FAQs about Cinnamon Raisin Bread Recipe
1. Can I use instant yeast instead of active dry yeast?
Yes, you can substitute instant yeast for active dry yeast in a 1:1 ratio. Just skip the proofing step—mix it directly with your dry ingredients.
2. How do I keep the raisins from sinking to the bottom?
Toss the raisins in a bit of flour before folding them into the dough. This helps them stay evenly distributed throughout the bread.
3. What type of flour is best for cinnamon raisin bread?
Bread flour works best because of its higher protein content, which gives the bread a chewier texture. All-purpose flour can also be used if needed.
4. Can I make this bread without a stand mixer?
Absolutely! You can knead the dough by hand for about 10–12 minutes until smooth and elastic. It’s a bit of a workout but totally doable.
5. How do I store cinnamon raisin bread?
Store it in an airtight container at room temperature for up to 3 days, or refrigerate it for up to a week. You can also freeze it for longer storage—just wrap it tightly in plastic and foil.
6. Why is my bread too dense or heavy?
This could be due to under-kneading, not letting the dough rise enough, or using too much flour. Make sure your yeast is active and follow rise times closely.
7. Can I add nuts to the recipe?
Yes! Walnuts or pecans make a great addition. Fold them in along with the raisins for extra texture and flavor.
8. Is there a dairy-free version of this recipe?
Yes, you can substitute plant-based milk and dairy-free butter without affecting the structure of the bread.
9. How long should I let the bread cool before slicing?
Let it cool for at least 30 minutes after baking. Slicing too early can make it gummy and flatten the texture.
10. Can I make this recipe in a bread machine?
Yes, many bread machines have a “sweet bread” setting perfect for cinnamon raisin bread. Just add the raisins after the first knead cycle to prevent them from breaking apart.
Conclusion
Making cinnamon raisin bread at home might take a bit of time, but the payoff is absolutely worth it. You’re rewarded with a soft, flavorful loaf that fills your home with the irresistible scent of cinnamon and warmth. Whether you’re a beginner baker or a seasoned pro, this recipe is a must-try. It’s simple, satisfying, and guaranteed to impress your taste buds and anyone lucky enough to share a slice with you.