Cinnamon Ornaments Recipe: Few holiday crafts are as charming, affordable, and fragrant as homemade cinnamon ornaments. These simple decorations fill your space with a warm spicy aroma and add a rustic, handmade touch to your tree, gift tags, garlands, or festive table décor. The best part is that they require only a few pantry staples and no complicated technique.
In this guide, we will walk through everything you need to know about making cinnamon ornaments, from the ingredients and tools to shaping, drying, decorating, and storing them properly. Whether you are crafting with children, preparing holiday gifts, or creating natural seasonal décor, this recipe is easy to follow and delivers beautiful results.
Why Make Cinnamon Ornaments?
Cinnamon ornaments are popular because they are:
- Easy to make
- Budget-friendly
- Naturally scented
- Perfect for holiday decorating
- Ideal for gifting or family crafts
They are not meant to be eaten, but they are wonderful for creating that cozy holiday atmosphere many people love.
Ingredients You’ll Need
Here are the basic ingredients for classic cinnamon ornaments:
- 1 cup ground cinnamon
- 3/4 cup applesauce
- 2 tablespoons white glue (optional, but helps make the ornaments sturdier)
Optional Additions
You can also add:
- A little extra cinnamon if the dough feels sticky
- A small amount of nutmeg or cloves for a richer scent
- Glitter, ribbon, paint, or icing for decoration after drying
Tools You May Need
To make the process easier, gather these tools:
- Mixing bowl
- Spoon or spatula
- Rolling pin
- Parchment paper
- Cookie cutters
- Straw or skewer for making holes
- Baking sheet or tray
- Cooling rack
- Ribbon or twine for hanging
How Cinnamon Ornament Dough Should Look
The perfect dough should be:
- Soft but not wet
- Firm enough to hold shape
- Easy to roll without sticking too much
- Smooth with very little cracking
If the dough feels too wet, add more cinnamon a little at a time. If it feels too dry and crumbly, add a tiny spoonful of applesauce until it comes together.
Step-by-Step Guide for Cinnamon Ornaments
Step 1: Mix the Cinnamon and Applesauce
In a medium bowl, combine the ground cinnamon and applesauce. Stir until the ingredients begin to form a thick paste. Add the white glue if you are using it. The glue is optional, but it can help the finished ornaments stay firm and last longer.
Mix thoroughly until no dry pockets remain.
Step 2: Knead the Dough
Use your hands to knead the mixture gently in the bowl or on a clean surface. Work it until it forms a cohesive dough. It should feel similar to soft modeling dough.
If it sticks heavily to your fingers, add a little more cinnamon. If it falls apart, add a touch more applesauce.
Step 3: Roll Out the Dough
Place the dough between two sheets of parchment paper or roll it on a lightly cinnamon-dusted surface. Roll it to about 1/4 inch thickness. This thickness works well because it helps the ornaments dry evenly without becoming too fragile.
Try to keep the thickness uniform so all ornaments dry at the same rate.
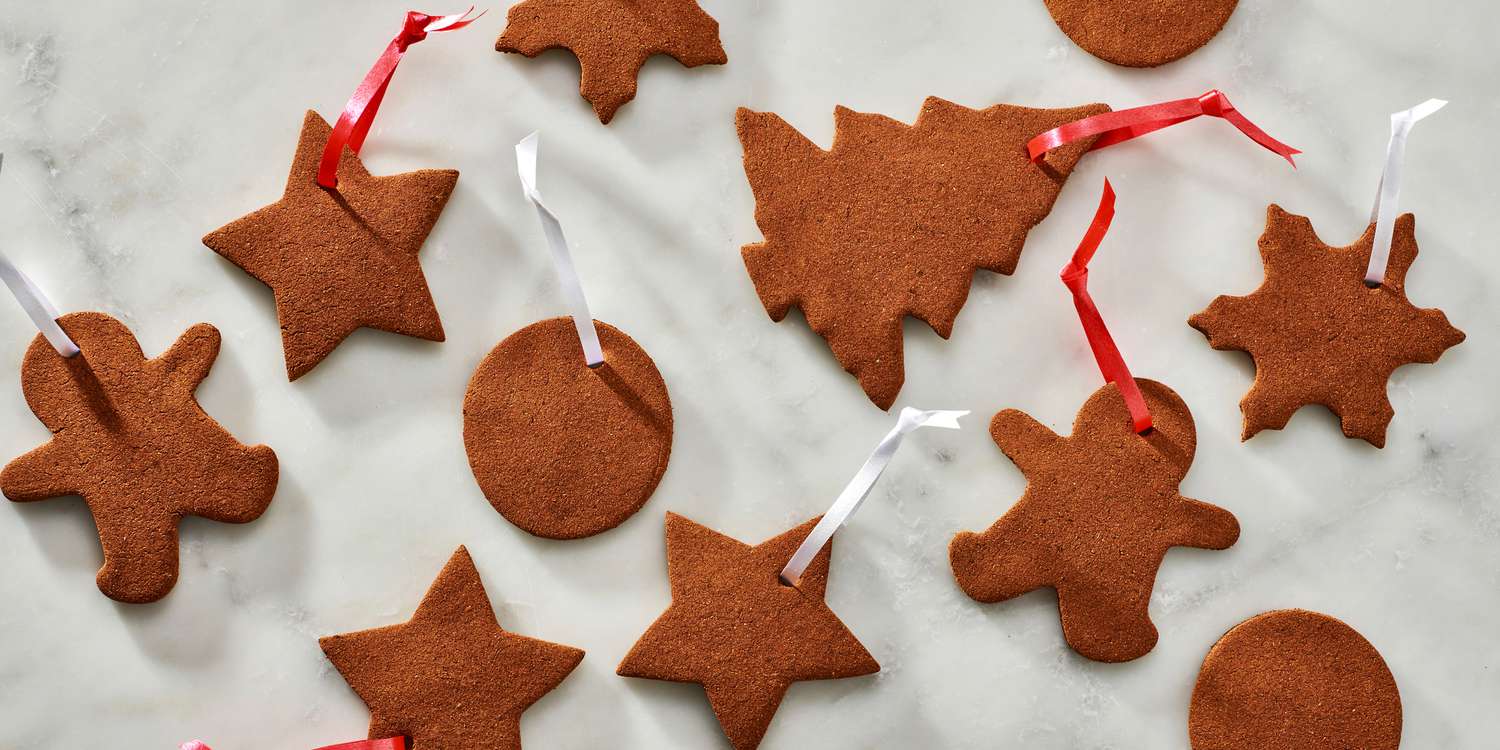
Step 4: Cut Out Shapes
Use your favorite cookie cutters to cut the dough into festive shapes such as:
- Stars
- Hearts
- Trees
- Snowflakes
- Gingerbread people
- Bells
Lift away the extra dough carefully and re-roll scraps as needed.
Step 5: Make Hanging Holes
Before drying, use a straw, skewer, or toothpick to make a hole near the top of each ornament. Make sure the hole is large enough for ribbon or twine to pass through later.
Do not place the hole too close to the edge, or the ornament may crack once dry.
Step 6: Dry the Ornaments
Place the shaped ornaments on a tray or baking sheet lined with parchment paper. Then dry them using one of these methods:
Air-Dry Method
Leave them at room temperature for 24 to 48 hours, flipping them once halfway through if needed.
Oven Method
Bake them at a very low temperature, around 200°F (93°C), for 1 to 2 hours, depending on thickness. Turn them gently during drying if necessary.
The ornaments should feel firm and dry when done.
Step 7: Cool Completely
If you used the oven, allow the ornaments to cool fully before decorating. Warm ornaments are more fragile and may crack if handled too soon.
Step 8: Decorate and Hang
Once dry, decorate them however you like. You can keep them simple for a natural rustic look or embellish them for a more festive finish.
Popular decoration ideas include:
- Threading ribbon or twine through the holes
- Adding white puffy paint like faux icing
- Brushing edges with glitter
- Personalizing with names or dates
- Painting details with acrylic paint
Then hang them on a Christmas tree, attach them to gifts, or display them around the home.
Tips for the Best Cinnamon Ornaments
Use Fresh Cinnamon
Fresh, fragrant cinnamon gives the ornaments their best scent and deepest color.
Keep the Dough Even
Uneven thickness can lead to ornaments that dry inconsistently or crack.
Do Not Rush the Drying
If ornaments are not fully dry, they may bend, soften, or grow mold during storage.
Handle Carefully
Even sturdy cinnamon ornaments can be somewhat delicate, especially thinner designs.
Store Properly
Keep them in a cool, dry place when not in use.
Common Mistakes to Avoid
Adding Too Much Applesauce
Too much moisture makes the dough sticky and difficult to shape.
Rolling the Dough Too Thin
Thin ornaments may crack or break easily.
Skipping the Hanging Hole
It is much harder to make a neat hole after the ornaments have dried.
Under-Drying
This is one of the biggest issues. The ornaments must be thoroughly dry before decorating or storing.
Creative Variations
You can personalize your cinnamon ornaments in several ways:
Rustic Farmhouse Style
Keep shapes simple and tie them with jute twine.
Elegant Holiday Style
Add gold paint, metallic ribbon, or pearl accents.
Kid-Friendly Craft Style
Let children decorate with stickers, glitter glue, or colorful paint pens.
Gift Tag Style
Write names on each ornament and attach them to wrapped presents.
How to Store Cinnamon Ornaments
To help them last, store the finished ornaments in an airtight container or a sealed box lined with tissue paper. Keep them in a dry location away from humidity. When stored properly, they can last through multiple holiday seasons, though the scent may fade over time.
You can refresh their fragrance slightly by placing them near a cinnamon stick or adding a tiny drop of cinnamon-scented oil nearby, but not directly on the ornament unless tested carefully.
Are Cinnamon Ornaments Edible?
No, cinnamon ornaments are not meant to be eaten. Even though they are made from simple ingredients like cinnamon and applesauce, they are intended only for decoration. If glue is added, they are definitely not food-safe.
Always keep them out of reach of pets or very young children who may mistake them for cookies.
Serving and Decorating Ideas
Although these ornaments are not food, they can be used beautifully in seasonal displays. Try them as:
- Christmas tree ornaments
- Gift toppers
- Stocking embellishments
- Holiday garland accents
- Table setting décor
- Scented keepsakes for friends and family
They also make thoughtful handmade gifts when bundled in sets.
FAQs about Cinnamon Ornaments Recipe
1. What are cinnamon ornaments made of?
Cinnamon ornaments are usually made with ground cinnamon and applesauce, and sometimes glue is added to help them hold their shape. The dough is simple, fragrant, and easy to work with.
2. Do cinnamon ornaments smell good?
Yes, they have a warm, spicy scent that many people love, especially during the holidays. The smell can last for quite a while if they are stored properly.
3. Are cinnamon ornaments edible?
No. Even though they are made with kitchen ingredients, they are meant for crafting and decorating, not for eating.
4. How do I keep them from cracking?
Roll the dough evenly and avoid making the ornaments too thin. Letting them dry slowly and carefully can also help reduce cracking.
5. How long do cinnamon ornaments take to dry?
They can dry in the oven on low heat or air-dry over a day or two, depending on thickness. Thicker ornaments take longer to fully harden.
6. Can I use cookie cutters?
Yes. Cookie cutters are perfect for shaping cinnamon ornaments into stars, hearts, trees, and other fun designs.
7. How do I hang them?
Make a small hole near the top with a straw or skewer before drying. After they harden, thread ribbon or string through the hole.
8. How should I store cinnamon ornaments?
Store them in a cool, dry place. Keeping them away from moisture helps them last longer and keeps their shape intact.
Conclusion
This cinnamon ornaments recipe is one of the easiest and most rewarding seasonal crafts you can make at home. With only a few ingredients and simple steps, you can create beautiful, fragrant decorations that look lovely on trees, gifts, and holiday displays.
Whether you prefer a rustic handmade finish or a more polished festive design, cinnamon ornaments are a timeless project that brings warmth and creativity to the season. Make a batch for your home, gift a few to loved ones, and enjoy the cozy scent of cinnamon while you craft.