Cinnamon Buns Recipe: Soft, fluffy, gooey, and dripping with sweet cinnamon sugar and cream cheese icing—what’s not to love? Cinnamon buns are more than just a breakfast treat—they’re a full-blown comfort food experience. Their rich aroma alone can make any morning feel special. But here’s the thing: while they seem fancy, homemade cinnamon buns are surprisingly easy to make if you follow the right steps. That’s exactly what you’ll get here—a foolproof, step-by-step guide that takes you from raw ingredients to melt-in-your-mouth perfection.
Whether you’re a weekend baker or a complete kitchen novice, this recipe is crafted for ease and maximum flavor. You’ll discover tips to keep your buns fluffy, your filling gooey, and your icing decadently smooth.
So, grab your apron and let’s dive into the sticky, sugary world of cinnamon bun magic.
Ingredients You’ll Need
Before we jump into the baking process, let’s gather everything you’ll need. We’re breaking this down into three parts—dough, filling, and icing.
Ingredients for the Dough
To make that signature fluffy texture, here’s what you’ll need:
- 1 cup warm milk (about 110°F)
- 2 ¼ teaspoons active dry yeast (1 packet)
- ½ cup granulated sugar
- 2 large eggs, room temperature
- ⅓ cup unsalted butter, melted
- 1 teaspoon salt
- 4 to 4 ½ cups all-purpose flour (start with 4, add more as needed)
Why these ingredients matter:
Warm milk activates the yeast, giving your buns the rise they need. Eggs and butter enrich the dough, creating that soft, tender crumb. Sugar feeds the yeast and adds sweetness, while salt balances all the flavors.
Ingredients for the Cinnamon Filling
This is where the magic happens:
- ⅔ cup brown sugar, packed
- 2 tablespoons ground cinnamon
- ¼ cup unsalted butter, softened
Pro tip: Use dark brown sugar for a deeper molasses flavor. Mix the filling into a paste for an even spread—no dry pockets here.
Ingredients for the Cream Cheese Icing
No cinnamon bun is complete without that luxurious topping:
- 4 oz cream cheese, softened
- ¼ cup unsalted butter, softened
- 1 to 1½ cups powdered sugar
- ½ teaspoon vanilla extract
- 1–2 tablespoons milk (to reach desired consistency)
Optional twist: Add a pinch of salt or lemon zest for a zippy flavor punch.
With your ingredients prepped, you’re already halfway to bun heaven. Let’s move on to the tools you’ll need.
Essential Tools & Equipment
Kitchen Tools Checklist
- Large mixing bowl (or stand mixer with dough hook)
- Measuring cups & spoons
- Rolling pin
- Sharp knife or dental floss (for cutting buns cleanly)
- 9×13 inch baking dish or cast iron skillet
- Clean towel or plastic wrap (for proofing)
- Small saucepan (if you want to warm your milk)
Having everything laid out beforehand can streamline the entire process and make cleanup easier.
Why the Right Tools Matter
A stand mixer can save you effort, but even hand-kneading works just fine with this dough. A sharp knife or floss ensures clean swirls in your rolls. And a heavy baking dish or skillet helps bake them evenly without burnt bottoms.
Prepping for Success
Tips Before You Start
Here are a few golden rules before you even mix your first ingredient:
- Read the entire recipe once—this avoids surprises.
- Bring ingredients to room temperature for better mixing.
- Grease your bowl and pan to prevent sticking.
- Don’t rush the rise—good things take time.
Taking just 10 minutes to prep everything can mean the difference between good and amazing results.
Room Temperature Ingredients – Why It’s Key
Cold eggs and butter can shock the dough and slow yeast activity. Warm, room-temp ingredients blend better, yield fluffier buns, and help everything rise smoothly.
If you forgot to take out your eggs or butter early, don’t panic—just soak the eggs in warm water for 10 minutes and gently microwave the butter in 5-second bursts.
Step-by-Step Guide to Making Cinnamon Buns
Let’s roll up those sleeves and start making the dough from scratch.
Step 1 – Making the Dough
Start by warming your milk to around 110°F—warm to the touch, but not hot. Pour it into a large mixing bowl and sprinkle the yeast on top. Let it sit for 5–10 minutes until it foams. That’s how you know your yeast is alive and kicking.
Next, whisk in the sugar, eggs, and melted butter. Slowly stir in 4 cups of flour and salt until a sticky dough forms. If it’s too sticky, add more flour ¼ cup at a time.
Now it’s time to knead. If using a stand mixer, knead for 5–7 minutes on medium speed. By hand, knead for about 10 minutes on a floured surface until the dough is smooth and elastic.
Place the dough in a greased bowl, cover it with a towel, and let it rise in a warm place for about 1 to 1.5 hours—or until doubled in size.
Pro tip: If your kitchen is cold, preheat your oven to the lowest setting for 3 minutes, turn it off, then let your dough rise inside.
Step 2 – Letting the Dough Rise
Once your dough is kneaded and in the bowl, it’s time for it to do its thing—rise and double in size. This stage is crucial. It’s when the yeast creates tiny gas bubbles, which get trapped in the gluten network, making the dough fluffy and airy.
Place the bowl in a warm, draft-free area. Cover it with a clean kitchen towel or plastic wrap. If your kitchen is on the cooler side, use the “oven trick” mentioned earlier—turn your oven on the lowest setting for a few minutes, then switch it off and let the dough rise inside.
Let it rest for about 60 to 90 minutes or until it has doubled in volume. You’ll know it’s ready if you poke the dough and the indentation stays—it shouldn’t bounce back immediately.
While the dough is rising, you can prep your cinnamon filling.
Step 3 – Preparing the Cinnamon Filling
This step is simple but packs a punch of flavor. In a medium bowl, combine:
- ⅔ cup brown sugar
- 2 tablespoons ground cinnamon
- ¼ cup unsalted butter (softened to room temp)
Mix it until it forms a thick, grainy paste. The softened butter binds everything together, making it easier to spread evenly over the dough. If the butter is too cold, it won’t mix well. If it’s too melted, the filling may ooze out during baking.
Flavor boost: You can add a pinch of nutmeg or a splash of vanilla extract for a deeper flavor.
Set this mixture aside—you’ll need it when you roll out your dough.
Step 4 – Rolling Out and Filling the Dough
Once the dough has risen, punch it down gently to release the air. Lightly flour your work surface and roll the dough into a large rectangle—about 16×12 inches in size and roughly ¼ inch thick.
Spread the cinnamon filling evenly across the surface, leaving a ½ inch border along the edges. Don’t skimp—this is where all the flavor lives.
Rolling it up: Starting from the long edge, roll the dough tightly into a log. Take your time here; the tighter the roll, the better the swirl.
Use unflavored dental floss or a very sharp knife to cut the log into 12 even slices. Floss works like magic—just slide it under the dough, cross the ends over the top, and pull. You’ll get clean cuts without smushing the rolls.
Step 5 – Cutting and Arranging the Buns
Place each cut bun into a greased 9×13 inch baking dish or cast iron skillet. Leave about ½ inch between each bun to allow for expansion during the second rise.
Why spacing matters: If they’re too close, they’ll bake into one giant mass. If too far apart, they won’t support each other’s rise and might dry out.
Once arranged, cover the pan loosely with plastic wrap or a towel. Time for rise #2!
Step 6 – Second Rise (Proofing)
This final rise is where your cinnamon buns puff up beautifully before heading into the oven. Let the arranged rolls rest in a warm, draft-free area for 30–45 minutes. They should double in size and look soft and pillowy.
Do not skip this step. The second rise makes your buns light, tender, and bakery-worthy.
While the buns are rising, preheat your oven to 350°F (175°C). Make sure it’s fully preheated before you bake.
Step 7 – Baking to Golden Perfection
Once risen, place the cinnamon buns in the center of your preheated oven and bake for 20–25 minutes, or until golden brown and the centers are cooked through.
Signs they’re ready:
- Tops are golden brown
- Filling is bubbling around the edges
- The buns sound hollow when tapped
If the tops are browning too fast, loosely cover with foil during the last 5 minutes.
Let them cool for 5–10 minutes before icing. They should still be warm, but not hot enough to melt the icing into a puddle.
Step 8 – Preparing the Cream Cheese Icing
While the buns bake or cool, whip up the cream cheese icing. In a medium bowl, beat together:
- 4 oz cream cheese (softened)
- ¼ cup butter (softened)
- 1–1½ cups powdered sugar
- ½ tsp vanilla extract
- 1–2 tbsp milk
Use a hand mixer or whisk until smooth and fluffy. Adjust with milk to get the consistency you want—thick and spreadable or thin and pourable.
Want a bakery-style sheen? Add a touch of corn syrup to the mix.
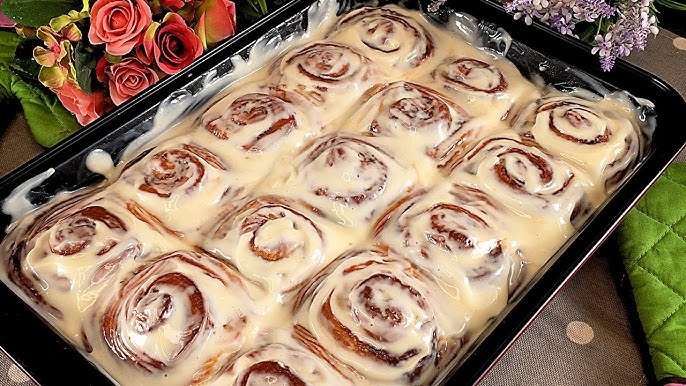
Step 9 – Icing the Buns While Warm
As soon as your buns have cooled slightly, spread the cream cheese icing generously over the tops. The warmth will help it melt just enough to seep into the swirls, making every bite a gooey delight.
Don’t hold back—this is where that irresistible finish happens. The creamy, tangy sweetness from the icing perfectly balances the rich, buttery cinnamon filling.
Now step back and admire your masterpiece. You’ve just made bakery-quality cinnamon buns from scratch.
Pro Tips for the Perfect Cinnamon Buns
Avoiding Common Mistakes
Even though cinnamon buns are fairly simple, a few key mistakes can ruin the magic. Here’s how to dodge them like a pro:
- Don’t rush the rise. Skipping or shortening either rise leads to dense buns. Give the yeast time to work—trust the process.
- Watch your flour. Adding too much makes the dough tough and dry. Start with the minimum and add only if necessary.
- Keep ingredients room temperature. Cold eggs or milk slow down yeast activity, making it harder for the dough to rise properly.
- Use fresh yeast. Old yeast won’t rise as effectively. Always check the expiration date.
- Avoid overbaking. Pull them out once they’re golden and puffed up. Overbaking dries them out, and no one wants a crumbly cinnamon bun.
Bonus tip: Use floss to cut rolls instead of a knife. It keeps the swirls clean and intact, preventing the dough from squishing.
Flavor Variations to Try
While classic cinnamon buns are always a win, sometimes it’s fun to experiment with flavors. Here are a few delicious twists to try:
- Nutty Delight: Add chopped pecans or walnuts into the filling for crunch and nuttiness.
- Apple Cinnamon Buns: Sprinkle small diced apples (tossed in cinnamon and sugar) before rolling the dough.
- Pumpkin Spice Rolls: Add pumpkin puree and pumpkin pie spice to the filling for a fall-themed twist.
- Sticky Buns: Line the pan with a caramel and nut mixture before adding the rolls—flip them upside down after baking for a gooey surprise.
- Chocolate Cinnamon Rolls: Add mini chocolate chips to the filling, or mix cocoa powder with the cinnamon for a mocha flavor.
You can even go savory—think garlic butter and cheese instead of cinnamon sugar. The dough base is versatile, and the sky’s the limit!
Serving and Storing Your Cinnamon Buns
How to Serve for Maximum Deliciousness
Cinnamon buns are best served warm and fresh out of the oven. That’s when they’re at their gooey, sticky, flavorful peak. Pair them with:
- A hot cup of coffee
- Chai or herbal tea
- Cold milk or a milk alternative
For brunch spreads, serve them alongside scrambled eggs, fresh fruit, or yogurt parfaits to balance the sweetness.
Want to take things up a notch? Drizzle extra icing or top with a dusting of powdered sugar just before serving.
If you’re entertaining, try warming them just before your guests arrive—the aroma alone is enough to make people swoon.
How to Store & Reheat Properly
Cinnamon buns store surprisingly well if done right. Here’s how:
Storing:
- At room temp: Keep them in an airtight container for up to 2 days.
- In the fridge: Store for up to 5 days, but note they may dry out slightly.
Freezing:
- Freeze unbaked rolls after the second rise. Place them in the baking dish, cover tightly with plastic wrap and foil, and freeze. When ready to bake, thaw overnight in the fridge, let them come to room temp and rise again, then bake as normal.
- Freeze baked buns (with or without icing) in a zip-top bag. Reheat before serving.
Reheating:
- Microwave for 20–30 seconds to bring back the soft texture.
- Oven: Cover with foil and warm at 300°F for 10–15 minutes.
- Steam method: Place over boiling water (covered) for ultra-soft results.
Pro tip: Add a small cup of water to the microwave while reheating to prevent them from drying out.
FAQs about Cinnamon Buns Recipe
1. Can I make cinnamon buns ahead of time?
Absolutely. You can prepare the dough and shape the rolls, then cover and refrigerate them overnight after the second rise. Let them come to room temperature for about 30–45 minutes before baking the next morning.
2. Can I freeze cinnamon buns?
Yes! Freeze them unbaked (after shaping) or fully baked. To freeze unbaked, assemble the rolls, then cover tightly and freeze. To bake, thaw overnight and let rise again before baking. For baked buns, just reheat in the oven or microwave before serving.
3. How do I make them extra fluffy?
Use room-temperature ingredients, don’t over-flour the dough, and allow both rises to complete fully. Kneading the dough well also helps create that elastic structure needed for fluffiness.
4. Can I use store-bought dough?
You can, especially if you’re short on time. Pre-made dough (like from the refrigerated section) will work, but you may lose some of the richness and flavor of homemade buns.
5. What’s the best flour to use?
All-purpose flour is ideal for this recipe. Bread flour also works and may give a chewier texture. Avoid cake flour—it’s too soft and lacks the protein needed for a strong rise.
Conclusion
Making cinnamon buns from scratch might seem like a weekend project, but it’s absolutely worth every step. From kneading the soft, pillowy dough to watching them puff up in the oven, the entire process is as satisfying as the final bite.
With a rich cinnamon filling, a buttery dough, and a smooth cream cheese icing that drips into every swirl, this recipe creates buns that are fluffy, gooey, and indulgent. Whether you’re baking them for a cozy breakfast, a brunch get-together, or just to treat yourself—you’re guaranteed bakery-quality results right in your own kitchen.
Remember: the secret lies in not rushing, using quality ingredients, and following each step with care. Once you master this recipe, you’ll never want store-bought buns again.


