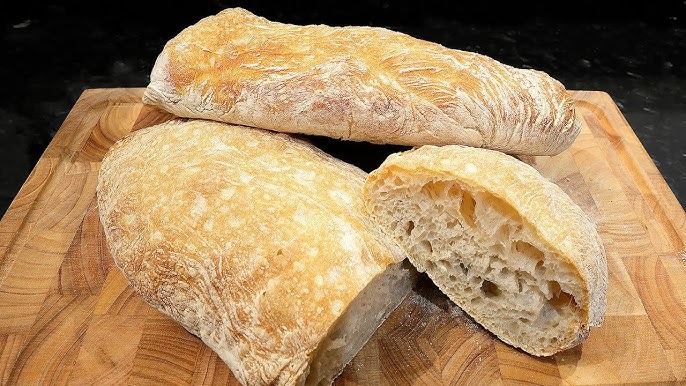
Ciabatta Recipe: Ciabatta is a rustic, Italian white bread known for its light, airy texture and crispy crust. The name “ciabatta” actually translates to “slipper” in Italian, which perfectly describes the shape of this delicious loaf. Unlike your typical sandwich bread, ciabatta boasts an open crumb with lots of holes, making it perfect for soaking up sauces, dipping in olive oil, or crafting gourmet sandwiches.
What makes ciabatta special is its high-hydration dough, meaning there’s a lot of water in the mix. This results in that signature soft and chewy interior. It’s a bit more involved than baking a basic loaf, but once you master it, you’ll be hooked on the process—and the flavor.
History and Origin of Ciabatta
Ciabatta might feel like an old-school classic, but it’s actually a relatively modern bread. Born in 1982 in Italy, the recipe was developed by a baker named Arnaldo Cavallari. He wanted to create an Italian alternative to the French baguette—something just as crusty and light but with more chew. Thus, ciabatta was born in the Veneto region, and it quickly became a staple across Italy and eventually, the world.
Today, you’ll find ciabatta loaves in artisan bakeries and sandwich shops everywhere. The flour-dusted top, irregular holes, and slightly tangy flavor have made it a favorite for paninis and gourmet sandwiches alike.
Ingredients Needed for Ciabatta
Basic Ingredients
To make a traditional ciabatta, you’ll only need a handful of ingredients—no fancy stuff required. Here’s the core list:
- 500g (about 4 cups) bread flour – Bread flour gives you that chewy texture and structure.
- 475ml (2 cups) water – Room temperature; hydration is key.
- 10g (2 tsp) salt – Enhances flavor and controls fermentation.
- 2g (½ tsp) instant yeast – Just a little goes a long way due to the long fermentation.
That’s it—four ingredients, yet such a beautifully complex bread. Don’t let the simplicity fool you; it’s the technique that makes the difference.
Ingredient Notes and Substitutions
- Flour: If you don’t have bread flour, you can use all-purpose flour, but expect a slightly less chewy texture. You can also experiment with a mix of all-purpose and whole wheat flour for more flavor.
- Water: Filtered water is ideal if your tap water has a strong taste or is heavily chlorinated.
- Yeast: Active dry yeast works too, but you’ll need to dissolve it in water first and give it a few extra minutes to activate.
Some bakers also add a tiny bit of olive oil to enhance the softness and flavor, though traditional ciabatta is usually oil-free.
Tools and Equipment
Kitchen Tools for Best Results
Making ciabatta requires some patience and gentle handling, but you don’t need fancy bakery tools. Here’s what you’ll need:
- Mixing bowl – Preferably large enough for dough to expand.
- Bench scraper – For folding and transferring the sticky dough.
- Kitchen scale – Essential for accurate measurements.
- Parchment paper or silicone baking mat – Helps prevent sticking.
- Baking sheet or stone – A hot surface is key to that crispy crust.
A stand mixer isn’t necessary, but it helps when working with high-hydration doughs like this one.
Optional Tools to Enhance the Experience
- Proofing box – To control dough temperature during fermentation.
- Dough scraper – Handy for folding and lifting.
- Spray bottle with water – To add steam during baking for a better crust.
- Digital thermometer – To ensure your bread is baked through (ideal internal temp is about 205°F / 96°C).
Using these tools can help elevate your results, especially if you’re baking ciabatta regularly.
Preparing the Dough
Mixing the Ingredients
Start by mixing your dry ingredients—flour, salt, and yeast—in a large bowl. Then slowly add the water while mixing. The dough will be sticky and shaggy at first. That’s normal. You’re not aiming for a smooth dough just yet.
Once combined, cover the bowl and let it rest for 30 minutes. This process is called “autolyse,” and it helps hydrate the flour and kickstart gluten development.
After resting, use a wet hand or a spoon to stretch and fold the dough from the sides into the center. Do this a few times, rotating the bowl as you go. It’s a gentle method that builds strength without kneading.
First Fermentation (Bulk Fermentation)
Cover the dough and let it rise for about 2 to 3 hours at room temperature. During this time, perform stretch-and-folds every 30 minutes (3–4 times total). Simply pull one side of the dough, stretch it up, and fold it over. Rotate and repeat.
This technique develops the dough’s structure while maintaining that open crumb we’re after. By the end of bulk fermentation, the dough should be bubbly, airy, and jiggle slightly when you shake the bowl.
Shaping and Proofing the Dough
Folding and Shaping Technique
Turn the dough out onto a floured surface gently. You don’t want to deflate all that lovely air you’ve developed. Dust the top lightly with flour and divide it into two rectangular pieces using your bench scraper.
Shape each piece by folding the edges slightly inward, like a letter fold. Flip it seam-side down and let it rest again. Don’t overwork it—the goal is to preserve the air pockets.
Place the shaped loaves onto a well-floured parchment sheet or couche cloth to prevent sticking.
Second Rise – Proofing
Let the loaves rest for another 45 to 60 minutes at room temperature. They should puff up a bit but not double in size. Preheat your oven during this stage to ensure it’s blazing hot when you’re ready to bake (about 475°F or 245°C).
If using a baking stone, place it in the oven during preheating to get it screaming hot.
Baking the Ciabatta Bread
Oven Preparation
Before baking, it’s crucial to properly preheat your oven to at least 475°F (245°C). A hot oven helps the dough spring up quickly, which gives you that airy, open crumb. If you’re using a baking stone or steel, place it in the oven as it heats up. Let it preheat for at least 45 minutes to ensure it’s piping hot.
To simulate a steam oven (which helps get that crispy crust), place a metal baking pan on the lower rack during preheating. When you put the bread in, pour a cup of hot water into the pan to create steam—just be careful to avoid burns.
Baking Process and Tips
Once your oven is hot and ready, gently transfer your dough (still on parchment) to the baking stone or a hot baking sheet. Try not to deflate it—this dough is delicate and airy. Bake the loaves for 20–25 minutes, rotating halfway through for even browning.
You’re looking for a deep golden crust, slightly blistered, and hollow-sounding when tapped on the bottom. Internal temperature should be around 205°F (96°C) when done.
A few pro tips:
- Don’t open the oven for the first 15 minutes—steam is essential during this phase.
- If you like an extra crispy crust, turn off the oven at the end of baking, crack the door open, and let the bread sit inside for 10 minutes.
- Let the loaves cool on a wire rack before slicing. Slicing too early can ruin the texture inside.
Cooling and Storing
Proper Cooling
Once out of the oven, place your ciabatta loaves on a wire rack. This ensures air circulates around the bread, preventing soggy bottoms. It might be tempting to slice into it right away, especially with that amazing aroma, but don’t! Give it at least 30 to 45 minutes to cool completely.
Cooling allows the interior crumb to finish setting. If you slice too early, it’ll feel gummy inside and won’t show the beautiful holes we worked so hard for.
Best Ways to Store
Ciabatta is best enjoyed the same day it’s baked. But if you have leftovers, don’t worry—there are a few ways to keep it fresh:
- Room Temperature: Wrap the loaf in a clean kitchen towel or place it in a paper bag. Avoid plastic—it traps moisture and ruins the crust.
- Freezing: Slice the loaf and freeze individual pieces. Wrap in foil or a freezer bag. Reheat straight from frozen in the oven or toaster.
- Reviving Stale Bread: If your ciabatta gets a bit hard the next day, sprinkle it with water and warm it in the oven for 5–10 minutes. The crust will crisp up, and the interior softens beautifully.
Serving Suggestions
Ideal Pairings
Ciabatta is one of the most versatile breads out there. It’s perfect for just about any meal. Here are a few ways to enjoy it:
- With Olive Oil & Balsamic: Tear off chunks and dip into a bowl of extra virgin olive oil and balsamic vinegar. Add a pinch of sea salt and cracked pepper for extra flavor.
- Panini Sandwiches: Thanks to its firm crust and soft interior, ciabatta makes the ultimate grilled sandwich. Try fillings like mozzarella, tomato, and basil or grilled chicken with pesto.
- Soups and Stews: Thick slices of ciabatta are perfect for dipping into hearty soups like tomato basil or beef stew.
- Avocado Toast: Toasted ciabatta with mashed avocado, chili flakes, and a poached egg? Yes, please.
How to Use Ciabatta in Meals
Don’t stop at just serving it on the side. Ciabatta can be the star of your meal:
- Breakfast: Toast it and top with ricotta, honey, and berries.
- Lunch: Slice and stuff it with cold cuts, cheese, and greens.
- Dinner: Serve alongside pasta, roast chicken, or salad.
- Appetizers: Cut into cubes, toast them, and make croutons for salad or soup.
It’s one of those breads that fits every time of day.
Common Mistakes and Troubleshooting
Avoid These Ciabatta Pitfalls
Baking ciabatta can be tricky the first few times. Here are the most common issues and how to avoid them:
- Dense Texture: Usually caused by overmixing, not enough fermentation, or low hydration. Don’t rush the process—time is your best friend.
- Flat Loaf: Overproofing is often the culprit. If your dough rises too much before baking, it collapses. Watch the dough, not the clock.
- Sticky Dough: This dough is supposed to be wet, but if it’s unmanageable, try wetting your hands when folding or add just a dusting of flour—not too much.
- Not Enough Holes: You want big, irregular holes. That requires gentle handling. Don’t knead the dough traditionally, and never punch it down.
How to Fix Common Issues
- If your dough feels too dry, add a little more water next time. Hydration levels are key.
- If your crust is too hard, it might be overbaked or your oven doesn’t have enough steam. Add a pan of water or mist the oven during the first 10 minutes.
- If your bread has no flavor, try a longer fermentation or add a pre-ferment (biga) for more depth.
Experiment and don’t be afraid to make mistakes—that’s how the best bakers learn.
Final Thoughts and Personal Tips
Ciabatta may look intimidating with its sticky dough and artisan shape, but once you get the hang of it, it becomes a deeply satisfying bread to bake. The secret isn’t in fancy ingredients—it’s in patience, gentle handling, and understanding fermentation.
Here are some of my personal tips to help you master the ciabatta game:
- Don’t rush the rise: Let the dough ferment at its own pace. A slower rise (even overnight in the fridge) adds flavor and improves the texture.
- Use a wet hand technique: High-hydration doughs love water. Wetting your hands or your scraper can make shaping much easier.
- Flour wisely: Use just enough to prevent sticking, but not so much that it dries out the dough.
- Track your progress: Each bake is a learning experience. Take notes—how did the dough feel? How was the rise? What would you change?
If you’re baking for the first time, don’t worry about perfection. A slightly misshapen loaf is still delicious. Keep baking, keep adjusting, and soon ciabatta will feel like second nature.
FAQs about Ciabatta Recipe
1. What makes ciabatta different from other breads?
Ciabatta is known for its airy texture, crisp crust, and chewy interior. Unlike traditional loaves, it’s made with a high-hydration dough, which gives it large, irregular holes inside and a rustic appearance.
2. Can I make ciabatta without a stand mixer?
Yes, you can. While a stand mixer makes the process easier, you can also mix and knead the dough by hand. It’s sticky and wet, so patience is key when working manually.
3. How long does ciabatta dough need to rise?
Typically, ciabatta dough requires two rises—each lasting 1 to 2 hours. The long fermentation is essential for developing flavor and texture.
4. Why is my ciabatta dough so sticky?
Ciabatta dough has high water content, which makes it naturally sticky. Avoid adding too much flour. Instead, use a bench scraper or wet your hands to handle it easily.
5. Can I freeze ciabatta bread?
Absolutely! Once it cools completely, wrap it tightly in plastic wrap or foil and freeze. It keeps well for up to 2 months. Reheat in an oven for that fresh-baked feel.
6. What’s the best flour to use for ciabatta?
Bread flour is ideal due to its high protein content, which helps create that chewy, structured crumb ciabatta is famous for.
7. How do I store homemade ciabatta?
Store it at room temperature in a paper bag or bread box for up to 2 days. Avoid plastic bags, as they trap moisture and soften the crust.
8. Can I make whole wheat ciabatta?
Yes, but the texture will be denser. You can substitute part of the bread flour with whole wheat flour to retain some of that airy feel while adding more nutrients.
Conclusion
Ciabatta is more than just a bread—it’s an experience. It’s about patience, technique, and letting time do its magic. From mixing to baking, every step brings you closer to that perfect crusty, holey loaf that’s just begging to be dipped, torn, or toasted.
Whether you’re a beginner baker or a seasoned home chef, learning how to make ciabatta will elevate your bread game. Once you’ve tasted a homemade loaf, there’s no going back to store-bought.
So roll up your sleeves, dust off that flour, and get baking. Your kitchen is about to smell amazing!