Chocolate Smoothie Recipe: Ever crave something chocolaty, creamy, and a little bit indulgent—but without all the guilt? That’s exactly where a chocolate smoothie comes in. It’s rich, silky, sweet, and packed with feel-good ingredients. Whether you’re looking for a quick breakfast that doesn’t taste boring, a midday energy booster, or a healthy-ish dessert, a chocolate smoothie checks all the boxes.
What makes it even better? You can customize it to suit your mood and your dietary needs. Want it high-protein? Add a scoop of protein powder. Want it vegan? Go with plant-based milk and cocoa. Want it sweet but not sugary? Use ripe bananas or dates. It’s the kind of recipe that adapts to you, not the other way around.
And the best part? You don’t need any fancy kitchen tools or gourmet ingredients. Just a blender, a few pantry staples, and five minutes of your day.
So, let’s dive into everything you need to know—ingredients, prep, and a full step-by-step walkthrough to help you make the perfect chocolate smoothie every single time.
Benefits of a Chocolate Smoothie
When people hear “chocolate smoothie,” they sometimes picture something super sweet and indulgent. But here’s the secret—it can be healthy too. And not just “not bad for you”—we’re talking actually good for you.
First, there’s the mood-boosting magic of cocoa. Real, unsweetened cocoa powder is rich in antioxidants and flavonoids, which are known to improve heart health, reduce inflammation, and even boost your mood. That’s why chocolate often feels like comfort food—it literally makes you feel happier.
Second, when you add in bananas or nut butters, you’re getting fiber, potassium, and healthy fats. These help with digestion, energy levels, and keeping you full longer. Add a scoop of protein powder, and you’ve got a perfect post-workout recovery drink or a meal replacement that won’t leave you hungry 30 minutes later.
And let’s not forget how easy it is to sneak in extra goodness—chia seeds, spinach, oats, flax seeds, or even avocado can be blended in without changing the taste much. That’s why this drink is a favorite among fitness lovers and foodies alike.
So yes, a chocolate smoothie tastes like dessert—but when made right, it’s actually a powerhouse of nutrition.
Types of Chocolate You Can Use
Not all chocolate is created equal, and when it comes to smoothies, the kind you use makes a big difference in flavor, sweetness, and health benefits.
- Cocoa Powder (Unsweetened): This is the healthiest and most common choice. It gives you that deep, rich chocolate flavor without added sugars or fats. Look for organic, non-alkalized (also called “natural”) cocoa for maximum nutrients.
- Chocolate Syrup: This adds sweetness and a smoother texture, but it’s often loaded with sugar. If you’re going this route, use it sparingly or opt for sugar-free versions.
- Dark Chocolate Chips or Chunks: Melting these into the smoothie or blending them in for texture can be delicious. The higher the cocoa percentage, the healthier it is—look for 70% or above.
- Cacao Nibs or Powder: More raw and nutrient-dense than regular cocoa powder. They add a slightly bitter, more intense flavor and lots of antioxidants.
- Milk Chocolate: Not the healthiest choice, but okay for an occasional treat. It’s sweeter and creamier but lower in actual cocoa content.
Each type brings something different to the table. Choose based on your taste preferences and nutritional goals.
List of Ingredients You’ll Need
Let’s talk about the stars of the show. Here’s a solid base list for a classic chocolate smoothie recipe. These ingredients are flexible—you can swap, adjust, and add based on what you have at home.
Basic Ingredients:
- 1 ripe banana (for sweetness and creaminess)
- 1 tablespoon unsweetened cocoa powder
- 1 cup milk (dairy, almond, oat, soy—your call)
- 1 tablespoon peanut butter (optional, but delicious)
- ½ cup Greek yogurt or plant-based yogurt (for creaminess and protein)
- 1 teaspoon vanilla extract
- 1 to 2 teaspoons honey or maple syrup (optional)
Optional Add-ins:
- 1 scoop chocolate or vanilla protein powder
- 1 tablespoon chia seeds or flax seeds
- ¼ avocado (makes it extra creamy)
- ½ teaspoon cinnamon
- A pinch of sea salt (enhances the chocolate flavor)
- ½ cup ice cubes or frozen banana slices (for a thicker, colder texture)
Healthy Substitutes:
- Use dates or stevia instead of sugar
- Swap dairy for oat or almond milk for vegan
- Add spinach for nutrients (won’t affect taste)
Feel free to get creative here. Once you know the basics, the possibilities are endless.
Kitchen Tools Required
Before you get blending, make sure you’ve got the right tools to keep things smooth—literally. The beauty of smoothie-making is that it doesn’t require any complicated kitchen gear. But a few essentials can really make a difference in the texture, convenience, and cleanup.
1. High-Speed Blender
This is the star of the show. A powerful blender ensures that all ingredients—from frozen bananas to chia seeds—get fully incorporated. If you use a low-powered blender, you might end up with gritty or chunky bits. Some top choices are:
- NutriBullet or Magic Bullet (great for single servings)
- Vitamix or Blendtec (for serious smoothie lovers)
- Ninja or Hamilton Beach (budget-friendly options)
2. Measuring Cups and Spoons
Precision helps, especially when you’re trying a new recipe or tracking calories. Use:
- 1 cup and ½ cup measures for liquids and yogurt
- Tablespoons and teaspoons for cocoa, nut butter, and sweeteners
3. Spatula or Spoon
Scraping down the sides of the blender or scooping out thick smoothies is way easier with a flexible silicone spatula.
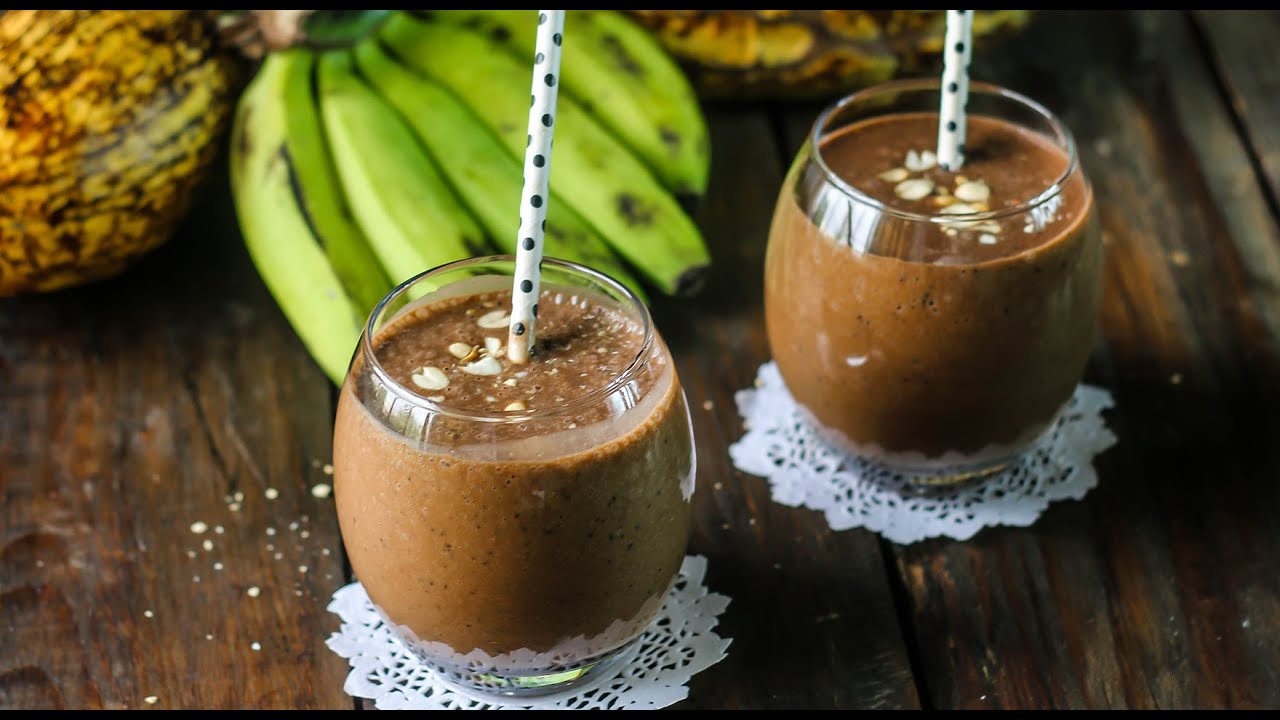
4. Glass or Mason Jar
Presentation matters! Pour your smoothie into a nice glass or jar—it’s more fun to drink that way. Mason jars with lids are perfect for taking your smoothie on the go.
5. Storage Containers (Optional)
If you’re meal prepping or making a double batch, use airtight containers to store leftovers in the fridge or freezer. BPA-free plastic or glass is best.
With these tools, you’ll not only make a delicious smoothie—you’ll actually enjoy the process from start to finish.
Prepping Your Ingredients
Now let’s talk prep. This step is where most people either rush or skip altogether—but trust me, it’s the difference between a “meh” smoothie and a mind-blowingly good one.
1. Use Ripe Bananas
If your banana is green or just turned yellow, it won’t be sweet enough. You want it spotty—those brown dots mean sugar. If you’re in a rush:
- Microwave a banana (peel on, poke a few holes) for 20-30 seconds to soften it.
- Or pop a banana in a paper bag with an apple to ripen it overnight.
2. Freeze Your Fruit
Frozen fruit gives your smoothie that thick, creamy texture without watering it down. If you’re using fresh banana or berries, just slice and freeze them the night before.
- Tip: Store sliced banana in freezer bags with parchment paper between layers to avoid clumping.
3. Measure Everything Ahead
Pre-measuring ingredients cuts down on mess and ensures consistency. If you’re making smoothies daily, prep your ingredients into “smoothie packs” and keep them in the freezer.
4. Prep Your Liquid Base
Pour your milk or liquid base into a measuring cup and let it sit at room temp if you want a smoother blend. Super cold liquids can cause clumping if you’re using protein powders or nut butters.
5. Choose Your Add-ins Wisely
For ingredients like chia seeds or oats, soak them in a bit of liquid for a few minutes before blending to prevent grittiness. If using nut butters, stir well before measuring (especially natural ones with oil separation).
Prepping smart makes your blending smoother—and your smoothie tastier.
Step-by-Step Guide to Make Chocolate Smoothie
Ready to make the best chocolate smoothie ever? Follow these steps in order for a rich, thick, and perfectly balanced treat.
Step 1: Add the Liquid Base First
Start by pouring your milk or liquid of choice into the blender. This could be:
- 1 cup almond milk
- 1 cup oat milk
- 1 cup regular milk (if you’re not dairy-free)
Adding liquid first helps the blender blades move freely and makes everything blend faster.
Step 2: Add the Fruit
Next, toss in your ripe banana and any other fruit you’re using. If you’re using frozen banana slices, now’s the time. You can also add:
- A handful of frozen strawberries or cherries for extra flavor
- ¼ avocado for creaminess
Banana is key here—it adds body, natural sweetness, and that dessert-like texture.
Step 3: Add Your Chocolate Flavor
This is the flavor bomb. Add:
- 1 tablespoon unsweetened cocoa powder (or 2, if you like it rich)
- Or use chocolate protein powder for a two-in-one
- Or a mix of cocoa and dark chocolate chips
Tip: A tiny pinch of salt brings out the chocolate flavor more.
Step 4: Add Boosters and Extras
Now’s the time for your optional healthy upgrades:
- 1 tablespoon peanut or almond butter (for flavor and fats)
- 1 scoop of protein powder
- 1 teaspoon chia or flax seeds
- 1 teaspoon vanilla extract
- A drizzle of maple syrup or honey (if needed)
Don’t overdo it—adding too much can weigh down the smoothie and change the flavor.
Step 5: Add Ice (Optional)
Want a thicker, colder smoothie? Toss in ½ cup of ice or more frozen banana. Just don’t go overboard unless your blender is strong.
Step 6: Blend Until Smooth
Blend for 30–60 seconds, or until it looks creamy and even. Stop halfway to scrape down the sides if needed.
Step 7: Taste and Adjust
Take a quick taste. Too thick? Add a splash of milk. Not sweet enough? Add a little extra honey or a soft Medjool date. Too thin? Toss in a few ice cubes or another frozen banana slice.
Pour it into your favorite glass or jar—and enjoy every chocolaty sip.
Best Chocolate Smoothie Recipes to Try
Once you’ve mastered the basic method, it’s time to have some fun with variations. Chocolate is super versatile and pairs well with so many flavors, so why not explore a few new blends? These are tried-and-true favorites that work whether you’re fueling up post-workout or treating yourself after dinner.
1. Classic Chocolate Banana Smoothie
This one’s the crowd-pleaser. Creamy, sweet, and rich with chocolate flavor, it’s the perfect go-to when you want something fast and delicious.
Ingredients:
- 1 ripe banana (preferably frozen)
- 1 cup milk (any type)
- 1 tablespoon cocoa powder
- ½ cup Greek yogurt
- 1 teaspoon vanilla extract
- 1 teaspoon honey or maple syrup (optional)
Why it works: The banana and yogurt give it the creaminess and body, while the cocoa adds that deep chocolate flavor. It’s simple, clean, and absolutely satisfying.
2. Chocolate Peanut Butter Protein Smoothie
A gym-lover’s dream! This smoothie is filling, energizing, and tastes like a chocolate peanut butter milkshake—but healthier.
Ingredients:
- 1 frozen banana
- 1 cup almond milk
- 1 scoop chocolate protein powder
- 1 tablespoon natural peanut butter
- 1 tablespoon cocoa powder
- A pinch of sea salt
Bonus tip: Add a few ice cubes and blend longer for a frosty, milkshake-like texture.
3. Vegan Chocolate Smoothie
Plant-based and proud. This one swaps out all dairy, but keeps all the flavor and creaminess intact.
Ingredients:
- 1 frozen banana
- 1 cup oat or almond milk
- 1 tablespoon cocoa powder
- 1 tablespoon almond butter
- 1 teaspoon maple syrup
- A handful of spinach (trust me—you won’t taste it)
Why it rocks: The healthy fats from the nut butter plus the fiber from banana and greens make it nutrient-packed and seriously delicious.
Try these combos, tweak them, and make them your own. Once you start experimenting, you’ll never want to stop.
Make It Healthier: Smart Substitutes
Want to enjoy your chocolate smoothie even more often—without feeling like you’re indulging too hard? No problem. With a few small swaps, you can upgrade your smoothie into a superfood-filled, guilt-free powerhouse.
1. Swap Dairy for Plant-Based Options
Milk alternatives like almond, oat, cashew, or soy milk are lower in calories and often easier to digest than dairy. They also add subtle flavor tones—like the creaminess of oat milk or the nuttiness of almond milk.
2. Replace Sugar with Natural Sweeteners
Instead of dumping in refined sugar, try:
- Ripe bananas – natural sweetness + creaminess
- Dates – especially Medjool dates for rich caramel flavor
- Maple syrup or honey – in moderation
- Stevia or monk fruit – zero-calorie alternatives
3. Add Healthy Fats
Healthy fats keep you full longer and help with nutrient absorption. Toss in:
- Avocado
- Chia seeds
- Flax seeds
- Nut butters
4. Boost the Protein Content
Great for muscle recovery, keeping you full, and balancing blood sugar. Add:
- Protein powder (plant-based or whey)
- Greek yogurt
- Silken tofu (great vegan alternative)
5. Include Greens Without Changing the Taste
Sounds weird, but spinach is your smoothie’s secret weapon. It blends in without changing the flavor and gives you a stealthy dose of iron, fiber, and vitamins.
With these simple upgrades, your smoothie becomes more than a treat—it becomes a meal, a fuel source, and your best excuse to drink chocolate for breakfast.
Common Mistakes to Avoid
Even though smoothies seem foolproof, there are a few traps people fall into that can ruin texture, taste, or even nutrition. Don’t worry, though—they’re easy to avoid once you know what to watch for.
1. Overloading the Blender
More isn’t always better. Too many solid ingredients can overwhelm your blender and leave chunks. Stick to a good liquid-to-solid ratio—start with 1 cup liquid to 1.5 cups solid ingredients.
2. Skipping the Frozen Ingredients
Ice is okay, but frozen banana or fruit is better. It creates a thick, milkshake-like texture without watering it down.
3. Using Low-Quality Cocoa
Not all cocoa powders are created equal. Some have fillers or are heavily processed. Look for pure, unsweetened cocoa or cacao for the richest flavor and most antioxidants.
4. Adding Too Many Sweeteners
Even healthy sweeteners can sneak in extra sugar. If you’re already using banana, you might not need honey or syrup. Always taste first and adjust after blending.
5. Blending Too Long
Believe it or not, blending too long can make your smoothie warm, especially with high-speed blenders. That can melt the frozen fruit and mess with the texture. Blend until just smooth—usually 30–60 seconds is perfect.
Avoid these mistakes, and you’ll be making smoothies like a pro in no time.
Tips for the Creamiest Smoothie
Everyone loves a silky, creamy chocolate smoothie—no one wants something watery or icy unless it’s on purpose. Here’s how to nail that perfect texture every single time, no matter what ingredients you’re working with.
1. Use Frozen Bananas or Avocados
Bananas are the OG smoothie thickener. When frozen, they act like ice cream, making your smoothie ultra-creamy without watering it down. Don’t like bananas? Avocados are your next best friend. They blend beautifully and add richness without much flavor interference.
2. Choose the Right Liquid-to-Solid Ratio
Too much liquid makes your smoothie thin. Too little, and you’ll burn out your blender. The golden ratio?
- Start with 1 cup of liquid for every 1 to 1.5 cups of solid ingredients (like fruit, yogurt, ice, etc.)
- Add more liquid gradually if it’s too thick
3. Use Full-Fat Yogurt or Nut Butters
Adding a spoonful of Greek yogurt, peanut butter, or almond butter not only amps up the flavor but gives you that luscious, velvety texture. Coconut cream is also a great option for extra indulgence.
4. Add a Small Handful of Oats
Oats soak up liquid and blend into a smooth, thick base. Use rolled oats or quick oats—avoid steel-cut, which won’t break down easily.
5. Blend in Two Stages
First, blend just the liquid and soft ingredients (like banana, yogurt, cocoa). Then add frozen ingredients or ice and blend again. This creates a smoother base and prevents chunks.
6. Try a Bit of Xanthan Gum (Advanced Trick)
This natural thickener is popular among fitness lovers. You only need ¼ teaspoon or less to dramatically improve the texture without adding calories.
When you follow these tips, you’re not just making a smoothie—you’re making dessert in a cup.
How to Store Your Chocolate Smoothie
Let’s say you made a bit too much (hey, it happens). Or maybe you’re meal-prepping for the week. Good news: smoothies are easy to store, as long as you do it right.
1. In the Fridge (Short-Term Storage)
If you’re planning to drink your smoothie later the same day or the next morning:
- Store in an airtight jar or container to minimize oxidation
- Use glass containers if possible—they don’t absorb smells or flavors
- Shake or stir well before drinking, since some ingredients may settle or separate
Shelf life: Up to 24–36 hours in the fridge.
2. In the Freezer (Long-Term Storage)
Want to make smoothies ahead for the week? Freeze them!
- Use freezer-safe jars or silicone molds
- Leave at least ½ inch of space at the top (liquid expands when frozen)
- You can also pour them into ice cube trays—just blend the cubes later with a little milk
Shelf life: Up to 3 months in the freezer.
3. Quick Tip for Meal Prepping
Instead of freezing a finished smoothie, you can freeze pre-measured smoothie packs. Just toss the fruit, cocoa, yogurt, etc. into a bag and freeze. In the morning, dump it into the blender with your liquid—done in 2 minutes.
Proper storage helps you enjoy chocolate smoothies on demand—without sacrificing flavor or texture.
Serving Ideas and Presentation
Let’s be honest—we eat (or drink) with our eyes first. Presentation can turn a simple chocolate smoothie into a coffee shop-style treat. Here are a few ways to make it look as good as it tastes.
1. Use a Tall, Clear Glass or Mason Jar
Smoothies just look better in a mason jar. The layers, the color, the vibe—it all adds up. For bonus points, chill the glass before pouring for that frosty effect.
2. Add a Topping or Two
Top your smoothie with something crunchy or colorful to create contrast and texture. Try:
- Sliced banana
- Shaved dark chocolate
- A drizzle of peanut butter
- Coconut flakes
- Chia seeds or cacao nibs
- Whipped coconut cream (for a dessert-style finish)
3. Smoothie Bowls
Want to turn your smoothie into a meal? Pour it into a bowl and load it with toppings like granola, fresh fruit, nuts, and seeds. Chocolate smoothie bowls are not only Instagram-worthy—they’re also filling and fun to eat.
4. Grab-and-Go Bottles
Busy mornings? Pour your smoothie into reusable bottles with lids. They’re great for work, the gym, or running errands. Just give it a shake before drinking.
With a little garnish and a good container, your everyday smoothie becomes something you’ll actually look forward to sipping.
Chocolate Smoothie for Different Diets
One of the best parts about chocolate smoothies is how easy they are to adapt to almost any dietary lifestyle. Whether you’re cutting carbs, avoiding dairy, or going full vegan, there’s a version of this recipe for you.
1. Vegan Chocolate Smoothie
- Swap dairy milk for almond, soy, or oat milk
- Use coconut yogurt or skip yogurt entirely
- Sweeten with maple syrup or dates
- Add plant-based protein powder for a protein boost
2. Keto Chocolate Smoothie
- Use unsweetened almond milk or coconut milk
- Skip bananas—use avocado, ice, or full-fat Greek yogurt instead
- Add unsweetened cocoa, stevia or monk fruit, and nut butter
- Toss in a scoop of collagen or keto-friendly protein powder
3. Gluten-Free Chocolate Smoothie
- Most smoothies are naturally gluten-free—just double-check your protein powder, oats (use certified gluten-free), and flavorings
- Avoid any processed chocolate syrups or mix-ins with gluten additives
4. Paleo Chocolate Smoothie
- Use almond milk or coconut milk
- Stick with whole foods—banana, cocoa, nut butter, and dates
- No dairy, grains, or refined sugar
No matter your dietary needs, you don’t have to give up your chocolate fix. With just a few swaps, your smoothie stays delicious and on-plan.
FAQs about Chocolate Smoothie Recipe
1. Can I make a chocolate smoothie without banana?
Yes! Use avocado, Greek yogurt, or frozen cauliflower for creaminess instead. Add a touch of honey or dates for sweetness if needed.
2. What’s the best milk to use?
That depends on your goals. Almond and oat milk are great for light, vegan smoothies. Regular milk adds protein and richness. Coconut milk makes it extra creamy.
3. Is it okay to add coffee to my chocolate smoothie?
Absolutely! A shot of espresso or cold brew pairs beautifully with cocoa. It turns your smoothie into a mocha-style drink with an energy kick.
4. How can I add more protein to my smoothie?
Easy—just add Greek yogurt, protein powder, nut butter, or silken tofu. These won’t compromise the flavor and will help keep you full longer.
5. Can kids drink this smoothie?
Yes! Just skip the protein powder and watch the caffeine (if using coffee). Use banana and natural cocoa for a sweet, healthy treat they’ll love.
Final Thoughts
There you have it—the ultimate, step-by-step guide to making a perfect chocolate smoothie. Whether you’re a total beginner or a seasoned blender wizard, this recipe is flexible enough to suit any taste and lifestyle. You can keep it classic with just banana and cocoa, or go wild with nut butters, superfoods, and protein boosts.
The real secret? It’s all about balance. Once you find your favorite ratio of creamy, sweet, and chocolatey, you’ll never go back to store-bought drinks again.
So grab those ingredients, fire up your blender, and sip your way to chocolate bliss—without the guilt.