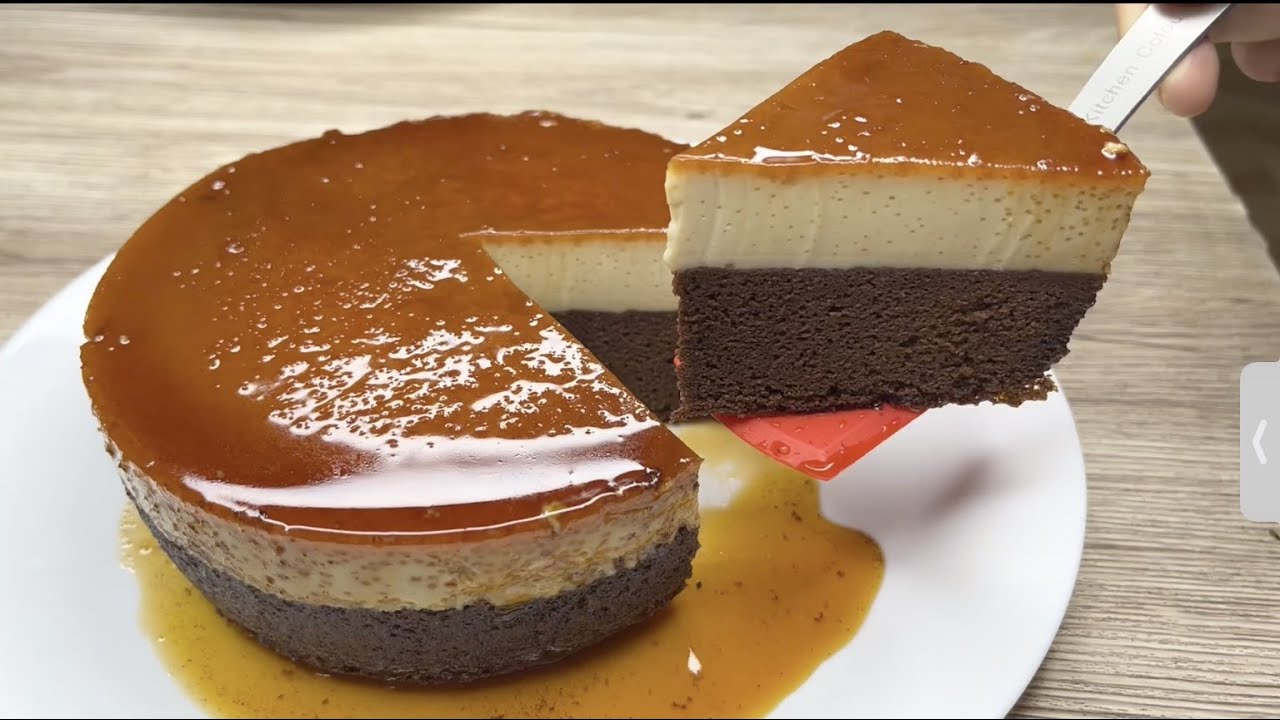
Chocolate Flan Cake Recipe: A Chocolate Flan Cake is one of those desserts that feels like a little kitchen miracle. At first glance, it looks almost too impressive to make at home, because it combines two beloved desserts in one pan: a moist chocolate cake and a silky vanilla flan, all coated with glossy caramel.
The twist is what makes people stop and stare. When the batter goes into the pan, the cake layer and the flan layer seem to be in the “wrong” order. But during baking, they switch places. That is the kind of dessert trick that feels like magic even when you know the science behind it.
What Makes It Different From Regular Cake
A regular chocolate cake gives you one consistent texture from top to bottom, and there is nothing wrong with that. But a Chocolate Flan Cake recipe offers contrast in every bite, and that is where the excitement lives. The lower portion becomes a smooth, creamy custard, while the upper portion bakes into a soft chocolate cake. When you cut into it, the knife glides through two very different layers that somehow belong together like best friends who should have met sooner.
The flavor balance also sets it apart. The chocolate layer brings richness and depth, while the flan adds a light, milky sweetness that keeps the dessert from feeling too heavy. Then the caramel adds a toasty finish that ties it all together. It is almost like listening to a song with perfect harmony. No one note overpowers the others. Each layer has a job, and each one shows up at exactly the right time.
Another big difference is the baking method. Most cakes are straightforward: mix, pour, bake, cool, frost. This one is more of an experience. You make caramel, blend a custard, prepare cake batter, and bake everything in a water bath. That sounds fancy, but it is not as intimidating as it seems. The process is actually very doable once broken down into simple steps. That is why a proper step-by-step guide matters. With the right method, this dessert moves from “too complicated” to “absolutely worth making.”
The Magic of Two Layers in One Dessert
The charm of this dessert comes from the way it transforms in the oven. When you assemble it, the caramel goes in first, then the cake batter, then the flan mixture. It looks suspicious. You might wonder whether the layers will stay separate or become a muddled pudding. But as the cake bakes, the densities of the mixtures shift. The flan settles one way, the cake rises another, and the final dessert emerges with a clean, beautiful divide.
That transformation is a huge part of why people love making it. It is not just dessert. It is edible theater. You do some careful prep, trust the method, and then reveal something that feels far more advanced than the effort suggests. It is the baking equivalent of watching a magic trick from backstage and still being impressed when the curtain goes up.
The best part is that this “magic” has a practical payoff. You do not need to bake two separate desserts and stack them together later. The oven does the work for you. Everything bakes in one pan, which means fewer dishes and a more unified flavor. The caramel seeps slightly into the flan, the flan rests gently on the cake, and the cake absorbs just enough moisture to stay incredibly tender. That layered result is not a gimmick. It is the reason this dessert is so memorable, and it is exactly why a great step-by-step chocolate flan cake recipe deserves a spot in your kitchen.
Ingredients You’ll Need
Below is the full ingredient list, broken into sections so you can see exactly what goes where. This will make your prep easier and help prevent the classic baking problem of forgetting one ingredient halfway through. Having a clearly listed Ingredients You’ll Need section is especially helpful for recipes like this, where one dessert contains multiple components.
Ingredients for the Caramel
The caramel layer is simple, but it is crucial. It becomes the glossy topping once the cake is flipped out of the pan.
| Ingredient | Amount |
|---|---|
| Granulated sugar | 1 cup |
| Water | 2 tablespoons |
The sugar melts and turns into a rich amber syrup that coats the bottom of the pan. That syrup later becomes the caramel crown of the dessert. Watch it carefully while cooking, because caramel moves from perfect to burned in a blink.
Ingredients for the Flan Layer
The flan is smooth, creamy, and lightly sweet, which balances the bold chocolate cake underneath.
| Ingredient | Amount |
|---|---|
| Sweetened condensed milk | 1 can (14 ounces) |
| Evaporated milk | 1 can (12 ounces) |
| Cream cheese, softened | 4 ounces |
| Eggs | 4 large |
| Vanilla extract | 1 tablespoon |
This combination creates a custard that is rich without being overwhelming. The cream cheese is optional in some recipes, but it adds body and a luxurious texture that makes the flan even more satisfying.
Ingredients for the Chocolate Cake Layer
This is where the deep cocoa flavor comes in. The cake should be moist and tender, not dense or dry.
| Ingredient | Amount |
|---|---|
| All-purpose flour | 1 cup |
| Granulated sugar | 1 cup |
| Unsweetened cocoa powder | 1/3 cup |
| Baking powder | 1 teaspoon |
| Baking soda | 1/2 teaspoon |
| Salt | 1/4 teaspoon |
| Egg | 1 large |
| Buttermilk | 1/2 cup |
| Vegetable oil | 1/2 cup |
| Vanilla extract | 1 teaspoon |
| Hot coffee or hot water | 1/2 cup |
Hot coffee deepens the chocolate flavor without making the cake taste like coffee. It is a quiet little trick that experienced bakers love, because it adds complexity in the background.
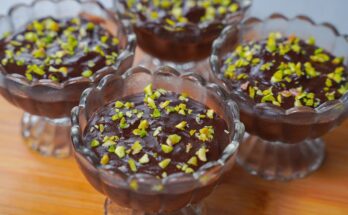
Optional Garnishes and Serving Ideas
The cake is beautiful on its own, but a few finishing touches can make it feel extra polished.
| Optional garnish | Idea |
|---|---|
| Whipped cream | Adds lightness |
| Fresh berries | Adds color and brightness |
| Chocolate shavings | Enhances presentation |
| Mint leaves | Gives a clean finish |
| Extra caramel drizzle | For a more dramatic look |
Kitchen Tools for the Best Results
The right tools can make this dessert feel much easier. You do not need a professional pastry kitchen, but you do need a few basics that help with smooth prep and clean results. A bundt pan is the classic choice because it makes the finished dessert look elegant and allows the caramel to coat the cake beautifully when unmolded. That said, a deep round cake pan can also work if that is what you have. The key is depth. You need enough room for the layers and enough structure for a safe water bath.
A blender is especially helpful for the flan mixture because it creates a silky texture quickly. You can whisk by hand, but a blender gives you that ultra-smooth finish that makes the custard feel restaurant quality. Mixing bowls, measuring cups, a whisk, and a saucepan for the caramel are also essential. If you are the kind of baker who likes to avoid stress, line them up before you start. It is like setting out ingredients before cooking dinner. A little organization at the front saves a lot of scrambling later.
The water bath setup matters too. You will need a large roasting pan or deep baking dish that can hold your cake pan with room around the sides. This allows hot water to gently surround the cake during baking, helping the flan cook evenly and preventing the custard from turning rubbery. That gentle environment is what gives flan its smooth texture. It is the difference between a velvet curtain and a crumpled bedsheet.
Essential Baking Equipment
The most important tools are a bundt pan, a saucepan, a blender, mixing bowls, and a roasting pan for the water bath. These cover every stage of the recipe from caramel to baking. A cooling rack also helps once the cake comes out of the oven.
Helpful Extras for Easier Prep
A fine mesh sieve can help remove bubbles from the flan mixture, and a thin knife or offset spatula is useful when loosening the cake before unmolding. Oven mitts and a kettle for hot water will also make the water bath setup easier and safer.
Step-by-Step Guide for Chocolate Flan Cake
Below is the full step-by-step guide with each phase clearly broken down so you can follow it without confusion.
Step 1 – Prepare the Caramel
Place sugar in a saucepan over medium heat and let it melt slowly until it turns into a golden amber caramel. Do not stir too much; gently swirl the pan instead. Once ready, carefully pour the caramel into the bottom of your baking pan and spread it quickly before it hardens.
Step 2 – Make the Flan Mixture
In a blender or mixing bowl, combine condensed milk, evaporated milk, eggs, vanilla extract, and a little cream cheese if desired. Blend or whisk until smooth. This creates the rich custard layer that will become the flan.
Step 3 – Prepare the Chocolate Cake Batter
In another bowl, mix the chocolate cake batter using flour, cocoa powder, sugar, eggs, oil or butter, milk, and baking powder. Stir until smooth and lump-free. The batter should be pourable but not too thin.
Step 4 – Assemble the Layers Correctly
Pour the flan mixture gently over the caramel in the pan. Then slowly pour the chocolate cake batter on top. Although it may seem unusual, the layers will separate and switch during baking, creating the classic effect.
Step 5 – Bake Using a Water Bath
Place the filled pan inside a larger baking dish and carefully pour hot water into the outer dish to create a water bath. Bake in a preheated oven until the cake is set and the flan is cooked through. The water bath helps the flan stay smooth and creamy.
Step 6 – Cool, Chill, and Unmold
Remove the cake from the oven and let it cool completely. Chill it in the refrigerator for several hours or overnight for the best texture. To serve, run a knife around the edges, place a plate over the pan, and carefully invert it so the caramel flows over the top.
Common Mistakes to Avoid
The most common mistake is rushing the process. This dessert rewards patience at nearly every step, from caramel to chilling. Burned caramel, overmixed cake batter, and early unmolding are all avoidable problems, and they usually come from trying to move too fast. The recipe itself is not difficult, but it is precise. It asks you to slow down just enough to let each layer do its job.
Another mistake is skipping the water bath or not using enough water. This is not a decorative step. It is essential for a smooth flan texture. Without it, the custard can bake unevenly, curdle slightly, or become rubbery around the edges. That soft, creamy flan texture depends on gentle heat, and the water bath provides exactly that.
Overbaking is another issue. Since this dessert contains both cake and custard, people sometimes keep baking until everything feels fully firm. That can dry out the cake and make the flan too dense. The center should be set but not stiff. And perhaps the biggest mistake of all is not chilling it long enough. A warm or barely cooled chocolate flan cake is much harder to unmold neatly. Let time do part of the work. This is one of those recipes where waiting is not passive. It is an active part of getting the best result.
How to Serve Chocolate Flan Cake
Serving Chocolate Flan Cake is where all the effort turns into applause. The dessert already has built-in drama thanks to its layered look and caramel topping, so presentation does not need to be complicated. A clean slice on a simple plate is often enough to make an impression. The flan catches the light, the caramel glistens, and the dark cake layer anchors the whole thing visually. It is the kind of dessert that almost introduces itself.
For the best texture, serve it chilled or lightly cool, not ice cold straight from the fridge. Letting slices sit for a few minutes at room temperature softens the flavors and allows the chocolate notes to open up more fully. A spoonful of whipped cream works beautifully here because it adds airy contrast without competing with the dessert. Fresh berries can also brighten the plate and cut through the richness.
This cake pairs especially well with coffee, espresso, or even a glass of cold milk. The bitterness of coffee plays nicely against the sweetness of caramel and condensed milk. If you are serving guests, a small garnish of chocolate shavings or mint can make the plate feel restaurant-ready without much extra effort. The main thing is not to overdecorate. This dessert is already doing a lot, and it does not need noisy extras to prove its worth.
Storage Tips and Make-Ahead Advice
One of the best things about this dessert is that it is naturally friendly to make-ahead planning. In fact, it is often better the next day. The flavors deepen, the flan sets more firmly, and the caramel has more time to mingle with the layers. That makes it a smart choice for holidays, dinner parties, or any event where you do not want to be baking at the last minute.
Store the cake covered in the refrigerator for up to 4 days. Keep it on a serving plate or in an airtight container if possible. Because of the custard layer, this is not a dessert that should sit out for long periods. Chill it promptly after serving. When slicing leftovers, use a clean sharp knife and wipe between cuts to keep the layers looking neat.
Freezing is possible, but it is not ideal. The cake layer may freeze reasonably well, but the flan texture can change after thawing and become less smooth. For best quality, enjoy it fresh from the refrigerator within a few days. Since it holds so well and slices beautifully once chilled, it is one of those rare desserts that is actually easier to serve after resting. That is a gift in the kitchen. Not every impressive dessert gives you that kind of flexibility.
FAQs about Chocolate Flan Cake Recipe
1. What is chocolate flan cake?
Chocolate flan cake is a layered dessert that combines rich chocolate cake with smooth, creamy flan and a caramel topping. During baking, the layers switch places, creating a beautiful upside-down effect when unmolded.
2. Why do the layers switch during baking?
The cake batter and flan mixture have different densities. As the dessert bakes, the heavier flan layer sinks while the lighter cake layer rises, creating the signature two-layer result.
3. Why is a water bath used?
A water bath helps the flan cook gently and evenly. It prevents the custard from curdling and keeps the texture smooth and creamy.
4. How do I know when it is done?
The cake is ready when the flan is set and the cake portion is fully baked. A toothpick inserted into the cake part should come out mostly clean, while the flan should jiggle slightly but not look liquid.
5. Can I make chocolate flan cake ahead of time?
Yes, it is actually better when made ahead. Chilling it for several hours or overnight helps the layers firm up and makes unmolding easier.
6. Why did my caramel harden too fast?
Caramel naturally hardens as it cools, so it should be poured into the pan quickly after melting. Work carefully but without delay.
7. How should I store leftovers?
Store chocolate flan cake covered in the refrigerator for up to 4 days. Keep it chilled until ready to serve.
8. Can I freeze chocolate flan cake?
It is not usually the best dessert for freezing because the custard texture can change after thawing. Refrigeration is recommended for the best quality.
Conclusion
The real beauty of this dessert is that it balances opposites so well. It is rich but not overwhelming, elegant but still comforting, dramatic but achievable. Once you understand the sequence of caramel, flan, cake batter, water bath, cooling, and chilling, the mystery disappears and the fun begins. This is the kind of recipe that turns an ordinary baking day into something memorable.
Whether you are making it for a celebration or simply because you want a dessert that feels special, this step-by-step chocolate flan cake guide gives you everything you need to succeed. Follow the method, trust the layers, and let the oven do its quiet magic.