Chocolate Dipped Strawberries Recipe: There’s something timeless and irresistible about chocolate dipped strawberries. The burst of juicy sweetness from the strawberries combined with the rich, velvety chocolate creates a flavor explosion that’s hard to beat. It’s not just a treat—it’s a little piece of indulgence wrapped in a beautiful, simple package. Whether you’re celebrating Valentine’s Day, a romantic date night, or just looking for a special way to elevate your dessert game, chocolate dipped strawberries hit the sweet spot.
These gems bring together the best of two worlds—fresh fruit and decadent chocolate—making them a go-to treat for both kids and adults. They’re elegant, yet incredibly simple to make. And the best part? You don’t need to be a pastry chef to pull them off. With a bit of guidance and a few good ingredients, you’ll be dipping strawberries like a pro in no time.
Perfect Occasions for This Delight
Chocolate dipped strawberries aren’t just for Valentine’s Day. Think birthdays, baby showers, bridal events, Mother’s Day, or even as a sweet surprise after dinner. They can be served on fancy platters at weddings or enjoyed solo while binge-watching your favorite Netflix series. Because they’re so versatile and easy to customize, they fit just about any occasion—romantic or casual.
And let’s not forget gifting! Boxed chocolate strawberries are popular for a reason—they’re classy, thoughtful, and downright delicious. Making them yourself adds that personal touch that store-bought ones simply can’t replicate.
Ingredients You’ll Need
Choosing the Right Strawberries
Start with the freshest strawberries you can find. Look for berries that are deep red, firm, and plump. The greener and fresher the tops, the better—they make the strawberries easier to hold when dipping and look much prettier once coated in chocolate. Organic is ideal, especially since you’re eating the whole fruit, but any high-quality berries will do.
Avoid overly ripe strawberries that are mushy or have bruises. They won’t hold up well under the heat of the chocolate and could turn into a mess when dipped. Uniform size is also helpful for an even, attractive presentation.
Selecting the Best Chocolate
The quality of your chocolate can make or break this treat. Semi-sweet or dark chocolate chips work well for a rich flavor, but you can also use milk chocolate or white chocolate depending on your taste preferences. Opt for chocolate labeled as “couverture” if you want that glossy, professional finish, as it contains a higher percentage of cocoa butter, which is perfect for dipping.
If you’re short on time or patience, you can use melting wafers or candy melts—they’re made for this kind of thing and don’t require tempering. But if you want the real, luscious taste of premium chocolate, go with bars of Ghirardelli, Lindt, or any good-quality brand and chop it before melting.
Optional Toppings to Elevate the Treat
Here’s where you can get creative:
- Crushed nuts (almonds, pistachios, peanuts)
- Sprinkles or edible glitter
- Shredded coconut
- Crushed cookies or graham crackers
- Mini chocolate chips
- Drizzled contrasting chocolate
These toppings not only add crunch and flavor but also make your strawberries look like they came straight from a gourmet bakery.
Equipment Required
Must-Have Tools for Success
To make the process smooth and stress-free, gather your tools before you start. Here’s a basic list:
- A double boiler or microwave-safe bowl
- A baking sheet
- Parchment paper or a silicone mat
- A fork or skewer (to hold strawberries while dipping)
- A small spatula or spoon for drizzling chocolate
Having everything laid out will make the process go much faster and keep you from scrambling mid-recipe.
Preparation Tips for a Mess-Free Process
Here are a few pro tips:
- Dry strawberries completely. Any water left on them can cause the chocolate to seize or slide right off.
- Line your baking sheet before dipping. This will keep your strawberries from sticking and help with easy cleanup.
- Use room temperature strawberries. Cold berries can cause the chocolate to harden too quickly and may create a thick, clumpy coating.
Step-by-Step Guide to Making Chocolate Dipped Strawberries
Step 1: Wash and Dry the Strawberries Thoroughly
This step might sound simple, but it’s crucial. Rinse your strawberries gently under cold water and pat them completely dry with paper towels. Let them air dry for at least 30 minutes. Any moisture will prevent the chocolate from sticking properly, so be thorough.
Step 2: Melt the Chocolate to the Perfect Consistency
Use a double boiler or microwave to melt your chocolate. For the double boiler method, fill a small pot with water and place a heat-safe bowl over it. Stir the chocolate constantly over low heat until it’s smooth and fully melted.
Microwaving works too—just heat in 15-30 second intervals, stirring in between, until melted. Be careful not to burn the chocolate. You want it silky, not grainy or scorched.
Step 3: Dip the Strawberries Like a Pro
Now comes the fun part—dipping! Hold each strawberry by the green leaves or use a skewer inserted into the top. Dip it into the melted chocolate, swirling to coat about three-quarters of the berry. Gently shake off the excess chocolate, allowing it to drip back into the bowl.
Place the dipped strawberries on your prepared baking sheet lined with parchment paper. Repeat the process, working quickly so the chocolate doesn’t cool and harden before you’re done. If you’re using more than one type of chocolate—say, milk and white—do one batch at a time, cleaning your tools in between to keep the flavors distinct.
To make your strawberries look store-bought, you can even tilt them slightly to let the chocolate form a lovely slanted edge. It’s those little touches that make a big visual impact!
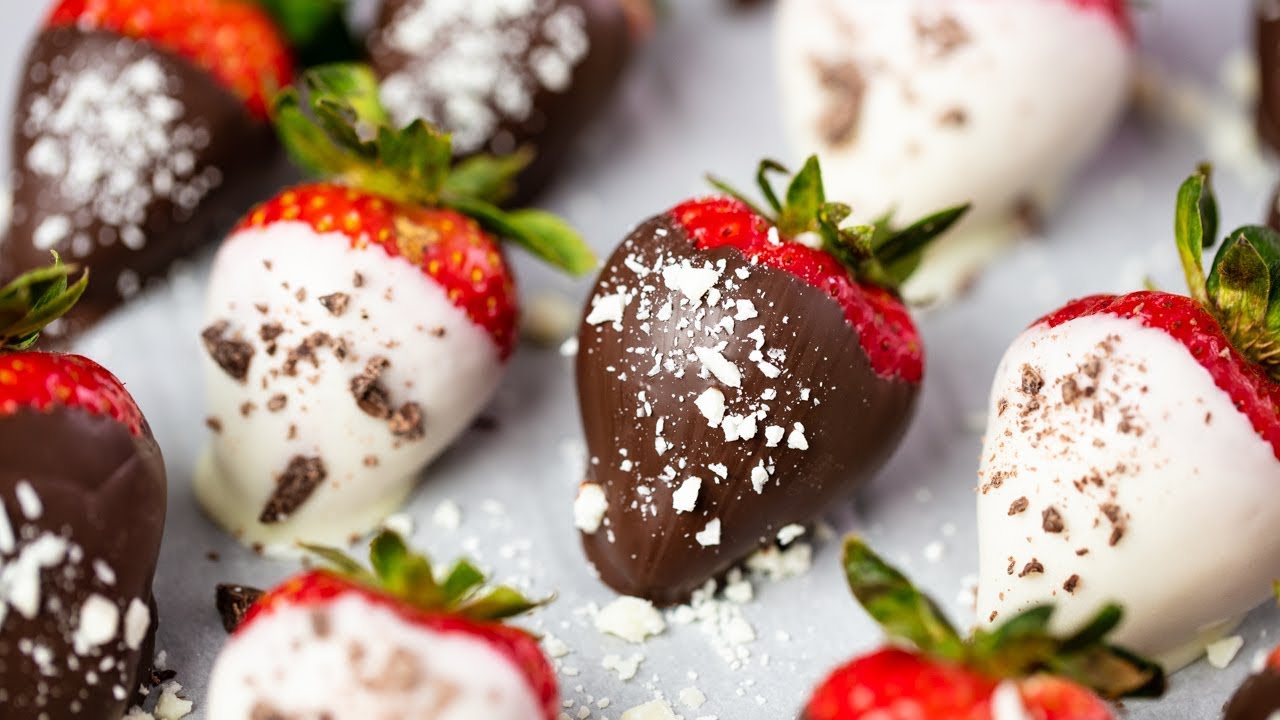
Step 4: Add Your Favorite Toppings
While the chocolate is still wet, now’s the time to sprinkle your chosen toppings. Crushed pistachios? Go for it. Colorful sprinkles? Perfect for a festive touch. Want to drizzle some white chocolate over dark? Just use a spoon or piping bag for those delicate lines. Be creative!
If you want your toppings to stick, timing is everything—do it while the chocolate is soft. Otherwise, they’ll bounce right off. This is also your chance to personalize each berry if you’re making them for a party or as gifts. Little candy hearts, edible glitter, or even crushed pretzels can add flair and texture.
Step 5: Let Them Set and Serve with Style
Once all the strawberries are dipped and topped, it’s time to let them set. Leave them at room temperature for about 30–60 minutes, or speed up the process by placing the tray in the refrigerator for 15–20 minutes.
After they’re firm to the touch, arrange them on a fancy platter or package them in gift boxes. Want to make them pop even more? Use cupcake liners to separate each berry—it’s simple, elegant, and keeps them from sticking to each other.
Tips and Tricks for the Perfect Result
Common Mistakes to Avoid
Even though the recipe is simple, some common errors can mess things up. Here are the big ones to steer clear of:
- Wet strawberries: Water is chocolate’s enemy. It can make the chocolate clump and prevent it from sticking.
- Overheating chocolate: Burnt chocolate can’t be saved. Use low heat and stir constantly if you’re melting on the stove.
- Too much handling: Constantly touching the strawberries after dipping can cause fingerprints or smudges. Handle with care.
Be mindful of the room temperature too. Hot kitchens can cause your chocolate to melt or sweat, especially once the berries are chilled. If it’s a warm day, keep them in a cool place.
Enhancing Flavor and Presentation
Want to kick your strawberries up a notch? Add a pinch of sea salt to your dark chocolate batch. The sweet-salty contrast is divine. You can also infuse your chocolate with flavor extracts—think orange, peppermint, or vanilla—for a twist that surprises your guests.
Presentation matters, especially if you’re gifting or serving them at an event. Use decorative boxes, cellophane wraps, or themed containers. Add a ribbon and a personal tag, and voilà—you’ve got a handmade, heartfelt gift that looks as good as it tastes.
Storing Your Chocolate Dipped Strawberries
Best Practices for Freshness
Chocolate dipped strawberries are best enjoyed the same day, but if you need to store them, do it right. Place them in a single layer in an airtight container, ideally on a paper towel to absorb any moisture. Store them in the refrigerator, but avoid leaving them in there too long as they may sweat.
Never freeze them—the chocolate will crack, and the strawberries will become mushy once thawed. If you’re making them ahead of time, try to dip and serve them within 24 hours for peak freshness.
How Long They Last and When to Serve
Ideally, serve your strawberries within 24–36 hours of dipping. Beyond that, the strawberries may begin to leak juice, which can make the chocolate soggy or cause the coating to peel. Keep them cool and dry, and they’ll hold up beautifully.
For parties or gifts, prepare them the evening before and refrigerate overnight. Just take them out about 15 minutes before serving to take the chill off and bring out the full chocolate flavor.
FAQs About Chocolate Dipped Strawberries Recipe
Q1: What kind of chocolate is best for dipping strawberries?
Answer: Use high-quality chocolate like semi-sweet, dark, or white chocolate bars. Avoid chocolate chips as they contain stabilizers that make melting harder and less smooth.
Q2: Do I need to wash the strawberries before dipping?
Answer: Yes, always rinse strawberries gently and pat them completely dry. Any moisture can cause the chocolate to seize or not stick properly.
Q3: How do I keep the chocolate from seizing?
Answer: Melt the chocolate slowly using a double boiler or microwave in short bursts. Avoid letting water touch the chocolate while melting.
Q4: Can I make chocolate-dipped strawberries ahead of time?
Answer: Yes! You can prepare them up to 24 hours in advance. Store them in the fridge on a parchment-lined tray and loosely cover them.
Q5: How long do chocolate-dipped strawberries last?
Answer: They’re best eaten within 1–2 days. After that, the strawberries may start to leak moisture and affect the texture of the chocolate.
Q6: Why is my chocolate not sticking to the strawberries?
Answer: The strawberries may still be wet or too cold. Always bring them to room temperature and dry them thoroughly before dipping.
Q7: Can I use toppings like nuts or sprinkles?
Answer: Absolutely! While the chocolate is still wet, roll or sprinkle your strawberries with crushed nuts, sprinkles, coconut flakes, or drizzle more chocolate for decoration.
Q8: How do I store leftovers?
Answer: Place them in a single layer in an airtight container and refrigerate. Avoid stacking them, as they may stick together or lose their coating.
Q9: Can I use vegan chocolate for dipping?
Answer: Yes, just ensure it’s dairy-free and good quality. There are many vegan dark chocolate options that melt beautifully.
Q10: What’s the best way to melt chocolate for this recipe?
Answer: A double boiler gives you more control, but a microwave on low power, stirring every 15–20 seconds, also works great for quick melting.
Conclusion
Chocolate dipped strawberries are one of those rare treats that look luxurious but are surprisingly easy to make. With just a few fresh ingredients and a little creativity, you can whip up a dessert that’s equally at home on a romantic dinner table or a kid’s birthday spread.
Whether you’re going for elegance, indulgence, or just a fun kitchen project, this recipe delivers every time. So the next time you’ve got strawberries and chocolate on hand, skip the store-bought versions—your homemade ones will taste better, look better, and mean a whole lot more.