Chocolate Covered Strawberry Recipe: There is something almost magical about chocolate covered strawberries. They look elegant, taste luxurious, and somehow make even an ordinary day feel a little more special.
The best part is that they are surprisingly simple to make at home. You do not need to be a pastry chef, and you definitely do not need a kitchen full of fancy gadgets.
With a few good ingredients, a little patience, and the right method, you can make strawberries that look like they came straight out of a high-end dessert box.
Ingredients You’ll Need
The beauty of this recipe is that the ingredient list is short, but every item matters. Since there are so few components, quality makes a real difference. Great strawberries and good chocolate are the stars here, so this is not the moment to grab whatever is lowest on the shelf and hope for the best. Think of it like building a tiny dessert with only a few bricks. When each brick is strong, the final result feels polished and special.
For a basic batch of chocolate covered strawberries, you will need the following:
- 1 pound fresh strawberries with stems attached
- 8 to 10 ounces semi-sweet, dark, milk, or white chocolate
- 1 teaspoon coconut oil or vegetable oil if needed for smoother melting
- Optional toppings: crushed nuts, shredded coconut, sprinkles, mini chocolate chips, cookie crumbs, or sea salt
- Optional drizzle chocolate: extra white, dark, or milk chocolate for decoration
That is the core list, but there is more to choosing each ingredient wisely. The strawberries should be ripe, firm, and dry. The chocolate should melt smoothly and set with a nice finish. If you are aiming for a professional-looking result, ingredients are not just a checklist. They are the foundation of the entire recipe. A good strawberry should be naturally sweet with a fresh aroma. A good chocolate should taste rich and melt into a silky consistency, not a grainy paste.
Some people assume this recipe is foolproof because it is simple, but that is exactly why details matter. If your strawberries are wet, the chocolate will not stick properly. If the chocolate is low quality, it may clump or turn dull. Once you understand why each ingredient plays its role, the whole process feels much easier and more predictable. The next sections break those ingredients down so you know exactly what to buy and why it matters.
Fresh Strawberries
When it comes to making the best chocolate covered strawberry recipe, strawberries are not just the base ingredient. They are half the dessert. That means choosing them carefully is every bit as important as picking good chocolate. Go for strawberries that are bright red, firm to the touch, and have fresh green leaves still attached. The stem is useful because it gives you something to hold while dipping, but it also adds that classic, elegant look that makes homemade strawberries appear more polished.
Size matters more than people think. Large strawberries are often easier to dip because they give you more surface area to coat and decorate. They also look more dramatic on a serving tray. Still, giant berries are not always better. Sometimes extra-large strawberries can be watery or less flavorful. The ideal choice is medium to large berries that feel heavy for their size and smell sweet. If a strawberry looks pale near the top or feels mushy in the container, skip it. Those are warning signs that the fruit is underripe or already starting to break down.
The shape also affects the final result. Strawberries with a classic heart-like shape tend to look the most attractive after dipping. Oddly shaped berries still taste fine, of course, but uniform strawberries create a cleaner presentation if you are making them for guests or gifting them. It is also helpful to inspect the container carefully before buying. One soft or moldy berry can affect the others quickly, so fresher is always better.
Freshness is the real secret here. Since chocolate covered strawberries are usually best enjoyed the same day or within 24 hours, starting with fresh fruit gives you the best texture and flavor. A juicy, naturally sweet berry balances the richness of the chocolate beautifully. Without that fresh fruit brightness, the dessert can feel heavy. Choose well here, and the rest of the recipe becomes much easier.
Chocolate for Dipping
The chocolate you choose shapes the flavor, texture, and appearance of your final strawberries more than anything else. This is the part where many home cooks accidentally lower the quality of the whole dessert. Not all chocolate melts the same way, and not every chocolate bar or chocolate chip is ideal for dipping. For the smoothest finish, use high-quality baking chocolate, couverture chocolate, or melting wafers designed to melt evenly. Good chocolate behaves better and gives you that glossy shell people expect.
You have several options depending on taste. Dark chocolate gives a deeper, richer flavor that balances the natural sweetness of the berries beautifully. Milk chocolate is creamier and sweeter, which many people love because it feels classic and comforting. White chocolate is softer and sweeter still, and it is often used for decorative drizzles or a more festive look. There is no single correct choice here. It depends on whether you want bold, mellow, or extra sweet.
Chocolate chips can work, but they are not always the easiest option. Many are made to hold their shape during baking, which means they may not melt as smoothly as bar chocolate. That does not make them useless, but it does mean you may need a little oil or extra care when melting them. Chopped chocolate bars often create a silkier coating because they melt more evenly.
Flavor-wise, think about contrast. Strawberries are bright, juicy, and slightly tangy. Chocolate is rich, sweet, and dense. The balance between those two is what makes this dessert so satisfying. A strong dark chocolate creates a more elegant, grown-up finish. A creamy milk chocolate makes the dessert feel nostalgic and crowd-friendly. White chocolate offers visual drama, especially with colorful toppings. Pick the one that fits the mood, but do not cut corners on quality. Good chocolate is the difference between strawberries that look homemade in the best way and strawberries that look like a kitchen experiment gone slightly wrong.
Optional Toppings and Finishing Touches
Once the strawberries are dipped, the fun really begins. Toppings and decorative details are where you can turn a simple dessert into something personalized, festive, or gift-worthy. You absolutely can stop at plain chocolate covered strawberries, and they will still taste wonderful. But adding texture or contrast gives them extra visual appeal and makes them feel more thoughtful. It is like putting a frame around a beautiful picture. The picture already works, but the frame makes people pause and notice it.
Some of the most popular toppings include crushed almonds, pistachios, pecans, toasted coconut, cookie crumbs, mini chocolate chips, colorful sprinkles, and a tiny pinch of flaky sea salt. Each one changes the experience slightly. Nuts add crunch and a roasted flavor. Coconut brings a tropical note. Cookie crumbs create a dessert-on-dessert effect that feels playful and indulgent. Sea salt is a small touch, but it wakes up the sweetness and makes the chocolate taste more intense.
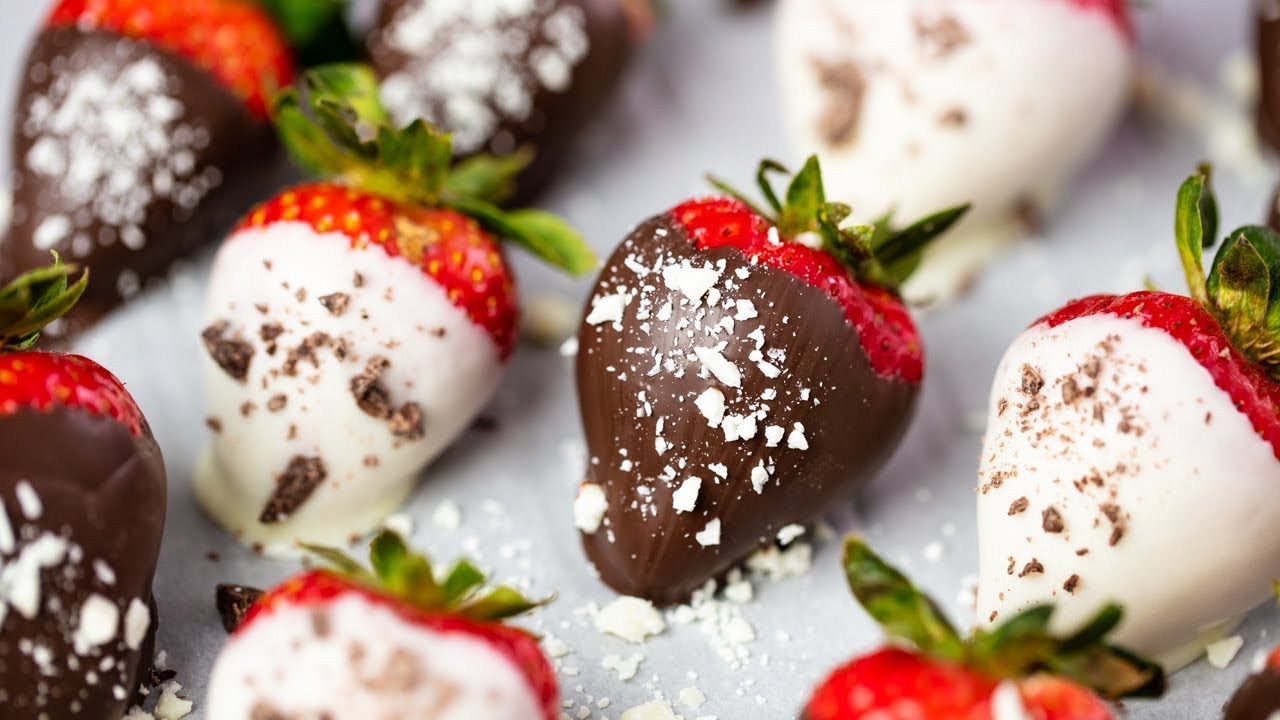
Decorative drizzles are another easy upgrade. Melt a second kind of chocolate and lightly zigzag it across the dipped berries. Dark chocolate over white chocolate looks dramatic. White chocolate over dark chocolate looks elegant and bakery-style. Milk chocolate can soften either one. The drizzle does not need to be perfect. In fact, slightly uneven lines often look more handmade and charming.
The key is timing. Toppings need to go on while the chocolate coating is still wet so they stick properly. If the coating sets too quickly, the toppings will slide off or refuse to attach. Keeping your toppings prepped and ready before dipping makes the whole process smoother. Small bowls, spoons, and a lined tray nearby help a lot.
These finishing touches are optional, but they add personality. They also make it easy to create variety in a single batch. You can keep some strawberries plain, coat some with nuts, drizzle others with white chocolate, and suddenly one recipe turns into a dessert assortment that looks professional and inviting.
Tools and Equipment for Easy Preparation
One reason this recipe is so approachable is that you do not need much equipment to pull it off well. Still, the right tools make the process cleaner, faster, and less stressful. When you are working with melted chocolate, organization matters. A messy workspace can turn a simple dessert into an awkward balancing act. Setting out everything before you begin makes the whole experience feel calm instead of chaotic.
You will need a baking sheet or tray, parchment paper or wax paper, a microwave-safe bowl or heatproof bowl, and either a saucepan if using a double boiler or a microwave if you are taking the quicker route. A spoon, rubber spatula, and fork can also help, especially when stirring melted chocolate or lifting berries if needed. Some people use dipping tools, skewers, or toothpicks, but they are not essential. Holding the strawberry by its stem usually works just fine.
Parchment paper matters more than people realize. Once dipped, the strawberries need somewhere to rest while the chocolate sets. Without a nonstick surface, they can stick to the tray and tear when removed. That ruins the beautiful coating, and nobody wants the bottom of the chocolate shell left behind on the pan. A lined tray makes cleanup easier too, which is always a small victory in the kitchen.
A heatproof bowl that is wide enough for dipping is also helpful. If the bowl is too narrow or too deep, coating the strawberries becomes clumsy. A medium bowl usually gives you the best balance of depth and access. If you plan to decorate with drizzles, a spoon works, though a small piping bag or zip-top bag with the corner snipped off gives more control.
This is not one of those recipes that demands a long equipment list. It is more about using a few simple tools smartly. A smooth setup keeps the chocolate workable, the strawberries neat, and the process enjoyable. When everything is within reach, dipping becomes almost relaxing, like an assembly line made of fruit and chocolate instead of paperwork and deadlines.
How to Prepare Strawberries Before Dipping
Preparation is where this recipe quietly succeeds or fails. It is tempting to rush straight to the melted chocolate because that is the exciting part, but properly preparing the strawberries is what makes the coating stick, set, and look smooth. Chocolate and water are not friends. Even a little moisture can cause problems, from slipping chocolate to streaky finishes. That is why this stage deserves more attention than it usually gets.
Before doing anything else, rinse the strawberries gently under cool water. This removes dirt and any residue from storage or handling. After washing, place them on paper towels or a clean kitchen towel and dry them thoroughly. Then dry them again. And just to be safe, let them air-dry for a while longer. It may sound excessive, but it is one of the best habits you can build when making this dessert. Moisture left on the berries can stop the chocolate from adhering properly and may create a lumpy or patchy coating.
Keep the stems on. They make dipping easier and help the strawberries look more attractive when served. Do not cut the tops off unless you are intentionally making a different style of dessert. A bare strawberry is harder to handle and tends to leak juice faster, which can interfere with the chocolate.
Room temperature strawberries usually work best. Very cold strawberries can cause the chocolate to set too quickly, which may sound useful, but it can also create uneven coatings or condensation later. Allowing the fruit to sit out a bit after drying often leads to a better finish.
This step may not be glamorous, but it is crucial. Think of it as laying the road before driving the car. The smoother the surface, the better the journey. Once your berries are clean, dry, and ready, the chocolate coating process becomes dramatically easier and more reliable.
Choosing the Best Strawberries
Shopping for strawberries sounds simple until you realize how much the final dessert depends on that choice. The best strawberries for dipping are not just red and pretty. They should be fresh, firm, fragrant, and reasonably uniform in size. A good container of strawberries can make your dessert look polished before the chocolate even enters the picture. A poor container can leave you working around bruised fruit, odd shapes, and inconsistent sweetness.
Start by checking color. Look for berries that are mostly deep red with minimal pale areas near the tops. A little variation is normal, but large white or green patches usually mean the fruit is underripe. Since strawberries do not keep ripening much after they are picked, what you buy is more or less what you get. Smell matters too. Ripe strawberries have a sweet, fruity aroma. If they smell like nothing, they may also taste like very little, which is disappointing in a dessert where the fruit is one of only two main stars.
Texture is just as important. You want strawberries that feel firm but not rock hard. Mushy berries can leak juice, collapse slightly after dipping, or become unpleasantly soft once chilled. Check the bottom of the container carefully because that is where damaged berries often hide. Even one leaking strawberry can make the whole package feel damp and less fresh.
Try to choose berries with green leaves that still look lively rather than dried out or brown. That fresh green cap is usually a sign that the berries have not been sitting too long. It also gives you a built-in handle, which is extremely useful when dipping.
Uniform size helps with presentation and timing. If all your strawberries are close in size, they coat more evenly and set at a similar rate. That makes the batch look more intentional and elegant. You do not need perfection, but a little selectiveness goes a long way. Great strawberries are the quiet backbone of a truly memorable batch of chocolate covered strawberries.
Washing and Drying Them Properly
Washing strawberries is easy. Drying them properly is where the real discipline shows up. This is the step many people underestimate, and it often explains why their chocolate refuses to behave. The goal is simple: clean berries, zero surface moisture. It sounds minor, but that tiny detail controls whether your chocolate coating goes on smoothly or fights you the entire time.
Rinse the strawberries under cool running water just before you plan to use them. Do not soak them for long periods because strawberries are delicate and absorb moisture quickly. Once rinsed, spread them out in a single layer on a clean towel or several paper towels. Gently pat every berry dry, including around the leaves and shoulders near the stem where water likes to hide. After patting, let them sit out to air-dry completely.
A lot of people stop after the first towel-dry and assume that is enough. It often is not. Tiny droplets can cling around the leafy tops or in small dimples on the berry surface. Those droplets may seem harmless, but once the strawberry touches melted chocolate, they create issues. The coating may seize, slide, or develop rough patches. In some cases, moisture can also shorten how well the finished strawberries hold up in storage.
It helps to wash the berries a little ahead of time so they can fully dry naturally. You do not want them sitting wet on the counter for ages, but you also do not want to rush them into the chocolate while they are still cool and damp. Dry, room-temperature strawberries usually give the cleanest coating.
This step is not flashy, and it will never be the part people photograph for social media. Still, it is one of the most professional habits in the whole recipe. Perfectly dried strawberries make the chocolate cling beautifully, set evenly, and look polished. In a dessert with only a handful of ingredients, these small preparation choices are what separate “pretty good” from “wow, did you really make these yourself?”
How to Melt Chocolate the Right Way
Melting chocolate sounds simple until chocolate reminds you that it can be a little dramatic. Heat it too aggressively and it scorches. Let water sneak in and it may seize into a grainy mess. Rush it and it may lose that silky smooth texture you were hoping for. The good news is that melting chocolate well is not difficult once you understand the basic rules: use gentle heat, stir often, and avoid moisture.
You can melt chocolate using either a double boiler or a microwave, and both methods work well when handled properly. The choice depends on your comfort level and the time you have. The double boiler offers more control and is less likely to overheat the chocolate quickly. The microwave is faster and easier for many home cooks, but it requires short intervals and attention so the chocolate does not burn.
Before melting, chop chocolate into small, even pieces if you are using bars. Smaller pieces melt more uniformly and reduce the chance of overheated spots. If the chocolate seems too thick after melting, stir in a tiny amount of coconut oil or neutral vegetable oil. Use just enough to loosen it slightly. Too much oil can change the texture and make the coating thinner than you want.
The ideal melted chocolate should be glossy, smooth, and fluid enough for dipping. It should coat the strawberry without forming a heavy, uneven shell. Stirring is part of the process, not an afterthought. Chocolate often continues melting from residual heat even after you stop heating it, so patient stirring can prevent overheating.
Once melted, work steadily. Chocolate gradually cools and thickens as it sits. That does not mean panic, just pace. Dip the berries in batches, and if needed, rewarm the chocolate gently. Melted chocolate is a bit like a good conversation. It flows best when you do not force it. Treat it gently, and it will reward you with a smooth, glossy finish that makes your strawberries look bakery-worthy.
Double Boiler Method
The double boiler method is often the most reliable way to melt chocolate, especially if you want extra control. It sounds fancy, but it is really just a gentle heating setup. You place a heatproof bowl over a saucepan with a little simmering water underneath. The bowl should sit above the water, not touch it. The steam provides indirect heat, which melts the chocolate slowly and evenly.
This method works so well because chocolate dislikes harsh heat. Direct heat can scorch it fast, especially white chocolate, which is more delicate than dark or milk chocolate. With a double boiler, you reduce that risk because the temperature rises more gradually. Add your chopped chocolate to the dry bowl and stir as it softens. Once most of it is melted, remove the bowl from the heat and keep stirring until fully smooth. The residual warmth usually finishes the job.
The biggest thing to watch out for is water. Even a few drops can make chocolate seize, turning it from silky to stiff and grainy. Make sure the bowl, spatula, and all utensils are completely dry. Also keep the simmer low. You want gentle steam, not an aggressive rolling boil.
This method is especially helpful if you are making a larger batch or using several types of chocolate. It gives you time to work without the chocolate overheating in a matter of seconds. It is slower than the microwave, yes, but sometimes slow is exactly what makes the result better. Like easing into a warm bath instead of jumping into icy water, the double boiler gives the chocolate a smoother transition.
For beginners or anyone aiming for a polished finish, the double boiler is hard to beat. It creates a smooth dipping texture, offers more margin for error, and makes the whole process feel controlled. When you want glossy chocolate and less stress, this method is a smart choice.
Microwave Method
The microwave method is the fast lane, and when done carefully, it works beautifully. It is ideal for busy kitchens, small batches, or anyone who wants fewer dishes to wash. The trick is not to treat the microwave like a magic box that can do all the thinking for you. Chocolate can burn quickly in there, so success depends on short heating intervals and frequent stirring.
Place your chopped chocolate or melting wafers in a dry microwave-safe bowl. Heat it in 15 to 20 second intervals, stirring after each round. Even if the chocolate does not look fully melted, stir it anyway. This matters because chocolate often holds its shape even while softening inside. Stirring distributes the heat and helps you avoid overheating one area while another section stays solid.
As the chocolate begins to melt, reduce the heating time if needed and keep stirring. Stop microwaving when there are still a few small unmelted pieces left, then stir until everything turns smooth. That final stirring step often finishes the melting without exposing the chocolate to extra heat. It is a simple move, but it can save the entire batch.
A teaspoon of coconut oil or neutral oil can help if the melted chocolate seems too thick for dipping. Add very little at a time and stir thoroughly. You want smooth and fluid, not watery. The goal is a coating that glides over the strawberry and settles into a neat shell.
The microwave method is quick, but it rewards attention. Walk away for too long, and the chocolate can overheat before you realize it. Stay present, keep the intervals short, and let the stirring do half the work. Done right, this method gives you glossy, dip-ready chocolate in just a few minutes. It is a practical choice for home cooks who want great results without setting up extra cookware.
Step-by-Step Guide for Chocolate Covered Strawberry
The following steps break the process down clearly so you can follow along with confidence and get strawberries that taste as good as they look.
Step 1: Prepare the Tray and Workspace
Line a tray or plate with parchment paper so the strawberries will not stick as they set. Wash the strawberries gently and dry them completely with paper towels. It is very important that they are fully dry, because water can prevent the chocolate from sticking smoothly.
Step 2: Hold and Dip Each Strawberry
Melt the chocolate gently until smooth using a microwave or double boiler. Hold each strawberry by the stem or leafy top and dip it into the melted chocolate, turning slightly to coat it evenly. Lift it out and let the excess chocolate drip back into the bowl before placing it on the lined tray.
Step 3: Add Toppings Before the Chocolate Sets
While the chocolate is still soft, add toppings such as crushed nuts, coconut flakes, sprinkles, or a drizzle of white or dark chocolate. Work quickly so the toppings stick well before the coating begins to harden. This step adds extra flavor and makes the strawberries look more attractive.
Step 4: Let the Strawberries Set Properly
Place the dipped strawberries on the tray and leave them at room temperature until the chocolate starts to firm up. For faster setting, place the tray in the refrigerator for a short time. Once the chocolate is fully set, the strawberries are ready to serve. Keep them chilled until needed for the best freshness and texture.
Common Mistakes to Avoid
Even though this recipe is beginner-friendly, a few common mistakes can interfere with the final result. The good news is that most of them are easy to avoid once you know what to watch for. One of the biggest mistakes is using wet strawberries. Any moisture on the surface can prevent the chocolate from sticking properly, and it may also cause the coating to look rough or patchy. Drying thoroughly is not an optional extra. It is one of the core rules of the recipe.
Another common issue is overheating the chocolate. When chocolate gets too hot, it can become thick, grainy, or scorched. This usually happens when using a microwave in long bursts or heating too aggressively on the stove. Short intervals, gentle heat, and frequent stirring are your best protection. Chocolate needs patience more than force.
Using poor-quality chocolate is another mistake that shows up in both taste and texture. Cheap chocolate can melt unevenly, taste overly sweet, or fail to set with a nice finish. Since the ingredient list is so short, quality really stands out. The same goes for using strawberries that are overripe or bruised. Soft berries may leak juice or collapse slightly after dipping, which affects both appearance and shelf life.
A final mistake is waiting too long to add toppings. If the chocolate starts setting before the toppings go on, they will not stick well. Have everything ready before you dip the first strawberry. Preparation makes the process smoother and the results better.
This recipe rewards attention to simple details. None of these mistakes are dramatic on their own, but together they can make the difference between a polished dessert and a frustrating one. Avoid them, and the whole process becomes much easier, cleaner, and more successful.
How to Store Chocolate Covered Strawberries
Chocolate covered strawberries are at their absolute best on the day they are made, but you can store them for a short time if needed. The biggest challenge with storage is moisture. Strawberries naturally release water as they sit, especially once chilled. That can affect the chocolate coating and make the berries soften faster. So while storage is possible, freshness should always be the goal.
Place the finished strawberries in a single layer in a container lined with paper towels if possible. That extra layer can help absorb some moisture. Do not stack them unless you separate layers very carefully, because the chocolate can smudge or crack. Store them in the refrigerator, loosely covered rather than sealed too tightly. A completely airtight container can trap condensation, which is not ideal for the chocolate shell.
For the best quality, eat them within 24 hours, though some may still be fine up to 48 hours depending on the fruit and storage conditions. The longer they sit, the more likely you are to notice moisture, softer texture, or slight sweating when they come back to room temperature. If you are making them for an event, it is always smart to prepare them as close to serving time as possible.
When serving from the fridge, let them sit out for a few minutes first. Very cold strawberries can dull the flavor slightly. A short rest helps the chocolate and fruit taste more balanced. Just do not leave them out too long in a very warm room.
Storage is one of those areas where this dessert asks for realism. It is not meant to be a week-long snack stash. It is a fresh, short-lived treat, and that is part of its charm. Like flowers or a perfect summer peach, it is best appreciated in its prime.
Creative Variations to Try
Once you master the classic version, chocolate covered strawberries become a playground for creativity. The basic method stays the same, but small changes in flavor, coating, or decoration can completely shift the mood of the dessert. This is where the recipe becomes especially fun because one technique opens the door to endless variations.
Try using a mix of chocolates in the same batch. Dark chocolate gives richness, milk chocolate adds creaminess, and white chocolate creates visual contrast. You can also flavor the chocolate subtly with a drop of vanilla extract in white chocolate or a tiny bit of espresso powder in dark chocolate, though additions should be used carefully so the chocolate texture stays smooth.
For a more gourmet feel, add toppings like freeze-dried raspberry crumbs, toasted hazelnuts, crushed pistachios, or flaky sea salt. For a playful party version, use colorful sprinkles or cookie crumbs. You can even make themed batches for holidays by matching drizzle colors and decorations. A red and white drizzle for Valentine’s Day, pastel toppings for spring, or gold sprinkles for celebrations can make the dessert feel tailored without much extra work.
Another variation is to dip only half the strawberry, then add a second drizzle layer once set. This gives a cleaner look and a more delicate balance between fruit and chocolate. Some people also like stuffing the strawberries slightly with cheesecake filling before dipping, though that moves the recipe into a more advanced dessert category.
The beauty of this recipe is that it scales easily from simple to elaborate. You can keep it minimal and elegant or turn it into a full dessert table highlight. It is like starting with a plain canvas and adding just enough paint to match the occasion. The classic version is timeless, but the variations keep it exciting every time you make it.
FAQs about Chocolate Covered Strawberry Recipe
1. Why must the strawberries be completely dry?
Strawberries need to be completely dry so the melted chocolate can stick properly. Any water on the surface can cause the chocolate to slide off or become uneven.
2. What type of chocolate works best?
Milk chocolate, dark chocolate, and white chocolate all work well. Choose the one you enjoy most, or combine them for extra flavor and decoration.
3. How do I melt the chocolate properly?
Melt the chocolate gently in short microwave intervals or over a bowl of simmering water, stirring often. This helps keep it smooth and prevents burning.
4. Can I add toppings?
Yes, you can add toppings like chopped nuts, coconut flakes, crushed cookies, sprinkles, or a drizzle of another chocolate. Add them before the chocolate sets.
5. Do I need to refrigerate chocolate-covered strawberries?
Yes, it is best to chill them after dipping so the chocolate sets properly and the strawberries stay fresh.
6. How long do chocolate-covered strawberries last?
They are best enjoyed the same day, but they can usually last up to 1 to 2 days in the refrigerator.
7. Why does my chocolate look thick or lumpy?
This can happen if the chocolate is overheated or if moisture gets into it. Melt it slowly and make sure all tools and strawberries are dry.
8. Can I use frozen strawberries?
Fresh strawberries are strongly recommended. Frozen strawberries release too much moisture after thawing, which can affect the chocolate coating.
9. How should I store them?
Store chocolate-covered strawberries in a single layer in a container lined with paper towel or parchment paper. Keep them in the refrigerator until ready to serve.
Conclusion
The real secret is not hidden in a complicated technique. It is in the small choices: selecting ripe strawberries, drying them thoroughly, using good chocolate, and setting up your workspace before you begin. Those details turn a basic recipe into something that looks thoughtful and tastes balanced. It is one of those desserts that proves simplicity can still feel luxurious.
Whether you are making them for a romantic occasion, a celebration platter, a homemade gift, or just because strawberries looked too good to pass up, this recipe gives you a dependable method with plenty of room for creativity. Keep them classic, decorate them generously, or mix flavors and toppings to suit the moment. However you make them, they deliver that wonderful contrast of crisp chocolate and juicy fruit that never seems to go out of style.
When a dessert is this easy to love and this easy to personalize, it earns its place in any home cook’s collection. Make one batch, and it is easy to see why chocolate covered strawberries remain a favorite year after year.