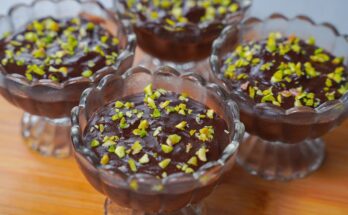
Chocolate Covered Fruit Recipe: There is something almost magical about chocolate covered fruit. It feels elegant, tastes indulgent, and still manages to come across as fresh and light at the same time.
That balance is exactly why this treat has become such a favorite for home cooks, party hosts, dessert lovers, and even people who usually do not spend much time in the kitchen.
You get the richness of melted chocolate wrapped around naturally sweet, juicy fruit, and the result tastes like something from a fancy dessert shop without requiring professional-level skills.
It is the kind of recipe that looks impressive on a serving platter, but behind the scenes, it is surprisingly simple.
What Makes This Recipe So Popular
This recipe has earned its place in kitchens everywhere because it checks so many boxes at once. It is easy, beautiful, customizable, and satisfying. Some desserts are delicious but complicated. Others are simple but do not feel special enough to serve guests. Chocolate dipped fruit lands right in the sweet spot. It feels polished and thoughtful, yet it can be made in less than an hour from start to finish. For busy people, that is a huge win. You can pull together a tray of eye-catching treats without getting buried in dishes, frosting, or oven timing.
There is also a universal appeal in the flavor pairing itself. Fruit brings brightness, tang, and natural sweetness. Chocolate brings richness, depth, and that silky melt-in-your-mouth texture everyone knows and loves. Together, they create contrast in the best way possible. Think about a juicy strawberry with a crisp chocolate shell, or a banana slice covered in creamy dark chocolate. It is the dessert version of a perfect duet. Neither part overpowers the other. Instead, they lift each other up and create something more memorable than either ingredient on its own.
On top of that, this recipe adapts easily to different preferences and events. You can make it with dark chocolate for a more intense flavor, milk chocolate for sweetness, or white chocolate for a creamy vanilla-like finish. You can keep it classic or decorate it for holidays with festive toppings and colorful drizzles. It can feel fancy enough for a dinner party or relaxed enough for a family movie night. That flexibility is a big reason it keeps showing up again and again. It is not just a dessert recipe. It is one of those kitchen go-to ideas that works whenever you need something easy that still makes people smile.
Ingredients You’ll Need
To make the best chocolate covered fruit recipe, you need a short but important list of ingredients. The beauty of this dessert lies in its simplicity, but every ingredient still matters. Good fruit and good chocolate make all the difference. If either one is low quality, the final result can feel flat. On the other hand, when you start with fresh fruit and smooth, flavorful chocolate, the whole recipe comes alive. The fruit tastes brighter, the chocolate coating looks glossier, and every bite feels intentional rather than rushed.
Here is the ingredients list you’ll need for a basic and versatile batch:
- 2 cups fresh strawberries
- 2 bananas, sliced into thick rounds
- 1 cup pineapple chunks
- 1 cup seedless grapes
- 1 apple, sliced
- 8 ounces dark chocolate
- 8 ounces milk chocolate
- 1 teaspoon coconut oil or vegetable oil for smoother melting
- 2 ounces white chocolate for optional drizzling
Optional toppings:
- Crushed almonds or pistachios
- Unsweetened coconut flakes
- Mini sprinkles
- Crushed freeze-dried berries
- Sea salt flakes
- Cookie crumbs
You do not have to use every fruit listed here. This recipe is flexible, and you can focus on your favorites. Still, including a variety makes the platter more colorful and exciting. One bite can be juicy and tart, while the next is creamy and sweet. That kind of variety keeps dessert interesting. It also helps when you are serving a group, because everyone has their own favorite fruit. By setting out a mix, you create a dessert tray that feels generous and thoughtful.
The chocolate matters just as much as the fruit. Try to use chocolate bars, couverture chocolate, or quality melting wafers rather than low-grade chocolate chips, which can sometimes melt unevenly or become too thick. Adding just a small amount of oil helps create a smoother dipping consistency and a shinier finish. It is a tiny step, but it makes a noticeable difference in texture and appearance. With only a few ingredients, every detail counts.
Fresh Fruit Options
When it comes to fresh fruit, some choices naturally shine more than others. Strawberries are the classic favorite, and for good reason. Their bright red color, natural sweetness, and convenient shape make them ideal for dipping. The green tops also act like a built-in handle, which makes them much easier to work with. Bananas are another popular choice because they pair beautifully with both milk and dark chocolate, though they are softer and need a bit more care. Pineapple chunks bring a juicy tropical brightness that cuts through the richness of chocolate in a refreshing way. Grapes offer bite-sized convenience and are especially good when served chilled.
Apples are also a smart option, especially when you want a crisp texture to contrast with the smooth chocolate shell. Slice them thick enough that they hold up well when dipped, and consider lightly brushing them with lemon juice to slow browning. Orange segments can work too, though they are juicier and a bit more delicate. The key is picking fruit that is ripe, flavorful, and firm enough to stay stable during dipping and chilling. Fruit that is too soft can slide around, release too much moisture, or break apart under the chocolate.
A good rule of thumb is to think about texture before you think about color or variety. The prettiest fruit in the bowl is not always the easiest to coat. You want fruit that will hold its shape and present well after chilling. Once you start seeing the recipe that way, choosing fruit becomes much easier. You are not just shopping for flavor. You are choosing ingredients that can stand up to warm chocolate, cooling time, and serving. That little mindset shift can make the difference between a messy tray and a picture-perfect dessert spread.
Best Chocolate for Dipping
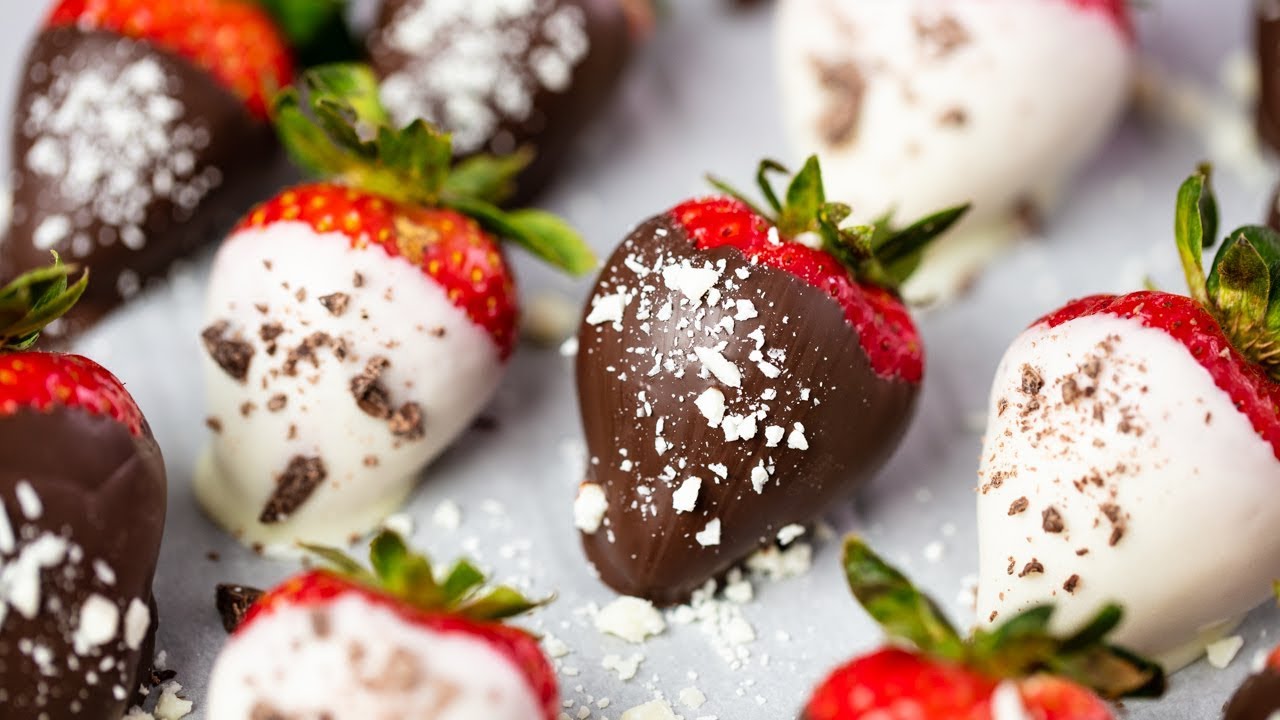
The best chocolate for this recipe is chocolate that melts smoothly and tastes good on its own. That sounds obvious, but it is one of the most important parts of getting the final result right. Since this recipe has so few ingredients, the chocolate is front and center. You are going to taste it in every bite, so there is no reason to settle for something waxy or overly sweet. Dark chocolate gives you a bold, rich flavor that pairs especially well with strawberries, oranges, and pineapple. Milk chocolate is sweeter and creamier, making it a crowd-pleaser for bananas, grapes, and apples. White chocolate can be used for drizzles, decorative touches, or full dipping when you want a sweeter and softer flavor profile.
Chocolate bars usually melt better than standard chips because they contain fewer stabilizers. If you are using chocolate chips, choose high-quality ones made for melting or baking. Melting wafers are another convenient option, particularly for beginners, because they are designed to melt evenly and coat smoothly. Adding a teaspoon of coconut oil or neutral vegetable oil to your melted chocolate can help loosen the texture and make dipping easier. Think of it like smoothing out paint before brushing it onto a wall. A little adjustment makes the whole process cleaner and more polished.
Avoid overheating the chocolate, because that can make it grainy or scorched. The texture should be glossy and fluid, not stiff or clumpy. When the chocolate is melted properly, it clings to the fruit in a thin, even layer and sets beautifully. When it is too thick, it becomes hard to work with and can pull the fruit apart. Good chocolate is not just about flavor. It is about control, texture, and presentation. Choosing wisely at the beginning saves a lot of frustration later.
Optional Toppings and Garnishes
Toppings are where this recipe gets to show a little personality. You do not need them for chocolate covered fruit to taste amazing, but they can turn a simple dessert into something eye-catching and memorable. A plain chocolate-dipped strawberry is already lovely, but add a dusting of crushed pistachios or a drizzle of white chocolate, and suddenly it looks bakery-worthy. Toppings also add texture, which makes every bite more interesting. You get the snap of chocolate, the softness or crispness of fruit, and then an extra little crunch or burst of flavor on top.
Some of the best toppings include chopped nuts, toasted coconut, crushed cookies, sprinkles, and freeze-dried fruit crumbs. Nuts bring richness and crunch, coconut adds a tropical touch, and cookie crumbs make the dessert feel playful and indulgent. For a more elegant finish, a few sea salt flakes can be incredible, especially on dark chocolate dipped fruit. That sweet-salty contrast is small but powerful. It sharpens the flavors and makes the chocolate taste even more complex.
Timing matters here. Toppings need to be added while the chocolate is still wet, otherwise they will not stick. It helps to work in small batches so you can dip, decorate, and set each piece before the coating hardens. This part of the recipe is especially fun if you are making dessert for a celebration, because you can match the toppings to the event. Red and pink sprinkles for Valentine’s Day, gold dust for a formal dinner, rainbow sprinkles for birthdays. It is a simple recipe, but these finishing touches give it character. They make the tray look like it was made with care, and honestly, that is often what people remember most.
Kitchen Tools You Should Have Ready
One of the reasons this recipe is so approachable is that it does not require a kitchen full of fancy equipment. Still, having the right tools ready before you start makes the process much smoother. It is a little like setting up your workspace before painting a room. Once the chocolate is melted, things move quickly, and you do not want to be searching for parchment paper while holding a dripping strawberry over the counter. A little preparation upfront saves a lot of mess and helps the final result look more polished.
You will need a microwave-safe bowl or a heatproof bowl for melting chocolate, depending on whether you use a microwave or a double boiler. A baking tray or large plate lined with parchment paper is essential for placing the dipped fruit while it sets. You should also have a fork, skewer, or dipping tool to help coat smaller fruit pieces like banana slices or grapes. A small spoon can help drizzle chocolate over the fruit if you want a decorative finish. Paper towels are also important because fruit must be completely dry before dipping. Even a little water can make the chocolate seize or slide off.
A sharp knife and cutting board will be needed for slicing fruit such as apples, bananas, and pineapple. If you plan to make the fruit look extra neat, a wire cooling rack can help excess chocolate drip away, though it is not necessary for most home kitchens. What matters most is that your setup is organized. Place the fruit, melted chocolate, toppings, and lined tray all within reach. Once everything is arranged, the process becomes calm and enjoyable rather than rushed and sticky. Good tools do not make the recipe harder. They make it feel effortless.
How to Choose the Best Fruit
Choosing the right fruit is half the battle when making this recipe. Even the best melted chocolate cannot rescue fruit that is mushy, underripe, or watery. What you want is fruit that tastes fresh on its own and has the right texture to handle dipping. Think of the fruit as the foundation of the dessert. If the foundation is strong, everything else comes together beautifully. If it is weak, the whole treat can feel disappointing, no matter how pretty it looks.
Look for fruit that is ripe but firm. Strawberries should be bright, fragrant, and free from soft spots. Bananas should be yellow with very little browning, since overripe bananas become too soft and can fall apart during dipping. Pineapple should smell sweet and tropical, not sour or fermented. Grapes should be plump and tight-skinned. Apples should be crisp and fresh, with no bruising. It is tempting to use whatever fruit is already in the kitchen, but this is one of those recipes where freshness really stands out. Since the fruit is not baked or heavily seasoned, its flavor stays front and center.
Also, consider how much moisture the fruit naturally holds and how it behaves after being cut. Juicier fruits may need extra drying time after washing, and cut fruit often needs to be dipped soon after slicing to keep it looking fresh. A little attention here pays off later in both taste and texture. Great fruit does not just improve the recipe. It makes the whole dessert feel lighter, brighter, and more satisfying.
Fruits That Work Best for Chocolate Dipping
Some fruits are simply made for this recipe. Strawberries are the gold standard because they are firm, easy to hold, and naturally beautiful. Their tart sweetness pairs with every type of chocolate, and they hold up well when chilled. Grapes are another great option, especially for bite-sized treats that are easy to serve at parties. Bananas are creamy and sweet, which makes them excellent with dark chocolate, though they are best eaten the same day. Pineapple adds a tropical punch that feels refreshing and unexpected, especially when paired with dark or white chocolate.
Apple slices are especially good when you want contrast. Their crisp bite against the smooth chocolate shell creates a satisfying texture that feels clean and bright. Pear slices can also work in a similar way if they are firm enough. The most successful fruits usually share a few traits: they are sturdy, not overly wet, and flavorful enough to stand next to chocolate without getting lost. That is the sweet spot you are aiming for.
The reason these fruits work so well is not only because they taste good. It is also because they hold their shape during the whole process. They survive washing, drying, dipping, setting, and plating without falling apart or leaking too much moisture. Once you understand that, picking fruit becomes less of a guessing game. You begin to see why some fruits turn into elegant little treats while others become slippery kitchen drama. The winners are the ones that can handle both the flavor side and the structural side of the recipe.
Fruits That Need Extra Care
Some fruits can absolutely be used for chocolate covered fruit, but they require a gentler touch. Bananas, for example, are delicious but delicate. Once sliced, they soften quickly and can become slippery if left out too long. They are best cut into thicker pieces and dipped soon after slicing. Orange segments can also be lovely, but they contain a lot of moisture, which can make chocolate harder to stick. Patting them very dry is essential. Raspberries and blackberries may look stunning, but their fragile structure means they can collapse easily under the weight of the chocolate.
Water-heavy fruits can be tricky because moisture is the enemy of smooth chocolate coating. If the fruit is wet, the chocolate may seize, become streaky, or refuse to stick properly. Cut fruit is especially vulnerable because exposed surfaces release juice. That does not mean you should avoid these fruits entirely. It just means you should handle them carefully, dry them thoroughly, and work quickly. In some cases, partially freezing the fruit for a short time can help firm it up before dipping, though you do not want it so cold that condensation forms.
This section matters because frustration often comes from using fruit that is technically tasty but not ideal for the method. A banana may taste wonderful with chocolate, but if it is too ripe, it turns the dipping process into a mess. An orange might be flavorful, but if it is too juicy, the coating slides away. It is a bit like trying to wrap a gift with slippery paper. It can be done, but it takes more patience. Knowing which fruits need extra care helps you approach the recipe with better expectations and better results.
How to Prepare Fruit Before Dipping
Preparation is where a lot of people either set themselves up for success or accidentally create problems. The most important thing to remember is that fruit must be washed, fully dried, and prepped neatly before it ever touches melted chocolate. This is not optional. Water and chocolate do not get along well, and even a small amount of moisture can ruin the coating. The chocolate may clump, streak, or slide right off the fruit. So while washing fruit is a must, drying it completely is just as important.
Start by rinsing all the fruit under cool water. After that, spread it out on paper towels or a clean kitchen towel and dry each piece thoroughly. Strawberries need extra attention around the leafy tops because water likes to hide there. Grapes should be rolled dry. Apples and bananas should be sliced only when you are close to dipping time so they stay fresh and appealing. If using apples, a quick brush of lemon juice can help prevent browning, though too much juice should be avoided because you do not want extra wetness on the surface.
Once the fruit is dry and sliced, arrange it on a tray or board so everything is easy to access. This simple bit of organization makes dipping much easier. You do not want to melt the chocolate and then realize your pineapple still needs cutting. Think of the prep stage as building a smooth runway for the recipe. Once the chocolate is ready, you want every fruit piece lined up and waiting, not scrambling behind the scenes. That calm, ready-to-go setup helps the whole recipe feel easier and gives you much cleaner, prettier results.
Step-by-Step Guide for Chocolate Covered Fruit
Step 1 – Melt the Chocolate Properly
Chop the chocolate into small pieces if needed and place it in a heat-safe bowl. Melt it gently using a microwave in short bursts or over a bowl of simmering water, stirring often until smooth. Be careful not to overheat the chocolate, or it may become thick and hard to work with.
Step 2 – Dip the Fruit Like a Pro
Make sure the fruit is washed and completely dry before dipping, because water can stop the chocolate from coating properly. Hold each piece by the stem, edge, or with a fork, then dip it into the melted chocolate. Let the excess chocolate drip off before placing the fruit on parchment paper.
Step 3 – Add Toppings Before the Chocolate Sets
While the chocolate is still soft, sprinkle on your favorite toppings such as crushed nuts, coconut flakes, sprinkles, or crushed cookies. Work quickly so the toppings stick well before the chocolate begins to harden. You can also drizzle a second type of melted chocolate on top for extra decoration.
Step 4 – Let the Fruit Set and Chill
Place the dipped fruit on a tray lined with parchment paper and let it sit until the chocolate starts to set. For faster results, place the tray in the refrigerator for a short time. Once firm, the chocolate covered fruit is ready to serve. Keep chilled until needed for the best texture and freshness.
Common Mistakes to Avoid
Even though this recipe is easy, a few common mistakes can throw things off. The biggest one is trying to dip fruit that is still wet. Moisture and melted chocolate are not friends, and this single issue can cause streaking, slipping, or clumping. Another common problem is overheating the chocolate. Once chocolate gets too hot, it can become thick, grainy, and difficult to work with. That is why gentle heating and frequent stirring matter so much. It is better to melt slowly than to rush and end up fighting the texture.
Another mistake is choosing fruit that is too ripe or too soft. Overripe bananas, bruised strawberries, or watery cut fruit can make the process frustrating. The fruit should be flavorful, but it also needs enough structure to survive dipping and setting. Skipping parchment paper is another little error that creates a big mess. Without it, the chocolate can stick to the tray and ruin the neat finish. People also sometimes wait too long to add toppings, only to realize nothing sticks anymore. Timing really is part of the recipe here.
The good news is that these mistakes are easy to avoid once you know they exist. Dry the fruit thoroughly, melt the chocolate gently, use firm fresh fruit, prep your tray, and decorate while the coating is still wet. That is basically the whole game plan. This recipe is forgiving in many ways, but it rewards attention to detail. When you respect the basics, it comes together beautifully and feels far more professional than the effort it actually requires.
Flavor Variations to Try
One of the best things about chocolate covered fruit is how easy it is to customize. Once you have the basic method down, you can start playing with flavors in a way that makes each batch feel new. Dark chocolate with sea salt creates a bold, rich finish. Milk chocolate with crushed pretzels adds sweetness and crunch. White chocolate with freeze-dried strawberry dust feels soft, creamy, and a little fancy. These small changes do not require a brand-new recipe. They simply build on the one you already know.
You can also shape the flavors around different moods or occasions. For something tropical, try pineapple dipped in dark chocolate with coconut flakes. For a cozy fall-style version, dip apple slices in milk chocolate and finish with cinnamon cookie crumbs. For a more elegant platter, use strawberries with dark chocolate and a white chocolate drizzle. Even a tiny touch of orange zest, crushed pistachio, or flaky sea salt can completely change the experience. That is the beauty of a simple base recipe. It gives you lots of room to experiment without making things complicated.
Another fun idea is to create themed assortments. You could make one tray with only dark chocolate combinations, another with colorful party toppings, or another with nut-based garnishes for extra crunch. This makes the dessert feel fresh every time you serve it. Instead of being a one-note treat, it becomes a whole category of easy homemade desserts. Once people taste a few combinations side by side, they usually start picking favorites and talking about which pairing surprised them most. That is when you know the recipe has done more than fill a plate. It has created a little experience.
How to Store Chocolate Covered Fruit
Chocolate covered fruit is best enjoyed fresh, but proper storage helps maintain both flavor and texture for as long as possible. Place the finished fruit in a single layer inside an airtight container lined with paper towels or parchment paper. If you need to stack pieces, add a layer of parchment in between so they do not stick together or damage the chocolate coating. Store the container in the refrigerator, especially if you are using delicate fruits or serving them later the same day.
That said, not all fruits store equally well. Strawberries, grapes, and pineapple usually hold up better than bananas and apples. Bananas can soften and darken fairly quickly, while apples may lose some of their crispness over time. For the best texture, try to eat the fruit within 24 hours, though some varieties can still be pleasant a little beyond that. The challenge is that fruit naturally releases moisture as it sits, and that moisture can affect the chocolate shell. The longer it waits, the more likely the texture shifts.
Serving cold from the refrigerator usually works well, but letting the fruit sit for a few minutes before serving can improve flavor, especially with dark chocolate. You do not want it warm, just not ice-cold to the point where flavors feel muted. Storage is really about protecting the texture as much as the taste. This dessert is at its peak when the fruit still feels fresh and the chocolate still has a clean snap. Treat it like a fresh bouquet rather than a shelf-stable candy. It is beautiful, best appreciated soon, and worth enjoying at the right moment.
Serving Ideas for Parties and Gifts
Presentation can turn this easy dessert into a real showpiece. For parties, arrange the fruit on a large platter with a mix of colors and shapes so it feels abundant and inviting. Grouping different fruits together can create a more polished look, or you can mix them for a relaxed, overflowing style. A few whole strawberries placed upright beside dipped grapes, banana rounds, and pineapple chunks can make even a simple tray look carefully styled. Add a small bowl of extra melted chocolate or a matching dip on the side, and suddenly the whole thing feels like a dessert board rather than just a snack plate.
For gifts, chocolate covered fruit can look incredibly thoughtful when packaged neatly. Place them in mini cupcake liners inside a small box, or arrange them in a shallow gift container lined with parchment. Drizzled strawberries in particular look elegant and romantic, which is why they are such a classic for special occasions. If you are taking them to a gathering, transport them chilled and plate them once you arrive for the freshest presentation. A garnish of mint leaves or a few fresh berries around the tray can make the whole arrangement feel even more vibrant.
What makes this dessert especially useful is that it bridges the gap between homemade and polished. It feels personal because you made it yourself, but it also looks refined enough to give away or serve to guests. That combination is rare. Some homemade desserts taste great but do not travel well or look especially elegant. This one does both when handled carefully. It is proof that a little melted chocolate and fresh fruit can punch far above their weight when it comes to presentation.
FAQs about Chocolate Covered Fruit Recipe
1. What fruits work best for chocolate-covered fruit?
Strawberries, bananas, grapes, pineapple, apple slices, cherries, and orange segments all work well. The best fruits are firm, fresh, and not too watery.
2. Why must the fruit be completely dry?
Chocolate does not stick well to wet fruit. Any water on the surface can also make the melted chocolate seize or become uneven.
3. What type of chocolate should I use?
Milk chocolate, dark chocolate, and white chocolate all work well. You can choose based on your taste or even combine them for decoration.
4. Can I add toppings?
Yes, you can add toppings like chopped nuts, shredded coconut, sprinkles, crushed cookies, or a drizzle of another chocolate. Add them before the chocolate sets.
5. How do I melt the chocolate properly?
Melt it gently in short microwave bursts or over simmering water, stirring often. Avoid overheating so the chocolate stays smooth and easy to dip.
6. Do I need to refrigerate chocolate-covered fruit?
Yes, it is best to chill chocolate-covered fruit, especially if the fruit is soft or juicy. Refrigeration helps the chocolate set and keeps the fruit fresh.
7. How long does chocolate-covered fruit last?
It is best enjoyed the same day, but it can usually be stored in the refrigerator for up to 1 to 2 days depending on the fruit used.
8. Can I use frozen fruit?
Fresh fruit is better. Frozen fruit often releases too much moisture after thawing, which can affect the chocolate coating.
9. Why is my chocolate coating uneven?
This can happen if the fruit is wet, the chocolate is too thick, or the chocolate was overheated. Smooth melted chocolate and dry fruit give the best results.
Conclusion
The secret lies in the basics. Choose ripe but firm fruit, dry it thoroughly, melt the chocolate gently, dip with care, and let the coating set properly. Those simple actions are what give you the clean finish and satisfying texture people love. From there, toppings and flavor variations let you have fun and put your own spin on things. Some days you may want classic strawberries with dark chocolate. Other days you may want pineapple with coconut or apple slices with cookie crumbs. The method stays reliable while the flavors keep things interesting.
This is the kind of recipe that earns a permanent place in your dessert rotation because it is easy to remember and hard not to love. It offers a little luxury without demanding too much time, money, or effort. And honestly, that is a pretty wonderful combination. Once you make it once and see how simple the process is, it becomes one of those desserts you return to again and again whenever you need something quick, beautiful, and guaranteed to disappear fast.