Chocolate Covered Cherries Recipe: There’s something magical about biting into a smooth, rich chocolate shell only to discover a juicy, sweet cherry hiding inside. That’s the joy of chocolate covered cherries. Whether you’re prepping for the holidays, a romantic surprise, or just treating yourself (which you totally deserve), this recipe is a guaranteed crowd-pleaser. And guess what? You don’t need to be a pastry chef to make them. With just a handful of ingredients and a little bit of patience, you’ll be crafting these sweet little gems like a pro.
Why You’ll Love This Recipe
What makes chocolate covered cherries so irresistible? It’s the perfect combo of textures and flavors. You’ve got the juicy cherry, the sweet creamy filling, and a rich chocolate shell that ties it all together. Each bite is like a burst of nostalgia and indulgence. Plus, when you make them at home, you can control the sweetness, customize the chocolate type, and even sneak in a little booze if you’re feeling fancy.
But here’s the kicker—they’re incredibly easy to make. You don’t need fancy tools or rare ingredients. And the best part? These get better with time. Yup, that creamy filling slowly melts around the cherry, creating that iconic liquid center you know and love. So, a little patience pays off in a big, sweet way.
What Are Chocolate Covered Cherries?
Chocolate covered cherries, also known as cherry cordials, are a type of candy made by coating whole cherries in a layer of creamy fondant or sugar paste and then dipping them in melted chocolate. Over time, the fondant dissolves into a liquid, creating that gooey, syrupy center that oozes when you take a bite.
Some store-bought versions add liqueurs like brandy or kirsch for extra flavor, but the homemade ones? They’re on another level—fresher, richer, and completely customizable. Whether you go boozy or kid-friendly, they’re a hit with everyone. They also make for beautiful edible gifts, adding a touch of elegance to any dessert spread.
Homemade vs Store-Bought: Why Go Homemade
We get it. Grabbing a box of chocolate covered cherries off the shelf is easy. But here’s why you might want to skip the grocery aisle this time:
- Better ingredients: No preservatives, no artificial flavors. Just good, real stuff.
- Customize to taste: Prefer dark chocolate? Love boozy centers? You’re in control.
- Freshness factor: Homemade tastes cleaner and more vibrant.
- Satisfaction: Nothing beats the “I made this!” feeling when someone takes a bite and goes “Wow!”
Besides, once you make them yourself, you’ll realize they’re way simpler than they look.
List of Ingredients You’ll Need
Let’s get into the good stuff. Here’s everything you need to whip up a batch of these irresistible candies.
For the Cherries
- 40–50 maraschino cherries (with stems preferred)
- Paper towels (for drying)
For the Creamy Fondant Filling
- 3 tablespoons unsalted butter (softened)
- 3 tablespoons light corn syrup
- 2 cups powdered sugar (sifted)
- 1 teaspoon almond extract or vanilla extract
For the Chocolate Coating
- 2 cups semi-sweet or dark chocolate chips
- 2 teaspoons coconut oil or shortening (for a smoother coating)
Optional: Cherry liqueur, kirsch, or amaretto (for adult version)
How to Choose the Best Cherries
If you’re thinking, “Aren’t all cherries the same?”—not quite. The cherries you choose will determine how your final candy turns out. For this recipe, maraschino cherries are a classic pick. They’re already sweet, vibrantly red, and have that iconic cherry flavor that screams “cordials.”
But not all maraschinos are created equal. Go for ones that are firm, whole, and not too mushy. If they come with stems, even better—it makes the dipping part a breeze and adds a nice visual flair. Also, be sure to pick cherries packed in juice or syrup—not alcohol—unless that’s what you’re going for.
Prefer fresh cherries? You can use them, but keep in mind they won’t develop the same liquid center unless you pre-soak them in liqueur and use a different filling method.
Should You Use Fresh or Maraschino Cherries?
Let’s break it down.
Fresh Cherries:
- Pros: More natural, firmer bite, less sweet.
- Cons: Shorter shelf life, need pitting, don’t liquify inside.
Maraschino Cherries:
- Pros: Classic flavor, juicy, perfect for long storage, easily liquify with fondant.
- Cons: Sweeter, may contain dyes (unless you buy natural ones).
Bottom line? For that old-school candy shop vibe and gooey center, maraschinos are the way to go. Just be sure to dry them really well—moisture and chocolate are not friends.
How to Properly Drain Maraschino Cherries
This might seem like a small step, but trust me, it’s crucial.
- Drain the cherries in a colander or sieve over the sink.
- Spread them on a few layers of paper towels.
- Gently pat them dry with more towels, especially around the stem.
- Let them air dry for at least 30–60 minutes to remove all excess syrup.
If they’re even a little wet, your fondant won’t stick, and your chocolate might seize. So, dry like your recipe depends on it—because it does.
Step-by-Step Guide to Making Chocolate Covered Cherries
Alright, aprons on—let’s get rolling.
Step 1: Prep the Cherries
Start with maraschino cherries and drain them well. Pat them dry with paper towels—any excess liquid will make the coating slide off. Keep the stems intact if possible; they make dipping easier and add a charming touch.
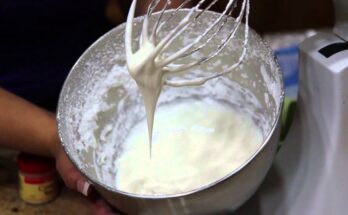
Step 2: Make the Fondant Filling
In a bowl, mix softened butter, corn syrup, and powdered sugar until smooth. The mixture should form a pliable dough-like fondant. This sweet layer will create that creamy center once the cherries are coated and set.
Step 3: Wrap Cherries with Fondant
Take a small piece of fondant and flatten it into a disk. Wrap it carefully around each cherry, covering completely. Roll gently in your hands to smooth out any seams.
Step 4: Chill the Fondant-Wrapped Cherries
Place the cherries on a lined baking tray and refrigerate for 30 minutes to firm up before dipping.
Step 5: Melt the Chocolate Coating
Melt high-quality dark or milk chocolate using a double boiler or microwave, stirring until silky and smooth.
Step 6: Dip Cherries in Chocolate
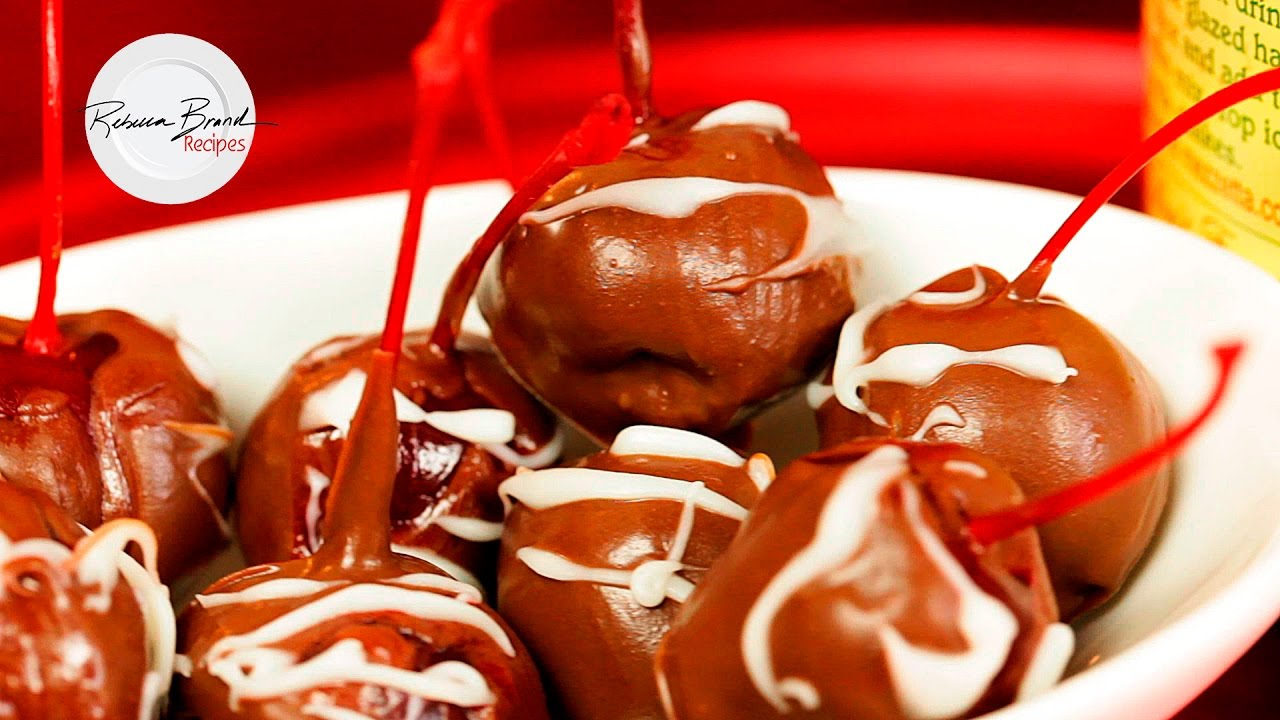
Hold each cherry by the stem and dip into the melted chocolate, coating evenly. Let excess drip off.
Step 7: Set and Store
Place dipped cherries on parchment paper and let them set completely at room temperature or in the fridge. Store in an airtight container—decadent, glossy, and irresistible!
Helpful Tips for Success
To make sure your chocolate covered cherries turn out perfectly every time, here are a few pro tips:
- Don’t skip the drying: Moisture is the enemy of chocolate. Dry cherries = smooth coating.
- Use real chocolate: Skip cheap compound chocolate. The better the chocolate, the better the flavor.
- Chill at every stage: Cold cherries make for cleaner dips and better structure.
- Avoid humidity: Store in a cool, dry place. Humidity can cause chocolate to sweat or bloom.
- Double-dip for thicker shells: Want a thicker chocolate shell? Let the first layer set, then dip again.
How to Avoid Leaking Chocolate Covered Cherries
There’s nothing worse than seeing your beautiful candies leak cherry juice after a few days. Here’s how to prevent that mess:
- Seal the fondant properly: No cracks or open seams.
- Use a thick enough fondant layer: Too thin, and the cherry juice will break through.
- Fully coat in chocolate: Make sure the entire cherry is sealed—especially around the stem.
- Don’t skip the resting period: That 1–2 week rest helps prevent premature leaking and allows the interior to liquify naturally.
How to Make Liquor-Filled Chocolate Covered Cherries
Want to add a little grown-up twist to this classic? It’s easy to infuse your cherries with liqueur.
Here’s how:
- Drain your maraschino cherries and soak them in cherry liqueur, amaretto, or brandy overnight.
- Drain and pat them completely dry.
- Proceed with the fondant wrapping as usual.
- Be extra cautious with the sealing—boozy cherries are leak-prone!
Let them rest for a few weeks, and the alcohol will mix beautifully with the liquified fondant for an indulgent center.
How to Store Chocolate Covered Cherries
Storage is simple, but super important for the quality and longevity of your candies.
- Short-Term (Up to 2 weeks): Store in an airtight container at room temperature in a cool, dry place.
- Long-Term (2–4 weeks): Store in the fridge, but allow to come to room temperature before serving to avoid condensation.
Never store them uncovered or near moisture—it can cause sugar bloom (white patches) or sticky messes.
Can You Freeze Chocolate Covered Cherries?
Technically, yes—but it’s not ideal.
Freezing can affect the texture of both the fondant and the chocolate. When thawed, they may become grainy, and the chocolate may develop white spots (fat bloom). If you do freeze them:
- Wrap each cherry in wax paper.
- Store in a freezer-safe container.
- Thaw slowly in the fridge before bringing to room temp.
Still, if you’re making a big batch ahead of time, freezing can work in a pinch—just know they won’t be quite as pretty.
Serving Suggestions
Chocolate covered cherries are more versatile than you might think. Sure, they’re a fantastic candy on their own, but don’t be afraid to get creative with how you serve and enjoy them.
Here are some fun and delicious serving ideas:
- Dessert Platter Star: Add them to a dessert board with truffles, caramels, nuts, and fruit for a stunning centerpiece.
- Coffee or Wine Pairing: Serve them with a dark roast coffee or a bold red wine like Merlot or Cabernet for a luxurious after-dinner treat.
- Cupcake Toppers: Pop one on top of a frosted cupcake for a classy finishing touch.
- Ice Cream Sundae Upgrade: Slice one open and drizzle the cherry syrup center over vanilla ice cream.
- Gift Boxes or Party Favors: Wrap them in foil or place them in mini candy cups for elegant edible gifts.
These sweet little gems make any occasion feel extra special—from Valentine’s Day and Christmas to birthdays or cozy nights in.
Perfect for Holidays and Gifting
Let’s be real—homemade gifts always steal the show. And chocolate covered cherries? They look impressive, taste incredible, and store well, which makes them ideal for gifting.
- Holiday Treat Bags: Pack them in clear cellophane with a ribbon and a handwritten tag.
- DIY Gift Boxes: Line a small box with tissue or parchment and nestle 6–12 cherries inside.
- Hostess Gifts: Heading to a party? Bring a batch of these instead of wine—they’ll be remembered!
- Christmas Stocking Stuffers: Make them in advance and pop them in decorative tins for a festive surprise.
Make a double batch—half for gifting, half for you. You’ll thank yourself later.
Common Mistakes to Avoid
Even simple recipes can go sideways if you’re not careful. Here are the top mistakes people make—and how to avoid them:
- Skipping the drying process: This leads to fondant not sticking or chocolate seizing.
- Using cheap chocolate: Go for quality! Better chocolate melts and coats more smoothly.
- Impatience with resting time: You won’t get that iconic liquid center if you bite in too soon.
- Overheating the chocolate: This can cause it to seize or become gritty. Slow and steady wins.
- Not sealing the fondant: Gaps = leaks. Take your time wrapping the cherries properly.
Avoid these, and you’ll be cranking out professional-quality chocolate covered cherries in no time.
Healthier Alternatives & Variations
Looking for a way to indulge without going overboard? Try these lighter or alternative versions:
- Dark Chocolate: Use 70% cacao or higher for more antioxidants and less sugar.
- Naturally Sweetened Fondant: Sub powdered sugar with a monk fruit blend or other sugar alternative.
- Fresh Cherries: Skip the maraschino sugar syrup and use pitted fresh cherries (though they won’t liquify inside).
- Vegan-Friendly: Use plant-based butter and dairy-free chocolate.
- Nutty Coating: Roll dipped cherries in crushed almonds or walnuts before the chocolate sets.
Customizing your cherries isn’t just fun—it’s a great way to meet your dietary needs or impress guests with unique flavors.
FAQs about Chocolate Covered Cherries Recipe
1. Can I make them without fondant?
Yes, you can use melted white chocolate or a mixture of powdered sugar and cherry juice to mimic the filling. However, it won’t liquify the same way traditional fondant does over time.
2. How long do they take to liquify inside?
Typically, it takes 7 to 14 days for the fondant to fully transform into a syrupy center. Store them at room temperature to speed up the process.
3. Do I need to use a candy thermometer?
Nope! This recipe doesn’t require any boiling or exact-temperature steps. Just melt your chocolate gently and keep an eye on the texture.
4. How long will they last?
Stored properly in an airtight container, these candies can last up to 4 weeks. They get better with age, so don’t rush it.
5. Can I use dark chocolate instead of milk chocolate?
Absolutely! Dark chocolate (especially 60–70% cacao) adds richness and balances the sweetness of the fondant and cherry. It’s also a healthier choice.
Conclusion
From choosing the right cherries and mastering the fondant to getting that clean, glossy chocolate coating, each step is simple but essential. And the best part? These candies actually get better the longer they sit. So make a batch, gift a few, and stash the rest. Future you will be so grateful.
With just a little love and patience, you can create a classic confection that tastes like it came straight from a gourmet chocolatier. And trust me—after one bite, no one will believe they’re homemade.