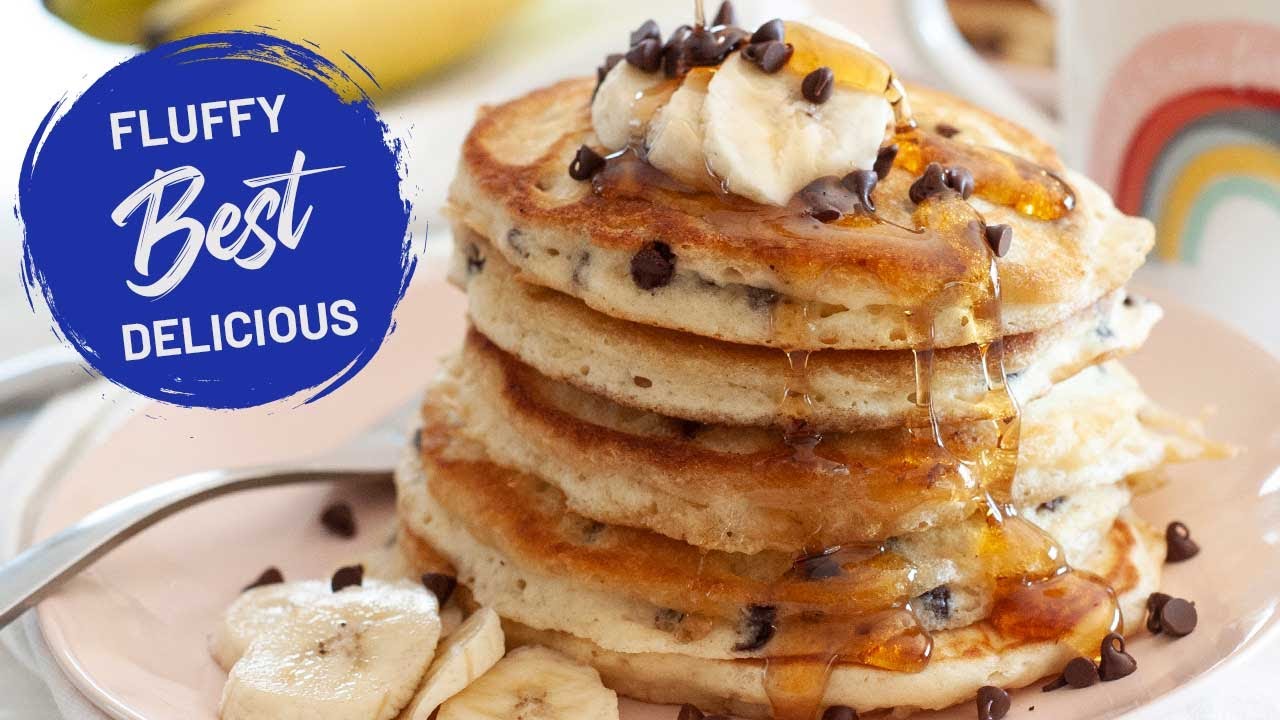
Chocolate Chip Pancake Recipe: Is there anything more comforting than a stack of warm, fluffy pancakes dotted with gooey, melty chocolate chips? For many, chocolate chip pancakes bring back memories of cozy weekend mornings, the scent of batter sizzling on a hot griddle, and the delight of that first sweet, pillowy bite. Whether you’re making them for kids, a special breakfast-in-bed, or just treating yourself, this step-by-step guide ensures you create perfect chocolate chip pancakes every single time.
This isn’t just another recipe—this is your go-to guide. We’re diving deep into every step, from choosing ingredients to mastering the griddle game. No dry cakes, no soggy centers—just golden, chocolate-studded stacks that are soft, fluffy, and absolutely irresistible.
Ingredients You’ll Need
Great pancakes start with great ingredients. Here’s everything you need to whip up a batch of delicious chocolate chip pancakes. Let’s break it down:
Dry Ingredients:
- 1½ cups all-purpose flour (for structure)
- 2 tablespoons sugar (to sweeten the batter just a touch)
- 1 tablespoon baking powder (your leavening agent)
- ½ teaspoon salt (enhances flavor)
Wet Ingredients:
- 1¼ cups milk (whole milk gives the best richness, but any milk works)
- 1 large egg (for structure and moisture)
- 3 tablespoons melted butter (adds richness and flavor)
- 1 teaspoon vanilla extract (optional, but highly recommended)
Chocolate Chips:
- ½ to ¾ cup semi-sweet chocolate chips (mini or regular)
- Optional: white chocolate chips, dark chocolate chunks, or even peanut butter chips
Optional Add-Ins:
- A pinch of cinnamon for a cozy twist
- Chopped nuts for crunch
- A mashed ripe banana for extra sweetness and moisture
The beauty of this recipe lies in its flexibility. You can tailor it to suit your taste buds—use dairy-free milk or vegan chocolate chips if you prefer, or even toss in some shredded coconut or berries for a gourmet spin.
Tools and Equipment
You don’t need a fancy kitchen to make these pancakes, but a few reliable tools can make all the difference.
Basic Tools:
- Mixing bowls: One for dry and one for wet ingredients
- Whisk or fork: For combining ingredients smoothly
- Measuring cups and spoons: Precision matters, especially for baking
- Spatula: A flexible, flat spatula is ideal for flipping
Cooking Surface:
- Non-stick skillet: Prevents sticking and allows even cooking
- Griddle: Best for making multiple pancakes at once
- Cast iron pan: Great for heat retention, just be sure to use enough butter or oil
Optional Tools:
- Ice cream scoop or ladle: For perfectly portioned pancakes
- Sifter: Helps combine dry ingredients evenly and adds air
- Cooling rack: Prevents pancakes from getting soggy after cooking
Having the right tools ensures your pancakes cook evenly and look as good as they taste.
Preparing the Batter
Here’s where the magic begins. The secret to fluffy, tender pancakes? Don’t overmix. Let’s walk through the batter process step by step.
Step 1: Mix the Dry Ingredients
In a large mixing bowl, whisk together the flour, sugar, baking powder, and salt. Sifting these together helps evenly distribute the leavening agent, which is key for consistent fluffiness.
Step 2: Combine the Wet Ingredients
In a separate bowl, beat the egg lightly, then whisk in the milk, melted butter, and vanilla extract. Make sure the melted butter isn’t too hot—otherwise it might cook the egg. Lukewarm is perfect.
Step 3: Bring It All Together
Make a well in the center of your dry ingredients and pour in the wet mixture. Gently fold the batter with a spatula or spoon until just combined. Lumps are okay! Overmixing activates the gluten in the flour and leads to tough pancakes.
Step 4: Add the Chocolate Chips
Once your batter is combined, fold in the chocolate chips. If you add them earlier, they might sink or clump together. Add-ins like bananas or nuts should also go in now.
Let the batter rest for 5–10 minutes before cooking. This allows the baking powder to activate and gives you extra-fluffy results.
Cooking the Pancakes
Now for the fun part—turning your batter into golden, fluffy pancakes filled with melty chocolate goodness.
Step 1: Preheat Your Cooking Surface
Whether you’re using a skillet or griddle, preheat it over medium heat. Lightly grease with butter or oil. You’ll know it’s ready when a drop of water sizzles on contact.
Step 2: Pour the Batter
Use a ladle, measuring cup, or ice cream scoop to pour about ¼ cup of batter per pancake. This keeps them uniform in size and helps them cook evenly.
Step 3: Cook and Flip
Cook until you see bubbles forming on the surface and the edges look set—this usually takes about 2–3 minutes. Flip gently with your spatula and cook the other side for another 1–2 minutes until golden brown.
Don’t press them down with your spatula—this squeezes out the air and makes them flat instead of fluffy.
Step 4: Keep Warm
Place cooked pancakes on a baking sheet in a warm oven (about 200°F or 90°C) while you finish the rest. This keeps them warm without drying them out.
Serving Suggestions
Now that your chocolate chip pancakes are hot and fluffy, it’s time to get creative with how you serve them. While these beauties can be enjoyed straight off the griddle, the right toppings can elevate them to a full-blown breakfast (or brunch) masterpiece.
Classic Toppings:
- Butter and maple syrup: This duo never fails. Let a pat of butter melt over the stack and drizzle generously with syrup.
- Whipped cream: Light, fluffy, and slightly sweet—perfect against warm pancakes.
- Extra chocolate chips: Sprinkle a few on top while they’re still warm so they melt a bit.
Fruity Additions:
- Sliced bananas or strawberries: Fresh fruit adds a pop of color and balances out the sweetness.
- Berry compote: Simmer blueberries or raspberries with a bit of sugar and lemon juice for a sweet-tart topping.
Nutty and Crunchy:
- Chopped walnuts or pecans: Add some crunch and a toasty flavor.
- Granola or toasted coconut: A crunchy contrast to the soft pancakes.
Want to make it a full meal? Serve alongside crispy bacon, scrambled eggs, or a breakfast sausage for that sweet-and-savory combo.
Storing and Reheating Pancakes
Made too many pancakes? Lucky you! These store beautifully, and with the right method, they reheat just as soft and tasty as the day they were made.
Storing:
- Refrigerator: Stack cooled pancakes with parchment paper between each layer and place them in an airtight container. They’ll last up to 3 days.
- Freezer: Wrap pancakes individually or in small stacks with plastic wrap, then place them in a freezer bag. Label the bag and store for up to 2 months.
Reheating:
- Microwave: Place one or two pancakes on a plate and microwave for 20–30 seconds. Quick and easy.
- Oven: Preheat to 350°F (175°C) and warm pancakes on a baking sheet for about 10 minutes.
- Toaster: Great for a crisp edge—just pop them in like a slice of bread.
Pro Tip: Avoid reheating in a frying pan, as it can dry them out unless you’re using a lid to trap moisture.
Tips for the Fluffiest Pancakes
Want pancakes that look and taste like they came from your favorite brunch spot? Here are some game-changing tips to make your stack stand tall and fluffy.
- Don’t Overmix the Batter: Seriously—stop stirring as soon as the dry ingredients disappear. Overmixing leads to gluten development, which makes pancakes chewy instead of tender.
- Let the Batter Rest: Letting the batter sit for even 5–10 minutes allows the flour to fully hydrate and the leavening agents to do their job.
- Check Your Baking Powder: Old baking powder = flat pancakes. If it’s more than 6 months old, it might be time to replace it.
- Use Buttermilk (Optional): Want extra tang and tenderness? Swap out regular milk for buttermilk. You’ll love the difference.
- Low and Slow Wins the Race: Cook on medium to medium-low heat for even browning without burning the outsides.
Following these tips will guarantee a tall stack of golden pancakes every single time.
Making It Healthier
Love the idea of chocolate chip pancakes but want to keep things a bit lighter? No worries—you can make adjustments without sacrificing flavor.
Ingredient Swaps:
- Whole wheat flour: Swap half or all of the all-purpose flour for whole wheat for added fiber.
- Natural sweeteners: Use honey, maple syrup, or coconut sugar instead of refined white sugar.
- Greek yogurt: Replace some of the butter or oil with Greek yogurt for added protein and moisture.
- Dark chocolate chips: Higher in cocoa, lower in sugar—and still super satisfying.
Lower-Calorie Toppings:
- Fresh fruit instead of syrup
- A dollop of low-fat Greek yogurt instead of whipped cream
- A drizzle of almond butter or nut-free alternatives
Healthier doesn’t have to mean boring, and with the right tweaks, you’ll still end up with a breakfast you’ll crave.
Chocolate Chip Pancake Variations
Once you’ve nailed the classic, why not branch out a bit? Pancakes are one of the most versatile breakfast foods, and there are countless ways to put your own spin on the basic recipe.
Double Chocolate Pancakes:
- Add 2 tablespoons of unsweetened cocoa powder to the dry mix for an ultra-chocolatey base.
- Use white chocolate chips for contrast.
Banana Chocolate Chip Pancakes:
- Mash a ripe banana into the wet ingredients.
- Top with banana slices and chopped nuts.
Vegan Chocolate Chip Pancakes:
- Use plant-based milk (almond, soy, oat)
- Replace egg with flax egg (1 tbsp ground flax + 3 tbsp water)
- Use vegan chocolate chips and coconut oil instead of butter
Gluten-Free Pancakes:
- Use a gluten-free flour blend with a 1:1 substitution ratio
- Add a touch of xanthan gum if your blend doesn’t include it
With a little creativity, the chocolate chip pancake possibilities are endless.
Kid-Friendly Pancake Fun
Chocolate chip pancakes are already a hit with kids, but why not take breakfast from fun to unforgettable? Here are some creative ways to get your little ones even more excited about breakfast:
Shapes and Designs:
- Cookie cutters: Pour the batter into metal cookie cutters on the griddle to make heart, star, or dinosaur-shaped pancakes.
- Pancake art: Use a squeeze bottle to “draw” letters, numbers, or animals with the batter. Start with outlines, then fill them in.
Interactive Toppings Bar:
Set up a build-your-own pancake station. Include small bowls of:
- Chocolate chips (white, dark, or milk)
- Sprinkles
- Sliced fruit
- Mini marshmallows
- Nut butters
Let them decorate their stack like an edible masterpiece!
Colorful Creations:
- Add natural food coloring to the batter for colorful pancakes (use beet juice for pink, matcha for green, or blueberries for purple).
- Let them swirl the colors into tie-dye pancakes.
Getting kids involved not only makes breakfast more fun—it can also help picky eaters become more adventurous!
Chocolate Chip Pancakes for Special Occasions
Chocolate chip pancakes aren’t just for lazy Sundays—they’re also the perfect way to celebrate life’s little moments. Here’s how to turn them into the star of the show:
Birthday Breakfast:
- Add rainbow sprinkles to the batter for “funfetti” pancakes.
- Top with whipped cream, candles, and a drizzle of chocolate syrup.
Valentine’s Day:
- Use a heart-shaped cookie cutter and add red berries and a dusting of powdered sugar.
- Make them pink with a little beet juice or red food coloring in the batter.
Holiday Mornings:
- Christmas: Add cinnamon, nutmeg, and mini white chocolate chips.
- Halloween: Use orange and black sprinkles or food coloring.
- Easter: Serve with pastel-colored candies and fresh berries.
Pancakes can turn any morning into a mini celebration. It’s all about the little touches that make the moment feel extra special.
Common Mistakes to Avoid
Even the most straightforward recipes can go off track with a few small missteps. Let’s break down the most common pancake-making mistakes so you can avoid them like a pro.
1. Overmixing the Batter
We’ve said it before, but it’s worth repeating: overmixing = tough pancakes. Stir until combined—lumps are your friend here.
2. Flipping Too Soon
If you flip before the bubbles form and the edges set, you risk a messy, undercooked pancake. Be patient.
3. Using the Wrong Pan Temperature
Too hot and you’ll burn the outside before the inside is done. Too cool and you won’t get that golden color. Stick with medium to medium-low heat.
4. Skipping the Resting Time
Let the batter rest! It’s a tiny step that yields huge results in texture.
5. Not Greasing the Pan
Even with non-stick, a bit of butter or oil gives your pancakes that irresistible golden edge and prevents sticking.
Being mindful of these small details can be the difference between “meh” pancakes and breakfast glory.
Why Chocolate Chip Pancakes Are a Family Favorite
There’s a reason chocolate chip pancakes are a breakfast staple in homes across the world. They’re nostalgic, comforting, and just plain fun. But there’s more to their appeal than meets the eye.
- Versatility: Sweet or slightly savory, for kids or adults, they’re endlessly customizable.
- Ease of Preparation: Quick to whip up with pantry staples, even on a weekday morning.
- Universal Appeal: Who can resist the combo of soft pancakes and melted chocolate? It hits every craving.
- Memory Maker: Whether it’s a sleepy Saturday or a birthday breakfast surprise, chocolate chip pancakes bring people together.
They’re the kind of food that creates traditions—one delicious stack at a time.
FAQs about Chocolate Chip Pancake Recipe
Q1: Can I use pancake mix for chocolate chip pancakes?
Absolutely! Store-bought pancake mix is a quick shortcut. Just add chocolate chips and a splash of vanilla to give it that homemade magic.
Q2: What kind of chocolate chips work best?
Semi-sweet chips are the go-to, but feel free to get wild with dark, milk, or even white chocolate if you’re feeling adventurous.
Q3: How do I keep the chocolate chips from sinking?
Easy hack: toss your chocolate chips in a little flour before mixing them into the batter. It keeps them from pulling a Titanic.
Q4: Can I make these pancakes ahead of time?
Yes, chef! Make a batch, let them cool, then freeze with parchment paper between layers. Reheat in a toaster or microwave for pancake bliss on demand.
Q5: Are chocolate chip pancakes healthy?
Let’s be honest—these are a treat. But you can lighten them up by using whole wheat flour, bananas instead of sugar, and dark chocolate chips for a health-ish twist.
Q6: Can I make this recipe gluten-free?
Yep! Just sub in a good gluten-free flour blend and make sure your chocolate chips are certified GF.
Q7: What’s the secret to fluffy pancakes?
Don’t overmix the batter. A few lumps are okay—perfection is overrated, fluff is not.
Q8: Can I add toppings?
Heck yes. Think whipped cream, syrup, banana slices, or a dusting of powdered sugar for that Instagram-worthy finish.
Conclusion
Whether you’re a seasoned cook or just starting out in the kitchen, chocolate chip pancakes are a guaranteed win. They’re warm, fluffy, rich with melted chocolate, and endlessly adaptable to any palate or occasion. With the step-by-step guidance provided here, you’re all set to master the art of the perfect pancake—crispy on the edges, tender in the center, and bursting with chocolatey goodness in every bite.
So go ahead, whip out that skillet, mix up some magic, and treat yourself or your loved ones to a breakfast that feels like a warm hug. Just remember: pancakes are more than food—they’re a moment of joy, best served hot and shared with a smile.