Chocolate Chip Cookie Recipe: There’s something magical about chocolate chip cookies, isn’t there? One bite, and suddenly you’re back in your childhood kitchen, watching cookies rise in the oven while the sweet aroma wraps around you like a warm blanket.
This recipe is designed for consistent, bakery-quality results. Whether you’re baking for family, friends, or even planning to sell cookies professionally, you’ll find every detail covered here. From ingredient selection to baking techniques, you’ll learn how to create cookies that look as good as they taste.
Ready to transform basic pantry ingredients into something extraordinary? Let’s dive in and make chocolate chip cookies the right way—step by step.
The History Behind Chocolate Chip Cookies
Before we get into the mixing bowls and measuring cups, let’s appreciate where these iconic cookies came from. Chocolate chip cookies weren’t invented by accident—but they were certainly a happy surprise.
Back in the 1930s, Ruth Wakefield, owner of the Toll House Inn in Massachusetts, was experimenting with a butter cookie recipe. She chopped up a Nestlé semi-sweet chocolate bar and added the pieces into her dough, expecting them to melt completely. Instead, the chocolate softened but held its shape. The result? The world’s first chocolate chip cookie.
That simple innovation changed baking forever. Nestlé later struck a deal with Wakefield to print her recipe on chocolate bar wrappers, making chocolate chip cookies a household staple across America—and eventually the world.
Over time, bakers began tweaking the recipe. Some preferred crispy and thin cookies, others loved thick and chewy ones. Brown sugar was added for moisture. Extra egg yolks for richness. Sea salt for contrast. What started as one recipe evolved into hundreds of variations.
Today, chocolate chip cookies remain one of the most searched and baked dessert recipes globally. Why? Because they’re comforting, customizable, and nearly impossible to resist.
Understanding the history reminds us of one thing: baking is both science and creativity. And now, you get to be part of that delicious tradition.
Why This Chocolate Chip Cookie Recipe Works
Ever followed a cookie recipe exactly, only to end up with flat, greasy disks? Or maybe dry, crumbly lumps? Frustrating, right? That’s because baking isn’t just cooking—it’s chemistry.
This chocolate chip cookie recipe works because every ingredient has a specific purpose. Nothing is random. Every measurement matters.
Here’s why:
- Butter provides richness and affects spread.
- Brown sugar adds moisture and chewiness due to its molasses content.
- White sugar helps create crisp edges.
- Eggs bind everything together while adding structure.
- Baking soda ensures proper rise and browning.
- Salt enhances flavor and balances sweetness.
- Vanilla extract deepens the overall taste.
The method also plays a critical role. Creaming butter and sugar properly incorporates air, giving cookies structure. Chilling the dough prevents excessive spreading. Baking at the correct temperature ensures golden edges without burning.
This isn’t guesswork. It’s a carefully structured process that guarantees:
- Thick centers
- Even browning
- Balanced sweetness
- Melted chocolate pockets
- Perfect texture contrast
Think of this recipe as your blueprint. Follow it carefully, and you’ll consistently bake cookies that taste like they came straight from a high-end bakery.
Now, let’s gather what you need.
Ingredients You’ll Need
Great cookies begin with quality ingredients. While chocolate chip cookies use simple pantry staples, choosing the right type and measuring correctly makes all the difference.
Here’s everything you’ll need:
Dry Ingredients
- 2 ½ cups all-purpose flour
- 1 teaspoon baking soda
- 1 teaspoon salt
Wet Ingredients
- 1 cup (2 sticks) unsalted butter, softened
- ¾ cup granulated sugar
- ¾ cup brown sugar (packed)
- 2 large eggs (room temperature)
- 2 teaspoons pure vanilla extract
Chocolate & Optional Add-Ins
- 2 cups semi-sweet chocolate chips
- Optional: ½ cup chopped walnuts or pecans
- Optional: Flaky sea salt for topping
Each ingredient serves a purpose beyond flavor. For example, brown sugar contains molasses, which attracts moisture and makes cookies chewy. White sugar caramelizes during baking, creating crisp edges. Using room temperature eggs ensures even mixing and better texture.
Accuracy matters here. Baking isn’t forgiving like cooking. Too much flour? Dry cookies. Too little? Flat cookies. Always level your flour with a knife instead of scooping directly from the bag.
With ingredients ready, it’s time to explore how choosing the right versions can elevate your cookies even further.
Choosing the Right Ingredients for Best Results
You might think flour is just flour and sugar is just sugar—but small differences can dramatically change your cookies. Professional bakers obsess over ingredients for a reason.
Let’s break it down.
Flour: All-Purpose vs Bread Flour
All-purpose flour is ideal because it provides the perfect balance of protein. Bread flour has more protein, which can create chewier cookies—but sometimes too dense. If you prefer extra chewiness, you can replace ½ cup of all-purpose flour with bread flour for added structure.
Butter: Salted or Unsalted?
Unsalted butter is recommended. Why? Because it allows you to control the salt content precisely. Salted butter varies by brand, making results inconsistent. Softened butter—not melted—is key. Melted butter leads to thinner, denser cookies.
Sugar Combinations Explained
Using only white sugar makes cookies crispy. Using only brown sugar makes them moist but heavy. A 50/50 blend gives you the best of both worlds: crisp edges and soft centers.
Chocolate Types Compared
Semi-sweet chocolate chips are classic. Dark chocolate offers intensity. Milk chocolate makes sweeter cookies. Want gourmet results? Use chopped chocolate bars instead of chips—they create beautiful melted pools.
When you choose quality ingredients, your cookies instantly taste more professional. It’s like building a house—you need solid materials for a strong foundation.
Now, let’s move into the practical part: baking tools.
Essential Baking Tools
You don’t need a professional bakery setup to make perfect chocolate chip cookies—but having the right tools definitely helps. Think of tools as your silent assistants. They don’t speak, but they determine your results.
Here’s what you’ll need:
- Mixing bowls (one large, one medium)
- Electric hand mixer or stand mixer
- Measuring cups and spoons
- Rubber spatula
- Baking sheets
- Parchment paper or silicone baking mat
- Cooling rack
- Cookie scoop (recommended)
A cookie scoop may seem optional, but it ensures uniform size. Uniform cookies bake evenly. Uneven cookies? Some burn while others stay raw.
Parchment paper prevents sticking and promotes even browning. Avoid greasing the pan heavily—it can cause excessive spreading.
An electric mixer saves time and properly creams butter and sugar. While you can mix by hand, achieving the right fluffy texture is more difficult.
Preparation is half the battle. Once your tools are ready, the process becomes smooth and enjoyable.
Now, it’s time for the most important section—the step-by-step guide.
Step-by-Step Guide to Making Chocolate Chip Cookies
Step 1: Preparing Your Ingredients
Start by gathering all your ingredients and tools. Measure everything accurately—this is baking, not cooking, so precision matters. Allow your butter and eggs to come to room temperature; this helps them mix smoothly and evenly. Preheat your oven to 350°F (175°C) and line your baking trays with parchment paper.
Step 2: Creaming Butter and Sugar
In a large mixing bowl, beat the softened butter with granulated sugar and brown sugar. Cream them together until the mixture becomes light, fluffy, and pale in color. This step is crucial—it incorporates air, which gives your cookies a tender texture instead of a dense one.
Step 3: Adding Eggs and Vanilla
Add the eggs one at a time, mixing well after each addition. This helps the dough emulsify properly. Pour in the vanilla extract and mix again until everything is fully combined and smooth.
Step 4: Mixing Dry Ingredients Separately
In a separate bowl, whisk together the flour, baking soda, and salt. Mixing dry ingredients separately ensures even distribution, preventing pockets of salt or baking soda in the dough.
Step 5: Combining Wet and Dry Mixtures
Gradually add the dry ingredients into the wet mixture. Mix on low speed or fold gently with a spatula. Stop mixing as soon as no dry flour is visible—overmixing can make cookies tough.
Step 6: Folding in Chocolate Chips
Gently fold in the chocolate chips until evenly distributed throughout the dough. You can add a mix of milk, dark, or semi-sweet chips for deeper flavor.
Step 7: Chilling the Dough
Cover the dough and refrigerate for at least 30 minutes. Chilling firms up the butter, controls spreading, and intensifies flavor, giving you thicker, chewier cookies.
Step 8: Shaping the Cookies
Scoop the dough into equal portions using a spoon or cookie scoop. Roll lightly into balls and place them on the baking tray, leaving enough space between each cookie to allow spreading.
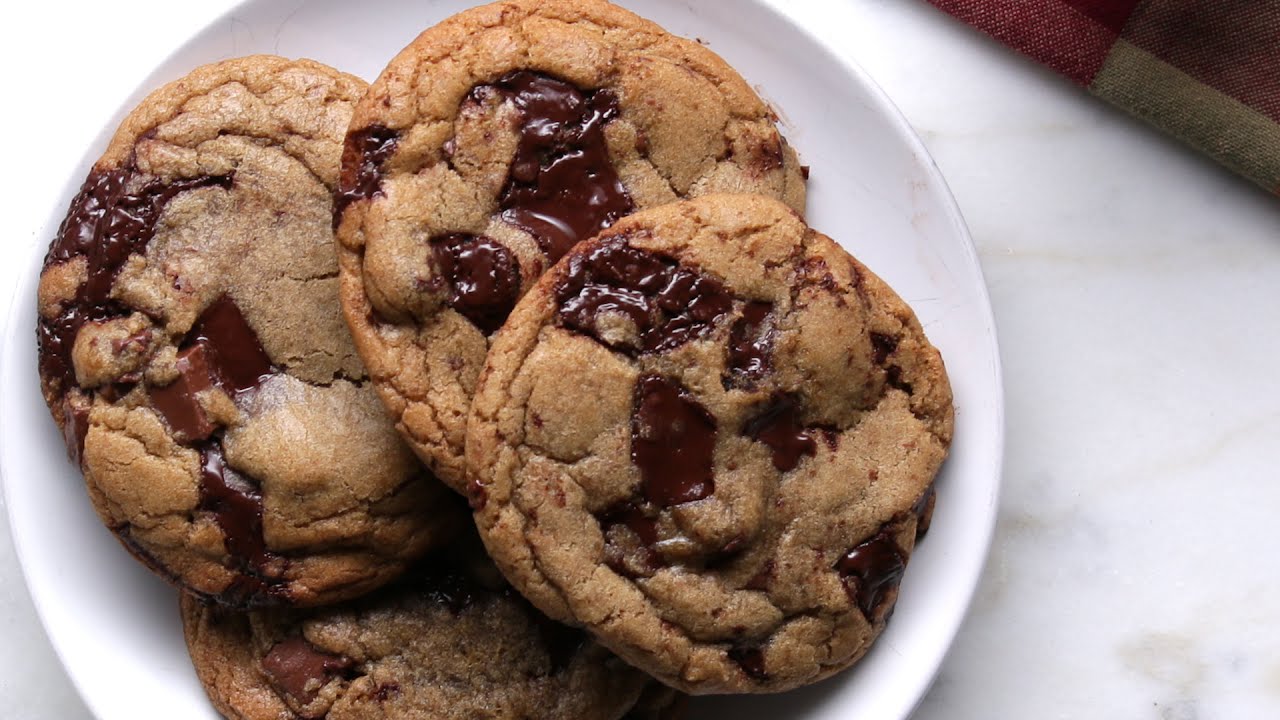
Step 9: Baking to Perfection
Bake in the preheated oven for 10–12 minutes, or until the edges are golden but the centers still look slightly soft. This ensures a chewy middle once cooled.
Step 10: Cooling and Serving
Let the cookies cool on the tray for 5 minutes before transferring them to a wire rack. Serve warm for gooey chocolate perfection, or store once fully cooled for later enjoyment.
Pro Tips for Soft, Chewy, or Crispy Cookies
Want softer cookies?
- Add an extra egg yolk.
- Slightly underbake.
Want crispier cookies?
- Increase white sugar slightly.
- Bake 1–2 minutes longer.
Want extra chewy?
- Use more brown sugar.
- Chill dough overnight.
Small tweaks create big differences.
Common Mistakes and How to Avoid Them
- Using melted butter → Causes flat cookies.
- Skipping chilling → Excessive spreading.
- Overmixing flour → Tough texture.
- Overbaking → Dry cookies.
- Incorrect flour measurement → Texture imbalance.
Avoid these, and success is guaranteed.
Storage and Shelf Life
Store cookies in an airtight container at room temperature for up to 5 days.
To keep them soft:
- Add a slice of bread inside the container.
Freeze baked cookies for up to 3 months.
Freeze dough balls and bake fresh anytime.
Nutritional Information Overview
| Nutrient | Per Cookie (Approx.) |
|---|---|
| Calories | 200 |
| Carbs | 26g |
| Fat | 10g |
| Protein | 2g |
| Sugar | 18g |
Values vary depending on portion size.
Creative Variations to Try
- Double chocolate chip
- White chocolate macadamia
- Peanut butter chocolate chip
- Oatmeal chocolate chip
- Stuffed Nutella cookies
Baking is creativity. Experiment.
FAQs About Chocolate Chip Cookie Recipe
1. Why did my cookies turn out flat?
Flat cookies are usually caused by butter that is too soft or partially melted. When butter is overly warm, it spreads too quickly in the oven. Skipping the chilling step can also lead to thin cookies, as chilled dough helps control spread and improves texture.
2. Can I use salted butter?
Yes, salted butter works perfectly fine. Just reduce or completely omit the added salt in the recipe to prevent the cookies from tasting overly salty. This adjustment keeps the flavor balanced without affecting texture.
3. How do I make thicker cookies?
For thicker cookies, chill the dough for at least 30–60 minutes before baking. You should also avoid flattening the dough balls on the tray. Using slightly more brown sugar than white sugar can also help create a thicker, chewier cookie.
4. Can I freeze cookie dough?
Absolutely. Scoop the dough into individual portions and freeze them on a tray until solid, then transfer to a freezer-safe bag. Bake straight from frozen, adding 1–2 extra minutes to the baking time.
5. What’s the best chocolate to use?
Semi-sweet chocolate chips are the classic choice, offering a balanced sweetness. For a richer flavor, use chopped dark chocolate or a mix of chocolate chunks and chips for varied texture and deeper chocolate notes.
Conclusion
Chocolate chip cookies aren’t just a dessert—they’re an experience. When made correctly, they offer crisp edges, soft centers, and rich chocolate in every bite. By following this step-by-step professional guide, you’re not just baking—you’re mastering technique, understanding ingredients, and creating consistent bakery-quality results.
Simple ingredients. Proper method. Incredible outcome.
Now it’s your turn. Preheat that oven.