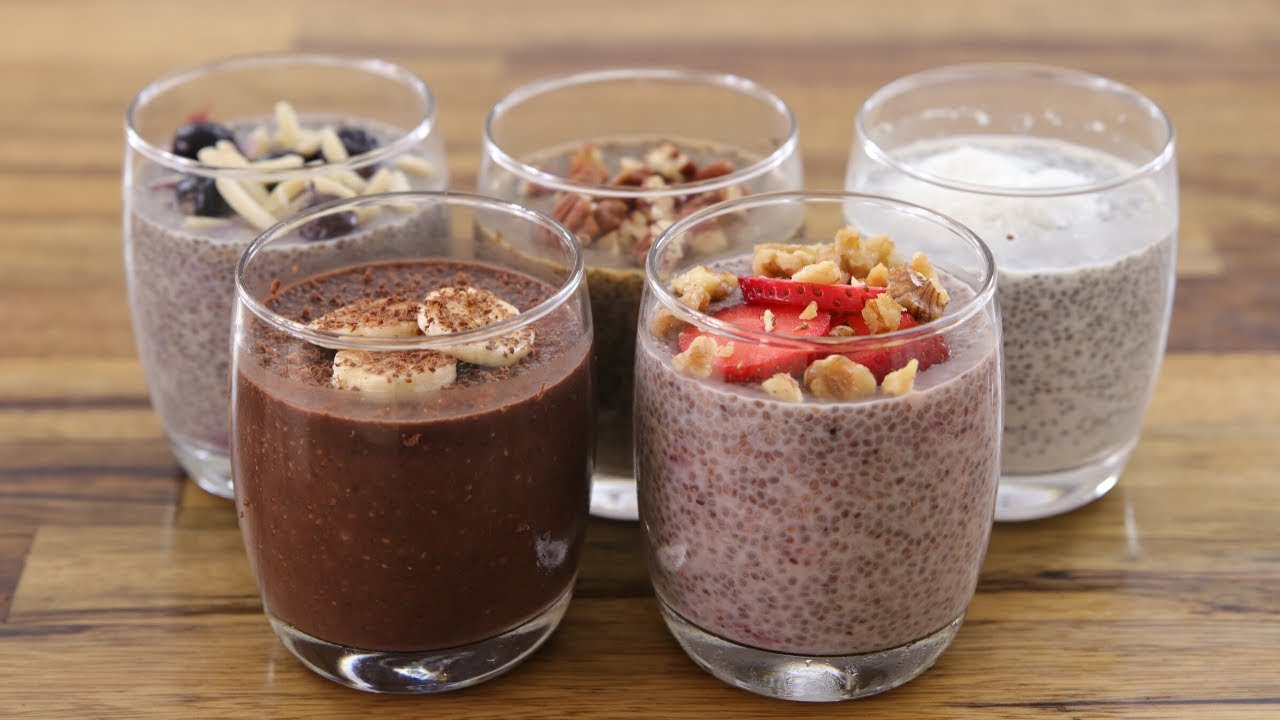
Chocolate Chia Pudding Recipe: Chocolate chia pudding is a delicious, nutrient-packed treat made by mixing chia seeds with milk, cocoa powder, and a natural sweetener. After a few hours of resting time, the chia seeds absorb the liquid, swell up, and create a thick, creamy, pudding-like texture. This wholesome dish has exploded in popularity across health and fitness communities, and it’s easy to see why: it’s rich in fiber, omega-3 fatty acids, antioxidants, and plant-based protein.
Unlike traditional puddings that are cooked on the stove and often loaded with sugar, this one is raw, made with whole ingredients, and can be customized endlessly. It can be enjoyed cold or slightly warm, depending on your preference. Whether you’re preparing a wholesome breakfast, a post-workout snack, or a guilt-free dessert, chocolate chia pudding hits the sweet spot.
It’s also incredibly easy to make—no cooking skills required. Just stir, chill, and enjoy! With a silky, pudding-like texture and rich cocoa flavor, it satisfies dessert cravings while still keeping your health goals in check.
Why It’s a Great Choice for Breakfast or Dessert
One of the best things about chocolate chia pudding is its versatility. You can serve it as a healthy breakfast, a light lunch, or a decadent yet clean dessert. Why? Because it offers the perfect balance of taste, convenience, and nutrition. It feels indulgent like a dessert, but it fuels your body like a superfood meal.
For breakfast, it’s a brilliant alternative to oatmeal or smoothies—especially when you’re on the go. You can make it in batches, portion it into jars, and grab one from the fridge on busy mornings. It’s naturally filling thanks to the high fiber content in chia seeds, so it keeps you full for hours.
As a dessert, it’s low in sugar (especially if you use natural sweeteners like maple syrup or dates), dairy-free (if you use plant milk), and gluten-free. It fits easily into vegan, keto, and paleo diets. Top it with berries, nuts, or even a dollop of peanut butter, and you’ve got a heavenly treat that doesn’t wreck your diet.
Health Benefits of Chia Seeds and Cocoa
Chia seeds are often hailed as a superfood, and for good reason. Here’s a breakdown of what makes them special:
- High in Omega-3 Fatty Acids: These healthy fats help reduce inflammation and support heart health.
- Rich in Fiber: Just two tablespoons of chia seeds provide around 11 grams of fiber, which aids digestion and helps you feel full.
- Packed with Protein: Great for vegetarians and vegans looking to boost their protein intake naturally.
- Loaded with Antioxidants: Chia seeds help combat oxidative stress in the body.
Cocoa, on the other hand, isn’t just about that chocolatey goodness—it brings its own health perks:
- Mood-Boosting Properties: Cocoa increases serotonin and endorphin levels.
- Heart Health Benefits: It’s rich in flavonoids, which can improve blood flow and lower blood pressure.
- Good Source of Iron and Magnesium: Both essential for energy production and muscle health.
Put these two together, and you’ve got a powerhouse of nutrition in a humble little jar of pudding.
Ingredients You’ll Need
Main Ingredients List
To make a basic batch of chocolate chia pudding, you only need a handful of pantry staples:
- Chia Seeds – 3 tablespoons
- Unsweetened Cocoa Powder – 1 to 2 tablespoons (depending on how chocolatey you like it)
- Milk of Choice – 1 cup (almond milk, oat milk, coconut milk, or dairy milk)
- Sweetener – 1 to 2 teaspoons of maple syrup, honey, agave, or a keto-friendly alternative like stevia or erythritol
- Vanilla Extract (Optional) – ½ teaspoon for added depth of flavor
- Salt (Optional) – A tiny pinch to balance the sweetness
Each of these ingredients plays a key role: the chia seeds thicken the pudding, the milk acts as the base, and the cocoa gives it that indulgent chocolatey flavor. The sweetener can be adjusted to your preference or dietary needs.
Optional Add-Ins and Toppings
Here’s where you can get creative. The toppings and mix-ins can elevate your pudding from good to gourmet:
Mix-Ins:
- Greek yogurt (for creaminess)
- Protein powder (for a post-workout treat)
- Mashed banana (for natural sweetness)
- Peanut or almond butter (for extra richness)
Toppings:
- Fresh berries (strawberries, raspberries, blueberries)
- Shredded coconut
- Chopped nuts or seeds (walnuts, almonds, sunflower seeds)
- Dark chocolate chips or cacao nibs
- A drizzle of nut butter
These additions not only enhance the flavor but also boost the nutritional profile. A sprinkle of chopped nuts can add healthy fats, while a few berries contribute antioxidants and a burst of color.
Substitutes for Dietary Restrictions (Vegan, Keto, etc.)
Chia pudding is naturally flexible, making it a favorite for people with dietary restrictions.
Vegan?
- Use plant-based milk (almond, soy, oat, coconut)
- Opt for maple syrup or agave instead of honey
Keto or Low-Carb?
- Stick with unsweetened almond or coconut milk
- Sweeten with erythritol, stevia, or monk fruit
- Add cacao powder instead of regular cocoa for less sugar
Nut-Free?
- Use oat milk, rice milk, or coconut milk
- Avoid nut-based toppings like almonds or peanut butter
Gluten-Free?
- All core ingredients in chia pudding are naturally gluten-free. Just double-check your milk and toppings for any additives.
No matter your dietary lifestyle, chocolate chia pudding can be adapted to suit you. That’s what makes it such a winning recipe.
Kitchen Tools Required
Basic Tools You’ll Need
This recipe is so simple, you don’t need any fancy equipment. Here’s what you’ll need for the basic prep:
- Measuring Spoons and Cups – For accurate portioning
- Mixing Bowl or Mason Jar – To mix and store your pudding
- Whisk or Fork – For blending the ingredients together
- Spoon or Spatula – To stir and scoop
If you’re meal-prepping, mason jars work perfectly for individual servings. They’re easy to seal and store in the fridge.
Recommended Tools for Efficiency
Want to take your chia pudding game to the next level? Here are a few bonus tools that make prep even easier:
- Blender – To blend everything smooth if you prefer a mousse-like texture
- Electric Frother – For evenly mixing cocoa powder into the milk
- Wide-Mouth Funnel – Helps pour mixture cleanly into jars
- Rubber Spatula – Scrapes down the sides of your mixing bowl
These tools are optional, but if you’re making chia pudding often (and you will be once you try it), they’ll save you time and effort.
Step-by-Step Guide to Making Chocolate Chia Pudding
Step 1: Gather All Ingredients and Tools
Before you start, make sure everything is within reach. That means measuring out your chia seeds, cocoa powder, milk, sweetener, and any add-ins or toppings you want to include. Lay out your mixing bowl or jar and grab your whisk or spoon.
Pro tip: if your cocoa powder tends to clump, you can sift it first to make mixing easier. Also, prep your jars or containers ahead of time if you’re planning to store the pudding for meal prep or later use.
Step 2: Mix the Ingredients Thoroughly
Once everything is prepped, pour your milk of choice into the mixing bowl or jar. Add in the cocoa powder, sweetener, vanilla extract, and a tiny pinch of salt if you’re using it. Whisk these together until fully combined. Make sure there are no clumps of cocoa powder sticking to the sides.
Now, sprinkle in the chia seeds. This part is important: don’t just dump them in and walk away. Stir them in right away to prevent clumping. Chia seeds gel up quickly, so mixing thoroughly now helps create a smooth, even texture later on.
Stir for a solid minute or two to ensure everything is well blended. The mixture should be thin and runny at this stage—it will thicken as the chia seeds absorb the liquid. If you’re adding optional ingredients like mashed banana or nut butter, do so during this step and blend well.
If you’re using a jar with a lid, you can shake it vigorously instead of stirring. Just make sure it’s tightly sealed!
Step 3: Let It Sit and Gel
This is the magic step. After your ingredients are thoroughly mixed, let the mixture sit for about 10–15 minutes at room temperature. During this time, the chia seeds begin absorbing the liquid and expanding, turning the mixture into a thick, pudding-like consistency.
It’s tempting to skip this and toss it straight into the fridge, but this short rest period makes a big difference. It allows the seeds to start their gelling process and gives you a chance to stir again before refrigerating—preventing clumps from forming.
After 15 minutes, check the texture. It should already be noticeably thicker. Give it another quick stir to break up any seeds that may have settled or bunched up at the bottom. Then it’s ready to chill!
Step 4: Stir Again to Avoid Clumping
After the initial rest, stir the mixture again very well. This second stir is critical for a smooth pudding. Chia seeds have a tendency to sink and clump together, especially in thicker liquids like oat or coconut milk. Stirring again redistributes the seeds evenly and ensures that every bite will have the same creamy texture.
Use a fork, whisk, or spoon to break up any lumps. If your cocoa powder or sweeteners weren’t fully blended earlier, now is the time to fix that.
At this point, the pudding should be thick but pourable. It should coat the back of a spoon but still be able to move if you tilt your bowl or jar. If it feels too thin, don’t worry—refrigeration will firm it up even more.
Step 5: Refrigerate Overnight
Once you’re happy with the mixture, cover it with a lid or plastic wrap and place it in the fridge. The pudding needs at least 4 hours to set properly, but overnight is best for maximum thickness and flavor development.
During this time, the chia seeds fully absorb the liquid and form a gel-like consistency, transforming the mixture into a pudding that’s spoonable, creamy, and satisfying.
If you’re making breakfast or meal prep, this is where the convenience kicks in. Make a few jars in the evening, and by morning you’ll have a week’s worth of grab-and-go meals ready to enjoy.
When you’re ready to eat, just give it a good stir, add your favorite toppings, and dig in!
Tips for Perfect Texture and Flavor
How to Avoid Lumps
Lumpy chia pudding is the number one complaint from beginners, but it’s totally avoidable. The key is in the stirring. You must:
- Stir immediately after adding the seeds.
- Stir again after 10–15 minutes.
- Optionally stir one more time an hour later if you’re still awake!
Other tips include:
- Sift your cocoa powder before mixing to prevent dry clumps.
- Use a whisk instead of a spoon for better ingredient distribution.
- Consider blending the mixture if you prefer a mousse-like texture instead of the classic seedy pudding.
Consistency is everything, and a few extra stirs go a long way toward pudding perfection.
Sweetness Adjustments
Everyone has a different sweet tooth, so feel free to adjust the sweetness to your taste. Here’s how to do it right:
- Start with 1 to 2 teaspoons of your preferred sweetener.
- After the pudding sets, taste it. If it’s not sweet enough, stir in a little more.
- Avoid over-sweetening in the beginning—chilling can enhance flavors, and some toppings like fruit or chocolate chips will add sweetness too.
Want it sugar-free? Go for stevia or monk fruit extract. Prefer something more natural? Maple syrup and mashed bananas are both healthy and tasty alternatives.
Getting the Creamiest Consistency
For extra creaminess, try one of these hacks:
- Use full-fat coconut milk for a thick, rich pudding.
- Add a spoonful of Greek yogurt or plant-based yogurt to the mix.
- Blend the mixture after it has set for a smoother texture.
Creamy chia pudding is all about fat content and smooth blending. Don’t be afraid to experiment until you find your perfect combo.
Serving Suggestions
Best Toppings for Chocolate Chia Pudding
Toppings take your chocolate chia pudding from “meh” to mouthwatering. Not only do they add visual appeal, but they also bring different textures and flavors to the dish.
Here are some top-tier toppings you should definitely try:
- Fresh Fruits: Sliced bananas, strawberries, raspberries, and blueberries add a natural sweetness and a pop of color.
- Nut Butters: Drizzle peanut butter, almond butter, or cashew butter for creamy richness.
- Crunchy Nuts & Seeds: Toasted almonds, walnuts, sunflower seeds, or pumpkin seeds add a satisfying crunch.
- Coconut Flakes: Whether toasted or raw, coconut adds tropical flavor and texture.
- Chocolate Chips or Cacao Nibs: Perfect for chocolate lovers—adds both crunch and extra chocolate intensity.
- Granola: Great for breakfast-style puddings, offering crunch and fiber.
Toppings are your chance to get creative. Mix and match depending on your mood, season, or diet preferences.
Layering Ideas for Parfaits
Want to elevate your chia pudding for brunch or a fancy dessert? Turn it into a parfait! Layering is simple, but the results are stunning and delicious.
Try these layering ideas:
Classic Berry Parfait
- Bottom layer: Chocolate chia pudding
- Middle layer: Vanilla Greek yogurt or coconut yogurt
- Top layer: Mixed berries and granola
Banana Split Parfait
- Chocolate chia pudding
- Sliced bananas
- Whipped coconut cream
- Chopped peanuts and chocolate shavings
Tropical Paradise
- Chocolate chia pudding
- Mango chunks and pineapple bits
- Toasted coconut and a mint leaf
You can layer in jars or glasses for visual appeal—perfect for serving guests or meal-prepping in style.
How to Make It Look Instagram-Worthy
We eat with our eyes first, right? Here’s how to turn your basic chia pudding into a photo-ready masterpiece:
- Use Clear Glass Jars or Cups – It showcases the layers and textures.
- Add Vibrant Toppings – Fresh fruits like kiwi, dragon fruit, or strawberries pop in photos.
- Drizzle Strategically – A drizzle of peanut butter or honey over the top gives a glossy, tempting look.
- Wipe the Rim – Before photographing or serving, clean the edges of your jar or bowl for a polished presentation.
- Use Natural Light – When snapping a photo, shoot near a window to capture that beautiful soft glow.
Even if you’re just eating it alone at your desk, a beautifully presented chia pudding can make your meal feel special.
Storage and Shelf Life
How Long Can You Store It?
Chocolate chia pudding is a dream for meal preppers. Once made, it stores beautifully in the refrigerator.
- Shelf Life: Up to 5 days in the fridge when stored in an airtight container.
- Ideal Containers: Mason jars, glass meal prep containers, or any sealable container with a tight lid.
The longer it sits, the thicker it becomes. If it gets too thick for your liking, just stir in a splash of milk before serving.
Freezing Chia Pudding
Yes, you can freeze chia pudding, but there are a few things to know:
- Portion it into freezer-safe containers.
- Leave some room at the top for expansion.
- Freeze for up to 1 month.
- Thaw overnight in the fridge or gently at room temperature.
While freezing doesn’t harm the taste, the texture might change slightly. Stir well after thawing to regain the original consistency.
Freezing is perfect if you like to batch prep or don’t want to waste leftovers.
Variations You Can Try
Chocolate Banana Chia Pudding
This one’s a crowd-pleaser. The banana adds natural sweetness, creaminess, and blends beautifully with chocolate.
How to Make It:
- Add ½ a mashed ripe banana to the base mixture.
- Use slightly less sweetener, as bananas are naturally sweet.
- Optional: Add a pinch of cinnamon or nutmeg for warmth.
Top with banana slices, crushed walnuts, and a drizzle of honey for a dessert-style pudding that tastes like banana bread and chocolate cake had a baby.
Mocha Chia Pudding
Calling all coffee lovers! The mocha version gives you your caffeine fix and a healthy treat in one.
What to Add:
- Replace half the milk with cooled brewed coffee or espresso.
- Add a tiny dash of cinnamon or nutmeg for depth.
- Sweeten to taste—mocha flavors shine when balanced with the right amount of sweetener.
This one is especially great in the morning or before a workout. It energizes and satisfies without the sugar crash.
Nut Butter Swirl Version
For a rich, indulgent twist, swirl in your favorite nut butter. Peanut butter, almond butter, or even Nutella-style hazelnut spreads can turn your chia pudding into a decadent dessert.
How to Do It:
- After your pudding is set, stir in 1–2 teaspoons of nut butter.
- Or, layer it with the pudding for a beautiful marble effect.
- Top with crushed peanuts or chocolate chips for extra flair.
This version is particularly filling and great for an afternoon snack or a healthy post-dinner sweet treat.
Nutritional Breakdown
Calories, Protein, Fiber
Chia pudding might feel like a treat, but it’s incredibly nutritious. Here’s a typical breakdown for a 1-cup serving of chocolate chia pudding made with unsweetened almond milk and maple syrup:
| Nutrient | Amount (Approx.) |
|---|---|
| Calories | 180–220 kcal |
| Protein | 6–8 grams |
| Fiber | 10–12 grams |
| Carbohydrates | 15–20 grams |
| Fat | 8–10 grams |
| Omega-3s | 5,000+ mg |
Chia Seeds: The star of the show, chia seeds are loaded with fiber and omega-3 fatty acids, which support heart and brain health.
Cocoa Powder: Packed with antioxidants and magnesium, cocoa helps with mood and energy.
Milk: Your choice of milk (dairy or plant-based) will slightly alter the macros, but generally contributes to protein and calcium.
Whether you’re counting macros, focusing on fiber, or just trying to eat cleaner, this pudding fits beautifully into most diets.
Benefits of Chia + Cocoa Combo
The pairing of chia seeds and cocoa isn’t just tasty—it’s nutritional synergy.
- Weight Management: High fiber content keeps you full longer, helping reduce snacking.
- Heart Health: Omega-3s and flavonoids from both chia and cocoa support healthy cholesterol levels.
- Energy & Mood: The combination of protein, magnesium, and complex carbs offers sustained energy without a crash.
- Antioxidant Boost: Both ingredients are rich in antioxidants, which fight inflammation and oxidative stress.
This is functional food at its finest—every spoonful does your body a favor.
Common Mistakes to Avoid
Using Wrong Ratios
The golden chia pudding ratio is about 3 tablespoons of chia seeds to 1 cup of liquid. Stray from this, and you’ll either get a soupy mess or a concrete block.
Common ratio mistakes:
- Too much liquid = watery pudding that never sets.
- Too many seeds = overly thick, hard-to-eat paste.
Stick to the standard ratio and adjust only slightly based on your texture preference.
Not Mixing Properly
Chia seeds love to clump together if not stirred well. You must:
- Stir immediately after adding chia seeds.
- Stir again after 10–15 minutes.
- Consider a third stir an hour later if you have time.
Skipping any of these steps often results in uneven texture—some parts too runny, others gelatinous.
Skipping the Second Stir
This one’s a game-changer. That second stir (10–15 minutes after the first) is what gives chia pudding its smooth, uniform texture. It breaks up clumps, redistributes the seeds, and ensures you don’t get weird layers in your pudding.
One extra minute of effort = significantly better results.
FAQs about Chocolate Chia Pudding Recipe
1. Can I eat chia pudding every day?
Absolutely! Chia pudding is packed with fiber, protein, and omega-3s, making it a great daily addition to your diet. Just ensure you’re drinking enough water, as chia seeds absorb liquid and you’ll want to stay hydrated.
2. How long should chia pudding sit before eating?
The minimum is about 4 hours, but overnight is best for the creamiest texture. The longer it sits, the more the seeds absorb and the smoother the consistency becomes.
3. Can I blend chia pudding?
Yes, blending chia pudding turns it into a smooth, mousse-like texture. Simply blend the finished pudding (after it’s set) in a high-speed blender until creamy. This is great for people who don’t like the texture of whole seeds.
4. Is chia pudding good for weight loss?
Yes! It’s high in fiber and protein, which promotes fullness and helps reduce calorie intake throughout the day. Use a low-sugar sweetener and healthy toppings to keep it weight-loss friendly.
5. What milk works best for chia pudding?
Unsweetened almond milk is a popular choice due to its low calories and neutral flavor. However, oat milk, coconut milk, and dairy milk also work well. Choose based on your dietary needs and flavor preference.
Conclusion
From its superfood-packed ingredients to its creamy texture and customizable flavors, chocolate chia pudding deserves a regular spot in your kitchen rotation. It’s easy to make, incredibly forgiving, and endlessly adaptable. You can make it keto, vegan, paleo, low-sugar, or high-protein—whatever fits your lifestyle.
So, the next time you’re craving chocolate, whip up a jar of this wholesome pudding. It tastes like dessert but fuels your body like breakfast. And once you master the base recipe, the variations are endless.