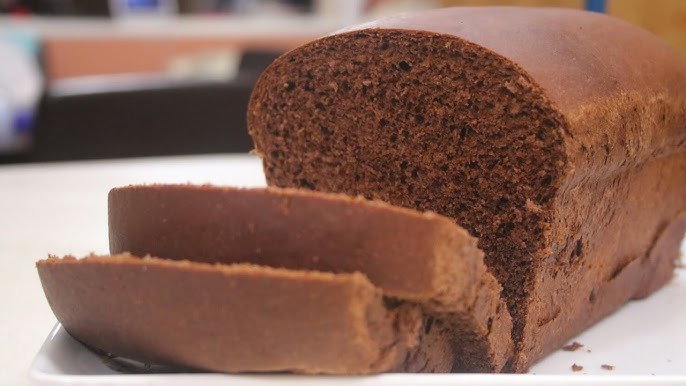
Chocolate Bread Recipe: Craving something rich, moist, and ultra-chocolaty? This chocolate bread recipe is here to satisfy every chocoholic’s dream. Whether you’re baking for a weekend treat or looking to impress someone, this chocolate bread will hit all the right notes—moist, fluffy, packed with real cocoa flavor, and loaded with melty chocolate chips. And the best part? It’s super easy to make at home with everyday pantry ingredients.
Unlike store-bought versions that often taste artificial or overly sweet, this homemade chocolate bread balances the richness of cocoa with just the right amount of sweetness. It’s like eating a slice of heaven with your morning coffee or late-night tea. You won’t believe how quick and simple this recipe is until you try it yourself. So grab your apron—let’s bake this chocolate dream from scratch.
Why You’ll Love This Chocolate Bread
Let’s be real—who doesn’t love chocolate? But this bread takes it to another level. It’s rich without being overpowering, sweet but not cloying, and moist with the perfect crumb. Here’s why this chocolate bread will become your go-to dessert or snack:
- Incredibly Moist Texture: Thanks to a mix of buttermilk and oil, the crumb stays tender and soft for days.
- Deep Chocolate Flavor: Made with real cocoa powder and chocolate chips, this isn’t some light-flavored loaf—it’s a full-on chocolate experience.
- No Mixer Required: Just a couple of bowls, a whisk, and you’re good to go.
- Versatile: Enjoy it plain, drizzle it with chocolate glaze, or even toast it slightly for a warm breakfast.
- Crowd-Pleaser: Perfect for kids, adults, or anyone who loves a good chocolate treat.
You’ll fall in love with how easy and rewarding it is to whip up this delicious bread. It tastes gourmet but requires zero fuss.
Tools & Equipment You’ll Need
Before diving into the recipe, make sure you have these tools on hand. It’ll make the process smoother and more enjoyable:
- Mixing bowls (1 large, 1 medium)
- Whisk and rubber spatula
- Measuring cups and spoons
- 9×5 inch loaf pan
- Parchment paper (optional, for easy removal)
- Cooling rack
- Toothpick (for doneness test)
Having everything ready before you start helps avoid mid-recipe chaos. Trust me, prepped kitchens make for happy bakers!
List of Ingredients You’ll Need
Time to get your pantry and fridge involved! These are the simple but powerful ingredients that turn basic batter into chocolatey bliss.
Dry Ingredients
- 1 and ¾ cups (220g) all-purpose flour
- ½ cup (45g) unsweetened cocoa powder (Dutch-process or natural)
- 1 teaspoon baking soda
- ½ teaspoon baking powder
- ½ teaspoon salt
- 1 cup (200g) granulated sugar
- ½ cup (100g) light brown sugar, packed
Wet Ingredients
- 2 large eggs
- 1 cup (240ml) buttermilk (or use milk with 1 tbsp vinegar as a substitute)
- ½ cup (120ml) vegetable oil (canola or sunflower work great)
- 1 teaspoon vanilla extract
Optional Add-ins
- 1 cup (170g) semi-sweet or dark chocolate chips
- ½ cup chopped walnuts or pecans
- Pinch of espresso powder (enhances chocolate flavor)
You probably already have most of these in your kitchen. Let’s make them shine!
Choosing the Right Cocoa Powder
Not all cocoa powders are created equal. Your choice here makes a huge difference in flavor and texture. You can use either:
- Natural cocoa powder: Slightly acidic, lighter in flavor.
- Dutch-processed cocoa: Smoother, richer, less bitter.
For this recipe, either one works—but if you want that deeper, more intense chocolate flavor, go Dutch. Just make sure your baking soda/powder combo matches the type (Dutch pairs better with baking powder, but we balance both here).
Also, avoid cocoa mixes like hot chocolate powder. They’re sweetened and diluted, which will throw off the flavor.
Best Chocolate Chips to Use
Let’s talk chips. The chocolate chips you choose can either elevate or ruin your loaf. Go for:
- Semi-sweet chips for classic chocolatey richness.
- Dark chocolate chips for a more adult, less sweet flavor.
- Milk chocolate chips for a sweeter loaf (great for kids).
- Mini chips if you want a more even distribution.
Feel free to mix and match. A blend of dark and milk chocolate can add dimension. Also, tossing the chips in a tablespoon of flour keeps them from sinking to the bottom of your bread while baking. Smart move, right?
Step-by-Step Guide to Make Chocolate Bread
Here’s where the magic begins. Follow each step carefully and you’ll have a chocolate loaf that’s bakery-level delicious.
Step 1: Prepare Your Oven and Pan
Preheat your oven to 350°F (175°C). Grease a 9×5-inch loaf pan with butter or non-stick spray. For easy removal, line it with parchment paper and let the sides hang over like handles.
A properly preheated oven ensures your bread rises perfectly and bakes evenly—so don’t skip this step.
Step 2: Mix Dry Ingredients
In a large mixing bowl, whisk together:
- All-purpose flour
- Cocoa powder
- Baking soda
- Baking powder
- Salt
- Both sugars
Whisking helps eliminate lumps and evenly distributes the leavening agents. Cocoa powder tends to clump, so be thorough. No one wants a bite full of dry cocoa!
Step 3: Combine Wet Ingredients
In a separate bowl, whisk together:
- Eggs
- Buttermilk
- Oil
- Vanilla extract
The eggs should be at room temperature so they mix more smoothly. Room temp ingredients blend better and give you a fluffier crumb. If you’re using milk + vinegar instead of buttermilk, let it sit for 5 minutes before mixing in.
Step 4: Mix Wet and Dry Together
Pour the wet ingredients into the dry ingredients slowly, stirring with a rubber spatula or wooden spoon. Don’t overmix—just fold until no flour pockets remain.
Overmixing develops gluten, which can make your bread dense and chewy instead of tender and soft. Think “just combined” not “beat into submission.”
Step 5: Fold in the Chocolate Chips
Now’s the time to add your chips (and nuts if using). Toss your chocolate chips in 1 tablespoon of flour first—this helps keep them from sinking.
Gently fold them into the batter using wide strokes. You want every slice to have gooey, melty chips without all of them sitting at the bottom.
Step 6: Pour into the Pan
Scrape the batter into your prepared loaf pan. Use a spatula to smooth the top evenly. Tap the pan lightly on the counter to release any trapped air bubbles.
If you want that café-style look, sprinkle a few extra chocolate chips on top. It’ll look professional and taste amazing.
Step 7: Bake the Bread
Pop your pan into the center of your preheated oven. Bake for 50 to 60 minutes. Start checking at the 50-minute mark.
Insert a toothpick into the center—if it comes out mostly clean (a few moist crumbs are fine), it’s done. If there’s wet batter, give it 5–10 more minutes.
Every oven is different, so trust your eyes and toothpick over the timer.
Step 8: Cooling and Serving
Remove the bread from the oven and let it cool in the pan for 15 minutes. Then transfer it to a cooling rack.
Let it cool fully before slicing—it’s hard, I know, but it helps the structure set. Warm slices tend to crumble more. Once cool, slice thick and serve!
Tips for Making the Perfect Chocolate Bread
Getting chocolate bread just right is a delicious science. With a few pro tips, you can avoid common pitfalls and make sure your loaf turns out like a masterpiece every single time.
- Room Temperature Ingredients: This makes a big difference in how smoothly your ingredients mix. Cold eggs or buttermilk can cause the batter to separate.
- Don’t Overmix: This is probably the golden rule in quick bread baking. Mix until ingredients are just combined. Overmixing = dense, rubbery bread.
- Measure Accurately: Baking is all about precision. Use the spoon and level method for dry ingredients—don’t scoop directly from the bag, or you’ll end up with too much flour.
- Sift the Cocoa Powder: Cocoa can be lumpy. Sifting helps create a smoother batter and better texture.
- Add Espresso Powder: Just a tiny pinch can intensify the chocolate flavor without making the bread taste like coffee.
- Check Oven Temp with a Thermometer: Most ovens run hot or cold. A simple oven thermometer can save your loaf from overbaking or underbaking.
- Cool Before Slicing: It’s tempting to cut into it while warm, but let it rest. The texture improves as it cools.
Remember, even if your first loaf isn’t perfect, it’s still going to taste incredible. And with each bake, you’ll get better and more confident!
Chocolate Bread Variations to Try
Want to switch things up? Chocolate bread is super customizable. Here are some fun and tasty ways to put a spin on the classic recipe:
- Chocolate Banana Bread: Replace ½ cup of buttermilk with 1 mashed ripe banana.
- Zucchini Chocolate Bread: Add 1 cup of grated zucchini for a healthier twist (plus moisture!).
- Chocolate Marble Bread: Reserve some plain batter and swirl it in for a marbled look.
- Mocha Bread: Add 1 tablespoon of instant espresso powder for a rich coffee flavor.
- Nutty Chocolate Bread: Mix in walnuts, pecans, or hazelnuts for extra crunch.
- Spiced Chocolate Bread: Add cinnamon, nutmeg, or chili powder for warmth and depth.
The base recipe is like a blank canvas. Once you master it, you can go wild with flavor experiments.
How to Store Chocolate Bread
Once your chocolate bread has cooled completely (yes, completely!), it’s time to think about storage. You want to keep it moist and delicious for as long as possible.
Here’s how:
- Room Temperature: Wrap tightly in plastic wrap or foil and keep in an airtight container. It will stay fresh for 2 to 3 days.
- Refrigeration: You can refrigerate it to extend the shelf life to 5–6 days. Just know it might dry out a bit in the fridge—reheat slices in the microwave for 10 seconds before eating.
- Keep It Airtight: Exposure to air = dried-out bread. Use Ziploc bags, storage containers, or wrap tightly to keep the air out.
Never store the bread while it’s still warm—it’ll create condensation and make the crust soggy. Let it cool fully first!
Can You Freeze Chocolate Bread?
Absolutely—and it freezes beautifully. Freezing is a smart way to always have a treat on hand when the chocolate cravings hit.
Here’s How to Freeze It Properly:
- Cool Completely: Never freeze warm bread. It traps moisture and creates ice crystals.
- Wrap Tightly: First in plastic wrap, then in aluminum foil, or use a freezer-safe zip-top bag.
- Label It: Write the date on the package so you don’t forget when you made it.
- Freeze for Up to 3 Months: It’ll still taste amazing months later if wrapped well.
To Reheat:
- Let the loaf thaw overnight in the fridge or on the counter.
- You can warm individual slices in the microwave for 15–20 seconds.
- Or reheat the whole loaf in the oven at 300°F (150°C) for 10–15 minutes.
Freezing doesn’t mean sacrificing flavor. Done right, it tastes almost as fresh as day one.
How to Reheat for Best Taste
While chocolate bread tastes amazing at room temperature, reheating it takes it to a whole new level—especially if you love melty chocolate chips.
Here are the best reheating methods:
For Individual Slices:
- Microwave: 10 to 15 seconds max. More than that and you risk making it rubbery.
- Toaster Oven: Toast on low heat until just warm. Adds a slightly crisp edge!
For the Whole Loaf:
- Preheat oven to 300°F (150°C)
- Wrap the loaf in foil to prevent it from drying out.
- Warm for 10 to 15 minutes.
Add a bit of butter, nut butter, or even a scoop of vanilla ice cream on the side… you’re welcome.
Common Mistakes to Avoid
Even with simple recipes, there are traps that can sabotage your chocolate bread. Here’s what not to do:
- Overmixing the Batter: Creates dense, gummy texture.
- Using Cold Ingredients: Causes the batter to seize and mix unevenly.
- Baking at the Wrong Temperature: Too hot and it dries out. Too cool and it doesn’t rise properly.
- Skipping the Cooling Time: Slicing too early leads to crumbly slices.
- Overloading with Mix-ins: Too many chips or nuts can weigh down the loaf and affect baking time.
- Not Testing for Doneness Properly: Always use a toothpick. Your eyes can lie, but a toothpick doesn’t.
Avoid these pitfalls, and you’re on the road to chocolate bread greatness.
Serving Suggestions
Chocolate bread is surprisingly versatile. Here are some fun and delicious ways to enjoy it:
- Classic with Coffee or Milk: Simple and comforting.
- Topped with Whipped Cream: For a quick dessert vibe.
- Drizzled with Chocolate Ganache: For serious chocolate lovers.
- Sliced and Toasted: Gives it a crispy edge—top with butter or Nutella.
- Made into French Toast: Yes, really. Soak in egg mixture and fry—mind. blown.
No matter how you serve it, chocolate bread brings that cozy, homemade feel you just can’t get from a store.
FAQs about Chocolate Bread Recipe
Q1: Can I use whole wheat flour instead of all-purpose?
Yes, but the bread will be denser and slightly more bitter. You can try using half whole wheat and half all-purpose for a better balance.
Q2: Can I make this recipe vegan?
Absolutely. Replace eggs with flax eggs, use plant-based milk + vinegar, and choose dairy-free chocolate chips.
Q3: Why did my chocolate bread sink in the middle?
Usually due to underbaking or overmixing. Always test with a toothpick and avoid opening the oven too early.
Q4: Can I double the recipe?
Yes, but bake in two separate loaf pans to ensure even cooking.
Q5: How do I know if my bread is overbaked?
If it’s dry or crumbly, it’s likely overbaked. Keep a close eye in the last 10 minutes and check with a toothpick.
Conclusion
There’s something magical about chocolate bread. It walks the line between cake and bread, breakfast and dessert. It’s indulgent yet simple. Fancy enough to serve guests but easy enough to whip up on a lazy Sunday.
This recipe is reliable, forgiving, and completely customizable. Whether you follow it to a tee or tweak it to suit your tastes, it’s bound to become one of your go-to baked treats. So the next time you need something chocolatey, warm, and homemade—this loaf’s got your back.
Happy baking, and enjoy every delicious bite!


