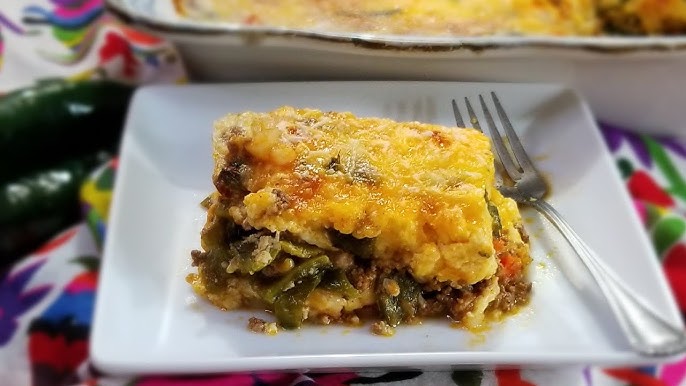
Chili Relleno Casserole Recipe: If you love the smoky heat of green chiles and the gooey goodness of melted cheese, then you’re in for a treat with this Chili Relleno Casserole. It’s everything you adore about traditional chili rellenos—minus the messy deep frying. This dish brings comfort, warmth, and spice straight to your dinner table, all wrapped up in an easy-to-make casserole. Whether you’re cooking for your family on a busy weeknight or preparing a crowd-pleaser for your next potluck, this recipe is a total game-changer.
The beauty of this casserole lies in its simplicity. You get all the flavors of a classic Mexican dish in a much more convenient form. It’s also flexible—you can tweak the heat level, add some meat, or keep it vegetarian. And the best part? It comes together in just one dish with minimal cleanup. Let’s dive into this cheesy, spicy, savory masterpiece.
Ingredients You’ll Need
To get started, you’ll need a mix of pantry staples and fresh ingredients. Here’s what goes into the ultimate Chili Relleno Casserole:
Main Ingredients:
- 6-8 roasted green chiles (like Anaheim or Poblano), peeled and seeded
- 2 cups shredded Monterey Jack cheese
- 1 cup shredded cheddar cheese
- 4 large eggs
- 1 cup whole milk
- 1/4 cup all-purpose flour
- 1 teaspoon baking powder
- 1/2 teaspoon salt
- Cooking spray or butter (for greasing the dish)
These ingredients create the perfect balance of texture and flavor. The chiles bring the signature smokiness, while the cheeses add melty richness. The eggs and flour form a fluffy, golden crust that holds everything together beautifully.
Optional Add-ons for Extra Flavor:
- Cooked ground beef or chorizo for a meaty version
- A dash of cumin or smoked paprika
- Chopped onions or green onions for added bite
- Jalapeños if you like it spicy
- A handful of fresh cilantro for garnish
With these additions, you can turn your casserole into something uniquely yours.
Kitchen Tools and Equipment
You don’t need anything fancy to pull off this dish, but a few tools will make the process smooth and hassle-free.
Must-Have Utensils:
- 9×13 inch baking dish (glass or ceramic works best)
- Mixing bowls
- Whisk or fork
- Knife and cutting board
- Measuring cups and spoons
- Cheese grater
Tips to Make the Prep Easier:
- Use pre-shredded cheese if you’re short on time, though freshly grated gives better melt and flavor.
- Consider disposable gloves when handling chiles to avoid irritation.
- A food processor can speed up cheese shredding and batter mixing.
Being prepared saves you time and mess in the kitchen.
Prepping the Ingredients
Before you start layering and baking, prepping your chiles and cheese is key. Let’s break it down.
Roasting and Peeling the Chiles
If you bought fresh chiles, roast them first. Here’s how:
- Place the chiles directly over a gas flame or under the broiler.
- Turn frequently until the skin is blistered and blackened all over.
- Transfer them to a plastic bag or bowl covered with plastic wrap. Let them steam for 10 minutes.
- Peel off the skins gently, then slice open and remove seeds.
If you’re using canned whole green chiles, rinse and dry them well to reduce excess liquid.
Shredding Cheese the Right Way
Freshly shredded cheese melts better and tastes richer. Use a coarse grater and shred both Monterey Jack and cheddar into separate bowls. Mix them together or layer them individually for a multi-dimensional cheesy taste.
Now that everything’s prepped, you’re ready to put it all together.
Step-by-Step Cooking Instructions
Here comes the fun part—assembling and baking your Chili Relleno Casserole.
Step 1: Preheat the Oven
Set your oven to 350°F (175°C). Grease your 9×13 inch baking dish with butter or cooking spray to prevent sticking.
Step 2: Layering the Chiles and Cheese
- Lay half the roasted chiles flat on the bottom of the dish.
- Spread half the shredded cheese evenly over the chiles.
- Repeat with another layer of chiles and then the remaining cheese.
This layered method gives each bite the perfect combo of chile and cheese.
Step 3: Mixing the Egg Batter
In a mixing bowl:
- Beat the eggs until frothy.
- Whisk in the milk, flour, baking powder, and salt until smooth.
- Pour this mixture evenly over the chile and cheese layers.
This batter will puff up and bind everything together like a fluffy, cheesy quiche.
Step 4: Assembling the Casserole
Once your egg mixture is in, gently tap the dish on the counter to remove air bubbles. If you’re adding cooked meat or onions, sprinkle them between the layers before pouring the batter.
Step 5: Baking to Perfection
Bake uncovered for 40 to 45 minutes or until the top is golden and the center is set (test with a knife—if it comes out clean, you’re good to go).
Let it cool for 10 minutes before serving. This helps the casserole firm up for cleaner slices.
Serving Suggestions
Once your Chili Relleno Casserole is hot and bubbling, the next step is deciding how to serve it. This dish is incredibly versatile—it can shine on its own or play a supporting role in a larger meal.
Best Ways to Serve Chili Relleno Casserole
- Solo Star: Serve a generous slice with a simple side salad or a bowl of black beans. The rich, cheesy interior and mildly spicy chiles are satisfying enough to stand alone.
- Breakfast Favorite: Yes, you read that right. Reheat it in the morning and top with a fried egg, some avocado, and hot sauce for a killer breakfast or brunch option.
- Mexican-Inspired Spread: Pair with refried beans, Spanish rice, and warm tortillas for a full-on fiesta.
- Top it Off: Garnish with fresh cilantro, diced tomatoes, sour cream, or even a drizzle of enchilada sauce for extra pizzazz.
No matter how you serve it, expect clean plates and second helpings.
Storing and Reheating
This dish isn’t just great fresh out of the oven—it also stores like a champ.
How to Store
- Refrigerator: Let the casserole cool completely, then cover the dish with foil or transfer slices into airtight containers. It will stay fresh in the fridge for up to 4 days.
- Freezer: For longer storage, freeze individual portions wrapped tightly in plastic wrap and foil. They’ll keep well for up to 2 months.
Best Reheating Tips
- Microwave: Heat individual slices for about 1-2 minutes until warmed through.
- Oven: Reheat in the oven at 325°F for 15-20 minutes if you want to retain that slightly crispy top.
Avoid reheating more than once to preserve texture and flavor.
Tips for the Perfect Casserole
There’s a little art and a little science to nailing this recipe every time. Here are some helpful pro tips:
Top Tips to Keep in Mind
- Use high-quality chiles. Fresh roasted Anaheim or Poblano chiles give the most authentic flavor.
- Drain canned chiles well. Extra liquid can make your casserole soggy.
- Go easy on the flour. Too much and the batter becomes cakey; just enough gives it that soufflé-like puff.
- Let it rest. Giving your casserole 10 minutes to cool after baking helps it set and makes slicing easier.
- Make it your own. Don’t be afraid to experiment with ingredients like pepper jack cheese, diced tomatoes, or even a layer of tortilla strips.
This casserole is forgiving, so feel free to play around with what you’ve got in the kitchen.
Common Mistakes to Avoid
Even a simple recipe like this one can go sideways if you’re not careful. Here are a few common missteps—and how to avoid them.
Mistake #1: Not Draining Chiles
Leaving too much moisture in the chiles can lead to a watery casserole. Pat them dry with a paper towel before layering.
Mistake #2: Overbaking
It’s tempting to wait for an extra-crispy top, but overbaking will dry it out. Stick to the recommended bake time and do the knife test for doneness.
Mistake #3: Skipping the Resting Time
Slicing it right out of the oven will cause the layers to fall apart. Give it a few minutes to firm up before digging in.
Mistake #4: Using Cold Ingredients
Room temperature eggs and milk blend better and create a more uniform batter. Let them sit out for a bit before mixing.
These small details make a big difference in flavor and texture.
Healthier Variations
Trying to lighten things up without sacrificing flavor? You’ve got options.
Lighter Swaps and Ideas
- Low-fat cheese: Use reduced-fat versions of Monterey Jack or cheddar.
- Egg substitutes: Opt for egg whites or liquid egg replacements.
- Non-dairy milk: Unsweetened almond or oat milk can work if you’re going dairy-free.
- More veggies: Add spinach, mushrooms, or bell peppers for extra nutrients and texture.
These swaps let you enjoy your favorite comfort food guilt-free.
Chili Relleno Casserole for Special Diets
One of the best things about this dish? It’s easy to modify for different dietary needs without sacrificing flavor.
Vegetarian-Friendly
The original version is already vegetarian if you skip any meat add-ons. Using wholesome, real ingredients like roasted chiles and rich cheese makes this a satisfying meatless main course.
Keto or Low-Carb Version
Want to cut down on carbs? Here’s how:
- Omit the flour or substitute with almond flour or coconut flour.
- Use heavy cream instead of milk for a richer, low-carb batter.
- Stick with full-fat cheese and eggs for a filling keto meal.
Gluten-Free Modification
Making this gluten-free is super simple:
- Swap all-purpose flour with gluten-free flour blends.
- Double-check that your baking powder is labeled gluten-free.
- Canned chiles are usually safe, but always check labels just in case.
Dairy-Free Version
For a dairy-free option:
- Use plant-based cheese alternatives (cashew-based or coconut oil-based work best).
- Substitute cow’s milk with unsweetened soy or almond milk.
- Add nutritional yeast for that cheesy flavor punch.
With just a few adjustments, you can turn this casserole into a diet-friendly star that everyone at the table can enjoy.
What to Serve with Chili Relleno Casserole
Pairing the casserole with the right sides or drinks can turn dinner into an unforgettable feast.
Tasty Side Dishes
- Mexican Rice or Cilantro Lime Rice – balances out the cheesy richness
- Refried or Black Beans – classic and filling
- Corn Salad or Mexican Street Corn (Elote) – adds sweetness and crunch
- Avocado or Guacamole – creamy contrast to the casserole’s spice
- Fresh Salsa or Pico de Gallo – light and zesty
Drink Pairings
- Classic Margarita – a zesty pairing for spicy food lovers
- Mexican Lager or Craft Beer – cools the heat and complements the flavors
- Iced Hibiscus Tea or Horchata – traditional and refreshing non-alcoholic options
With these pairings, you’re ready to host a complete and delicious Mexican-themed meal.
Make-Ahead and Freezer Tips
Planning ahead? This dish can be prepared in advance and stored until you’re ready to bake.
Make-Ahead Tips
- Assemble the entire casserole the night before, cover tightly with foil, and refrigerate.
- When ready to bake, let it sit at room temperature for 20-30 minutes, then bake as directed.
Freezing for Later
- Bake the casserole fully, let it cool, then cut into individual portions.
- Wrap each piece in plastic wrap and foil, then freeze.
- To reheat, thaw overnight and warm in the oven at 325°F for 15-20 minutes.
Meal prepping with this casserole saves time and keeps your weeknight dinners stress-free.
FAQs about Chili Relleno Casserole Recipe
1. Can I use canned green chiles instead of fresh ones?
Yes, absolutely! Canned green chiles are a convenient alternative. Just be sure to drain them well to avoid extra moisture in your casserole.
2. Can I add meat to this casserole?
Definitely. Ground beef, shredded chicken, or chorizo make great additions. Cook and season the meat before layering it into the dish.
3. How spicy is Chili Relleno Casserole?
It has a mild to moderate heat depending on the chiles used. You can always add jalapeños or hot sauce for extra kick.
4. Is it better to grate your own cheese?
Yes! Freshly grated cheese melts better and has more flavor compared to pre-shredded varieties that often contain anti-caking agents.
5. Can I make this ahead of time?
Yes. You can prep it the night before and bake it the next day, or even freeze it for a future meal.
Final Thoughts
The Chili Relleno Casserole is more than just a recipe—it’s a cozy, flavorful, and ridiculously satisfying meal that brings the essence of classic Mexican comfort food straight into your kitchen. It’s simple enough for beginners and versatile enough for seasoned home cooks who want to get creative. Whether you’re making it for breakfast, dinner, or your next potluck, this dish is bound to impress.
What makes it even better? You can tailor it to fit nearly every dietary need without losing the magic of the original. From prepping to baking and serving, every step is easy and rewarding. Once you try it, don’t be surprised if it becomes a regular part of your recipe rotation!

