Chiffon Cake Recipe: Ever bitten into a cake that’s airy like a cloud, but still holds a buttery richness? That’s chiffon cake for you! Chiffon cake is one of those treats that bridges the gap between sponge and butter cakes. It’s fluffy, thanks to whipped egg whites, but it’s also rich and moist due to the use of oil instead of butter. What makes it stand out even more is its light texture that almost melts in your mouth, leaving you craving another bite.
Chiffon cake is often baked in a tube pan, giving it height and structure. The magic happens when you combine the right technique with the perfect mix of ingredients. The whipped egg whites act as the leavening agent, lifting the cake while keeping it super tender. And because oil remains liquid even when chilled, it keeps the cake moist for days.
History and Popularity of Chiffon Cake
Chiffon cake has a fascinating history. Invented in the 1920s by a Los Angeles insurance salesman named Harry Baker (yes, that’s his real name!), this cake was a closely guarded secret for over two decades. He baked it exclusively for Hollywood elites until the late 1940s, when he finally sold the recipe to General Mills. The company dubbed it “the first new cake in 100 years” and published it under the Betty Crocker brand. Since then, it’s been a staple in home kitchens and bakeries alike.
The popularity of chiffon cake spread globally, especially in Asia. You’ll find it commonly served during tea time, birthdays, and special occasions in countries like Japan, the Philippines, and Malaysia. It’s versatile, too — from plain vanilla chiffon to flavors like pandan, orange, and chocolate, this cake can be anything you want it to be.
Ingredients You’ll Need
Essential Ingredients Breakdown
To create the perfect chiffon cake, you don’t need any exotic ingredients, but precision is key. Here’s what you’ll typically need:
- Cake flour (1 1/4 cups) – This gives your cake a tender crumb.
- Sugar (1 cup) – Divided between the yolks and the egg whites.
- Baking powder (1 1/2 teaspoons) – Helps with the rise.
- Salt (1/2 teaspoon) – Enhances all the flavors.
- Eggs (6 large) – Separated into yolks and whites.
- Vegetable oil (1/2 cup) – For moisture.
- Water (3/4 cup) – Adds steam and softness.
- Vanilla extract (1 teaspoon) – For flavor.
- Cream of tartar (1/2 teaspoon) – Helps stabilize egg whites.
Each of these ingredients plays a specific role. Egg whites bring the fluffiness, while oil ensures the cake stays moist. Cake flour is crucial — don’t substitute with all-purpose flour unless you’re okay with a denser texture.
Optional Flavor Enhancers
Want to get creative? Chiffon cake is like a blank canvas. Here are some extras you can add:
- Lemon or orange zest – For a citrusy zing.
- Matcha powder – Adds a subtle, earthy flavor.
- Cocoa powder – For a light chocolate version.
- Pandan extract – A favorite in Southeast Asian chiffon cakes.
Mix and match to suit your taste or the occasion. Just be sure not to overload the batter with heavy ingredients that could deflate the cake.
Tools and Equipment Required
Must-Have Baking Tools
Before you dive in, make sure you have the right tools. These make a huge difference in how your chiffon cake turns out:
- Mixing bowls – You’ll need a few to keep wet and dry ingredients separate.
- Electric mixer or stand mixer – Beating egg whites by hand? Not fun. Go electric.
- Whisk and spatula – For folding and blending ingredients gently.
- Tube pan (10-inch, ungreased) – Essential for structure and even baking.
- Sifter – To aerate your dry ingredients.
- Measuring cups and spoons – Precision is non-negotiable in baking.
Having these tools at the ready streamlines your baking process and helps avoid common errors.
Tips for Choosing the Right Pan
Chiffon cake should ideally be baked in an ungreased tube pan. Why ungreased? Because the batter needs to cling to the sides of the pan as it rises — that’s how you get that signature height and fluffy texture. Greasing it will make the cake slide down and deflate.
If you don’t have a tube pan, you can try a bundt pan, but be warned: you may not get the same rise or softness. Also, avoid non-stick pans, as the slick surface makes it hard for the cake to cling while baking.
Preparing the Ingredients
Separating Eggs Properly
One of the biggest mistakes in chiffon cake making? Messing up the egg separation. Even a tiny drop of yolk in the whites can ruin your meringue. So here’s the trick — separate your eggs while they’re cold (it’s easier), but let them come to room temperature before using (they whip better that way).
Use three bowls — one for yolks, one for whites, and one as a transfer bowl. Crack each egg over the transfer bowl, then move the white into the egg white bowl if it’s clean. This way, if one yolk breaks, it doesn’t ruin the whole batch.
Measuring with Precision
Chiffon cakes are all about balance. Too much flour? Dense cake. Too little sugar? Egg whites don’t whip properly. That’s why measuring accurately is so important.
Always spoon your flour into the measuring cup, then level it off with a knife. Never scoop directly — it packs the flour and adds extra weight. For sugar and liquids, use clear measuring cups and read them at eye level. Baking is a science, and every gram matters!
Step-by-Step Baking Process
Step 1: Prepping the Oven and Pan
Before diving into mixing ingredients, always start with a well-prepared baking setup. Preheat your oven to 325°F (160°C). Chiffon cake requires gentle heat to rise steadily and bake through without burning or collapsing. Avoid higher temperatures — they can cause the outside to cook too fast while the inside stays undercooked.
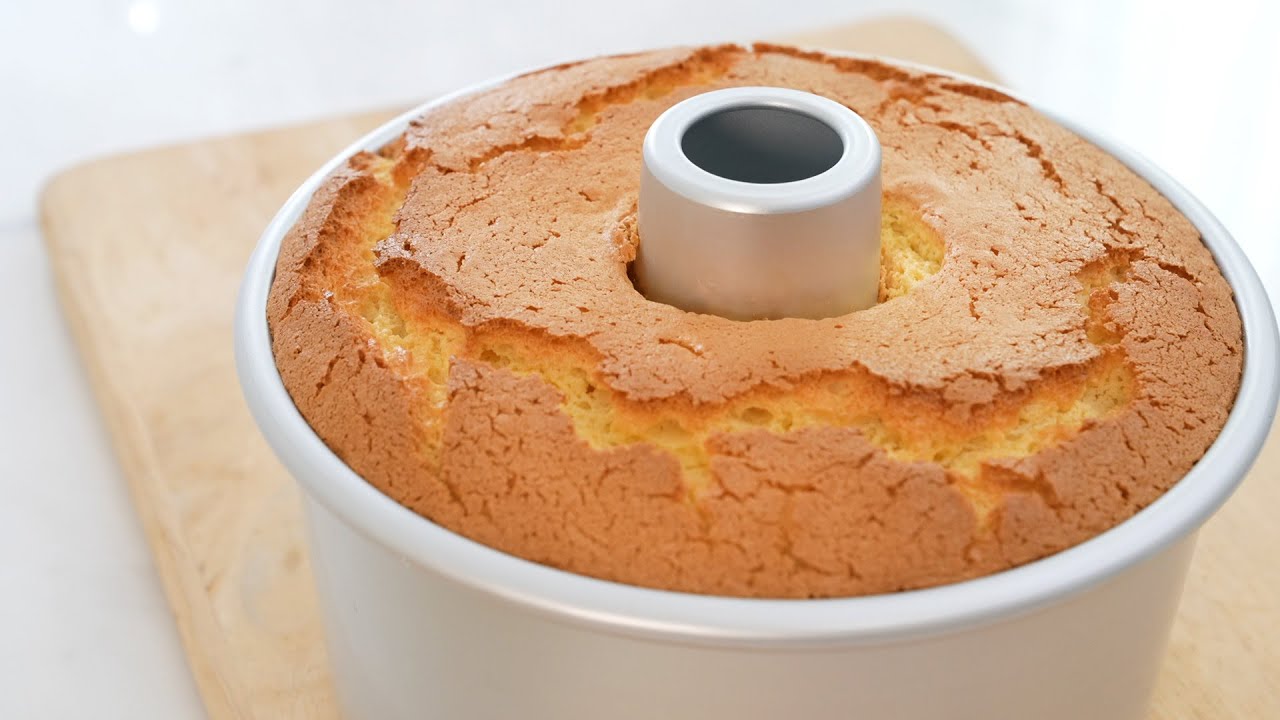
Now let’s talk pans. The pan for chiffon cake is not your average cake pan. Use a 10-inch aluminum tube pan, ungreased. Yes, you read that right — no butter, no spray, no parchment. The ungreased surface is essential because the cake batter clings to the sides as it rises, allowing for that incredible fluffy height. Greasing it would cause the batter to slide down, resulting in a sunken, deflated cake.
Place your pan on the middle rack in the oven, and if your oven has hot spots, rotate the pan halfway through baking for even cooking. A steady, controlled environment is your chiffon cake’s best friend.
Step 2: Mixing the Dry and Wet Ingredients
With your oven preheating, start by sifting together your dry ingredients — cake flour, sugar (half of it), baking powder, and salt. Sifting is more than just combining ingredients. It adds air and ensures your flour is lump-free, which helps keep the batter light.
In a separate bowl, whisk the egg yolks, vegetable oil, water, and vanilla extract until the mixture is smooth and well emulsified. The yolk mixture is the base of your batter, adding richness and moisture. Slowly incorporate the sifted dry ingredients into the wet mixture. Stir until you get a smooth, thick batter with no visible lumps.
This mixture alone might not look like much — it’s the meringue (your next step) that gives the chiffon cake its iconic lift and fluffiness. So, onto the magic!
Step 3: Beating Egg Whites to Perfection
This is where chiffon cake either becomes a cloud or a flop. Using a clean, grease-free bowl and beaters, start whipping your egg whites on medium speed. As they start to foam, add the cream of tartar. This acidic ingredient stabilizes the egg whites, allowing them to hold more air and stay firm without collapsing.
Gradually add the remaining sugar as the whites turn frothy. Increase the speed to high and continue whipping until stiff peaks form. You’ll know it’s ready when you lift the beaters and the peaks stand tall without drooping. If the peaks curl over or slide, keep whipping a bit longer.
Take care not to overbeat — that leads to dry, clumpy egg whites that won’t incorporate well into the batter. You want them glossy and firm, not grainy or broken.
Step 4: Folding and Pouring the Batter
Now for the delicate part — combining the two mixtures. Start by adding a small scoop of the egg white foam into the yolk batter and stir gently to lighten the mix. This helps blend the heavier batter without deflating the rest of the meringue.
Then, add the remaining meringue in three parts. Use a rubber spatula and fold with a gentle motion: cut down through the middle, scoop up from the bottom, and turn the bowl as you go. Don’t stir vigorously. Your goal is to keep as much air as possible in the batter.
Once everything is just combined and there are no streaks of white or yellow, pour the batter into your ungreased tube pan. Tap the pan gently on the counter to release large air bubbles.
Step 5: Baking and Cooling the Cake
Pop the pan into your preheated oven and bake for 50 to 60 minutes. Don’t open the oven in the first 45 minutes — chiffon cake is sensitive and can collapse from sudden temperature changes. It’s done when the top springs back to the touch and a toothpick inserted in the center comes out clean.
Now here’s the key step: invert the pan immediately after baking. Place it upside down on a cooling rack, or if your tube pan has legs, use those. This prevents the cake from collapsing while cooling. Gravity helps it maintain its airy structure. Let it cool completely — at least an hour.
Once cooled, use a long knife or offset spatula to loosen the edges and gently remove the cake from the pan. Slide the knife around the center tube as well. Turn it out onto a serving plate and admire your beautiful, tall, fluffy chiffon creation.
Decorating and Serving Suggestions
Simple Toppings for Chiffon Cake
Chiffon cake is delicious on its own — it doesn’t need heavy frostings or loads of sugar. A dusting of powdered sugar is often all you need for a clean, elegant finish. You can also pair it with a simple glaze made from powdered sugar and citrus juice for a zesty touch.
Want to keep it classic? Serve it with fresh whipped cream and seasonal berries. The lightness of the cake pairs beautifully with the cream’s richness and the fruit’s natural sweetness.
For chocolate lovers, drizzle a bit of chocolate ganache over the top. It adds richness without overpowering the delicate texture of the cake. But keep it light — the star here is the chiffon itself.
Making It a Showstopper Dessert
Hosting a party or need a dessert that’ll wow your guests? Turn your chiffon cake into the centerpiece. Cut it into layers and fill it with flavored whipped cream, fruit preserves, or mousse. You can also serve it with a scoop of ice cream and a fruit compote on the side.
Try flavor variations like:
- Lemon-lavender with lemon glaze
- Chocolate chiffon with espresso whipped cream
- Matcha chiffon with red bean paste and whipped topping
You can even create a trifle using chiffon cake cubes, layered with cream and fruits. It’s light, refreshing, and absolutely gorgeous in a glass dish.
Common Mistakes to Avoid
Overbeating or Underbeating Egg Whites
Egg whites are the backbone of chiffon cake. They provide the airiness and height that defines this cake’s signature texture. However, getting them right can be tricky. One of the most common mistakes is overbeating the egg whites. When you beat them too much, they become dry and start to clump. This makes folding them into the batter a nightmare, often resulting in a deflated, dense cake.
On the flip side, underbeating the whites won’t give the cake enough lift. If your egg whites don’t reach stiff peaks, the batter won’t trap enough air. This leads to a short, dense cake — the complete opposite of what you want.
Here’s a quick test: lift your beater out of the bowl — the peak should stand straight and firm. If it droops or slides off, keep beating. If it looks crumbly or breaks into chunks, you’ve gone too far. Aim for glossy, firm peaks with a smooth texture. Also, never use plastic bowls for beating egg whites, as they often retain grease and prevent proper whipping.
Using the Wrong Type of Pan
Choosing the right pan is just as important as nailing the batter. Chiffon cakes are traditionally baked in ungreased aluminum tube pans. This is not a suggestion — it’s practically a rule. The ungreased surface helps the cake “climb” as it bakes, and the central tube allows heat to reach the center, ensuring even cooking.
Using non-stick pans or greasing your pan disrupts this process. The cake won’t stick to the sides and rise properly. Instead, it will slump down, leaving you with a sad, flat cake.
Avoid pans with dark coatings too, as they absorb more heat and can cause the edges to overcook before the center is done. Stick with classic, light-colored aluminum for best results.
If you’re desperate and don’t have a tube pan, you can try using a bundt pan in a pinch — but results may vary. The key takeaway? Invest in a proper chiffon cake pan if you plan to make it often.
FAQs about Chiffon Cake Recipe
What is the difference between chiffon and sponge cake?
While both cakes are light and airy, chiffon cake contains oil and baking powder, making it more moist and rich compared to sponge cake, which typically relies on just whipped eggs for volume and has no added fat.
Can I make a chiffon cake without a tube pan?
Technically yes, but it’s not ideal. A tube pan gives the best rise and texture. If you use a regular round pan, expect a flatter, denser cake — and you’ll need to adjust baking time.
How do I know when the chiffon cake is done?
Look for a golden brown top that springs back when touched. Insert a toothpick in the center — it should come out clean. Also, the cake should not jiggle in the middle when you move the pan.
Can I store chiffon cake for later?
Absolutely! Wrap it tightly in plastic wrap or store it in an airtight container. It keeps well at room temperature for 2–3 days or can be refrigerated for up to a week. Freeze for longer storage.
Why did my chiffon cake collapse?
Common reasons include underbaked centers, overfolding the batter (which deflates air), or using a greased or non-stick pan. Always cool the cake upside down to prevent collapsing.
Conclusion
Chiffon cake is a beautiful blend of science and art. It combines the lightness of sponge cake with the richness of oil-based batter, resulting in a soft, moist, and airy dessert that’s hard to beat. Though it might seem intimidating at first — with all the egg beating, folding, and specific tools — once you understand the steps and avoid the common pitfalls, it’s surprisingly straightforward.
What makes chiffon cake special is not just its taste and texture, but also its versatility. Whether you enjoy it plain with a cup of tea or dressed up with cream and fruit for a special occasion, it’s a dessert that fits every moment. So go ahead, gather your ingredients, prep your pan, and whip up a chiffon cake that’s worthy of applause.
Once you’ve mastered the basics, experiment with flavors, try new toppings, and make it your signature bake. Happy baking!

