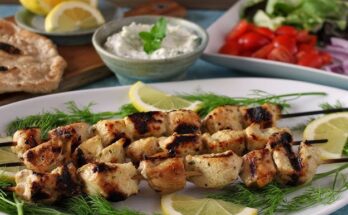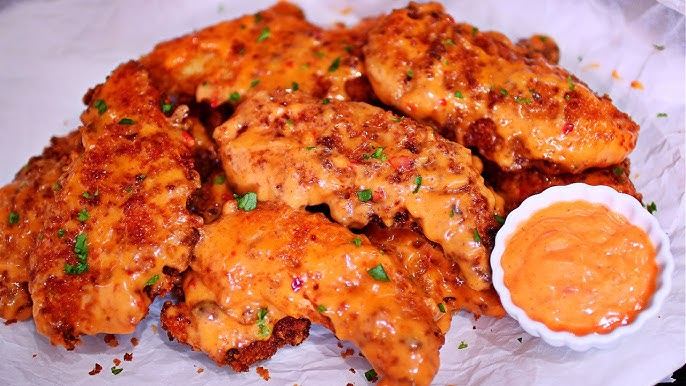
Chicken Strips Recipe: There’s just something undeniably comforting about biting into a perfectly crispy, juicy chicken strip. Whether you’re whipping up a quick dinner for the family or prepping snacks for a game night, chicken strips are a crowd-pleaser that never fails. They’re versatile, flavorful, and surprisingly easy to make from scratch. The best part? You don’t need fancy ingredients or restaurant-level skills to nail this dish. Just a bit of prep, the right breading technique, and some hot oil, and you’re good to go!
But if you’ve ever had soggy, under-seasoned, or dry chicken strips before, you know the importance of doing things the right way. That’s why we’ve laid it all out for you here—step by step. From prepping the chicken to making it crispy and delicious, this guide will show you how to make chicken strips that are golden on the outside and tender on the inside every single time.
Ready to get started? Let’s dive into what you’ll need to make your chicken strips next-level tasty.
List of Ingredients You’ll Need
Creating the perfect chicken strips starts with quality ingredients. The better the ingredients, the more flavorful and crunchy your chicken strips will be. Here’s a complete list to stock up before you start:
Fresh Ingredients
- Chicken breasts or tenderloins – 1.5 to 2 lbs, boneless and skinless
- Eggs – 2 large
- Buttermilk – 1 cup (for marinade)
- Garlic – 2 cloves, minced (optional)
- Fresh parsley or cilantro – chopped (for garnish)
Pantry Ingredients
- All-purpose flour – 1 cup
- Breadcrumbs – 1.5 cups (panko recommended for extra crunch)
- Cornstarch – 2 tablespoons (for crispiness)
- Salt – 1 tsp
- Black pepper – 1 tsp
- Paprika – 1 tsp
- Onion powder – 1/2 tsp
- Garlic powder – 1/2 tsp
- Cayenne pepper – 1/4 tsp (optional, for heat)
- Vegetable or canola oil – for frying
Optional Add-ons
- Parmesan cheese – for added flavor in the breadcrumb mix
- Hot sauce – for spicy marinade
- Lemon juice – a splash in the marinade brightens flavor
Kitchen Tools Required
You don’t need a fancy kitchen to make delicious chicken strips. Here’s a list of simple tools that will make the process easier and cleaner:
- Cutting board – Preferably one for raw meat.
- Sharp knife – To trim and slice the chicken.
- Mixing bowls – At least three (for marinade, flour, and breadcrumbs).
- Tongs or fork – For dipping the chicken without making a mess.
- Deep skillet or fryer – For frying your chicken strips.
- Baking sheet with wire rack – For oven baking or draining fried strips.
- Paper towels – To absorb excess oil.
- Meat thermometer – Optional, but recommended for checking doneness (165°F / 74°C).
Choosing the Right Chicken for Strips
For juicy, flavorful chicken strips, choosing the right cut of meat is key. Here are your best options:
- Chicken Tenderloins – These are naturally the perfect shape and size for strips. Very tender and cook evenly.
- Boneless, Skinless Chicken Breasts – A popular and affordable option. Just slice into even strips.
- Boneless Thighs (Optional) – A little fattier but full of flavor and hard to overcook.
Pro Tip: When using chicken breasts, slice them against the grain to keep the strips tender. Try to keep your pieces uniform in size so they cook evenly—no one wants overcooked or undercooked chicken!
Preparing the Chicken
Preparation is everything when it comes to nailing this recipe. Once you’ve chosen your cut, follow these steps:
- Trim the Chicken – Remove any visible fat or connective tissue.
- Slice Evenly – Cut into ¾ inch to 1-inch wide strips. Try to make them all roughly the same thickness.
- Pat Dry – Use paper towels to dry your strips before marinating. This helps them absorb the flavors better.
If you want extra tender strips, you can pound the chicken lightly with a meat mallet. This also helps them cook evenly and quickly.
Creating the Marinade
Marinating is a game-changer. It’s what separates bland, dry chicken from flavorful, juicy strips.
Basic Marinade Recipe:
- 1 cup buttermilk
- 1 tsp salt
- 1 tsp paprika
- ½ tsp black pepper
- ½ tsp garlic powder
- Optional: a dash of hot sauce for a spicy kick
Steps:
- Combine all the ingredients in a large bowl.
- Add the chicken strips and toss to coat.
- Cover the bowl and refrigerate for at least 30 minutes, ideally up to 4 hours.
How Long Should You Marinate Chicken Strips?
You should marinate chicken strips for at least 30 minutes, but longer is better. If you have time, leave them in the fridge for 2–4 hours to really soak in that flavor. The buttermilk tenderizes the meat while the spices penetrate deep into the chicken.
Avoid over-marinating for more than 24 hours, especially with acidic marinades (like those with lemon juice), as it can start to break down the meat too much and affect the texture.
Prepping the Breading Station
Here’s where the magic happens—turning that tender marinated chicken into crunchy, golden strips of joy. You’ll need three bowls:
1. Flour Mixture:
- 1 cup all-purpose flour
- 2 tbsp cornstarch
- ½ tsp salt
- ½ tsp paprika
- ¼ tsp black pepper
- ¼ tsp onion powder
2. Egg Wash:
- 2 large eggs
- 2 tbsp milk or water
- Optional: a splash of hot sauce for extra flavor
Whisk until smooth.
3. Breadcrumb Mix:
- 1.5 cups breadcrumbs (panko for extra crunch)
- Optional: ¼ cup grated Parmesan cheese
- Optional: dried herbs like parsley, oregano, or thyme
Set up the bowls in this order: flour → egg wash → breadcrumbs.
Step-by-Step Guide to Making Chicken Strips
Let’s walk through the full breading and cooking process to make your chicken strips crispy and flavorful.
Step 1: Marinate the Chicken
Start by pulling the chicken from the fridge. Let it sit at room temperature for about 10–15 minutes before breading. This helps it cook more evenly.
Step 2: Dredge in Flour
Take each strip from the marinade and coat it in the seasoned flour. This gives the egg something to stick to.
Step 3: Dip in Egg Wash
Next, dip the flour-coated strip into the egg wash. Let the excess drip off.
Step 4: Coat in Breadcrumbs
Finally, press the chicken into the breadcrumb mix. Make sure each strip is fully coated on all sides. Press gently to help it stick.
Place breaded strips on a wire rack or baking tray while you finish the rest.
Tip: Let the coated strips rest for 10–15 minutes before frying or baking. This helps prevent the breading from falling off during cooking.
Frying the Chicken Strips
Frying gives you that ultimate crispy, golden exterior and juicy inside—exactly what great chicken strips are known for. It’s the most popular cooking method, and when done right, it’s unbeatable.
How to Fry Chicken Strips:
- Heat the Oil – Add 1–2 inches of vegetable or canola oil to a deep skillet or pot. Heat to 350°F (175°C). Use a kitchen thermometer if you have one.
- Test the Oil – Drop in a tiny pinch of flour. If it sizzles right away, the oil is ready.
- Add Chicken Carefully – Place 3–5 strips in the oil at a time. Don’t overcrowd the pan—it drops the temperature and makes them soggy.
- Cook Time – Fry each strip for about 4–5 minutes, flipping once halfway through. You want a golden-brown color and an internal temperature of 165°F (74°C).
- Drain Properly – Use tongs to remove the strips and set them on a paper towel-lined plate or a wire rack to drain the excess oil.
Tips for Better Frying:
- Let the oil come back to temperature between batches.
- Never fry over low heat—this makes them greasy.
- Use tongs instead of a fork to avoid puncturing the meat and letting juices escape.
Baking Option: Healthier Chicken Strips
Looking for a lighter option? Baking chicken strips still delivers crunch and saves you from deep frying. Great for meal prep and everyday eating.
How to Bake Chicken Strips:
- Preheat Oven – Set to 425°F (220°C).
- Prepare Baking Sheet – Use a wire rack on top of a tray, or line with parchment paper. Spray lightly with cooking spray.
- Place Chicken – Set strips on the rack or tray, spaced evenly.
- Oil Spray – Lightly spray the top of the breaded chicken with cooking spray or brush with olive oil. This helps them brown and crisp.
- Bake Time – Bake for 20–25 minutes, flipping halfway through. Make sure internal temp reaches 165°F (74°C).
Bonus Tip:
For added crunch, finish under the broiler for the last 2 minutes. Just watch carefully so they don’t burn!
Air Fryer Chicken Strips
Air frying is the best of both worlds—crispy like fried, but healthier like baked. It’s also super fast and easy.
How to Air Fry Chicken Strips:
- Preheat Air Fryer – Set to 400°F (200°C) for 3 minutes.
- Place Chicken in Basket – Arrange in a single layer. Don’t overcrowd. You may need to cook in batches.
- Cook Time – Air fry for 10–12 minutes, flipping halfway through.
- Check Doneness – Make sure they’re golden brown and reach 165°F inside.
Tip: Spray the basket and the chicken lightly with oil for a crispier finish.
How to Make Chicken Strips Extra Crispy
Crispy is king when it comes to chicken strips. Here are some simple tricks to level up your crunch:
Double Breading Technique:
- After the first coat of flour → egg → breadcrumbs…
- Dip the chicken BACK into the egg wash and breadcrumb mix again.
- This double layer gives you a thicker, crunchier coating.
Use Panko Breadcrumbs:
- Panko breadcrumbs are lighter and airier than regular breadcrumbs.
- They create more texture and a better crunch.
Rest After Breading:
- Letting your breaded strips sit for 10–15 minutes before cooking helps the coating bind better.
- This reduces the chances of it falling off while cooking.
Best Dipping Sauces for Chicken Strips
The only thing better than a chicken strip is a chicken strip dipped in something delicious. Here are some go-to sauces that pair perfectly:
Classic Dipping Sauces:
- Ranch Dressing – Cool, creamy, and always a winner.
- Honey Mustard – Sweet and tangy.
- Barbecue Sauce – Smoky and rich, ideal for fried strips.
- Buffalo Sauce – Spicy and bold; mix with a little melted butter for smoothness.
- Garlic Aioli – Fancy, flavorful, and worth trying!
You can even make your own dipping sauce by combining mayo, ketchup, a dash of hot sauce, and a pinch of garlic powder.
Serving Suggestions
Wondering how to serve your chicken strips? Here are a few easy and creative ways to enjoy them:
- With Fries and Coleslaw – The classic combo never gets old.
- In a Wrap – Add lettuce, tomato, and a drizzle of ranch for a quick meal.
- Over a Salad – Slice and serve on top of a fresh garden salad.
- In a Sandwich – Toast a bun, add pickles and sauce, and build your own chicken strip sandwich.
- With Mac and Cheese – Comfort food heaven!
No matter how you serve them, chicken strips are always a hit.
Storage and Reheating Tips
So, you made a big batch of chicken strips (nice work!), but now you’ve got leftovers. No worries—chicken strips store well and reheat beautifully if you do it right.
Storing in the Refrigerator
- Let the chicken strips cool completely at room temperature before storing.
- Place them in an airtight container lined with a paper towel (this helps absorb excess moisture).
- Store in the fridge for up to 3–4 days.
Freezing Chicken Strips
Want to save them for later? Freezing is a great option!
- Let the strips cool completely.
- Place them on a baking sheet in a single layer and freeze for 1 hour (this prevents sticking).
- Transfer the partially frozen strips to a freezer-safe bag or container.
- Store for up to 2 months.
When you’re ready to enjoy them again, move to the fridge to thaw overnight or reheat straight from frozen using one of the methods below.
How to Reheat Without Losing Crispiness
The biggest challenge when reheating is keeping that crispy crust. Here’s how to do it right:
- Oven Method: Preheat your oven to 375°F (190°C). Place strips on a wire rack over a baking sheet. Bake for 10–12 minutes, flipping halfway.
- Air Fryer Method: Set to 375°F (190°C) and air fry for 5–7 minutes. This brings back that fresh-from-the-fryer crunch.
- Avoid the Microwave: It’s fast, but it makes your chicken strips soggy. Only use it in emergencies!
FAQs about Chicken Strips Recipe
1. Can I make chicken strips ahead of time?
Yes! You can marinate the chicken up to 24 hours in advance. You can also bread them and keep them in the fridge for a few hours before cooking. If freezing, follow the pre-freeze method for best results.
2. How do I keep the breading from falling off during frying?
Make sure the chicken is dry before marinating. After breading, let the strips rest for 10–15 minutes. This helps the coating stick better. Don’t overcrowd the pan when frying.
3. What’s the difference between chicken tenders and chicken strips?
Chicken tenders are a specific part of the chicken located under the breast. Chicken strips can be made from tenders or sliced breast meat. Both work great, but tenders are naturally more uniform and tender.
4. Can I make this recipe gluten-free?
Absolutely! Just use a gluten-free flour blend and gluten-free breadcrumbs. Check all seasoning labels to make sure they’re GF-certified.
5. Why are my chicken strips soggy after frying?
This usually happens when the oil temperature is too low or if the chicken is crowded in the pan. Make sure your oil stays at 350°F and fry in small batches. Drain on a wire rack instead of paper towels to keep the bottoms crispy.
Conclusion
And there you have it—the ultimate step-by-step guide to making golden, crispy, juicy chicken strips at home. Whether you’re frying, baking, or air frying, these homemade strips are guaranteed to be better than anything you’d get from a drive-thru. With just a little prep and the right techniques, you can enjoy restaurant-quality chicken strips in your own kitchen.
From marinating for flavor, to double breading for crunch, to finding the perfect dipping sauce—it’s all about those little steps that make a big difference. Chicken strips aren’t just for kids’ menus—they’re comfort food done right, and now, you’ve got everything you need to master them.
So go ahead—grab your ingredients, heat up that skillet, and wow your taste buds (and maybe your family, too). Once you try homemade chicken strips, there’s no going back!