Chicken Pho Soup Recipe: Chicken Pho, also known as Pho Ga, is a classic Vietnamese noodle soup that has captured the hearts of food lovers around the globe. With its rich, aromatic broth, tender chicken, silky rice noodles, and a burst of fresh herbs, this dish is the definition of comfort food in a bowl. Unlike beef pho, chicken pho has a lighter, more delicate flavor, making it perfect for those who prefer something less heavy yet equally satisfying.
One of the most beautiful things about pho is that it’s more than just food—it’s an experience. From the slow-simmered broth infused with spices to the way you customize each bowl with herbs, lime, and chili, every bite feels personal and comforting. If you’ve ever walked into a Vietnamese restaurant and smelled that irresistible aroma, you already know how special this soup can be.
In this guide, I’ll walk you through how to make chicken pho at home, step by step. Don’t worry if you’re not an expert in the kitchen—this recipe is beginner-friendly, yet authentic enough to satisfy pho purists. By the end, you’ll not only have a steaming hot bowl of pho but also the skills to recreate it whenever that craving strikes.
Ingredients You’ll Need
Before diving into the cooking process, let’s gather everything you’ll need. Having all your ingredients ready will make the cooking smoother and more enjoyable.
Key Ingredients for the Broth
The soul of pho lies in its broth, and to achieve that, you’ll need:
- Whole chicken or chicken parts (preferably with bones for maximum flavor)
- Onion (charred for depth)
- Fresh ginger (charred to release its aroma)
- Water (filtered if possible)
- Fish sauce (for authentic umami taste)
- Rock sugar or regular sugar (balances out the flavors)
- Salt (to season the broth properly)
Spices and Aromatics
Pho has a signature fragrance that comes from its blend of spices. You’ll need:
- Cinnamon stick
- Star anise
- Cloves
- Coriander seeds
- Cardamom pods
These spices are lightly toasted before being added to the broth, which enhances their flavor and fragrance.
Noodles and Garnishes
No pho is complete without the right noodles and toppings. Stock up on:
- Dried or fresh rice noodles (medium-width flat rice noodles are ideal)
- Fresh herbs like cilantro, Thai basil, and mint
- Bean sprouts for crunch
- Lime wedges for brightness
- Fresh chili slices for spice
- Hoisin sauce and Sriracha (optional condiments for extra flavor)
Having these garnishes allows each person to customize their bowl to their liking, which is one of the joys of eating pho.
Step-by-Step Guide to Making Chicken Pho
Now that we’ve got the ingredients ready, let’s move on to the actual cooking process. This is where the magic happens.
Step 1 – Preparing the Broth
The broth is the heart of pho, and getting it right makes all the difference. Start by placing your whole chicken (or chicken parts) in a large stockpot. Cover it with enough water to fully submerge it. Bring the water to a boil, then reduce to a simmer. As it simmers, you’ll notice foam rising to the surface—skim this off regularly to keep the broth clear and clean-tasting.
Simmer the chicken for about 45 minutes to an hour, depending on the size of your bird. This not only extracts flavor but also cooks the chicken meat until tender. Once done, carefully remove the chicken and set it aside to cool before shredding the meat for serving.
At this stage, your broth will have a solid chicken flavor, but it needs the signature pho aromatics to really shine—which brings us to the next step.
Step 2 – Roasting Aromatics and Spices
To unlock the deep, smoky notes of pho, you’ll need to roast your aromatics. Place your onion and ginger directly over an open flame (gas stove or broiler) until the skins are charred. Don’t worry, this isn’t burning—it’s caramelizing, and it adds a depth of flavor that plain raw aromatics can’t achieve.
Next, take your whole spices—cinnamon stick, star anise, cloves, coriander seeds, and cardamom pods—and toast them in a dry pan for a few minutes until fragrant. The heat releases their essential oils, making them more aromatic and flavorful.
Once roasted, add the onion, ginger, and spices to your simmering broth. Let them infuse for at least 30–40 minutes, but the longer they sit, the richer the flavor becomes. Just be careful not to overdo it, or the broth may become too strong or bitter.
Step 3 – Cooking the Chicken Perfectly
While your broth continues to simmer with aromatics, let’s focus on the chicken. By now, your chicken should have been cooked through in the broth and set aside to cool slightly. The goal is to have tender, juicy meat that pulls apart easily but doesn’t fall into mush.
Once cool enough to handle, remove the skin and bones. Shred the chicken into bite-sized pieces using your hands or a fork. Keep in mind that pho is all about balance—your chicken pieces should be small enough to mix with noodles and broth without overpowering a spoonful.
If you prefer a leaner pho, stick with breast meat. For a richer, juicier bite, thigh meat works wonderfully. Some cooks even like mixing both for variety. At this stage, you can also season the shredded chicken lightly with a splash of fish sauce to enhance its savory depth.
Set the chicken aside while you finish perfecting the broth. Remember, this is the protein star of the dish, so treating it with care makes your pho restaurant-worthy.
Step 4 – Straining and Clarifying the Broth
Now it’s time to polish your broth to perfection. After simmering with the aromatics and spices, strain everything through a fine-mesh sieve or cheesecloth into a clean pot. This step ensures you get a clear, golden broth without bits of onion or spice floating around.
If your broth looks cloudy, don’t panic—it’s still delicious. But if you want that crystal-clear look seen in authentic pho restaurants, you can clarify it further. One trick is to chill the broth, skim off the solidified fat, and reheat. Another option is to strain it again through a very fine filter.
At this stage, season the broth with fish sauce, a pinch of sugar, and salt to taste. The balance of salty, sweet, and umami is key to an authentic pho flavor. Taste and adjust carefully—remember, the garnishes and condiments later will also add complexity.
This is where patience pays off. A rich, fragrant, clear broth is what makes chicken pho irresistible, and taking the time to strain it well makes all the difference between a good bowl and an outstanding one.
Step 5 – Preparing the Rice Noodles
While the broth simmers, let’s get the noodles ready. Pho traditionally uses medium-width flat rice noodles, which you can find in most Asian grocery stores. You’ll often see them labeled as banh pho.
If using dried noodles, soak them in warm water for about 30 minutes, then cook them briefly in boiling water until tender but still slightly chewy. Fresh rice noodles, on the other hand, only need a quick blanch since they cook much faster.
Once cooked, rinse the noodles under cold water to stop the cooking process and prevent them from clumping together. Drain well and divide into serving bowls.
The noodles are the foundation of your pho bowl, so don’t overcook them. Mushy noodles will absorb too much broth and ruin the texture. Aim for that perfect balance—soft yet bouncy, ready to soak up the flavorful broth.
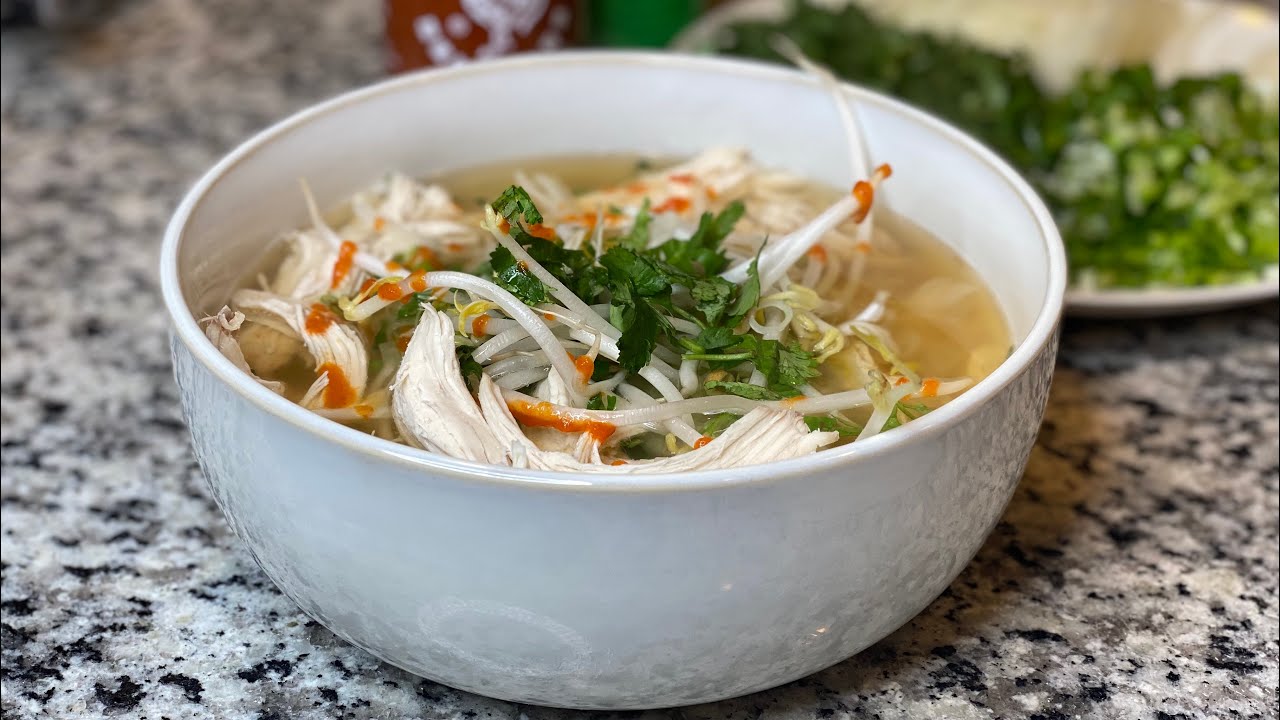
Step 6 – Assembling the Bowl
Now comes the fun part—building your bowl of pho! Start by placing a generous portion of rice noodles in the bottom of each bowl. Add a handful of shredded chicken on top, arranging it neatly for a beautiful presentation.
Next, ladle the hot, aromatic broth over the noodles and chicken. The steam will immediately carry that signature pho fragrance, making your kitchen smell like a Vietnamese restaurant.
Finally, add your garnishes. Traditionally, pho is served with a plate of fresh herbs, bean sprouts, lime wedges, and chili slices on the side. Each person can customize their bowl to taste—add more herbs for freshness, squeeze lime for brightness, or stir in chili for heat. For extra depth, drizzle a little hoisin sauce or Sriracha.
And there you have it—a steaming, flavorful, comforting bowl of homemade chicken pho. It’s not just food; it’s an experience of aroma, taste, and culture in every spoonful.
Pro Tips for the Best Chicken Pho
Making pho at home may seem intimidating, but with the right tricks, you can achieve restaurant-quality results every time.
How to Achieve a Clear Broth
- Blanch the chicken briefly first: Before simmering, boil the chicken for 5 minutes, then discard the water. This removes impurities and helps keep the broth clear.
- Skim regularly: As the broth simmers, foam will rise to the surface. Skim it off with a spoon.
- Low and slow: Avoid rapid boiling, which agitates the broth and makes it cloudy. A gentle simmer extracts flavor while keeping it clear.
Balancing Sweet, Salty, and Savory Flavors
Pho broth should taste layered and balanced. If it feels flat, here’s how to fix it:
- Too salty? Add more water or a pinch of sugar.
- Too sweet? A dash of fish sauce balances it out.
- Lacking depth? Simmer longer with the spices, or add more fish sauce.
The beauty of pho is in its balance—when done right, every sip should be savory, slightly sweet, aromatic, and deeply satisfying.
Variations of Chicken Pho Soup
One of the best things about pho is how adaptable it is. While the classic Vietnamese chicken pho (pho ga) is already amazing, you can switch things up depending on your mood, time, and ingredients on hand. Here are a few variations worth trying:
Traditional Vietnamese Pho Ga
This is the version most people think of when they hear “chicken pho.” It’s made with a whole chicken, simmered slowly to extract maximum flavor, and seasoned with fish sauce, sugar, and spices. The broth is light yet aromatic, the noodles are silky, and the toppings—fresh herbs, lime, and chili—bring it all together. This style focuses on authenticity and simplicity, relying on technique and quality ingredients rather than shortcuts.
If you want to impress guests or enjoy a weekend cooking project, this is the way to go. The time and effort you put into making a traditional pho broth will pay off with every delicious spoonful.
Quick Weeknight Version
Sometimes, you don’t have hours to simmer broth, but that doesn’t mean you can’t enjoy a comforting bowl of pho. For a faster version, use store-bought chicken stock as your base. Enhance it by simmering with charred onion, ginger, and spices for about 30 minutes. Poach chicken breasts or thighs directly in the broth for convenience.
This shortcut still delivers plenty of flavor but saves time, making it a perfect weeknight dinner option. While it won’t have the same depth as traditional pho, it’s still satisfying and far better than takeout.
Spicy Chicken Pho
If you love bold, fiery flavors, a spicy variation is for you. Simply add fresh chili slices, chili oil, or even a spoonful of Sriracha directly into the broth while it simmers. You can also serve it with spicy condiments on the side so each person can adjust their heat level.
Some cooks like adding lemongrass to the broth for a citrusy kick that complements the heat beautifully. The result is a pho that’s both soothing and invigorating—a perfect remedy for cold days or when you’re feeling under the weather.
Serving Suggestions
Pho is never just about the soup itself—it’s about how you serve it. The garnishes and condiments play an essential role in making each bowl unique and customizable.
Classic Vietnamese Garnishes
The traditional accompaniments to pho are what make it interactive and fun to eat. A standard garnish platter typically includes:
- Fresh Thai basil (adds a peppery, slightly sweet note)
- Cilantro and mint (for freshness)
- Bean sprouts (for crunch)
- Lime wedges (for brightness)
- Fresh chili slices (for heat)
- Green onions (for extra aroma)
These garnishes are usually placed on the table so each diner can build their own perfect bowl. The combination of hot broth with cold, crisp herbs creates a wonderful contrast in every bite.
Creative Modern Twists
While traditionalists may prefer sticking to the classics, there’s nothing wrong with experimenting. Here are a few modern serving ideas:
- Soft-boiled egg: Adds richness and creaminess, similar to ramen.
- Avocado slices: For a creamy, trendy twist.
- Roasted vegetables: Carrots, mushrooms, or bok choy can bulk up your pho.
- Different proteins: Swap chicken for shrimp, turkey, or even tofu for a vegetarian-friendly version.
These modern twists allow you to adapt pho to different dietary needs or simply keep things exciting when you want to change it up.
Storage and Make-Ahead Tips
Pho can take time to prepare, so knowing how to store it properly will save you effort while ensuring every bowl tastes fresh and delicious.
Storing Broth and Noodles Separately
One golden rule: never store cooked noodles in the broth. They’ll absorb the liquid and become mushy. Instead, keep the broth in one container and the cooked noodles in another. When ready to serve, simply reheat the broth and pour it over the noodles.
Cooked chicken should also be stored separately. Add it to the bowl just before reheating with the broth to prevent it from drying out.
Freezing Instructions
Pho broth freezes beautifully, so don’t hesitate to make a big batch. Let the broth cool completely, then store it in airtight containers or freezer bags for up to three months. For convenience, freeze in single-portion containers so you can thaw only what you need.
When reheating, bring the broth to a gentle simmer before assembling your pho bowl. The noodles, herbs, and garnishes should always be fresh, but with broth already ready to go, you can whip up a bowl of pho in minutes.
Nutritional Value of Chicken Pho Soup
Pho isn’t just tasty—it’s also nutritious. A well-prepared bowl provides a balance of protein, carbs, and essential vitamins from herbs and vegetables.
Health Benefits of Key Ingredients
- Chicken: A lean source of protein that supports muscle health.
- Ginger: Known for its anti-inflammatory and digestive benefits.
- Onion: Provides antioxidants and helps boost immunity.
- Herbs (basil, cilantro, mint): Rich in vitamins and natural detoxifying properties.
- Bean sprouts: Low in calories but high in fiber and vitamins.
Together, these ingredients make pho not just a comfort food but also a nourishing meal.
Calorie and Macronutrient Breakdown
On average, a serving of chicken pho contains:
- Calories: 350–450 (depending on portion size and garnishes)
- Protein: 25–30g
- Carbohydrates: 40–50g (from rice noodles)
- Fat: 8–12g (mainly from chicken and broth)
This makes pho a relatively balanced dish, especially compared to heavier comfort foods. For those watching calories, you can reduce the noodle portion and load up on herbs and vegetables instead.
FAQs about Chicken Pho Soup Recipe
1. What noodles are best for chicken pho?
Medium-width flat rice noodles (banh pho) are traditional. Fresh noodles give the best texture, but dried ones work well too.
2. Can I use leftover chicken?
Yes! Leftover roast chicken works perfectly. Just simmer the bones in the broth for extra flavor and shred the meat for serving.
3. How do I make pho broth richer?
Use bone-in chicken, toast your spices, and simmer gently for at least an hour. A splash of fish sauce also deepens the flavor.
4. Is pho healthy for weight loss?
Pho is relatively low in calories compared to other noodle soups. For a lighter version, reduce noodles, skip fatty cuts, and load up on vegetables.
5. Can I substitute chicken with tofu?
Absolutely. Tofu works as a protein substitute, especially when paired with vegetable broth for a vegetarian pho.
Conclusion
The beauty of pho lies in its balance. It’s a soup that’s light yet filling, simple yet layered with complex flavors. Making it at home may seem like a project, but once you try, you’ll realize it’s worth every minute. And with the make-ahead tips, you can always have a batch of broth ready for when the craving strikes.
So, the next time you’re in the mood for something soothing and delicious, skip the takeout—grab your pot, simmer some broth, and build your own bowl of homemade chicken pho.