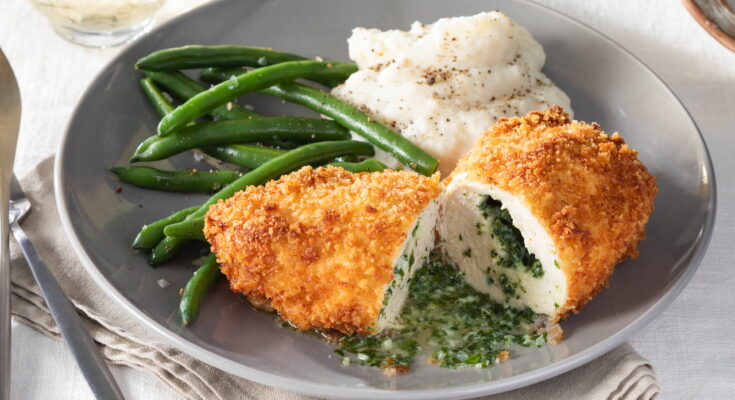
Chicken Kiev Recipe: Chicken Kiev is one of those classic dishes that feels both comforting and elegant. It’s a tender chicken breast stuffed with a garlicky herb butter, then breaded and fried (or baked) to crispy, golden perfection. When you cut into it, the warm, melted butter spills out in a luxurious cascade—like cutting into a culinary treasure chest. This isn’t just a meal; it’s an experience.
Despite its simplicity, Chicken Kiev carries a sort of luxurious flair. It blends the homely comfort of fried chicken with the sophisticated edge of fine European dining. It’s a popular choice for romantic dinners, special occasions, or even a midweek treat if you’re feeling fancy.
Origin and Popularity
Though its name suggests a Ukrainian origin, the true history of Chicken Kiev is a little more complex and debated. Some culinary historians argue that it was developed in France and brought to Russia by chefs trained in French cuisine. Others insist it’s a proud Ukrainian creation. Regardless of its origin, what’s clear is that Chicken Kiev has won the hearts of food lovers around the world.
It became especially popular in the mid-20th century, both in Soviet Russia and in the West. Today, it’s a staple in many home kitchens and is often featured in upscale restaurant menus. Whether you’re new to the dish or a longtime fan, making Chicken Kiev at home is a rewarding culinary project.
Ingredients Required
For the Chicken
- 4 boneless, skinless chicken breasts
- Salt and pepper to taste
- Plastic wrap and a meat mallet (for pounding)
The star of this dish is obviously the chicken breast, and quality matters. Opt for organic, free-range chicken if possible. These tend to be more tender and flavorful, which makes a noticeable difference.
For the Garlic Herb Butter Filling
- 1/2 cup (1 stick) unsalted butter, softened
- 2 cloves garlic, minced
- 1 tablespoon fresh parsley, chopped
- 1 tablespoon fresh dill, chopped
- 1 teaspoon lemon juice
- Salt to taste
This filling is where the magic happens. The combination of butter, garlic, and fresh herbs is what gives Chicken Kiev its signature richness. You can also add a pinch of chili flakes if you like a little kick.
For the Breading
- 1/2 cup all-purpose flour
- 2 large eggs, beaten
- 1 1/2 cups breadcrumbs (Panko for extra crunch)
- Salt and pepper to season
The classic three-stage breading process is essential for that perfect crispy coating. Panko breadcrumbs are ideal here—they create a lighter, crunchier crust compared to traditional ones.
Preparing the Garlic Herb Butter
Ingredients Breakdown
The herb butter might seem simple, but every ingredient plays a crucial role. Garlic offers pungency and depth, while parsley and dill add a fresh, slightly grassy flavor that cuts through the richness of the butter. Lemon juice brings a zesty brightness that lifts the whole dish.
Mixing and Chilling the Butter
- In a medium bowl, combine softened butter, minced garlic, chopped herbs, lemon juice, and salt.
- Mix thoroughly until the herbs and garlic are evenly distributed.
- Spoon the mixture onto a sheet of plastic wrap. Shape it into a log about 4-5 inches long.
- Wrap tightly and refrigerate for at least 30 minutes, or freeze for 10-15 minutes if you’re in a hurry.
Chilling the butter is non-negotiable. It helps in stuffing the chicken breasts cleanly and ensures that the butter doesn’t melt too quickly when cooking, which could lead to leaks.
Prepping the Chicken Breasts
How to Butterfly Chicken Breasts
Butterflying the chicken breast means slicing it horizontally but not all the way through, then opening it like a book. This technique is key for stuffing:
- Place a chicken breast on a cutting board.
- With one hand flat on top, slice horizontally through the thickest part.
- Stop just before cutting all the way through and open the chicken like a book.
This creates a pocket that’s perfect for stuffing and rolling.
Pounding for Uniform Thickness
Once butterflied, it’s time to pound:
- Cover the chicken with plastic wrap to prevent splattering.
- Use a meat mallet or rolling pin to gently pound the chicken to about 1/2 inch thickness.
Uniform thickness ensures even cooking and helps the chicken roll up tightly, sealing in the herb butter.
Assembling the Chicken Kiev
Stuffing the Chicken with Herb Butter
- Take the chilled herb butter and cut it into 4 equal pieces.
- Place one piece in the center of each butterflied chicken breast.
Securing and Rolling the Chicken
- Fold the sides of the chicken over the butter.
- Roll tightly from one end to the other, like a burrito.
- Use toothpicks or kitchen twine to secure the roll if needed.
A tight roll is crucial. It helps seal in the butter and creates a beautiful, compact shape that’s easy to bread and cook.
Breading the Chicken
Flour, Egg Wash, and Breadcrumbs Process
Breading the chicken is where we start to lock in all the flavors and prepare for that golden, crispy finish. Here’s how to do it like a pro:
- Set up your breading station with three shallow dishes:
- First dish: All-purpose flour seasoned with salt and pepper.
- Second dish: Beaten eggs.
- Third dish: Panko breadcrumbs, optionally mixed with a bit of paprika or garlic powder for extra flavor.
- Coat each chicken roll first in the flour, tapping off the excess. This step helps the egg wash stick.
- Dip into the beaten eggs, making sure the entire surface is coated. The egg wash acts as the glue between the flour and breadcrumbs.
- Roll in the breadcrumbs, pressing gently to make sure every inch is well coated.
Pro Tip: Double coating (egg and breadcrumbs again) can add an extra-crispy finish and extra insurance against butter leaks.
Tips for Perfect Coating
- Make sure your herb butter is fully chilled before stuffing; this helps avoid leaks during cooking.
- Don’t skimp on the breadcrumbs. A thick, even layer is your friend.
- Let the breaded chicken rest for about 10 minutes before cooking to help the coating adhere better.
Cooking the Chicken Kiev
Frying to Golden Perfection
Frying gives Chicken Kiev that irresistibly crispy crust. Here’s the step-by-step:
- Heat about 1/2 inch of oil in a deep skillet or sauté pan over medium heat.
- Test the oil by dropping in a breadcrumb—if it sizzles, you’re ready.
- Gently place the breaded chicken into the pan, seam side down first.
- Fry each side for 3-4 minutes, or until golden brown. You’re not cooking the chicken through here—just building a crust.
Finishing in the Oven
Once seared, transfer the chicken to a preheated oven at 375°F (190°C). Bake for 15-20 minutes, or until the internal temperature reaches 165°F (74°C). This step ensures the chicken is fully cooked and the butter is perfectly melted inside.
Pro Tip: Let the cooked chicken rest for 5 minutes before serving. This helps redistribute juices and keeps the butter from gushing out immediately when cut.
Serving Suggestions
Ideal Side Dishes
Chicken Kiev pairs beautifully with a variety of sides. Some top picks include:
- Mashed potatoes – classic and comforting.
- Steamed or roasted vegetables – think asparagus, green beans, or carrots.
- Rice pilaf or buttery noodles – great for soaking up the extra herb butter.
- Simple green salad – adds freshness and balance to the rich chicken.
Presentation Tips
- Serve on a warm plate to keep everything hot.
- Garnish with a sprinkle of fresh parsley or dill.
- Slice diagonally to reveal the melting butter inside—it’s a showstopper!
Storage and Reheating Tips
Best Practices for Leftovers
Chicken Kiev is best enjoyed fresh, but leftovers can still shine:
- Refrigerate: Store in an airtight container for up to 3 days.
- Freeze: Wrap tightly in plastic wrap and foil. Store up to 2 months.
To reheat:
- Preheat your oven to 350°F (175°C).
- Place the chicken on a baking sheet and cover loosely with foil.
- Bake for 15-20 minutes, until heated through.
Avoid microwaving if possible—it can make the breading soggy and the butter may leak.
Common Mistakes to Avoid
How to Prevent Butter Leaks
The hallmark of a good Chicken Kiev is that buttery eruption when you cut into it. But what if the butter leaks out during cooking? Here’s how to avoid that culinary heartbreak:
- Chill the herb butter until it’s firm before stuffing.
- Tightly roll and seal the chicken breast to prevent gaps.
- Secure with toothpicks or kitchen twine to keep everything snug.
- Double breading can add an extra layer of security.
Also, don’t skip the oven step. Frying alone often causes the butter to heat too quickly and escape before the chicken is cooked.
Nutritional Information
Caloric Breakdown
Chicken Kiev is indulgent, no doubt about it—but understanding its nutritional profile can help you enjoy it mindfully. Here’s a general breakdown for one serving (based on a 6 oz chicken breast and standard ingredients):
| Nutrient | Amount |
|---|---|
| Calories | ~600–700 kcal |
| Protein | 35–40 g |
| Fat | 40–45 g |
| Saturated Fat | ~15 g |
| Carbohydrates | 15–20 g |
| Fiber | 1–2 g |
| Sodium | ~600 mg |
The majority of the calories come from the herb butter and frying oil. If you’re watching your intake, you can lighten it up by baking instead of frying and using a leaner butter substitute. However, the full-fat, traditional version is a delicious treat worth savoring on occasion.
Variations of Chicken Kiev
Cheese-Stuffed Kiev
If you’re feeling adventurous or simply love cheese, try adding a cube of mozzarella or Gruyère inside the butter core. This turns your Chicken Kiev into a molten, cheesy masterpiece.
How to do it:
- Slice a small piece of your cheese of choice.
- Wrap it inside the herb butter log before chilling.
- Proceed as normal with stuffing and rolling.
This version is especially popular with kids and cheese lovers alike.
Spicy Herb Butter Version
For those who enjoy a bit of heat, try adding the following to your herb butter:
- 1/2 teaspoon chili flakes or cayenne pepper
- Finely chopped jalapeños or hot green chilies
- A touch of smoked paprika
This adds a bold kick without overpowering the fresh herb flavors, giving your Chicken Kiev a unique twist that stands out.
FAQs about Chicken Kiev Recipe
What is Chicken Kiev made of?
Chicken Kiev is made from a boneless chicken breast that’s pounded flat, filled with garlic herb butter, rolled up, breaded, and deep-fried or baked until golden and crispy.
Can I bake Chicken Kiev instead of frying it?
Absolutely! Baking is a healthier option. Just place the breaded chicken in a preheated oven at 200°C (400°F) for about 25–30 minutes until golden and cooked through.
How do you keep the butter from leaking out?
Seal it tight! Wrap the chicken tightly and chill it before cooking—this firms up the butter and helps keep that savory goodness inside while cooking.
What’s the best side dish for Chicken Kiev?
Mashed potatoes, steamed vegetables, or a fresh garden salad pair perfectly. Want to keep it classic? Go for buttery mashed spuds and peas.
Can I make Chicken Kiev in advance?
Yes! You can prep and freeze it before cooking. When ready, cook straight from frozen—just add an extra 10–15 minutes to your bake time.
Is Chicken Kiev Russian or Ukrainian?
Controversial kitchen politics! While it’s called “Kiev,” its origins are hotly debated between Russia and Ukraine. But one thing’s for sure—your taste buds won’t care!
Can I use chicken thighs instead of breasts?
You could, but chicken breasts are ideal because they’re large and easy to stuff and roll. Thighs might be trickier and messier.
How do I know when it’s cooked through?
Use a meat thermometer—once the internal temp hits 74°C (165°F), you’re good to go. No thermometer? Make sure the juices run clear and there’s no pink inside.
Conclusion
Chicken Kiev is more than just a meal—it’s a culinary experience filled with rich, buttery flavor and a satisfyingly crispy exterior. From the careful prep of garlic herb butter to the delicate breading and frying, every step in this recipe contributes to a dish that’s both comforting and luxurious. Whether you’re cooking to impress or just treating yourself, this classic recipe never fails to deliver.
What makes Chicken Kiev truly special is its versatility. It can be adapted, spiced up, or even made cheesy, and still retain its core appeal. The key is to take your time, pay attention to the details, and enjoy the process. Cooking, after all, is a form of love—and Chicken Kiev is love served crispy and golden.


