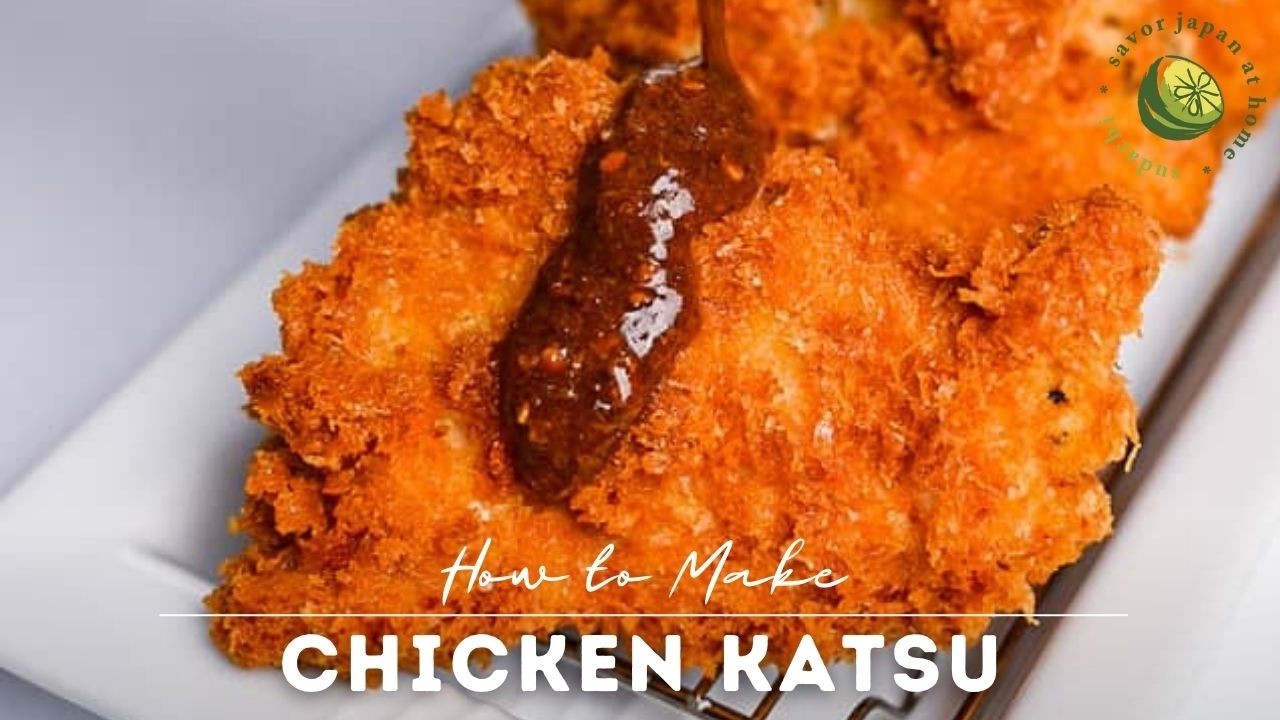
Chicken Katsu Recipe: Chicken Katsu is a Japanese dish consisting of breaded, deep-fried chicken cutlets that are irresistibly crispy on the outside and juicy on the inside. The word “katsu” is short for katsuretsu, meaning “cutlet” in Japanese. Unlike Western fried chicken, Chicken Katsu is lighter, less greasy, and typically served with a tangy, savory sauce and shredded cabbage on the side. Think of it as Japan’s answer to the schnitzel, but with a unique Asian flair.
The Origin and Popularity of Chicken Katsu
Chicken Katsu has its roots in Japanese yōshoku cuisine—Western-inspired Japanese dishes. Originally created in the late 19th century, katsu dishes were first made using pork (tonkatsu). Over time, chicken became a popular alternative, offering a leaner option. Today, Chicken Katsu is enjoyed worldwide, from Japanese restaurants to trendy fusion cafes. You’ll often see it served with curry (katsu curry), over rice (katsudon), or as part of a bento box.
Why You’ll Love This Recipe
Chicken Katsu is the kind of dish that works for both weeknight dinners and special occasions. It’s quick, comforting, and incredibly versatile. You don’t need fancy ingredients, and the whole process is straightforward once you set up your breading station. Plus, it’s family-friendly—kids love the crispy chicken strips, and adults appreciate the balance of flavors when paired with katsu sauce and rice.
Ingredients You’ll Need for Chicken Katsu
Main Ingredients for the Chicken
To make authentic Chicken Katsu, you’ll need simple, fresh ingredients:
- Chicken breasts or thighs (boneless, skinless) – thighs give more flavor and juiciness, while breasts are leaner.
- Salt and pepper – for basic seasoning.
Ingredients for the Breading and Coating
The crispy coating is the star of Chicken Katsu, and here’s what you’ll need:
- All-purpose flour – helps the egg stick to the chicken.
- Eggs – beaten, to act as a binder.
- Panko breadcrumbs – Japanese-style breadcrumbs that create a light, airy, and ultra-crispy coating.
- Vegetable oil – for frying (canola, sunflower, or peanut oil works best).
Ingredients for the Sauce
Traditional Chicken Katsu is incomplete without katsu sauce, which balances the dish with tangy and savory notes:
- Ketchup
- Worcestershire sauce
- Soy sauce
- Sugar
- Optional spices (garlic powder, mustard, or mirin for depth of flavor).
Suggested Sides and Garnishes
To complete the meal, consider serving Chicken Katsu with:
- Steamed white rice or Japanese short-grain rice
- Shredded cabbage
- Lemon wedges
- Pickled vegetables (tsukemono)
Tools and Equipment Required
Essential Kitchen Tools
Before starting, gather the following:
- Sharp knife and cutting board
- Meat mallet or rolling pin (for pounding chicken)
- Mixing bowls
- Whisk or fork (for beating eggs)
- Shallow plates for breading station
- Large skillet or deep frying pan
- Tongs or chopsticks (for flipping)
- Wire rack or paper towels (for draining excess oil)
Frying Pan vs. Deep Fryer: Which Works Best?
Both methods work well, but they produce slightly different results:
- Frying pan (shallow frying) – more control, less oil usage, easier cleanup.
- Deep fryer – more consistent results, ensures even cooking, and perfect crispiness.
Safety Tips for Frying
- Always keep oil at the correct temperature (around 170°C / 340°F).
- Avoid overcrowding the pan, which lowers oil temperature and makes the chicken greasy.
- Keep a lid nearby in case of oil splatters or emergencies.
Preparing the Chicken
Choosing the Right Chicken Cut
The cut of chicken you choose makes a big difference. Chicken thighs are juicier and more flavorful, while chicken breasts are leaner and cook faster. For best results, choose boneless, skinless cuts.
How to Properly Pound and Season the Chicken
Pounding the chicken ensures even cooking and tender results. Place the chicken between two sheets of plastic wrap and gently pound with a meat mallet or rolling pin until about ½ inch thick. Season both sides with salt and pepper.
Tips for Perfectly Tender Chicken
- Marinate the chicken in a little soy sauce and sake for extra flavor.
- Don’t over-pound—flattening too much can make the chicken dry.
- Let the chicken rest at room temperature for a few minutes before breading.
Step-by-Step Guide to Making Chicken Katsu
Step 1 – Preparing the Chicken Fillets
Trim any excess fat and pound the chicken evenly. Lightly season with salt and pepper on both sides.
Step 2 – Setting Up the Breading Station
Arrange three shallow dishes: one with flour, one with beaten eggs, and one with panko breadcrumbs.
Step 3 – Coating the Chicken Correctly
Dredge each fillet in flour, then dip into the egg mixture, and finally coat generously with panko breadcrumbs. Press gently to ensure the crumbs stick.
Step 4 – Frying the Chicken to Perfection
Heat oil in a skillet over medium heat. Fry the chicken until golden brown on both sides, about 3–4 minutes per side. Internal temperature should reach 165°F (74°C).
Step 5 – Resting and Serving the Chicken Katsu
Place the fried chicken on a wire rack or paper towel to drain excess oil. Slice into strips and serve with rice, shredded cabbage, and katsu sauce.
Making the Katsu Sauce
Ingredients for Homemade Katsu Sauce
One of the highlights of Chicken Katsu is the savory, tangy-sweet katsu sauce. While you can buy bottled versions at Asian grocery stores, making your own at home is quick and incredibly rewarding. The basic ingredients you’ll need are:
- 2 tablespoons ketchup – provides sweetness and body.
- 1 tablespoon Worcestershire sauce – adds depth and umami flavor.
- 1 tablespoon soy sauce – enhances the savory notes.
- 1 teaspoon sugar or honey – balances acidity.
- ½ teaspoon Dijon mustard or garlic powder (optional) – for an extra punch.
This simple sauce has just the right balance of sweet, salty, tangy, and umami. It clings beautifully to the crispy chicken, making every bite deliciously satisfying.
Mixing and Adjusting Flavors
To make the sauce, whisk all ingredients in a small bowl until smooth. Taste and adjust:
- Add more ketchup if you prefer a sweeter sauce.
- Add extra soy sauce if you like it saltier.
- A splash of mirin or rice vinegar can add brightness.
The beauty of homemade katsu sauce is that you can customize it to your liking. It should be thick enough to coat a spoon but still pourable.
Store-Bought Alternatives
If you’re short on time, Japanese brands like Bull-Dog Tonkatsu Sauce are widely available and work well as a substitute. Some people even mix barbecue sauce with Worcestershire as a quick hack. But if you want authenticity and freshness, the homemade version is hard to beat.
Serving Suggestions for Chicken Katsu
Classic Japanese Pairings
Traditionally, Chicken Katsu is served as part of a balanced Japanese meal. Here are some authentic ways to enjoy it:
- Chicken Katsu Teishoku – served with rice, miso soup, shredded cabbage, and pickles.
- Katsudon – sliced katsu simmered with egg and onions over rice.
- Katsu Curry – topped with Japanese curry sauce over rice, a hearty and comforting meal.
Western-Style Serving Ideas
Chicken Katsu has also found a place in Western kitchens, where it’s often paired with familiar sides:
- Serve as a chicken sandwich with coleslaw and katsu sauce.
- Use in a wrap or tortilla with fresh veggies.
- Pair with French fries or mashed potatoes for a fusion twist.
Garnishes to Elevate Your Dish
A few small touches can take your Chicken Katsu to restaurant-quality:
- Fresh lemon wedges – squeeze just before eating for a refreshing contrast.
- Chopped green onions – add a pop of color and mild sharpness.
- Toasted sesame seeds – sprinkle on top for nutty aroma.
- Shredded cabbage with sesame dressing – balances richness with crunch.
Tips and Tricks for Perfect Chicken Katsu Every Time
Common Mistakes to Avoid
Even though Chicken Katsu is simple, small mistakes can ruin the texture or taste. Avoid these:
- Skipping the pounding step – uneven thickness means uneven cooking.
- Using regular breadcrumbs – they won’t give the same crispiness as panko.
- Overcrowding the pan – this lowers oil temperature and makes the chicken soggy.
- Cooking on high heat – the outside burns before the inside cooks through.
How to Keep the Coating Crispy
The signature crunch is what makes Chicken Katsu irresistible. To maintain that perfect crispiness:
- Always fry at the correct temperature (170°C / 340°F).
- Drain on a wire rack, not paper towels (to prevent steaming).
- Don’t cover the chicken immediately after frying—trapped steam makes it soggy.
- If preparing ahead, re-crisp in the oven at 350°F (175°C) for 10 minutes.
Healthy Alternatives
If you love Chicken Katsu but want a lighter version:
- Bake instead of fry – coat with oil spray and bake at 400°F (200°C) until golden.
- Air fryer method – cooks with minimal oil while still keeping a crunchy texture.
- Use whole-wheat panko – for more fiber and nutrients.
- Pair with brown rice or salad – for a healthier balanced meal.
Storage and Reheating Instructions
Refrigerating Chicken Katsu
Chicken Katsu can be refrigerated for up to 3 days. Store it in an airtight container, but keep the sauce separate. To prevent sogginess, let it cool before storing.
Freezing for Long-Term Storage
For longer storage, freeze breaded but uncooked chicken fillets on a tray until solid, then transfer to freezer bags. Fry them directly from frozen when needed—just cook a few minutes longer. You can also freeze cooked katsu, though it may lose a bit of crispiness.
Best Way to Reheat Without Losing Crispiness
Microwaving tends to make the coating soggy, so it’s better to use:
- Oven – preheat to 350°F (175°C), bake for 10–15 minutes.
- Air fryer – reheat at 375°F (190°C) for 6–8 minutes.
This way, you restore the crisp texture while keeping the chicken juicy.
Nutritional Information
Calories and Macronutrients
On average, a serving of Chicken Katsu (one cutlet with sauce) contains:
- Calories: 500–600
- Protein: 30–35g
- Fat: 20–25g
- Carbohydrates: 45–50g
Of course, this varies depending on frying oil, portion size, and whether you serve it with rice or curry.
Healthier Ingredient Substitutions
- Swap chicken thighs for chicken breasts to reduce fat.
- Use olive oil instead of vegetable oil for frying.
- Bake or air fry instead of deep fry.
- Use low-sodium soy sauce and reduce added sugar in the sauce.
Balancing Katsu in Your Diet
Chicken Katsu is indulgent, but moderation is key. Enjoy it as part of a balanced diet—pair with a side of veggies and choose steamed rice over fried rice. If you’re mindful of portion sizes, you can enjoy katsu guilt-free.
Variations of Chicken Katsu
Pork Katsu (Tonkatsu)
While Chicken Katsu is delicious, its older cousin Tonkatsu is just as popular in Japan. Instead of chicken, pork cutlets—usually pork loin or tenderloin—are breaded in panko and fried until golden brown. Tonkatsu tends to be richer because of the marbled pork fat, making it juicy and flavorful. It’s traditionally served with shredded cabbage, rice, and a thicker tonkatsu sauce. For those who prefer a heartier dish, Tonkatsu is an excellent alternative.
Baked Chicken Katsu
For a healthier option, you can bake your Chicken Katsu instead of frying. Simply coat the breaded chicken with a light spray of oil, place it on a wire rack over a baking tray, and bake at 400°F (200°C) for about 20 minutes, flipping halfway. The result is still crunchy, though slightly less golden compared to deep frying. This version is great if you’re trying to cut down on oil while still enjoying the crispy texture of katsu.
Chicken Katsu Curry
One of the most famous variations is Katsu Curry, a comforting Japanese dish where Chicken Katsu is served with a mild, thick curry sauce over rice. Japanese curry is sweeter and less spicy than Indian curry, often made with onions, carrots, potatoes, and a roux-based curry mix. The combination of crispy chicken with rich curry sauce is a match made in heaven and is a favorite comfort food in Japan and beyond.
FAQs about Chicken Katsu Recipe
Can I Bake Instead of Frying?
Yes, baking is a healthier alternative to frying. Use a wire rack for airflow, spray lightly with oil, and bake at 400°F (200°C) until crispy and cooked through. While the texture won’t be as crispy as deep-fried, it’s still tasty and much lighter.
What Oil is Best for Frying?
Neutral oils with a high smoke point are best for frying Chicken Katsu. Some good options include vegetable oil, canola oil, sunflower oil, or peanut oil. Avoid using olive oil or butter, as they burn too quickly and can affect the flavor.
Can I Use an Air Fryer?
Absolutely! Air fryers are a fantastic way to make crispy Chicken Katsu without using much oil. Spray the breaded chicken lightly with cooking oil and air fry at 375°F (190°C) for 12–15 minutes, flipping halfway. The result is surprisingly close to traditional frying but much healthier.
How Do I Keep the Chicken Juicy?
The key to juicy chicken is not overcooking it. Pound the chicken evenly so it cooks consistently, use a meat thermometer to ensure it reaches 165°F (74°C), and let it rest for a few minutes before slicing. Using chicken thighs also helps because they retain more moisture than breasts.
Can I Make Chicken Katsu Ahead of Time?
Yes! You can prepare the breaded chicken fillets in advance and refrigerate them for up to a day before frying. Alternatively, freeze them uncooked, then fry directly from frozen. This makes meal prep easier and ensures you can enjoy crispy Chicken Katsu whenever you crave it.
Conclusion
Chicken Katsu is more than just fried chicken—it’s a dish that combines Japanese simplicity with satisfying flavors and textures. Crispy on the outside, juicy on the inside, and perfectly paired with tangy katsu sauce, it’s a recipe that’s easy enough for weeknights yet impressive enough for guests. Whether you enjoy it with rice and cabbage, smothered in curry, or tucked into a sandwich, Chicken Katsu is a versatile dish that never disappoints.
By following this step-by-step guide, you’ll master the art of making authentic Chicken Katsu at home. Remember to use panko for maximum crunch, maintain the right frying temperature, and pair it with the right sides. Soon, you’ll find yourself cooking this Japanese favorite on repeat!