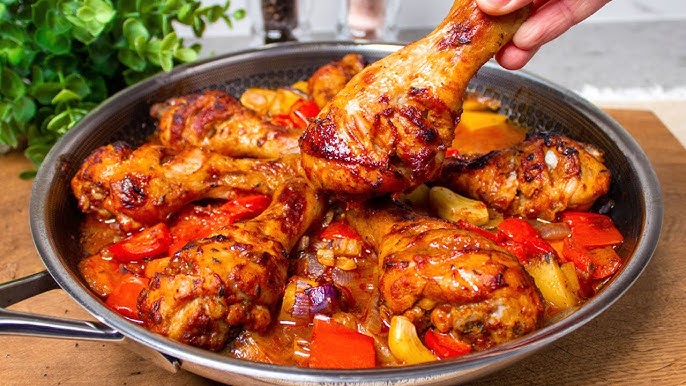
Chicken Drumstick Recipe: Chicken drumsticks are a staple in many households, and it’s no surprise why. They’re juicy, flavorful, and oh-so-satisfying. Whether you’re hosting a backyard BBQ, prepping a weeknight dinner, or just craving something savory, drumsticks have your back. Their shape makes them fun and easy to eat, and the bone-in meat stays tender and moist, even under high heat. Plus, they soak up marinades beautifully, giving you a canvas for almost any flavor profile you crave—spicy, tangy, sweet, or smoky.
Let’s be honest, drumsticks are also budget-friendly. You can feed a crowd without breaking the bank, and the prep is often fuss-free. Add some seasoning, throw them in the oven or on the grill, and voilà—restaurant-worthy chicken in your own kitchen.
This step-by-step guide will walk you through everything you need to know to cook the perfect chicken drumstick every single time.
Ingredients You’ll Need
You don’t need fancy ingredients to make delicious chicken drumsticks. Here’s a basic list to get you started:
Basic Ingredients:
- 6-8 chicken drumsticks
- 2 tbsp olive oil
- 1 tsp salt
- 1 tsp black pepper
- 1 tsp garlic powder
- 1 tsp onion powder
- 1 tsp paprika (smoked or sweet)
- ½ tsp chili powder (optional for heat)
Optional Add-Ons for Extra Flavor:
- Fresh herbs (thyme, rosemary, or parsley)
- Lemon juice or zest
- Soy sauce or Worcestershire sauce for umami
- Honey or brown sugar for a touch of sweetness
- Hot sauce or cayenne for a kick
These ingredients provide a good balance of savory, spicy, and sweet, and you can always tweak the ratios to suit your taste. One of the best things about drumsticks is their flexibility—they go just as well with a Mediterranean marinade as they do with a smoky BBQ rub.
Equipment Required
Before you start cooking, make sure you have the right tools. This not only makes the process smoother but also ensures your drumsticks turn out perfectly cooked.
Kitchen Tools You’ll Need:
- Large mixing bowl (for marinating)
- Measuring spoons
- Tongs (to handle hot chicken)
- Baking sheet with wire rack (for oven method)
- Grill or air fryer (depending on your cooking method)
- Aluminum foil or parchment paper
- Meat thermometer (optional but recommended)
Having these tools ready saves time and prevents last-minute scrambling. If you’re baking, that wire rack is especially useful—it lets the heat circulate evenly around the drumsticks so they get crispy on all sides. No one wants soggy skin!
Preparation Steps
Proper prep work is key to getting those drumsticks juicy and flavorful. Start by washing the chicken under cold water and patting it dry with paper towels. Moisture is the enemy of crispy skin, so make sure the drumsticks are completely dry before you season them.
Step-by-Step Prep:
- Trim: Remove any excess fat or skin if desired.
- Score: Lightly score the drumsticks with a knife—this helps the marinade penetrate deeper.
- Marinate: Mix your seasonings and olive oil in a bowl. Toss the drumsticks until fully coated. Let them marinate for at least 30 minutes—overnight is best if you want max flavor.
Marinating is where the magic happens. The longer you let those spices soak in, the more flavorful your chicken will be. If you’re in a rush, even 15 minutes helps, but don’t skip this step altogether. For even better flavor, place the marinated drumsticks in a sealed zip-lock bag and refrigerate.
Step-by-Step Cooking Guide
Now that your drumsticks are marinated and ready to go, it’s time to cook them. Here are three foolproof methods to try:
Oven-Baked Drumsticks
Instructions:
- Preheat oven to 400°F (200°C).
- Line a baking sheet with foil and place a wire rack on top.
- Arrange drumsticks on the rack, spacing them out evenly.
- Bake for 35–45 minutes, flipping halfway through for even browning.
- Use a meat thermometer to check for doneness (internal temp should be 165°F or 74°C).
Oven-baked drumsticks are a crowd-pleaser. They come out crispy on the outside and juicy on the inside. The wire rack helps the skin crisp up beautifully by letting hot air circulate all around. Want that extra crunch? Broil for the last 3–5 minutes.
Grilled Drumsticks
Instructions:
- Preheat grill to medium-high heat.
- Oil the grates to prevent sticking.
- Grill drumsticks for about 20–25 minutes, turning every 5–7 minutes.
- Check internal temperature to ensure it’s 165°F.
Grilling adds a smoky, charred flavor that’s unbeatable. Perfect for summer cookouts or when you’re craving that BBQ vibe. Keep an eye on the heat so the skin doesn’t burn before the inside cooks through.
Air Fryer Drumsticks
Instructions:
- Preheat air fryer to 375°F (190°C).
- Place drumsticks in a single layer in the basket.
- Cook for 25–30 minutes, shaking halfway through.
- Check doneness with a thermometer.
Air frying is perfect for a healthier option with less oil but still gives that crispy texture. Plus, it’s super convenient—no need to heat the whole kitchen!
Serving Suggestions
Once your drumsticks are cooked to golden perfection, it’s time to think about what to serve alongside them. A great meal is all about balance—combining textures, flavors, and colors to keep things interesting. Chicken drumsticks are incredibly versatile, so you can go rustic, fancy, or somewhere in between.
Classic Side Dishes:
- Mashed Potatoes – Creamy and buttery, they complement the crispy texture of the chicken.
- Coleslaw – Adds a refreshing crunch and tangy contrast.
- Corn on the Cob – Grilled or boiled, it’s a sweet, juicy match.
- Roasted Vegetables – Think carrots, broccoli, and bell peppers for a healthy, colorful plate.
Low-Carb Options:
- Cauliflower Rice – Light and fluffy, it soaks up all those juices.
- Zucchini Noodles – A fun twist if you’re watching your carbs.
- Steamed Greens – Spinach, kale, or asparagus seasoned lightly.
Dips and Sauces:
- Ranch Dressing – Creamy and herby, always a winner.
- Honey Mustard Sauce – Sweet and tangy for contrast.
- BBQ Sauce – Smoky and sticky, a classic choice.
- Hot Sauce – For those who like a fiery kick.
Mix and match your sides based on the occasion. Want something simple for a weeknight dinner? Go with a quick salad and rice. Hosting friends? Throw in a spread with dips, fries, and grilled corn. You really can’t go wrong.
Tips for Best Results
Even though cooking chicken drumsticks seems simple, there are a few pro tips that can elevate your dish from good to unforgettable. Let’s dig into some expert advice to help you nail it every time.
Marinate Like a Pro:
- Time matters: Try marinating overnight if you can. Even 2–4 hours can make a big difference.
- Use acid: Add lemon juice, vinegar, or yogurt to help tenderize the meat.
- Zip it up: Seal everything in a plastic bag to make sure every inch is covered.
Cooking Smart:
- Bring to room temp: Let the drumsticks sit out for 20–30 minutes before cooking. This helps them cook more evenly.
- Avoid overcrowding: Whether you’re baking, grilling, or air frying, space out the drumsticks so hot air circulates properly.
- Use a thermometer: Internal temp should hit 165°F. It’s the best way to guarantee safety without overcooking.
Get That Perfect Crisp:
- Dry skin = crispy skin: Always pat the chicken dry before seasoning.
- Rack it up: If baking, a wire rack keeps the bottom from getting soggy.
- Broil or blast: Finish under the broiler or crank up the air fryer at the end for extra crunch.
Avoid rookie mistakes like overcooking or skipping the seasoning. Trust us, taking those extra couple of steps makes all the difference. And if you’re ever in doubt, taste as you go!
Storage and Reheating
Made a big batch of drumsticks and have leftovers? No problem. Chicken drumsticks are surprisingly good the next day—if you store and reheat them the right way.
Storing Leftovers:
- Refrigerator: Place in an airtight container. Good for up to 3–4 days.
- Freezer: Wrap in foil or freezer-safe bags. They’ll keep for 2–3 months.
Make sure to cool the drumsticks to room temperature before storing to avoid excess moisture buildup. If you’re freezing, label the bag with the date so you don’t forget how long they’ve been in there.
Reheating Tips:
- Oven: Preheat to 350°F. Cover with foil to retain moisture, and heat for 15–20 minutes.
- Air Fryer: 375°F for 5–7 minutes gives a crispy finish.
- Microwave: Use only if you’re in a rush—cover with a damp paper towel and heat in short bursts to avoid drying out.
Pro tip: Add a splash of water or broth when reheating to keep the meat from drying. Always check that the center is hot before serving, especially if reheating from frozen.
Nutrition Facts
Chicken drumsticks are not only delicious—they’re also packed with protein and essential nutrients. Here’s a general breakdown for a standard, oven-baked drumstick (skin on, no breading):
| Nutrient | Amount (per drumstick) |
|---|---|
| Calories | 150–180 kcal |
| Protein | 18–22 grams |
| Fat | 9–11 grams |
| Carbohydrates | 0–2 grams |
| Iron | 6% DV |
| Zinc | 10% DV |
| Vitamin B6 | 25% DV |
Chicken is an excellent source of lean protein, making it a favorite among fitness enthusiasts. The dark meat in drumsticks has a bit more fat than chicken breast, but that’s also where the flavor lives. As long as you’re not deep-frying or drowning them in butter, drumsticks can be part of a healthy diet.
Want a leaner version? Remove the skin before cooking or opt for grilling over baking.
FAQs about Chicken Drumstick Recipe
Q1: Can I use frozen drumsticks without thawing?
A1: It’s best to thaw drumsticks in the fridge overnight. Cooking from frozen can result in uneven doneness and longer cooking times.
Q2: How long should I marinate drumsticks?
A2: Aim for at least 30 minutes, but overnight marination gives the best flavor and tenderness.
Q3: What’s the best method for extra crispy skin?
A3: Pat the drumsticks dry, use a wire rack when baking, and finish under the broiler or in the air fryer for a final crunch.
Q4: Can I make this recipe spicy?
A4: Absolutely! Add chili powder, cayenne, or your favorite hot sauce to the marinade for a spicy kick.
Q5: Is it okay to leave the skin on?
A5: Yes, the skin helps keep the meat juicy and adds flavor. You can remove it after cooking if you prefer a leaner bite.
Conclusion
Chicken drumsticks are the ultimate comfort food—easy to cook, full of flavor, and endlessly customizable. Whether you’re baking them in the oven, firing up the grill, or using an air fryer for a healthier twist, these meaty little marvels never disappoint. With the right seasoning, some smart cooking techniques, and tasty side dishes, you can turn a basic piece of chicken into a meal that impresses everyone at the table.
So next time you’re staring at a pack of drumsticks wondering what to do—remember, all it takes is a little love, a few spices, and a solid game plan.


