Chicken and Thigh Recipe: Chicken thighs are one of those underrated heroes in the kitchen. Juicy, flavorful, and rich in natural fats, they remain tender and succulent even after extended cooking. Unlike chicken breasts that can dry out quickly, thighs hold moisture beautifully. Whether you’re a home cook or a seasoned chef, chicken thighs offer unmatched flavor and flexibility in meals.
Another reason chicken thighs are so beloved? They’re economical. Pound for pound, they cost less than breasts, yet deliver more taste. That’s a win-win in any kitchen. Add in their forgiving nature when cooked, and you’ve got yourself a near-perfect protein option. From weeknight dinners to Sunday meal preps, chicken thighs bring deliciousness to the table with minimal fuss.
The Versatility of Chicken Thighs
There are countless ways to use chicken thighs: roast them, fry them, stew them, or grill them. They work wonders in international recipes too—think teriyaki, tikka masala, or Southern-style buttermilk fried chicken. Bone-in or boneless, skin-on or skinless, each type brings a different texture and flavor to your dish.
Want crispy skin? Leave it on and roast it high. Want quick cooking? Go boneless and pan-fry. Their adaptability means you can go spicy, savory, tangy, or sweet depending on your cravings. Whether you serve them over rice, with potatoes, or inside tacos, the result is always satisfying.
Ingredients You’ll Need
Core Ingredients
Before diving into the recipe, let’s gather the essentials. For a classic oven-baked chicken thigh dish, you’ll need:
- 6 bone-in, skin-on chicken thighs
- 2 tablespoons olive oil
- 1 teaspoon salt
- ½ teaspoon black pepper
- 1 teaspoon garlic powder
- 1 teaspoon paprika
- 1 teaspoon onion powder
- 1 tablespoon fresh or dried herbs (like thyme or rosemary)
- 1 lemon (optional, for added zest)
These basic pantry ingredients create a savory, golden-brown finish that locks in flavor and juices. You can adjust the seasonings based on your preferences, but the combination of garlic, paprika, and herbs is a time-tested winner.
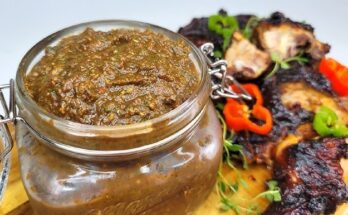
Optional Add-ons and Variations
Want to take it up a notch? Here are a few additions:
- Spicy twist: Add cayenne pepper or chili flakes.
- Sweet glaze: Mix in honey, brown sugar, or maple syrup for a sweet-savory contrast.
- Citrusy flavor: Add fresh lemon zest and juice for brightness.
- Asian-inspired: Soy sauce, sesame oil, and ginger can transform the dish into something exotic.
- Creamy version: Pair it with a garlic cream sauce or smother in mushroom gravy.
These optional ingredients open the door to endless variations, keeping the recipe fresh and exciting each time you make it.
Preparing the Chicken Thighs
Cleaning and Trimming
Preparation is key to a mouth-watering dish. First, rinse your chicken thighs under cold water and pat them dry using paper towels. Removing excess moisture ensures you get a crispy skin when baking. Look for any extra fat or hanging skin and trim it off with kitchen shears.
It’s crucial to dry them thoroughly—this step alone makes a big difference in how the skin crisps up. Avoid soaking the chicken in water or brine unless you’re doing a longer preparation for enhanced flavor. For this recipe, a quick rinse and pat dry will do the job.
Marinating for Maximum Flavor
To truly elevate your chicken thighs, marinate them. Even 30 minutes makes a difference, but if you can go for 2–4 hours, the results are exceptional. Combine olive oil, garlic powder, paprika, salt, pepper, and herbs in a bowl. Toss the chicken to coat it evenly and let it rest in the fridge.
The marinade helps tenderize the meat while infusing it with robust flavors. If you’re short on time, a dry rub will also work. Just season generously right before baking. Either method ensures your thighs are bursting with flavor from the inside out.
Cooking Methods Explained
Oven-Baked Chicken Thighs
Oven baking is hands-down the easiest way to cook chicken thighs. It’s mostly hands-off, retains moisture, and gives the skin a gorgeous crispiness. All you need is a baking tray, some foil or parchment paper, and your marinated chicken.
Preheat your oven to 400°F (200°C), arrange the thighs skin-side up, and bake for 35–45 minutes. Check internal temperature with a meat thermometer—165°F (74°C) is your goal. Let the chicken rest for 5–10 minutes before serving to lock in juices.
Pan-Fried Chicken Thighs
Prefer something quick and crispy? Pan-frying is your friend. Heat oil in a skillet over medium heat and place chicken thighs skin-side down. Cook for 7–8 minutes per side, flipping occasionally until golden brown and cooked through.
This method gives you a crackling skin and juicy interior. It’s ideal for smaller batches or when you want a stovetop-only solution. Add garlic or herbs to the pan for extra aroma while frying.
Air Fryer or Grill Option
Got an air fryer or grill? Great! For the air fryer, cook at 375°F for 20–25 minutes, flipping halfway. For grilling, place thighs skin-side down on medium-high heat and grill for about 6–8 minutes per side.
Both methods offer delicious alternatives with less oil and loads of flavor. Grilling adds smokiness, while the air fryer keeps things light and crispy.
Step-by-Step Chicken Thigh Recipe (Oven Method)
Step 1: Preheat the Oven
First things first—preheat your oven to 400°F (200°C). This ensures even cooking and a crispy finish. While it heats up, line a baking tray with foil or parchment paper to reduce cleanup. A wire rack over the tray can also help render fat and crisp the skin further.
Step 2: Season the Chicken
With your chicken thighs cleaned and patted dry, now it’s time to season like a pro. Generously rub each piece with olive oil—this acts as the flavor carrier and helps in crisping the skin. Now sprinkle your seasoning mix: salt, pepper, garlic powder, onion powder, paprika, and herbs. Use your hands to rub the spices into every nook and cranny.
If you’re marinating, toss all these spices with some lemon juice or zest and let the chicken rest for a while in the fridge. Even a 30-minute wait makes a noticeable difference. This step is where the flavor builds its foundation, so don’t rush it.
Make sure the skin side is well-coated, as this is the side that will be exposed during baking. The oil and spices together help caramelize the skin into a golden-brown, crispy delight.
Step 3: Arrange on Baking Tray
Next, arrange the seasoned thighs skin-side up on your prepared tray or wire rack. Give them a little breathing room—spacing is essential for that crispy edge. Crowding the pan will steam the chicken rather than roast it.
If you’re using a wire rack, it will allow the heat to circulate all around, cooking more evenly and letting excess fat drip down into the tray. This results in that perfect skin crackle we’re all after.
Add a few sprigs of rosemary or thyme in between if you want more aromatic notes. You can even scatter some garlic cloves around the tray for a subtle roasted garlic infusion that pairs beautifully with the chicken.
Step 4: Bake to Perfection
Slide the tray into your preheated oven and set a timer for 35 minutes. Don’t open the door too often—it drops the temperature and interrupts the cooking process. Around the 35-minute mark, use a meat thermometer to check the thickest part of the thigh. You’re aiming for an internal temp of 165°F (74°C).
If the skin isn’t crispy enough for your liking, flip the oven to broil for the last 3–5 minutes. Keep a close eye on it, though—broiling can go from golden to burnt in a blink.
You’ll know they’re done when the skin is crisp, the juices run clear, and the meat pulls away slightly from the bone. Let your nose guide you too—your kitchen will smell incredible when they’re ready.
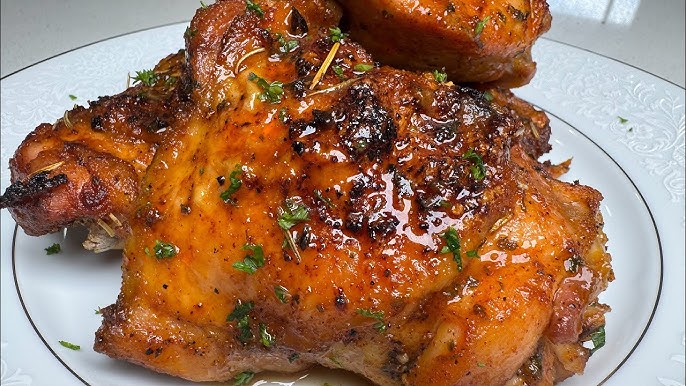
Step 5: Rest and Serve
As tempting as it is to dig in right away, let those thighs rest for at least 5–10 minutes. This short wait allows the juices to redistribute, keeping every bite tender and flavorful. Cutting in too early will cause those juices to spill out onto the plate instead of staying in the meat.
Serve your baked chicken thighs with a squeeze of lemon, a sprinkle of sea salt, or a fresh herb garnish. Pair with roasted veggies, mashed potatoes, rice, or a light salad. The dish is complete, but the flavor keeps going with every bite.
You’ve now nailed the ultimate oven-baked chicken thigh recipe—crispy on the outside, juicy on the inside, and bursting with flavor in every bite.
Serving Suggestions for Chicken Thighs
Perfect Side Dishes
One of the best things about chicken thighs is how well they pair with a wide variety of sides. Whether you’re aiming for a comforting, hearty dinner or a light and healthy meal, there’s a side dish to match. Here are a few crowd-pleasers:
- Roasted Vegetables: Think carrots, zucchini, bell peppers, and Brussels sprouts. Toss them with olive oil, salt, and pepper and roast them alongside your chicken.
- Mashed Potatoes: Creamy mashed potatoes with a dollop of butter and a hint of garlic pair beautifully with the crispy, savory flavor of chicken thighs.
- Steamed Rice or Pilaf: Simple white rice, fluffy basmati, or a seasoned rice pilaf balances the richness of the chicken.
- Garden Salad: A crisp salad with mixed greens, tomatoes, cucumbers, and a light vinaigrette can freshen up the meal.
- Corn on the Cob or Creamed Corn: Adds sweetness and texture that contrast well with savory baked chicken.
These sides not only complement the flavors but also add texture and nutrition to your meal.
Sauce Pairings to Elevate the Dish
Want to take your dish to the next level? Add a sauce! Here are a few sauces that pair perfectly with baked chicken thighs:
- Garlic Butter Sauce: Rich and aromatic, perfect drizzled over the top.
- Honey Mustard Sauce: Sweet and tangy for those who like a little zing.
- BBQ Sauce: Great if you’re after that smoky-sweet combo.
- Creamy Mushroom Sauce: Adds depth and luxury to the meal.
- Spicy Sriracha Mayo: For a spicy kick that cuts through the richness.
You can either drizzle the sauce on top before serving or keep it on the side for dipping—totally up to your personal taste.
Tips for Juicy and Flavorful Chicken Thighs
Secrets for Perfect Chicken Every Time
If you want to consistently nail this dish, here are a few key tips:
- Dry the Skin: Moisture is the enemy of crispiness. Pat the thighs thoroughly with paper towels before seasoning.
- Don’t Overcrowd the Pan: Give each piece some space for even cooking and crisping.
- Use a Meat Thermometer: Don’t guess—165°F (74°C) is your best friend.
- Let It Rest: Resting helps juices redistribute so they don’t spill out on your plate.
- Experiment with Marinades: Even a simple yogurt or citrus marinade can work wonders in tenderizing and flavoring the meat.
These small changes can make a huge difference in texture, moisture, and taste. Remember, great chicken thighs are all about balance: seasoning, temperature, and timing.
Storage and Reheating Tips
How to Store Leftovers Safely
Got leftovers? Great! Chicken thighs keep well and make for fantastic next-day meals. Store them in an airtight container in the fridge for up to 4 days. If you’ve got a bigger batch, freeze them for up to 3 months.
To freeze, wrap each piece individually in foil or plastic wrap, then place them in a zip-lock bag or airtight container. Label with the date, so you remember when you made them.
Reheating Without Drying Out
The biggest challenge with reheating chicken is maintaining that juicy texture. Here’s how to do it right:
- Oven Reheating: Place chicken on a baking sheet, cover loosely with foil, and bake at 350°F (175°C) for 15-20 minutes.
- Microwave: Use a microwave-safe plate and cover with a damp paper towel to retain moisture. Heat in short intervals.
- Skillet Method: Add a splash of water or broth to the pan and heat on low, covered.
No matter the method, always reheat until the internal temperature reaches 165°F (74°C). Done right, reheated thighs can taste just as good as day one.
FAQs about Chicken and Thigh Recipe
1. Can I use boneless, skinless chicken thighs for this recipe?
Yes, but the texture and flavor will be different. Boneless thighs cook faster and may be slightly drier without the skin, so reduce baking time and consider using a marinade for moisture.
2. How do I get extra crispy skin on chicken thighs?
Ensure the skin is dry before cooking and bake on a wire rack. You can also broil for the last few minutes to crisp it up.
3. What herbs go best with chicken thighs?
Thyme, rosemary, oregano, parsley, and basil all pair wonderfully with chicken. Fresh herbs add brightness, while dried herbs offer deeper flavor.
4. Can I make this recipe ahead of time?
Absolutely. You can season and marinate the thighs in advance and store them in the fridge for up to 24 hours before baking.
5. What’s the best way to reheat chicken thighs without drying them out?
Oven or skillet reheating is best. Add a splash of broth or cover with foil to help retain moisture and prevent drying.
Conclusion
Chicken thighs are truly one of the most flavorful, budget-friendly, and forgiving cuts of meat you can cook. From prepping and marinating to baking and serving, each step in this recipe plays a role in crafting a meal that’s crispy, juicy, and packed with flavor. Whether you’re cooking for your family or prepping meals for the week, this oven-baked chicken thigh recipe delivers every time.
Remember, cooking is an art and a science—so don’t be afraid to experiment. Try new marinades, side dishes, and sauces to keep things interesting. With this guide, you’re well on your way to mastering the perfect chicken thigh dish that’ll have everyone asking for seconds.