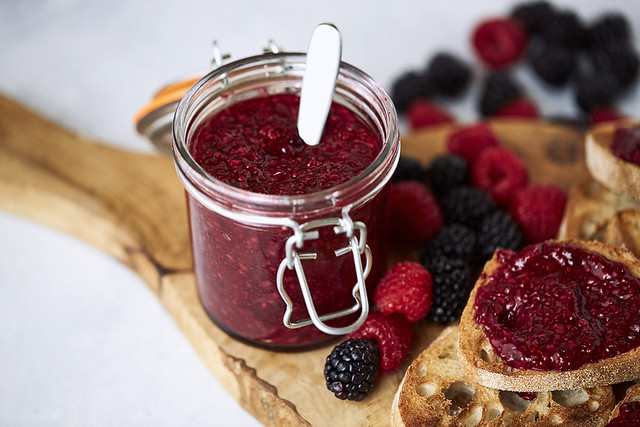
Chia Seed Jam Recipe: There is something incredibly satisfying about making your own jam, especially when it does not demand a long list of ingredients, a giant stockpot, or a full afternoon in the kitchen. Chia seed jam has become a favorite for home cooks because it strips jam-making down to its simplest, smartest form.
Instead of relying on heavy amounts of refined sugar and commercial pectin, this recipe uses the natural thickening power of chia seeds to create a rich, spoonable spread that feels fresh, fruity, and wholesome.
However, it is one of those small kitchen wins that makes you wonder why you ever bought the store-bought version on autopilot.
What Makes Chia Seeds Perfect for Jam
At first glance, chia seeds might seem like an unusual ingredient for jam. They are tiny, mild, and easy to overlook. But once they meet liquid, they transform. These little seeds absorb moisture and form a gel-like texture that makes them ideal for thickening fruit into a spreadable jam. Think of them like tiny kitchen magicians. They do not shout for attention, but they completely change the structure of the recipe.
Traditional jam often depends on pectin, sugar, and careful cooking time to reach the right consistency. Chia seeds take a different route. When stirred into warm mashed fruit, they gradually swell and thicken the mixture naturally. That means you get a quick jam without fussing over candy thermometers, sterilizing canning lids, or wondering whether the batch has reached the perfect setting point. The process is more forgiving, which makes it especially helpful for beginners or busy cooks who want something reliable.
The texture they create is also appealing. Chia jam is not exactly like classic jelly, and that is part of its charm. It has a soft, rustic consistency that feels closer to crushed fruit preserves. You can still taste the fruit clearly, and the seeds add a subtle body rather than a distracting crunch. Because chia seeds are quite neutral in flavor, they let berries, stone fruit, or tropical fruit stay center stage. In other words, the fruit still sings, while the chia seeds quietly hold the whole performance together. That balance is what makes this recipe both clever and delicious.
Ingredients You’ll Need
Here is the good news: this recipe works well whether you are using strawberries, raspberries, blueberries, blackberries, peaches, cherries, or a blend. It is forgiving, adaptable, and refreshingly low-pressure. That is why it is a staple in so many healthy kitchens. Below, you will find the ingredients clearly broken down so there is no guesswork before you start cooking.
Core Ingredients for a Basic Chia Seed Jam
For a reliable, delicious homemade batch, here are the ingredients you’ll need:
- 2 cups fruit (fresh or frozen; strawberries, raspberries, blueberries, blackberries, peaches, or cherries work well)
- 2 tablespoons chia seeds
- 1 to 2 tablespoons honey, maple syrup, or another sweetener (adjust to taste)
- 1 tablespoon lemon juice
- 1 teaspoon vanilla extract (optional, but excellent for depth)
- Small pinch of salt (optional)
That is the heart of the recipe. The fruit provides the body and flavor, the chia seeds create thickness, and the sweetener balances tartness. Lemon juice acts like a spotlight, making everything taste brighter and cleaner. The vanilla adds warmth, especially with strawberries or blueberries, and the pinch of salt helps round out the flavor so the jam tastes fuller rather than flat.
One of the smartest things about this ingredient list is that it is easy to scale. Need a smaller batch for one person? Halve it. Want to prep more for the week? Double it without much trouble. Since this is a refrigerator jam rather than a traditional shelf-stable preserve, you do not need to turn it into a massive kitchen project. You can make just enough to enjoy on toast, overnight oats, yogurt bowls, or pancakes for several days.
Optional Add-Ins for Extra Flavor
Once you have the core recipe down, this is where the fun starts. A basic chia seed jam is already delicious, but a few thoughtful extras can make it feel custom-made. For example, a dash of cinnamon works beautifully with apple, pear, or peach-based jams. A little orange zest can lift blueberry or cranberry mixtures, while fresh ginger can bring energy to mango or pineapple versions. These add-ins do not need to be loud. Even a tiny amount can change the whole personality of the jam.
You can also play with texture and sweetness. Some people like a chunkier jam with visible fruit pieces, while others prefer it smoother and more spreadable. A splash of water can loosen a fruit mixture that seems too dry while cooking, and an extra teaspoon of sweetener can soften very tart berries. For a richer flavor, try a drop of almond extract with cherry jam or a bit of cardamom with plum. These pairings work like seasoning in a good soup: subtle, but transformative.
Another great option is combining fruits. Strawberry-rhubarb, blueberry-lemon, raspberry-peach, and cherry-vanilla are all fantastic combinations. It is like mixing colors on a painter’s palette. The base remains the same, but the result can shift from bright and summery to deep and cozy depending on what you choose. That flexibility is one reason this recipe keeps earning a permanent place in home kitchens.
Kitchen Tools That Make the Process Easier
You do not need a professional kitchen to make excellent chia seed jam, but having a few basic tools nearby makes the process smoother. The good news is that most of these are everyday items you probably already own. A small saucepan is the main tool because it gives the fruit enough room to heat, soften, and simmer without making a mess. A spoon or silicone spatula is helpful for stirring and mashing the fruit as it cooks. A fork or potato masher also works well if you want a more broken-down texture.
A measuring spoon matters more than people think here, especially for the chia seeds. Too few and the jam stays runny; too many and it can become overly thick, almost pudding-like. A measuring cup for the fruit is also useful so the ratio stays balanced. Since chia seeds do the thickening, the amount matters. This is one of those recipes that feels casual, but still benefits from a little accuracy.
You will also want a clean jar or airtight container for storing the finished jam. Glass jars are ideal because they are easy to clean, do not hold odors, and make the jam look beautiful in the fridge. A lid that seals well is important because this is a refrigerated spread, not a canned preserve. If you like smoother jam, an immersion blender can help, though it is not necessary. In most cases, a spoon and a bit of mashing are all you need. Simple tools, simple process, excellent payoff.
How to Choose the Best Fruit for Chia Seed Jam
The fruit you choose shapes everything: flavor, texture, sweetness, and even color. That is why selecting the right fruit matters more than any fancy extra ingredient. The best fruit for chia seed jam is fruit that tastes good on its own. That may sound obvious, but it is the core rule. If the berries are bland, the jam will be bland. If the peaches are fragrant and sweet, the final result will practically glow with flavor.
Berries are the classic choice because they break down quickly and already have a jam-like personality. Strawberries give you a familiar, crowd-pleasing spread. Raspberries bring tartness and intensity. Blueberries create a deep, almost silky flavor, while blackberries offer richness and a slightly wild edge. Stone fruits like peaches, plums, and cherries also work beautifully, especially when cooked until soft and juicy. Apples and pears can be used too, though they often need longer cooking and more seasoning to feel lively.
Ripeness matters. Slightly overripe fruit is often perfect because it is naturally sweeter and softer, making it easier to mash and cook down. Fruit that is bruised or past its prime can still be great in jam as long as it is not spoiled. In that sense, chia jam is a smart way to rescue produce before it goes to waste. It turns “I should use these berries soon” into something genuinely delicious. That kind of recipe is not just useful. It is the kind of kitchen habit that pays off again and again.
Fresh Fruit vs Frozen Fruit
One of the most convenient things about this recipe is that you do not have to wait for peak berry season to make it. Fresh fruit and frozen fruit can both produce excellent chia seed jam. Each option has its own strengths, and knowing the difference helps you get the best result with whatever you have available.
Fresh fruit usually gives the brightest flavor and texture. When strawberries or blueberries are in season, fresh fruit can make a jam that tastes lively and aromatic, almost like summer captured in a jar. It also gives you a bit more control over the final consistency since the fruit is not releasing extra ice crystals as it heats. That said, frozen fruit is incredibly practical. It is picked and preserved when ripe, often making it more flavorful than out-of-season fresh fruit sold in stores. It is also budget-friendly, convenient, and ready whenever the craving hits.
Frozen fruit usually releases more liquid as it cooks, so it may need an extra minute or two on the stove before adding the chia seeds. That is not a flaw. It is just part of the process. In fact, frozen berries often break down faster, making them ideal for quick jam. So which is better? The honest answer is this: use the fruit that tastes best, fits your budget, and is easiest to access. Chia seed jam is one of those rare recipes that works beautifully either way, and that flexibility makes it especially useful for everyday cooking.
Step-by-Step Guide for Chia Seed Jam
Step 1: Prepare the Fruit
Start by washing and preparing your fruit. Remove any stems, pits, or peels if needed, then chop larger fruit into smaller pieces. Using ripe fruit gives the jam better natural sweetness and flavor. This step helps the fruit cook down more quickly and evenly.
Step 2: Cook and Soften the Fruit
Place the fruit in a small saucepan over medium heat and cook until it begins to soften and release its juices. Stir occasionally to prevent sticking and help the fruit break down. If needed, use the back of a spoon or a potato masher to mash the fruit into a smoother texture.
Step 3: Add Sweetener and Flavor
Once the fruit has softened, stir in your sweetener of choice, such as honey, maple syrup, or sugar. You can also add flavor boosters like lemon juice or vanilla extract. Mix well and taste the mixture so you can adjust the sweetness before the jam sets.
Step 4: Stir in Chia Seeds
Remove the pan from the heat or lower it slightly, then stir in the chia seeds. Mix thoroughly so the seeds are evenly spread throughout the fruit mixture. The chia seeds will begin absorbing the liquid and help thicken the jam naturally.
Step 5: Let the Jam Set
Allow the jam to cool for a few minutes, then transfer it to a clean jar or container. Let it sit until it thickens, either at room temperature for a short while or in the refrigerator for faster setting. Once it reaches your desired texture, it is ready to use on toast, yogurt, oatmeal, or desserts.
Best Flavor Combinations to Try
Once you master the base recipe, experimenting with flavor becomes one of the most enjoyable parts of making chia seed jam. Strawberry is the classic starting point, but there is an entire world beyond it. Blueberry-lemon is bright, clean, and slightly elegant. Raspberry-vanilla tastes vibrant and dessert-like without being too sweet. Peach-ginger has warmth and a gentle kick that feels perfect for late summer. Cherry-almond has a bakery-style richness that makes ordinary toast feel almost luxurious.
The key is to think about what each fruit naturally wants. Berries usually pair well with citrus, vanilla, and gentle herbs. Stone fruits often love warm spices, almond extract, or ginger. Tropical fruits like mango or pineapple can handle lime and a little heat beautifully. It is a bit like matching music to a mood. Some combinations feel cheerful and sunny, while others feel deep and cozy. You can keep things simple or lean into more creative territory.
A good rule is not to crowd the fruit with too many additions. Let one main fruit lead, then support it with one or two thoughtful accents. That keeps the jam tasting intentional rather than chaotic. When done well, a small-batch jam can taste surprisingly sophisticated. It feels homemade, yes, but also polished. That is part of what makes this recipe so appealing. It gives you the freedom to improvise while still delivering a result that feels beautifully put together.
Common Mistakes and How to Avoid Them
Even though this is an easy recipe, a few common mistakes can affect the final result. One of the biggest is using unripe or bland fruit. Since the ingredient list is short, every component matters. If the fruit lacks flavor, no amount of chia seeds will rescue it. Taste your fruit first. If it is tart, sweeten accordingly. If it is weak in flavor, add a little lemon or vanilla to help it along.
Another frequent mistake is adding too many chia seeds too quickly. People often expect the jam to thicken instantly, and when it does not, they throw in more. Then the mixture sits, swells, and suddenly becomes too dense. The better move is to wait at least 15 minutes before deciding whether the jam needs adjustment. Chia seeds need time. They are not instant starch. They work gradually, and patience is part of the method.
Overcooking is another issue. Cooking the fruit too long can dull the bright flavor and make the jam taste heavier than it should. You want the fruit softened and concentrated, not boiled into submission. Skipping lemon juice can also leave the flavor flat, especially in sweeter fruits. A final point: always store the jam properly in the refrigerator. This is not traditional canned jam, so it should be treated like a fresh spread. Avoiding these mistakes is easy once you know them, and that is what makes your second batch even better than your first.
How to Store Chia Seed Jam Safely
Because chia seed jam is a fresh refrigerator jam, proper storage matters. After the jam has cooled, transfer it to a clean airtight container, preferably a glass jar with a lid. Store it in the refrigerator rather than the pantry. Unlike traditional canned jam, this version is not designed for long-term shelf storage because it is made with much less sugar and without formal canning steps.
In most cases, homemade chia jam stays fresh for about one week in the fridge, sometimes a little longer depending on the fruit used and how cleanly it has been handled. Always use a clean spoon when scooping from the jar. That small habit helps extend freshness and reduces the chance of introducing moisture or bacteria. If the jam develops an unusual smell, mold, or a fermented taste, it should be discarded. Fresh recipes reward attention.
You can also freeze chia seed jam in small portions if you want to make a larger batch. Freeze it in freezer-safe jars or containers, leaving a little room for expansion. Then thaw it in the refrigerator before using. The texture may soften slightly after freezing, but a quick stir usually brings it back together nicely. This makes the recipe even more useful for meal prep. You can make one big fruit batch when berries are on sale, then enjoy homemade jam over time without waste.
Delicious Ways to Use Chia Seed Jam
Of course, the first thing most people do with chia seed jam is spread it on toast, and honestly, that is a great place to start. But that is only the beginning. Spoon it over Greek yogurt, swirl it into oatmeal, top pancakes or waffles, or layer it into chia pudding for double chia action with a different texture. It also works beautifully in smoothie bowls where you want a concentrated burst of fruit without watering everything down.
This jam can also play a role in baking and snacks. Spread it inside muffins, spoon it between cake layers, or use it as a filling for thumbprint cookies. Stir a little into softened cream cheese for a quick bagel spread. Add it to overnight oats, drizzle it over cottage cheese, or pair it with nut butter in a sandwich. It is one of those humble ingredients that quietly upgrades whatever it touches.
What makes it especially useful is that it delivers flavor without much effort. A small spoonful can make breakfast feel intentional instead of rushed. It turns plain yogurt into something worth looking forward to. It gives peanut butter toast a bright contrast that keeps it from feeling heavy. In that way, chia jam is not just a recipe. It is a small kitchen shortcut to meals that taste more alive, more homemade, and more satisfying.
Why This Recipe Works for Busy Home Cooks
Some recipes are delicious but demanding. Others are easy but forgettable. This chia seed jam recipe lands in the sweet spot between the two. It is simple enough for a weekday, fast enough for people with packed schedules, and flexible enough to work with the fruit you already have. That combination is rare. You are not buying specialty ingredients, not babysitting a stovetop for an hour, and not producing a giant batch that takes up half the fridge.
It also fits modern cooking habits beautifully. People want recipes that feel healthy without feeling strict, and this one delivers that balance. You can control the sugar, choose your fruit, make it vegan, and keep it small-batch. It adapts to the way real people cook now: practical, flexible, flavor-first. That is why it has become such a reliable favorite in healthy meal prep routines.
Maybe the biggest reason it works is that it feels encouraging. It is the kind of recipe that builds confidence. You make it once, realize how easy it is, and suddenly homemade jam no longer feels like a project reserved for experts. It becomes part of your regular rhythm. And once a recipe earns that kind of trust, it stops being a novelty and starts becoming a staple. That is the highest compliment a home recipe can get.
FAQs about Chia Seed Jam Recipe
1. What is chia seed jam?
Chia seed jam is a simple fruit spread made by combining cooked or mashed fruit with chia seeds. The seeds absorb liquid and naturally thicken the mixture without needing pectin. It is a quick and easy alternative to traditional jam.
2. Do I need pectin to make chia seed jam?
No, you do not need pectin for chia seed jam. The chia seeds do the thickening on their own as they soak up the fruit juices. This is one reason the recipe is so popular and beginner-friendly.
3. Can I use frozen fruit for chia seed jam?
Yes, frozen fruit works very well for chia seed jam. Just cook it until it softens and releases its juices, then continue with the recipe as usual. This makes it easy to enjoy homemade jam any time of year.
4. How long does chia seed jam last?
Chia seed jam usually lasts about 5 to 7 days in the refrigerator when stored in a sealed container. Because it is often made with less sugar than regular jam, it does not keep as long as traditional preserved jam. Always use a clean spoon when serving.
5. Why is my chia seed jam too thin?
If your jam is too thin, it may need more time to sit and thicken. Chia seeds usually need a little time to absorb the liquid fully. You can also stir in a few more chia seeds if the mixture still seems too runny.
6. What can I eat chia seed jam with?
Chia seed jam is great on toast, pancakes, waffles, yogurt, oatmeal, and desserts. It can also be used as a filling for pastries or layered into parfaits. Its fresh fruit flavor makes it very versatile.
Conclusion
The real beauty of chia jam is how well it fits into real kitchens and real schedules. You can make it from fresh berries in peak season or frozen fruit in the middle of winter. You can sweeten it lightly, keep it tart, or customize it with vanilla, citrus, or spice. It works for breakfast, snacks, meal prep, and even light baking. That kind of range makes it more than a trend. It makes it useful.
So whether you are trying to eat more whole foods, cut back on overly sweet store-bought spreads, or simply make something delicious with fruit you already have, this recipe is worth keeping close. Once you see how easy it is, there is a good chance it will become one of those quiet kitchen habits you return to again and again.