Cherry Yum Yum Recipe: There is something instantly comforting about a dessert like Cherry Yum Yum. Even the name sounds cheerful, easygoing, and a little nostalgic, like something you would spot at a family reunion, church potluck, or holiday table crowded with casseroles and desserts that disappear fast.
It has stayed popular for years because it checks nearly every dessert box at once. It is creamy, sweet, fruity, cool, and incredibly easy to make. You do not need advanced baking skills, fancy equipment, or hard-to-find ingredients. That alone makes it a winner for beginners and experienced home cooks alike.
What Is Cherry Yum Yum?
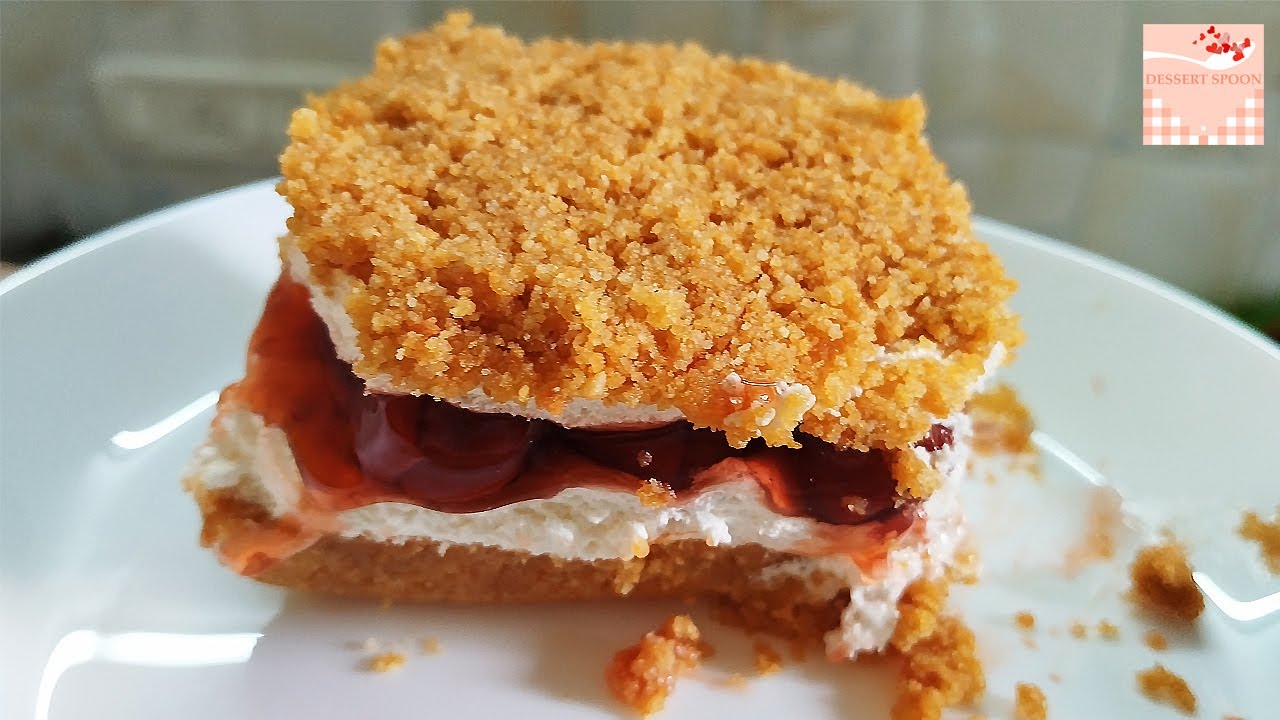
If you have never made Cherry Yum Yum before, think of it as a layered no-fuss dessert built on simple ingredients and old-fashioned charm. At its core, it is a dessert made with a crumb crust, a fluffy cream cheese filling, and a cherry pie topping spread over the top. Some versions are fully no-bake, while others use a briefly baked crust for a firmer base. Either way, the result is smooth, sweet, and easy to love. It sits somewhere between a cheesecake dessert and an icebox treat, which is exactly why so many people come back to it again and again.
The beauty of this dessert is that it feels special without being complicated. Unlike a traditional cheesecake, you do not have to worry about water baths, cracking tops, or careful oven timing. Cherry Yum Yum gives you that creamy cheesecake-like flavor with much less effort. That makes it ideal for anyone who wants a reliable dessert that looks pretty in a dish and slices nicely after chilling. It is forgiving, flexible, and well-suited for gatherings where you want something homemade but manageable.
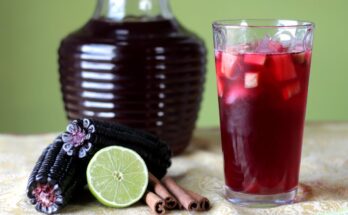
Another great thing about this dessert is how adaptable it is. While cherry is the classic topping, the same basic method can be used with blueberry, strawberry, lemon, or mixed berry toppings. The creamy layer pairs well with all sorts of fruit. Still, cherries remain the signature choice because they bring a sweet-tart contrast that livens up the richness of the filling. The bright red topping also makes the dessert visually appealing. It is simple, yes, but never boring. It is one of those timeless recipes that proves a dessert does not need to be flashy to be unforgettable.
Ingredients You’ll Need
To make things as clear as possible, the ingredients are listed below by section. That way, you can prep confidently and avoid missing anything. This is especially helpful if you are making Cherry Yum Yum for the first time. Once you have made it once, you will probably remember the pattern by heart because it is that simple and dependable. Here is exactly what you need.
Ingredients for the Crust
For the crust, you will need:
- 2 cups graham cracker crumbs
- 1/2 cup unsalted butter, melted
- 2 tablespoons granulated sugar
This crust is simple but important. Graham cracker crumbs give the dessert a slightly sweet, toasty flavor that pairs beautifully with the cream cheese and cherry topping. The melted butter acts like glue, helping the crumbs bind together into a firm layer. The sugar adds just a touch more sweetness and helps round out the flavor. Some people skip the sugar if the crackers are already sweet enough, but a small amount usually improves the overall taste.
You can make graham cracker crumbs by crushing full graham crackers in a food processor or by placing them in a zip-top bag and rolling over them with a rolling pin. The finer the crumbs, the more evenly the crust will press into the dish. If the mixture looks too dry, add a tiny bit more melted butter. It should resemble damp sand and hold together when pressed. That is the sweet spot for a crust that slices well and does not crumble apart at serving time.
Ingredients for the Creamy Filling
For the filling, you will need:
- 8 ounces cream cheese, softened
- 1 cup powdered sugar
- 1 teaspoon vanilla extract
- 1 container whipped topping (8 ounces), thawed
This is the heart of the dessert. The softened cream cheese creates that signature creamy texture and slight tang that keeps the dessert from tasting flat. The powdered sugar blends smoothly and sweetens the mixture without leaving a grainy texture. Vanilla extract adds warmth and depth, almost like a quiet background note in a song that makes the melody stronger. The whipped topping lightens the whole filling, making it airy and soft rather than dense.
Softened cream cheese matters more than people realize. Cold cream cheese can stay lumpy no matter how much you beat it, and those lumps can affect the final texture. Letting it sit at room temperature for a while makes mixing much easier. The whipped topping should be thawed but still cold. Once folded in, it turns the filling into a fluffy cloud-like layer that spreads beautifully over the crust.
Ingredients for the Cherry Topping
For the topping, you will need:
- 1 can cherry pie filling (about 21 ounces)
That is it. The topping is wonderfully simple. Cherry pie filling is the classic choice because it gives you a ready-made fruit layer with syrupy sweetness and tender cherries throughout. It spreads easily, looks beautiful, and saves time. This shortcut is part of what gives the recipe its approachable charm. You are not making a complicated reduction or fruit compote from scratch unless you want to.
If you prefer a homemade topping, you can use cooked cherries thickened with sugar and cornstarch, but canned filling remains the traditional option for this recipe. It is dependable and fast, which makes the dessert easier to prepare for parties, holidays, or busy weekdays. A single can is usually enough to cover the top generously, giving each slice a bright, glossy finish.
Kitchen Tools You Should Have
One of the best things about this dessert is that you do not need a kitchen full of gadgets to make it successfully. Still, having the right tools nearby makes the process smoother and helps you get a cleaner final result. The most important item is a 9×13-inch baking dish or similarly sized casserole dish. This gives you enough room to create distinct layers without making them too thin. Glass dishes work especially well because you can see the layers from the side, which adds to the presentation.
You will also want a couple of mixing bowls. One bowl is useful for combining the crust ingredients, and another larger bowl works for beating the cream cheese filling. A hand mixer or stand mixer makes the filling much easier to prepare because it helps create a smooth, lump-free base. You can mix by hand, but it takes more effort and may not give you the same silky texture. A rubber spatula is also essential for folding in the whipped topping gently and scraping down the bowl without wasting any of that creamy mixture.
Other helpful tools include measuring cups and spoons, a spoon or flat-bottomed glass for pressing the crust evenly into the dish, and a spatula for spreading the filling and cherry topping in neat layers. None of these tools are complicated or expensive, but together they make the recipe feel almost effortless. It is a bit like having the right shoes for a long walk. You can still get there without them, but the journey is much smoother when you are prepared.
Choosing the Best Ingredients for Flavor
A simple dessert depends heavily on ingredient quality because there are not many layers of flavor to hide behind. That does not mean you need premium luxury ingredients for Cherry Yum Yum, but it does mean you should choose carefully. Since cream cheese is one of the stars of the recipe, go for a full-fat block-style cream cheese when possible. It creates a richer, smoother filling than lower-fat versions and gives the dessert that classic indulgent texture. The same goes for butter in the crust. Real butter adds a depth and warmth that margarine often cannot match.
When it comes to the graham crackers, standard honey graham crackers work beautifully and give the dessert a familiar sweetness. Some people like to swap in vanilla wafer crumbs or shortbread crumbs, which also taste great, but graham crackers remain the most traditional and balanced option. For the whipped topping, use a product that is fully thawed and still fresh. It should smell clean and sweet, not watery or separated. These little choices may seem minor, but they shape the texture and overall taste more than you might expect.
The cherry topping deserves attention too. A good canned pie filling should have whole or halved cherries with a thick, glossy sauce rather than a runny, overly artificial consistency. Since this is the top layer and the first thing people see, it carries a lot of the visual appeal. Think of your ingredients like a three-piece band. None of them are trying to do everything alone, but each one has to play its part well for the performance to feel complete.
Best Cream Cheese Tips
Cream cheese is the backbone of the filling, so a few simple tips can make a big difference. First, always let it soften before mixing. This helps it blend smoothly with the powdered sugar and prevents lumps from showing up in the finished dessert. A smooth filling feels more luxurious and spreads much more evenly across the crust. Second, use a brick-style cream cheese rather than the whipped tub version. Tub cream cheese can be softer and sometimes changes the texture too much.
Another helpful tip is to beat the cream cheese by itself for a minute before adding the sugar and vanilla. This breaks it down and makes the base silkier. Then add the powdered sugar gradually rather than dumping it in all at once. That keeps the mixture manageable and helps you avoid little sugar pockets. These small steps are not dramatic, but they improve the final dessert in ways you can taste.
Fresh vs Canned Cherry Pie Filling
Fresh cherries sound appealing, and they can absolutely be used, but canned cherry pie filling is the classic choice for good reason. It is convenient, consistent, and already thickened to the right texture for layering over the filling. That means less work, less guesswork, and faster prep. For a dessert designed to be easy and crowd-friendly, that convenience is part of the charm.
Fresh cherries can be wonderful if you want a more homemade topping, but they require pitting, cooking, sweetening, and thickening. You also need to get the balance right so the topping is not too runny or too tart. Canned filling gives you a polished finish with almost no effort. It is the shortcut that makes this dessert weeknight-friendly instead of project-heavy.
Step-by-Step Guide for Cherry Yum Yum
This recipe is ideal for making ahead, which is one of its biggest strengths. Instead of rushing right before serving, you can prepare it earlier in the day or even the night before. That not only saves time but often improves the dessert because the layers settle into each other beautifully. Here is the full step-by-step method.
Step 1 – Prepare the Crust
Start by mixing your crust ingredients, usually crushed graham crackers or cookie crumbs, melted butter, and a little sugar. Stir until the mixture looks like wet sand and holds together when pressed. This forms the sweet and buttery base of the dessert.
Step 2 – Chill or Bake the Base
Press the crumb mixture firmly into the bottom of your serving dish or pan. Depending on the recipe, either chill it in the refrigerator until firm or bake it briefly to help it set. Let the base cool completely before adding the next layer.
Step 3 – Make the Cream Cheese Layer
In a mixing bowl, beat the cream cheese until smooth and creamy. Add powdered sugar and vanilla extract, then continue mixing until the texture is light and well combined. This creates the rich and tangy layer that gives Cherry Yum Yum its classic flavor.
Step 4 – Fold in the Whipped Topping
Gently fold whipped topping or freshly whipped cream into the cream cheese mixture. Use a spatula and mix carefully so the filling stays light and airy. This step makes the dessert soft, fluffy, and easy to spread.
Step 5 – Layer the Filling Over the Crust
Spread the cream cheese filling evenly over the cooled crust. Smooth the top with a spoon or spatula so the layer looks neat and even. Take your time here because a clean layer helps the final dessert look more attractive.
Step 6 – Add the Cherry Topping
Spoon the cherry pie filling over the cream cheese layer and spread it gently across the top. Make sure the cherries are evenly distributed so every serving gets plenty of fruit. This bright topping adds sweetness and a beautiful finish.
Step 7 – Chill Before Serving
Place the dessert in the refrigerator for several hours so it can set properly. Chilling helps the layers firm up and makes slicing or scooping much easier. Serve cold for the best texture and flavor.
Common Mistakes to Avoid
Even easy desserts can go sideways if a few details are ignored. One common mistake is using cream cheese that is still too cold. This often leads to lumps in the filling, and once those lumps are there, they are hard to fix. Another mistake is not pressing the crust firmly enough. A loose crust may fall apart during serving, which affects both the look and the texture of each slice. Neither of these problems ruins the dessert completely, but both can make it less enjoyable than it should be.
Another issue is rushing the chilling time. Because this dessert is layered and soft, it needs time in the refrigerator to set properly. Cutting into it too soon can make the layers slide and blur together. The flavor will still be there, but the presentation and texture will suffer. Overmixing the whipped topping into the cream cheese layer can also flatten the filling, making it denser than intended. A gentle hand really helps here.
Using too much topping can also throw off the balance. It may be tempting to pile on extra cherry filling, but too much can make the dessert overly sweet or cause the top layer to become sloppy. A balanced layer gives you fruit in every bite without overwhelming the creamy center. This recipe is simple, but like many simple things, it rewards a little patience and attention.
Delicious Variations to Try
The classic cherry version is hard to beat, but one of the best things about this dessert is how easy it is to adapt. If cherries are not your favorite, you can swap the topping for blueberry pie filling, strawberry topping, peach filling, or even a homemade lemon curd for something brighter and more citrusy. The cream cheese filling works like a blank canvas, ready to support different flavors without losing its smooth, rich appeal. That makes the recipe incredibly useful when you want variety without learning an entirely new method.
You can also change the crust to shift the flavor profile. Vanilla wafer crumbs, shortbread cookies, or even golden sandwich cookies can create a sweeter or more buttery base. For a holiday twist, some people add a little almond extract to the filling because cherry and almond pair beautifully together. It is a small change, but it adds a bakery-style flavor that feels a little more elegant.
Another fun variation is serving it in individual cups or jars instead of one large dish. This works especially well for parties because guests can grab a single serving without needing to cut slices. The layers still look attractive, and the dessert suddenly feels a bit more upscale. It is proof that a humble recipe can wear different outfits depending on the occasion.
Serving Suggestions
Cherry Yum Yum is best served cold, straight from the refrigerator, when the filling is firm and the topping is glossy and fresh. Use a sharp knife for cleaner slices, and wipe the blade between cuts if you want the layers to look neater. It is delicious on its own, but it can also be dressed up in simple ways. A small dollop of whipped cream on top adds extra softness, while a sprinkle of graham cracker crumbs gives a little texture and visual contrast.
This dessert works beautifully after heavy meals because it feels cool and light despite its richness. It pairs especially well with coffee, tea, or even a simple glass of milk. For summer gatherings, its chilled texture makes it especially welcome. For holiday meals, the bright red topping looks festive without requiring extra decoration. It is the kind of dessert that slides naturally into many settings without needing much explanation.
If you are serving guests, you can garnish with a few fresh cherries or a mint leaf for a polished look. That said, it does not need much help. The layers already do most of the visual work. This is one of those desserts where simplicity is part of the appeal. It arrives quietly, then disappears from plates faster than expected.
How to Store Cherry Yum Yum Properly
Proper storage matters because this dessert relies on a chilled, creamy texture. Once assembled, it should be covered and kept in the refrigerator. A tight-fitting lid works best, but plastic wrap or foil also does the job. Stored correctly, Cherry Yum Yum will usually stay fresh for about 3 to 4 days. During that time, the flavor remains good, though the crust may soften slightly as it absorbs moisture from the filling.
For the best texture, keep the dessert cold until just before serving. Leaving it out too long can cause the filling to soften, especially in a warm kitchen. That does not mean it becomes unsafe immediately, but it will lose some of its structure and clean layered look. Since it is designed to be served chilled, returning it to the refrigerator quickly helps preserve the experience you want people to have.
Freezing is possible, though it may alter the texture slightly once thawed. The cream layer can become a bit less fluffy, and the topping may not look quite as glossy. Refrigeration is usually the better option for short-term storage. The good news is that leftovers rarely stick around long. This dessert has a habit of calling people back for “just one more bite.”
FAQs about Cherry Yum Yum Recipe
1. What is Cherry Yum Yum made of?
Cherry Yum Yum is usually made with a crumb crust, a sweet cream cheese filling, whipped topping, and cherry pie filling. The layers come together to create a dessert that is creamy, fruity, and easy to serve. It is often prepared as a chilled no-bake dessert.
2. Does Cherry Yum Yum need to be refrigerated?
Yes, Cherry Yum Yum should be kept in the refrigerator because of the cream cheese and whipped topping. Chilling also helps the dessert hold its shape and improves the texture. It is best served cold.
3. Can I make Cherry Yum Yum ahead of time?
Yes, this dessert is great for making ahead because it needs time to chill and set. You can prepare it a day in advance and keep it covered in the refrigerator. This often makes it even easier to slice and serve.
4. Can I use homemade cherry topping instead of canned pie filling?
Yes, you can use a homemade cherry topping if you prefer a fresher flavor. Just make sure it is cooled and thick enough before adding it to the dessert. A runny topping may affect the layers.
5. Can I change the crust for Cherry Yum Yum?
Absolutely. While graham cracker crust is common, you can also use vanilla wafer crumbs, shortbread crumbs, or other cookie crumbs. Different crusts can slightly change the flavor and texture of the dessert.
6. How long does Cherry Yum Yum last?
Cherry Yum Yum can usually last about 3 to 4 days in the refrigerator when stored in a covered container. The texture is best within the first couple of days. Always keep it chilled until ready to serve.
Conclusion
Please Note: what makes it especially appealing is its balance. The sweetness never feels one-note because the cream cheese brings tang and the cherries bring brightness. The texture also keeps things interesting, moving from crumbly to creamy to silky in one bite. It is a dessert that feels familiar in the best way, like a recipe passed from one kitchen to another because it simply works.
Whether you make it for a holiday, a potluck, a birthday dinner, or just because the craving hits, Cherry Yum Yum is one of those desserts that rewards very little stress with a lot of satisfaction. It is practical, pretty, and deeply comforting. Sometimes that is exactly what the best desserts are meant to be.