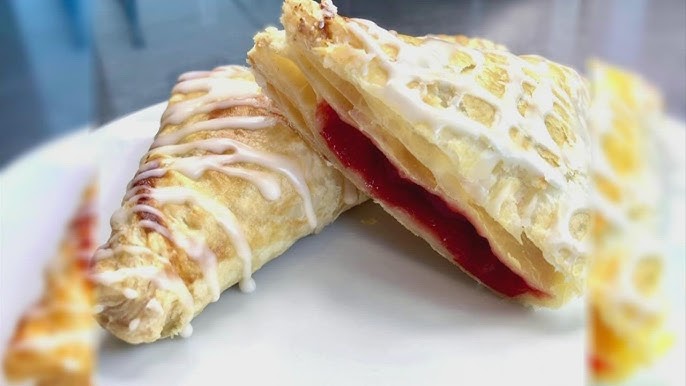
Cherry Turnovers Recipe: There is something almost magical about a cherry turnover. It looks fancy enough to come from a bakery window, yet it is surprisingly doable in a home kitchen. That contrast is part of the charm. You get crisp, buttery layers on the outside and a glossy, sweet-tart fruit filling tucked inside like a little treasure. Every bite gives you that beautiful mix of crunch and softness, richness and brightness. It is the kind of pastry that feels special without being fussy, which is probably why it has stayed popular for so long.
For anyone looking for a step-by-step cherry turnovers recipe, this guide covers the full process in a practical, easy-to-follow way. From choosing the right cherries to sealing the pastry correctly and baking it until deeply golden, every stage matters. Once you learn the rhythm, you will see just how reliable and rewarding homemade turnovers can be.
What Makes a Great Cherry Turnover
A great homemade cherry turnover is all about balance. You want the pastry to be deeply flaky, light, and crisp rather than soggy or dense. At the same time, the filling should be juicy enough to feel generous but thick enough to stay inside the pastry instead of bubbling out all over the pan. That balance is the difference between a turnover that looks bakery-worthy and one that feels more like a leaky fruit envelope.
The pastry matters more than many people realize. Puff pastry is built on layers of fat and dough, and those layers puff dramatically in the oven when kept cold and handled gently. If the pastry becomes too warm before baking, the butter softens too much and the layers can collapse. Instead of getting that airy lift, you end up with something flatter and heavier. That is why chilling during the process is not just a “nice extra.” It is one of the secret weapons behind a proper turnover.
The filling matters just as much. Cherries are naturally juicy, which is wonderful for flavor but tricky for structure. A filling that is too loose will soak into the pastry and break the seal during baking. A filling that is too stiff can feel gummy or overly sweet. The goal is a glossy, spoonable texture that holds together like a good pie filling. You want it thick enough to mound, but soft enough to spread slightly when heated in the oven.
Flavor is the final piece of the puzzle. The best turnovers do not taste one-note. They usually have a little acidity from lemon juice, a touch of warmth from vanilla or almond extract, and enough salt to keep the sweetness from feeling flat. Cherries already have a bold personality, so the supporting ingredients should highlight that rather than bury it. When everything works together, the turnover becomes more than a pastry. It becomes one of those recipes people remember and ask for again.
Ingredients You’ll Need
Here is the complete Ingredients You’ll Need section, clearly listed so you can gather everything before you begin. Keeping the ingredients ready from the start makes the whole process smoother and helps prevent pastry problems later.
Puff Pastry Essentials
For the pastry base, you will need:
- 1 package puff pastry (usually 2 sheets), thawed according to package directions
- A little all-purpose flour for dusting your work surface
Puff pastry is the backbone of this recipe. It creates the golden, airy layers that make turnovers feel so irresistible. Store-bought pastry is absolutely fine here and is actually what many home bakers prefer because it saves time and delivers reliable results. The key is to thaw it just enough so it unfolds without cracking, but not so much that it becomes sticky and warm. You are aiming for cool and flexible, not soft and limp.
Cherry Filling Ingredients
For the filling, you will need:
- 2 cups cherries (fresh pitted, frozen and thawed, or canned cherries well drained)
- 1/3 to 1/2 cup granulated sugar, depending on how sweet your cherries are
- 1 tablespoon cornstarch
- 1 tablespoon water
- 1 teaspoon lemon juice
- 1/2 teaspoon vanilla extract
- 1/4 teaspoon almond extract (optional, but excellent with cherries)
- Pinch of salt
These ingredients create a filling that is bright, rich, and thick enough to stay inside the pastry. Cherries bring the main flavor, while sugar balances their tartness. Cornstarch helps transform the juices into a glossy filling rather than a runny mess. Lemon juice sharpens the fruit flavor so it tastes fresher, not just sweeter. Vanilla softens the edges, and almond extract adds that classic bakery-style cherry note that people often love.
Egg Wash and Finishing Touches
For finishing, you will need:
- 1 large egg
- 1 tablespoon milk or water
- 1 tablespoon coarse sugar or granulated sugar for sprinkling
- Optional glaze: 1/2 cup powdered sugar plus 1 to 2 teaspoons milk or lemon juice
The egg wash is what gives the turnovers their shiny, deeply golden finish. Without it, they can still bake well, but they will not have the same polished bakery look. The sugar on top adds sparkle and a little crunch, which makes the final texture even better. A simple glaze is optional, but it can make the pastries look extra inviting and add a sweet finishing touch once they have cooled slightly.
Kitchen Tools That Make the Process Easier
You do not need a professional pastry station to make cherry turnovers, but a few simple tools can make the process much smoother. At the top of the list is a baking sheet lined with parchment paper. This keeps the turnovers from sticking and catches any filling that might escape during baking. Parchment also makes cleanup easier, which is always welcome when fruit filling gets involved. It is one of those little details that saves a lot of frustration.
A sharp knife or pizza cutter helps cut neat pastry squares or rectangles quickly. Clean cuts matter because ragged edges can interfere with the puff pastry’s ability to rise evenly. A small saucepan is useful for cooking the filling if you are making it from scratch, and a mixing spoon or silicone spatula helps you stir without mashing the cherries too much. You want the filling thick and cohesive, but still visibly fruity rather than reduced to jam.
A fork plays a double role here. You can use it to crimp the edges of the turnovers, which helps seal the filling inside while also creating that classic decorative border. A pastry brush is another helpful tool because it makes applying egg wash fast and even. If you try to spread egg wash with a spoon, it usually gets messy and patchy. A brush gives you control, especially around the seams where excess egg can accidentally glue the layers together.
A cooling rack is another smart addition, even though it is easy to overlook. Freshly baked turnovers continue releasing steam after they leave the oven. If they sit flat on the hot pan too long, the bottoms can become softer than you want. Transferring them to a rack helps preserve the crispness. None of these tools are complicated or expensive, but together they make the recipe feel more manageable. Like good lighting in a kitchen, they do not change the recipe itself, but they make everything work better.
Choosing Fresh, Frozen, or Canned Cherries
One of the best things about this cherry turnover recipe is that it works with several kinds of cherries. Fresh, frozen, and canned can all produce delicious results, but each option behaves a little differently. Fresh cherries tend to have the brightest flavor and the firmest texture, especially in peak season. They can make the filling taste especially lively, though they do require pitting, which adds prep time. If you do not mind a little extra work, fresh cherries are wonderful.
Frozen cherries are probably the most practical option for many home bakers. They are convenient, available year-round, and usually picked at peak ripeness before freezing. That means they can still deliver strong flavor even when cherries are out of season. The main thing to watch is extra moisture. Once thawed, frozen cherries release quite a bit of juice, so you may need to cook the filling a little longer or be careful to drain off some excess liquid before thickening it.
Canned cherries are the fastest route, particularly if you are using cherries packed in juice or a pie-style filling. They are consistent and easy to use, but they vary a lot in sweetness and texture depending on the brand. If you use canned cherries that are already sweetened, you may want to reduce the added sugar in the recipe. Nobody wants a turnover that tastes like candy with no tart contrast. Cherries should sing, not shout.
The “best” choice really depends on your goals. Fresh cherries give you the most control and often the freshest flavor. Frozen cherries offer convenience without sacrificing much quality. Canned cherries save time and can still work beautifully when adjusted carefully. It is a bit like choosing between homemade pasta, store-bought fresh pasta, and dried pasta. Each has its place. What matters most is understanding how your chosen ingredient behaves so the filling comes out thick, flavorful, and ready for pastry.
Best Type of Cherries for Flavor and Texture
When it comes to flavor and texture, sweet cherries such as Bing are a common favorite for turnovers because they create a rich, fruity filling with a deep red color and a naturally dessert-friendly taste. They are juicy and balanced, especially when paired with a little lemon juice to keep the sweetness lively. These cherries tend to soften nicely during cooking while still holding enough shape to give the filling texture. That makes each bite feel like real fruit rather than a fully blended jam.
Sour cherries, on the other hand, are often loved by serious bakers because they bring stronger tartness and a more complex flavor. They can make the filling taste especially vibrant and less sugary, which many people prefer in pastries. The catch is that sour cherries can be harder to find fresh in some places, though frozen versions are often available. If you use them, you will likely need a bit more sugar to round out the sharpness.
Texture is just as important as taste. A cherry that turns mushy too quickly can make the filling feel flat, while a very firm cherry can stay oddly chunky. Good turnover filling should feel soft and spoonable but still have identifiable fruit pieces. That texture keeps the pastry interesting. It is the difference between hearing a full band and hearing just one instrument on repeat. Variety creates depth.
For most home bakers, sweet cherries are the easiest and most versatile choice. Sour cherries are excellent when you want a more bakery-style tartness. A mix of the two can also be fantastic, giving you both brightness and body. The good news is that no matter which type you choose, the key is to taste the filling before assembling the turnovers. Cherries are not identical from batch to batch, and a quick taste lets you adjust sugar or lemon for the best result.
How to Prepare the Cherry Filling
A good filling starts with controlling moisture. Cherries naturally release a lot of juice, and that is exactly what makes them delicious, but it can also create trouble in pastry. To prepare the filling, place the cherries in a small saucepan with sugar, lemon juice, vanilla extract, almond extract if using, and a pinch of salt. Cook them over medium heat until the fruit begins to soften and the juices start to flow. This stage smells amazing, and it is also when the flavors begin to merge into something richer than the raw ingredients alone.
Once the cherries are juicy, you add the thickener. Cornstarch should be mixed first with a small amount of water to make a slurry. This step matters because adding dry cornstarch directly into the fruit can cause lumps, and nobody wants a silky filling interrupted by chalky bits. Stir the slurry into the cherry mixture and continue cooking for a few minutes until it thickens. The filling should look glossy and cohesive, not watery. When you drag a spoon through it, it should briefly leave a path before slowly settling back together.
Cooling the filling is every bit as important as cooking it. Warm filling and puff pastry are not close friends. If you spoon hot cherry filling onto the dough, the pastry softens too quickly, the butter layers begin to melt, and the final turnovers may leak or bake unevenly. Transfer the filling to a bowl and let it cool completely. You can even chill it for faster handling. Think of it like painting on a dry wall instead of a wet one. The surface needs to be ready before the next layer goes on.
At this point, the filling should be thick, spoonable, and deeply cherry-scented. It should hold together when scooped but still look juicy and inviting. That is the texture you want before assembly. It gives the pastries the best chance of staying flaky outside while remaining luscious inside. A well-made filling is really the heart of the whole recipe, because even perfect pastry cannot rescue a filling that is too runny or too bland.
How to Thicken the Filling Properly
Thickening the cherry filling is one of the most important technical parts of this recipe, and it is also where many turnovers go wrong. The filling should not behave like syrup. It should behave like a soft fruit compote. Cornstarch is a great thickener because it creates a clear, glossy finish and does not mask the fruit flavor. Still, it has to be used carefully. Too little, and the filling spills everywhere. Too much, and it turns gummy, which makes the pastry feel heavy instead of luscious.
The simplest method is to whisk 1 tablespoon cornstarch with 1 tablespoon water until smooth. Add that slurry to the warm cherry mixture only after the fruit has already released some juice. This allows you to judge how much liquid is really in the pan. Stir constantly for a couple of minutes while the mixture simmers gently. You will notice the filling go from loose and shiny to slightly thicker and more structured. That shift is what you are watching for. It is subtle at first, then suddenly clear.
A useful test is the spoon test. Dip a spoon into the filling and lift it. If the liquid runs off like thin juice, it needs more time. If it coats the spoon and falls in slow, glossy ribbons, you are close. After cooling, the filling will thicken even more, so do not overcook it trying to make it stiff in the saucepan. That is a common mistake. You are aiming for “thick enough to stay put,” not “solid enough to slice.”
If your cherries are especially juicy, you may need a touch more cornstarch, but add cautiously. It is easier to add a little more than to undo too much. The final texture should feel generous and smooth, with fruit pieces suspended evenly rather than floating in excess liquid. Once you get that consistency right, the rest of the recipe becomes much easier. Properly thickened filling is like a good foundation under a house. Nobody compliments it directly, but everything depends on it.
How to Prepare Puff Pastry Without Ruining the Layers
Puff pastry can seem intimidating, but it behaves well when treated with a little respect. The biggest rule is to keep it cold but workable. Let the sheets thaw just until they unfold without cracking. If they are frozen solid, they will split when you try to open them. If they get too warm, they become sticky and lose the firm structure that helps create those dramatic flaky layers in the oven. You are looking for that sweet spot in between.
Lightly flour your work surface and unfold the pastry carefully. If the sheet has visible cracks, you can gently press them together with your fingers. Roll it just enough to smooth the surface and slightly even out the shape, but do not flatten it aggressively. Puff pastry needs some thickness to rise properly. Over-rolling compresses the layers, and that can reduce the airy texture you want. In other words, treat it like a stack of delicate pages rather than bread dough that wants a workout.
Once rolled, cut the pastry into equal squares or rectangles depending on the style you want. Consistency helps them bake evenly. If one piece is much larger or thinner than another, one turnover may brown too fast while the other stays pale. Before filling, keep the pastry cool. If your kitchen is warm or the dough feels soft, place it on a tray and chill it briefly. This small pause can make a huge difference in the oven.
One more subtle trick is to avoid getting egg wash on the cut edges before baking. Egg wash on the top is great, but if it drips down the sides, it can seal the layers together and limit the rise. That is the opposite of what you want. Good puff pastry is all about expansion. When handled correctly, it bakes up in crisp, golden layers that shatter lightly when you bite in. That texture is what makes cherry turnovers feel luxurious, even when the ingredient list is refreshingly simple.
Step-by-Step Guide for Cherry Turnovers
Below, each step is broken down clearly so you can follow along without guesswork. The aim is not just to help you make turnovers once, but to help you understand why each part works.
Step 1: Make or Mix the Cherry Filling
Start by preparing the cherry filling with fresh, frozen, or canned cherries. Cook them with sugar, lemon juice, and a little cornstarch if needed until the mixture becomes thick and glossy. Let the filling cool completely before using it, because warm filling can soften the pastry too much.
Step 2: Roll and Cut the Puff Pastry
Lightly flour your surface and gently roll out the puff pastry if it needs smoothing. Cut it into even squares so each turnover bakes at the same rate. Keeping the pastry cold while working helps it stay flaky and easier to handle.
Step 3: Fill, Fold, and Seal
Place a spoonful of cherry filling in the center of each pastry square, being careful not to overfill. Fold each square diagonally to form a triangle, then press the edges together firmly. Use a fork to crimp the edges and seal them well so the filling stays inside during baking.
Step 4: Chill Before Baking
Arrange the turnovers on a lined baking tray and chill them for a short time before baking. This helps the pastry firm up again and can improve the flaky texture. You can also brush the tops with egg wash before chilling or just before baking for a golden finish.
Step 5: Bake Until Deep Golden
Bake the turnovers in a preheated oven until they are puffed and deep golden brown. The pastry should look crisp and well-risen, and some filling may bubble slightly at the edges. Let them cool for a few minutes before serving so the filling can settle a bit.
Common Mistakes to Avoid
One of the most common mistakes is using filling that is too runny. This almost always leads to leaks, soggy pastry, and frustration. A turnover is not a pie with walls to contain a loose filling. It needs structure. That is why thickening and cooling the cherries properly matters so much. Another frequent problem is overfilling. It is easy to think more cherries will make the turnover better, but too much filling usually breaks the seal and creates more mess than reward.
Another mistake is working with pastry that is too warm. When puff pastry gets soft, the butter layers begin to lose definition. That means less rise in the oven and a greasier texture overall. Warm pastry is also harder to cut cleanly and more likely to stick. Chilling the dough briefly whenever it starts feeling floppy can save the batch. It is one of the simplest fixes and one of the most effective.
People also sometimes underbake turnovers because they are worried about burning the tops. Puff pastry should look confidently golden, not timidly beige. If it is too pale, it may still be doughy inside. On the other side of the equation, applying egg wash too heavily around the edges can glue the layers shut. That prevents proper puffing. A light, careful coating on top is all you need.
Finally, many bakers skip the cooling rack and leave turnovers sitting on the hot pan too long. That traps steam underneath and softens the bottoms. It is a small detail, but texture lives in these little moments. Avoiding these mistakes does not require advanced skill. It just requires noticing where turnovers usually go wrong and making a few smart choices. That is often the difference between a decent bake and one that feels truly polished.
How to Serve Cherry Turnovers
Cherry turnovers are wonderfully versatile, which is part of what makes them such a smart recipe to keep around. They can be served warm for a cozy, just-baked feel, or at room temperature when you want something easy to set out for guests. Warm turnovers have softer filling and a more dramatic contrast between crisp pastry and juicy fruit. At room temperature, the flavors settle and the pastry stays pleasantly crisp. Both versions are excellent, just in slightly different ways.
For breakfast or brunch, serve them with coffee or tea and maybe some fresh fruit on the side. They feel elegant without needing much help. For dessert, they pair beautifully with vanilla ice cream, whipped cream, or even a spoonful of lightly sweetened mascarpone. The cold creaminess beside the warm or room-temperature pastry is hard to beat. It creates that classic hot-and-cold contrast that always feels just a little luxurious.
Presentation can stay simple. A light glaze, a dusting of powdered sugar, or a few fresh cherries on the plate are often enough. These pastries already have visual appeal thanks to their golden layers and rich red filling. They do not need elaborate decoration. In fact, their rustic charm is part of the point. They look homemade in the best possible way.
They are also great for sharing. Bring them to a brunch table, a holiday breakfast, a bake sale, or an afternoon gathering, and they tend to disappear quickly. There is something universally appealing about handheld fruit pastry. It is familiar, comforting, and a little indulgent without feeling over-the-top. That is a hard combination to beat, and it is exactly why cherry turnovers have remained such a favorite.
Storage, Freezing, and Reheating Tips
Freshly baked turnovers are best the day they are made, but they still store quite well with the right approach. Once completely cooled, place them in an airtight container and keep them at room temperature for up to 2 days, or refrigerate for up to 4 days. If you refrigerate them, the pastry may soften a bit, which is normal. Moisture is always trying to sneak back into crisp pastry like an uninvited guest. The key is how you reheat them.
For reheating, the oven or toaster oven is your best friend. A few minutes at around 350°F (175°C) helps bring back the crispness far better than a microwave. The microwave will warm the filling quickly, but it tends to make the pastry soft and chewy. If crisp layers matter to you, dry heat is the better path. Reheated turnovers often taste surprisingly close to freshly baked, especially within the first day or two.
You can also freeze turnovers either before or after baking. To freeze unbaked turnovers, assemble them fully, place them on a tray until firm, then transfer to a freezer-safe bag or container. Bake from frozen, adding a few extra minutes to the baking time. This is incredibly useful when you want fresh pastries without doing all the work in one go. Baked turnovers can also be frozen, then reheated in the oven until hot and crisp.
This make-ahead flexibility is one of the recipe’s quiet strengths. It allows you to spread the work out and still serve something that feels fresh and thoughtful. For busy mornings, holidays, or entertaining, that kind of flexibility is pure gold. A good recipe is not just one that tastes good. It is one that fits real life, and cherry turnovers do that very well.
Easy Variations to Try
Once you have the basic cherry turnover recipe down, it becomes a great template for creative variations. One easy upgrade is adding cream cheese beneath the cherry filling. The tangy richness works beautifully with the fruit and gives the turnover a more Danish-like feel. You only need a small spoonful per pastry. Too much can overpower the cherries, but just enough creates a creamy contrast that feels indulgent and balanced.
Another variation is adjusting the flavor profile. A little extra almond extract leans into that classic cherry-almond pairing often found in bakery pastries. A pinch of cinnamon can warm the filling subtly, though it should stay in the background rather than taking over. You can also mix cherries with raspberries or blueberries for a blended berry turnover that still keeps cherries in the spotlight. It is a nice option when you want more dimension in the fruit filling.
For texture, try adding sliced almonds or coarse sugar on top before baking. The almonds toast as the turnovers bake and give a nutty crunch that echoes the almond extract in the filling. You can also glaze them with lemon icing instead of plain sugar glaze, which brightens the whole pastry and adds another layer of flavor. These changes are small, but they make the recipe feel fresh each time you return to it.
Even savory-sweet twists are possible, though cherries usually shine best in dessert territory. The reason this recipe adapts so well is that the core technique is solid. Once you know how to prepare the filling, handle the pastry, and bake for proper texture, you can start playing with flavors confidently. It is a little like learning a basic song on guitar. Once the structure is in your hands, you can improvise and make it your own.
FAQs about Cherry Turnovers Recipe
1. Can I use canned cherry pie filling for cherry turnovers?
Yes, canned cherry pie filling works very well and saves time. It is already sweetened and thickened, which makes assembly easier. You can also use homemade cherry filling if you want a fresher flavor.
2. Why is my puff pastry not flaky?
Puff pastry may lose its flaky texture if it becomes too warm before baking. Keeping the pastry cold while working with it is very important. Chilling the turnovers before baking also helps create better layers.
3. How do I stop the filling from leaking out?
Do not overfill the turnovers, and make sure the edges are sealed tightly. Pressing the edges with a fork helps keep the filling inside. Using a thick filling instead of a runny one also reduces leaking.
4. Can I make cherry turnovers ahead of time?
Yes, you can assemble them ahead of time and keep them chilled until you are ready to bake. You can also freeze unbaked turnovers for later use. This makes them a convenient dessert or breakfast treat.
5. How should I store leftover cherry turnovers?
Store leftover turnovers in an airtight container at room temperature for a short time or in the refrigerator for longer freshness. Reheat them in the oven for a few minutes to help bring back the crisp texture. The microwave works, but the pastry may become softer.
6. Can I add icing to cherry turnovers?
Yes, a simple powdered sugar glaze or vanilla icing is a popular finishing touch. It adds extra sweetness and gives the turnovers a bakery-style look. Let the pastries cool slightly before drizzling on the icing.
Conclusion
The biggest keys are simple: keep the pastry cool, cool the filling before assembly, avoid overfilling, seal carefully, and bake until truly golden. Those details may sound small, but together they create the texture and flavor contrast that makes turnovers so special. Crisp layers, bright fruit, and just enough sweetness—that combination is hard to resist.
Whether you serve them for breakfast, dessert, brunch, or a weekend baking project, cherry turnovers have a way of feeling both comforting and a little celebratory. They are practical enough for everyday baking and pretty enough for guests. That is a rare combination, and it is one reason this pastry continues to earn a place in so many kitchens.
Once you make them once, the recipe starts to feel less like a one-time project and more like a dependable favorite. And honestly, that may be the best kind of recipe there is: one that tastes special, but fits naturally into real life.