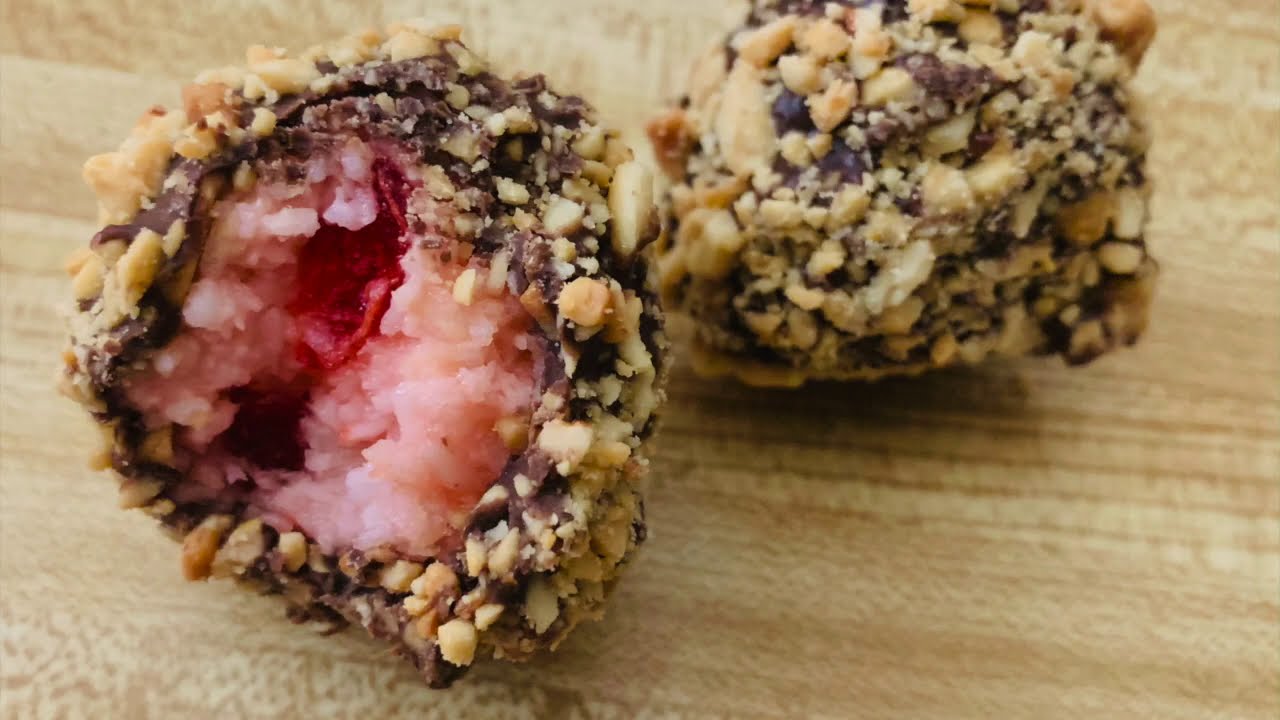
Cherry Mash Candy Recipe: There is something almost magical about homemade candy, especially when it combines a sweet cherry center with a rich chocolate peanut coating.
Cherry Mash candy has that old-fashioned charm that instantly feels nostalgic, like something tucked into a festive candy tin or handed over on a holiday plate by someone who really knows their way around the kitchen.
When you make it at home, you are not just recreating a candy recipe. You are building layers of flavor and texture that feel far more personal than anything pulled from a store shelf.
The cherry filling is soft, sweet, and slightly creamy, while the outer layer brings in that crunchy, salty-sweet contrast that makes every bite memorable.
What Is Cherry Mash Candy?
Cherry Mash candy is a sweet confection known for its soft cherry-flavored center and outer shell made from chocolate mixed with chopped peanuts. The contrast is what makes it so addictive. The center is smooth, chewy, and packed with cherry flavor, while the coating adds a bold crunch and a nutty richness that keeps the sweetness balanced. Think of it as the candy equivalent of a perfect duet. One part is fruity and tender, the other is deep and crunchy, and together they create a bite that feels complete.
Traditionally, this style of candy is associated with classic American sweets that were built around simple but satisfying combinations. Cherry and chocolate have always been a natural pair. Add peanuts to the mix, and suddenly the candy has more personality. The flavor becomes more layered, and the texture becomes far more exciting. It is not one-note sweetness. It is a little juicy, a little creamy, a little crunchy, and a little indulgent all at once. That is why Cherry Mash candy has stayed popular with people who love retro-style treats and handmade candy recipes.
The homemade version often tastes better than packaged varieties because the ingredients are fresher and the flavor is more vivid. The cherry center can be made with chopped maraschino cherries or candied cherries, and that fresh burst of fruit flavor really changes the game. The chocolate coating can also be customized. Some people prefer milk chocolate for a sweeter candy, while others lean toward semisweet chocolate for more depth. The peanut layer brings everything together, turning the candy from soft and sweet into something with real bite and balance. Once you understand what Cherry Mash candy is supposed to be, the recipe starts making perfect sense. It is not just a candy bar imitation. It is its own thing, and it deserves to be made carefully.
Ingredients You’ll Need
Below is a clear breakdown of everything you need. Keep your ingredients measured and ready before starting. That way, once the process begins, you can move through the steps without scrambling around the kitchen.
For the Cherry Center
For the inside of the candy, gather these ingredients:
- 1 cup chopped maraschino cherries, well drained
- 2 tablespoons cherry juice
- 3 tablespoons softened butter
- 3 cups powdered sugar
- 1/2 teaspoon almond extract
- 1/2 teaspoon vanilla extract
- A few drops of red food coloring if you want a brighter pink-red center
The cherry center is the heart of the recipe, so this part deserves care. Draining the cherries well is especially important. You want the flavor, not excess liquid pooling into the filling and making it too soft. Powdered sugar helps firm things up while also creating that smooth, melt-in-your-mouth candy texture. The almond extract may seem small, but it gives the cherry flavor more depth, almost like turning up the contrast on a photo so the colors appear richer.
For the Chocolate Peanut Coating
For the outer layer, you will need:
- 2 cups milk chocolate chips or semisweet chocolate chips
- 1 tablespoon coconut oil or shortening
- 1 1/2 cups salted peanuts, finely chopped
This outer shell is what gives Cherry Mash candy its iconic finish. The chocolate should melt into a smooth, glossy coating, and the chopped peanuts should be small enough to stick well but large enough to provide crunch. Coconut oil or shortening helps thin the melted chocolate slightly, making dipping easier and helping the coating set with a smoother finish.
Kitchen Tools That Make the Process Easier
You do not need a professional candy kitchen to make Cherry Mash candy, but having the right tools nearby can make the process smoother and far less stressful. Candy recipes tend to move in stages, and once you start shaping, dipping, or coating, it helps to have everything within arm’s reach. A simple mixing bowl and spoon can get you started, but a few extra tools will make the recipe easier to manage and help your candies look cleaner and more polished when they are done.
A medium mixing bowl is essential for preparing the cherry filling. You also want a sturdy spatula or wooden spoon because the mixture becomes thick as powdered sugar is added. A baking sheet or tray lined with parchment paper is important for chilling the cherry centers and setting the coated candies later. Without parchment paper, the candies may stick and lose their shape when you try to remove them. This is one of those small details that can save you a lot of frustration. Nobody wants to create beautiful candy only to peel half of it off the tray.
A microwave-safe bowl or double boiler is useful for melting the chocolate gently. Chocolate can be dramatic if overheated. One minute it is smooth and glossy, the next it is clumpy and irritated like it has had a bad day. A fork, dipping tool, or even two small spoons can help coat the candy centers neatly. Measuring cups, a small knife for chopping cherries, and paper towels for blotting extra moisture also come in handy. None of these tools are fancy, but together they make the candy-making process feel more controlled. And when you are dealing with something sticky, sweet, and shape-sensitive, a little control goes a long way.
How to Choose the Best Cherries for the Recipe
Cherries are the star of this candy, so choosing the right kind matters more than you might think. Most homemade Cherry Mash candy recipes use maraschino cherries because they are easy to find, brightly flavored, and soft enough to blend into a smooth filling. They give the center that signature sweet cherry taste people expect. That said, not all maraschino cherries are equal. Some are overly wet, some are too bland, and some have a slightly artificial aftertaste that can overpower the rest of the candy. Since the filling depends heavily on cherry flavor, it is worth taking a few extra seconds to choose a good jar.
When shopping, look for cherries that are plump, bright, and intact rather than mushy or faded. Once you open the jar, drain them thoroughly and blot them well with paper towels. This step makes a huge difference. Too much liquid can turn the filling into a sticky mess that refuses to hold shape. It is like trying to build a sandcastle with soaking wet sand. The materials are there, but the structure will not cooperate. You want the cherries moist enough to provide flavor and softness, but dry enough that the sugar can create a workable candy center.
Some home cooks like to mix in a little chopped candied cherry for deeper flavor or a chewier texture. That can work well if you want the filling to feel more old-fashioned and dense. You can also use high-quality jarred cocktail cherries for a richer flavor, though that may create a more grown-up version of the candy. Whichever route you take, the main goal is balance. The cherries should taste sweet and fruity without making the center watery. Once you get that part right, the rest of the recipe becomes much easier.
Why Texture Matters in Cherry Mash Candy
Flavor may get all the attention at first, but texture is what makes Cherry Mash candy unforgettable. The best version of this candy gives you a gentle resistance when you bite in, followed by a soft cherry center and a crunchy chocolate-peanut shell. That contrast is not just pleasant. It is the whole identity of the candy. If the filling is too wet, it feels sloppy. If it is too hard, it loses that creamy, meltable quality that makes the center feel luxurious. And if the coating lacks crunch, the candy misses its signature snap and becomes flat.
Texture starts with the filling consistency. As you mix the cherries, butter, extracts, and powdered sugar, you are aiming for a dough-like texture that can be rolled or shaped without sticking badly to your hands. It should feel soft, but not loose. Chilling helps firm it up, but chilling cannot rescue a filling that started out far too wet. That is why draining cherries properly and adding powdered sugar gradually are both so important. It is better to adjust as you go than to dump everything in and hope for the best. Candy making has a way of rewarding patience and punishing guesswork.
The chocolate coating has its own texture job to do. It should set firmly enough to hold the chopped peanuts in place and create a slight shell around the center. The peanuts need to be finely chopped so they cling well to the chocolate, but not ground into dust. You want crunch, not sand. When everything comes together, the candy has rhythm. Soft, crunchy, sweet, nutty, chewy. That rhythm is what makes people reach for a second piece without even thinking about it. Texture is not a side issue here. It is the heartbeat of the whole recipe.
Step-by-Step Guide for Cherry Mash Candy
Step 1: Prepare the Cherry Mixture
Start by mixing the chopped cherries, powdered sugar, butter, and any flavoring your recipe calls for in a bowl. Stir until the mixture becomes thick, sticky, and easy to shape. The cherry center should be sweet, soft, and well combined without being too wet.
Step 2: Shape and Chill the Centers
Scoop small portions of the cherry mixture and roll or shape them into balls or oval centers. Place them on a lined tray or plate, then chill them in the refrigerator until firm. This step makes the centers easier to handle when it is time to coat them.
Step 3: Melt the Chocolate Properly
Add the chocolate to a heat-safe bowl and melt it gently using a microwave in short intervals or over a double boiler. Stir often so it becomes smooth and glossy without burning. Properly melted chocolate helps create a neat and even candy coating.
Step 4: Add the Peanut Crunch
Mix the chopped or crushed peanuts into the melted chocolate, stirring until they are evenly spread throughout the mixture. This gives the candy its classic crunchy outer layer. Make sure the peanuts are well coated so every bite has texture.
Step 5: Coat the Cherry Centers
Remove the chilled cherry centers from the refrigerator and dip each one into the chocolate-peanut mixture. Use a fork or spoon to turn and coat them fully, then lift them out carefully. Let the excess chocolate drip off before placing each piece back onto the lined tray.
Step 6: Let the Candy Set
Leave the coated candies at room temperature or place them in the refrigerator until the chocolate is fully set. Once firm, the candies are ready to serve or store. Keep them in an airtight container for the best texture and freshness.
Common Mistakes to Avoid
Even a simple candy recipe can go sideways when a few small details are overlooked. One of the most common mistakes in Cherry Mash candy is not draining the cherries well enough. Extra moisture can turn the filling sticky and difficult to shape, and it can also make the centers soften too much during dipping. Another frequent issue is adding all the powdered sugar at once instead of gradually. That can lead to uneven texture and make it harder to judge whether the filling is too wet or too dry.
Overheating the chocolate is another classic problem. Chocolate needs patience. If blasted with too much heat, it can seize, turn grainy, or lose its glossy finish. Melting in short intervals and stirring often keeps it smooth. Using overly large peanut pieces can also affect the coating. Big chunks may make dipping messy and can leave gaps in coverage. Smaller chopped peanuts create a more even shell and help the candy hold together better.
Skipping chill time is perhaps the biggest shortcut that backfires. Soft centers and warm hands are not a good combination in candy making. Chilling gives the filling structure and keeps the coating process manageable. Another mistake is expecting every candy to look factory-perfect. Handmade candy has character. Focus on flavor, texture, and full coating rather than trying to force a flawless look on every single piece. Avoid those common errors, and the recipe becomes much more forgiving.
Tips for Getting a Smooth Chocolate Coating
A smooth coating can make your Cherry Mash candy look more polished, but the secret is not perfection. It is preparation. Begin with properly chilled centers, because cold filling is easier to dip and less likely to crumble into the chocolate. Melt the chocolate slowly and stir until it is silky. Add a bit of coconut oil or shortening to improve flow and help the coating spread more evenly. That one small addition often makes the difference between a heavy shell and a smoother finish.
Use a fork or dipping tool to lift each candy after coating and tap gently against the side of the bowl so excess chocolate falls away. This helps prevent thick puddles from forming underneath the candy. If you notice the coating becoming too thick as you work, rewarm it slightly instead of forcing it. Thick chocolate coats unevenly and can drag on the surface of the candy. Working with manageable batches also helps. Keep some centers in the refrigerator while dipping the others so they stay firm.
A final useful trick is to let the coated candies sit undisturbed while setting. Moving them too soon can create marks or uneven edges. You can also use a spoon to nudge chocolate over any bare spots before the shell firms up. Smooth coating is really about rhythm. Chill, dip, lift, tap, set. Once you fall into that pattern, the process becomes much easier, and the candies start looking cleaner with every piece.
How to Store Cherry Mash Candy
Proper storage helps Cherry Mash candy keep its texture and flavor longer. Once fully set, place the candies in an airtight container with parchment paper between layers to prevent sticking. They can be stored at room temperature in a cool area for a couple of days, but refrigeration is usually the better choice, especially if your kitchen runs warm. The chocolate shell stays firmer, and the cherry center holds its shape more reliably when chilled.
If refrigerated, the candy will usually keep well for about one to two weeks. Before serving, let it sit at room temperature for a few minutes so the center softens slightly and the flavors come forward. Straight from the fridge, the coating may feel quite firm, and the cherry filling can seem less aromatic. A brief rest makes a noticeable difference in taste and texture. It is a small step, but one that makes the candy feel more luxurious.
Avoid storing the candy in a humid environment, because moisture can affect both the shell and the filling. Chocolate can develop bloom, and the centers may become tacky. A sealed container and a stable temperature are your best friends here. With proper storage, these candies stay delicious and gift-worthy, making them ideal for advance prep during holidays or special events.
Can You Freeze Cherry Mash Candy?
Yes, Cherry Mash candy can be frozen, which makes it a great make-ahead treat. To freeze it properly, let the candies set completely first, then place them in a single layer on a tray until firm. After that, transfer them to a freezer-safe airtight container, separating layers with parchment paper. This keeps the shell from sticking and protects the candies from being crushed or absorbing freezer odors. Good wrapping matters because candy is like a sponge for strange smells, and nobody wants a cherry chocolate treat with a mysterious frozen-onion note.
Frozen Cherry Mash candy can generally keep well for up to two months. When you are ready to enjoy it, thaw the candies in the refrigerator first rather than on the counter. This helps reduce condensation and protects the chocolate coating. Once thawed, let them sit at room temperature briefly before serving for the best texture. The center should soften nicely, and the coating should still hold its crunch.
Freezing is especially useful around the holidays, when making sweets ahead of time can save a lot of stress. It also means you can keep a secret stash for cravings or surprise guests. As long as the candy is wrapped well and thawed carefully, freezing works beautifully and does not ruin the structure of the treat.
Flavor Variations to Try
One of the best things about homemade Cherry Mash candy is how easy it is to customize. The classic version is hard to beat, but small changes can create entirely new flavor directions. For example, using dark chocolate instead of milk chocolate gives the candy a deeper, less sweet outer shell that pairs beautifully with the sugary cherry center. You can also swap some of the maraschino cherries for candied cherries if you want a denser texture and a richer fruit flavor.
Another great twist is adding a little finely chopped coconut to the filling. That creates a tropical note that works surprisingly well with cherry and chocolate. Some people like to add a few drops of rose water or extra almond extract for a more bakery-style flavor. You can even experiment with the nuts. Salted peanuts are traditional, but chopped almonds or pecans can create an interesting variation while still giving the candy crunch. The overall personality changes, but the core idea remains the same: fruity center, chocolate shell, nutty bite.
You can also play with presentation. Shape the candy into small bars instead of rounds, drizzle extra chocolate over the top, or add festive sprinkles for holiday trays. These changes do not just affect appearance. They change the mood of the candy, making it feel elegant, playful, or seasonal. Once you master the base recipe, it becomes a flexible template you can tweak again and again.
Best Occasions to Serve This Candy
Cherry Mash candy fits beautifully into so many occasions because it feels both nostalgic and a little special. It is especially popular during the holidays, when candy trays, cookie boxes, and homemade gifts start filling kitchens and dining tables. The bright cherry center makes it festive, and the chocolate-peanut shell feels rich enough for celebratory moments. Tucked into a gift tin or arranged on a dessert platter, it looks thoughtful and homemade in the best possible way.
This candy also works well for baby showers, birthdays, potlucks, bake sales, and family gatherings. It is easy to make ahead, easy to transport once set, and easy to serve in small portions. That last part matters because these candies are rich. A little piece goes a long way, which means they add variety to a dessert table without overwhelming it. They are like the sparkling accessory of a sweets spread. Not always the largest item on the table, but often the one people remember and ask about.
Even outside special occasions, this recipe is worth making just for the pleasure of homemade candy. Sometimes the best reason is simply that you want something a little different from cookies, brownies, or cake. Cherry Mash candy scratches that itch beautifully. It feels old-school, generous, and deeply satisfying, especially with coffee, tea, or a glass of milk. Some recipes are only for events. This one earns a place in everyday cravings too.
FAQs about Cherry Mash Candy Recipe
1. What is Cherry Mash candy made of?
Cherry Mash candy is usually made with a sweet cherry center and a coating of chocolate mixed with chopped peanuts. The center often includes chopped cherries, butter, powdered sugar, and sometimes marshmallow or coconut, depending on the recipe. The result is a candy that is chewy, sweet, fruity, and crunchy at the same time.
2. Can I use maraschino cherries for Cherry Mash candy?
Yes, maraschino cherries are commonly used because they have a bright cherry flavor and soft texture. It is best to drain them well and pat them dry before mixing them into the filling. Too much liquid can make the center too soft and difficult to shape.
3. Why is my cherry filling too sticky?
The filling may be too sticky if the cherries were too wet or if there is not enough powdered sugar in the mixture. Chilling the filling also helps it firm up. You can add a little more powdered sugar if needed to make it easier to shape.
4. How do I keep the chocolate coating smooth?
Melt the chocolate slowly and stir it often so it does not overheat. If it becomes too thick, a small amount of shortening or coconut oil can help loosen it. Working with chilled cherry centers also makes coating easier and neater.
5. How should I store Cherry Mash candy?
Store Cherry Mash candy in an airtight container in a cool place or in the refrigerator. This helps the candy stay firm and fresh longer. If stored properly, it can last for several days.
6. Can I freeze Cherry Mash candy?
Yes, Cherry Mash candy can be frozen in a sealed container. Thaw it in the refrigerator before serving for the best texture. Freezing is a good option if you want to make it ahead of time.
Conclusion
Making Cherry Mash candy at home is one of those kitchen projects that feels rewarding from start to finish. You begin with a handful of simple ingredients, and by the end, you have a tray of candy that looks festive, tastes rich, and delivers that perfect contrast between fruity softness and crunchy chocolate coating. The process is straightforward once you break it down: prepare the cherry filling, shape and chill it, melt the chocolate, stir in the peanuts, coat the centers, and let everything set. Each step is manageable, and together they create something that feels far more special than the effort might suggest.
Whether you are making this recipe for holidays, gifts, family gatherings, or a weekend candy craving, it has the kind of old-fashioned charm that never goes out of style. Once you try it, there is a good chance it will become one of those recipes you return to again and again. Not because it is trendy, but because it works. And sometimes, that is exactly what makes a recipe unforgettable.