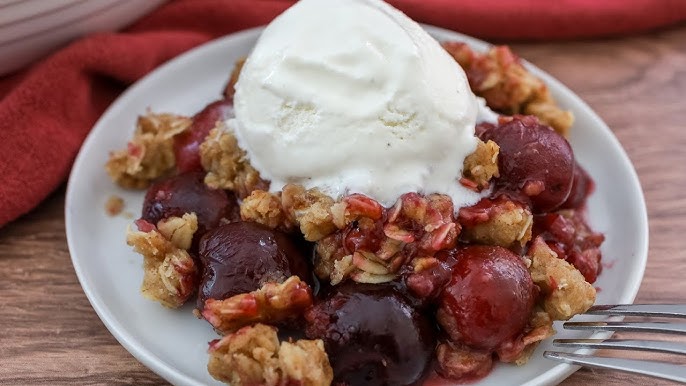
Cherry Crisp Recipe: There’s something magical about warm, gooey cherry crisp topped with a golden, buttery crumble. Whether it’s for a weekend treat or a special gathering, this classic dessert never fails to impress.
Follow this easy step-by-step guide to make a cherry crisp that’s bursting with sweet-tart flavor and topped with a crunchy oat crumble.
What Is Cherry Crisp?
Cherry crisp is a baked dessert made with juicy cherries and topped with a crispy oat and brown sugar crumble. Unlike pies, crisps don’t have a bottom crust, making them much easier and quicker to whip up. It’s the perfect combination of fruity filling and a textured topping, served warm and often with a scoop of vanilla ice cream.
This dessert has roots in American comfort food, especially popular in the summer when cherries are in season. But thanks to frozen cherries, you can enjoy it year-round. It’s also incredibly versatile—swap cherries for any fruit like peaches, apples, or blueberries, and you’ve got a new treat every time.
Why You’ll Love This Cherry Crisp
Flavor Explosion
From the moment you take a bite, your taste buds will be hit with a medley of sweet, tangy, and buttery notes. The cherries deliver a tart punch while the crumble topping provides a sweet, nutty finish. It’s the kind of flavor contrast that keeps you coming back for more.
Simple Ingredients
You won’t need a trip to a fancy store. Most ingredients are likely in your pantry right now. Flour, oats, sugar, and butter form the base of the topping, while cherries (fresh or frozen) and a few flavor boosters like cinnamon and lemon juice bring the filling to life.
Perfect for Any Occasion
This dessert fits every season. Serve it warm in the winter for a cozy treat or chill it slightly in summer for a refreshing twist. It’s ideal for family dinners, potlucks, BBQs, or a quiet night in. You can even prep it ahead of time and pop it into the oven when ready to serve.
Ingredients Needed
Let’s break down the simple, wholesome ingredients you’ll need for this cherry crisp.
For the Cherry Filling
- 4 cups of pitted cherries (fresh or frozen)
- ½ cup granulated sugar
- 2 tablespoons cornstarch
- 1 tablespoon lemon juice
- 1 teaspoon vanilla extract
- ½ teaspoon ground cinnamon
For the Crisp Topping
- ¾ cup all-purpose flour
- ½ cup rolled oats
- ½ cup brown sugar
- ¼ cup granulated sugar
- ½ teaspoon salt
- ½ teaspoon ground cinnamon
- ½ cup unsalted butter, cold and cubed
This combo of ingredients gives the dessert its signature juicy interior and crunchy, golden topping. Now, let’s walk through how to put everything together.
Step-by-Step Instructions
Step 1: Preheat the Oven
Start by preheating your oven to 350°F (175°C). You’ll want the oven hot and ready so the crisp cooks evenly and the topping gets nice and golden brown. Use the middle rack to ensure balanced heat distribution.
Step 2: Prepare the Cherry Filling
In a large mixing bowl, combine the pitted cherries, sugar, cornstarch, lemon juice, vanilla extract, and cinnamon. Stir gently but thoroughly, making sure every cherry is coated. The cornstarch helps thicken the filling as it bakes, so don’t skip it!
Transfer the cherry mixture to a greased 9-inch baking dish, spreading it out evenly to cover the bottom.
Step 3: Make the Crisp Topping
In a separate bowl, whisk together the flour, oats, brown sugar, granulated sugar, salt, and cinnamon. Add the cold butter cubes, then use your fingers or a pastry cutter to blend it all until the mixture resembles coarse crumbs. You want little clumps for that perfect crunchy topping texture.
Step 4: Assemble the Dessert
Sprinkle the crumb topping evenly over the cherry mixture. Don’t press it down—just let it sit lightly on top. This allows it to bake into a deliciously crispy layer that contrasts beautifully with the juicy fruit underneath.
Step 5: Bake to Perfection
Pop the dish into your preheated oven and bake for 40-45 minutes or until the top is golden brown and the filling is bubbling around the edges. If the topping browns too quickly, you can loosely cover it with foil during the last 10 minutes of baking.
Let it cool for at least 10-15 minutes before serving. This helps the filling set and enhances the flavor.
Tips for the Best Cherry Crisp
Achieving the perfect cherry crisp comes down to a few handy tips and tricks that elevate your dessert from good to unforgettable.
- Use Cold Butter: Always use cold, cubed butter for the topping. This helps create that golden, crumbly texture that crisps are famous for. Room-temperature butter can result in a greasy, less defined topping.
- Balance the Sweetness: Cherries can vary in tartness. Taste them before adding sugar. If they’re extra sweet, you can cut down the sugar in the filling slightly.
- Don’t Skip the Lemon Juice: The acidity of lemon juice brightens the flavor of the cherries and prevents the dessert from being overly sweet.
- Cornstarch is Key: Without a thickening agent like cornstarch, the cherry mixture can turn soupy. Cornstarch thickens the filling to a luscious consistency that doesn’t run all over the plate.
- Let It Rest: It’s tempting to dig in immediately, but let the crisp sit for at least 10-15 minutes after baking. This allows the filling to set and cool slightly, which improves texture and flavor.
- Add Nuts for Crunch: For an extra crunchy topping, mix in a handful of chopped pecans or almonds into the crisp mixture before baking.
- Go Big on Vanilla: A good-quality vanilla extract takes the flavor to another level. Don’t be shy—vanilla ties the whole dessert together beautifully.
Serving Suggestions
Cherry crisp is the kind of dessert that’s just begging for something creamy to go on top. Here are some ideas to serve it like a pro:
- Classic Vanilla Ice Cream: A warm slice of cherry crisp paired with cold vanilla ice cream is pure heaven. The temperature contrast makes each bite exciting and delicious.
- Whipped Cream: Light and fluffy, whipped cream adds a delicate texture that complements the crisp topping and fruity base.
- Greek Yogurt or Crème Fraîche: For a tangy twist, a dollop of Greek yogurt or crème fraîche brings a nice balance to the sweetness of the dish.
- Chilled Cherry Sauce: For cherry lovers, drizzle extra cherry sauce on top for more fruit-forward goodness.
- Pair with Coffee or Dessert Wine: A warm drink like coffee or a dessert wine like Moscato can elevate your cherry crisp into a complete gourmet experience.
No matter how you serve it, make sure to enjoy it warm for the best taste and texture. And if you’re sharing, be ready for people to ask for seconds!
How to Store and Reheat Cherry Crisp
Got leftovers? Lucky you! Cherry crisp stores and reheats like a dream, making it perfect for enjoying over a few days.
Storing:
- Refrigerator: Let the crisp cool completely, then cover the dish tightly with plastic wrap or transfer it to an airtight container. It will keep well in the refrigerator for up to 4 days.
- Freezer: To freeze, place portions of the crisp in freezer-safe containers. It can be frozen for up to 3 months. Let it thaw in the refrigerator overnight before reheating.
Reheating:
- Oven: Preheat your oven to 350°F. Place the crisp in an oven-safe dish, cover loosely with foil, and heat for 15-20 minutes or until warmed through. This method preserves the crispiness of the topping.
- Microwave: If you’re short on time, microwave a serving for 30-60 seconds. Just know the topping may soften slightly.
Pro Tip: Add a fresh scoop of vanilla ice cream after reheating, and it’ll taste just as amazing as when you first baked it.
Common Variations of Cherry Crisp
Cherry crisp is one of those recipes that invites creativity. Here are a few popular variations to keep things fresh and fun:
1. Mixed Berry Crisp
Combine cherries with blueberries, raspberries, or strawberries for a colorful, antioxidant-packed twist.
2. Apple Cherry Crisp
Mix in thinly sliced apples with the cherries. The apples bring extra sweetness and a different texture that pairs beautifully with the cherries.
3. Chocolate Cherry Crisp
Add chocolate chips to the topping or even a few chunks in the filling for a decadent treat. Chocolate and cherry are a match made in dessert heaven.
4. Cherry Almond Crisp
Stir some almond extract into the filling and top with slivered almonds for a nutty, fragrant variation.
5. Gluten-Free Cherry Crisp
Swap regular flour with a gluten-free blend and make sure the oats are certified gluten-free to create a version that’s safe for those with gluten intolerance.
These variations allow you to customize your cherry crisp based on what you have on hand or your personal flavor preferences.
Nutritional Information
Cherry crisp may be a dessert, but it’s one that offers a bit of nutrition too, especially when made with fresh fruits and wholesome oats. Here’s a rough breakdown of the nutritional content per serving (based on 8 servings per batch):
| Nutrient | Amount (Approx.) |
|---|---|
| Calories | 290-350 kcal |
| Total Fat | 12-15g |
| Saturated Fat | 7-9g |
| Carbohydrates | 45-50g |
| Sugars | 25-30g |
| Fiber | 3-4g |
| Protein | 3-4g |
| Sodium | 150-200mg |
Note: Values may vary based on exact ingredients used (e.g., butter vs. margarine, brown sugar amounts, or if you add extras like nuts or chocolate).
While this dessert is sweet and indulgent, it does offer antioxidants from the cherries, and oats provide dietary fiber and complex carbs. If you want a lighter version, consider reducing the sugar and butter slightly or serving with a dollop of Greek yogurt instead of ice cream.
FAQs about Cherry Crisp Recipe
1. Can I use canned cherries for this recipe?
Yes, you can use canned cherries, but make sure they are packed in water or juice, not syrup. Drain them well and reduce the added sugar in the filling to compensate for the sweetness.
2. What’s the best way to pit fresh cherries?
A cherry pitter tool makes the job fast and easy. If you don’t have one, a metal straw or a chopstick pushed through the cherry works as a great DIY method.
3. Can I make cherry crisp ahead of time?
Absolutely. You can prepare and assemble the crisp, then refrigerate it unbaked for up to 24 hours. Bake it when you’re ready to serve. You can also bake it in advance and reheat it before serving.
4. Is it okay to use quick oats instead of rolled oats?
While rolled oats give a chewier, more textured topping, quick oats can be used in a pinch. The topping might be slightly softer but still delicious.
5. How do I keep the topping crunchy after storing?
Reheat the crisp in the oven instead of the microwave. This helps re-crisp the topping. If needed, you can add a little extra topping before reheating for added texture.
Final Thoughts
Cherry crisp isn’t just a dessert—it’s a celebration of simplicity, flavor, and comfort. Whether you’re a seasoned baker or just getting started in the kitchen, this recipe is approachable and customizable, delivering incredible results every time. The gooey, vibrant cherry filling paired with that irresistible golden topping is sure to become a household favorite.
And what’s better? It’s made with everyday ingredients and can be prepped in under 15 minutes. Whether you’re looking for a dish to wow your guests, something sweet for a family dinner, or just a delicious way to use up extra cherries—this recipe checks all the boxes.
Try it once, and you’ll likely keep this one in your back pocket forever. Enjoy it warm, cold, solo, or with a scoop of your favorite ice cream—it never disappoints!