Cheesy Bread Recipe: Cheesy bread is the kind of comfort food that never fails to make people smile. The combination of warm, fluffy bread and gooey, melted cheese creates an indulgent treat that’s perfect for almost any occasion. Imagine pulling apart a fresh loaf, steam rising, with strings of cheese stretching from one slice to the next — it’s pure satisfaction. Cheesy bread hits all the right notes: a soft and pillowy inside, a crisp golden crust, and the savory punch of rich, flavorful cheese. The best part is its versatility; you can make it as a side dish for pasta, serve it at parties, or enjoy it as a snack on its own.
Another reason cheesy bread is so irresistible is the variety of cheese options available. From sharp cheddar to creamy mozzarella, each type brings its own unique taste and texture. And if you’re feeling adventurous, you can blend cheeses together for a more complex flavor profile. Fresh herbs like parsley, oregano, or basil can be sprinkled on top for a fragrant, gourmet touch. With just a few simple ingredients, you can transform an ordinary loaf into something that looks and tastes like it came from a bakery.
Cheesy bread also has a way of bringing people together. Whether it’s shared during family dinners, at game nights, or as a comforting snack after a long day, it creates moments of warmth and connection. That’s the magic of this simple yet powerful recipe — it’s not just food, it’s an experience.
Why You’ll Love This Recipe
You’ll love this cheesy bread recipe because it’s easy, customizable, and downright delicious. Even if you’re not a seasoned baker, you can follow this step-by-step guide and achieve bakery-level results. The dough is simple to prepare and doesn’t require any complicated techniques, making it accessible to beginners while still producing professional-quality results.
One of the greatest advantages of making cheesy bread at home is that you control everything — from the type of flour to the cheese blend. Want extra garlic flavor? Add a few minced cloves to the dough. Prefer a spicy kick? Sprinkle some chili flakes into the cheese mix. The possibilities are endless.
This recipe also fits into a variety of dining situations. Hosting a dinner party? Serve it as an appetizer alongside marinara sauce. Need something quick for the kids’ lunchboxes? Make smaller rolls for grab-and-go portions. Craving a late-night snack? Heat up a slice, and you’re in cheesy heaven in minutes.
If you’ve ever bought cheesy bread from a restaurant and thought, “I wish I could make this at home,” this recipe is your answer. Not only will it save you money, but it will also fill your kitchen with the mouthwatering aroma of freshly baked bread — something store-bought just can’t match.
Ingredients You’ll Need
Core Ingredients for the Dough
To start, you’ll need the basics for making soft, fluffy bread:
- All-Purpose Flour (3 cups) – This provides structure to the bread while keeping it light.
- Warm Water (1 cup) – Activates the yeast and helps form the dough.
- Active Dry Yeast (2¼ tsp) – This is the leavening agent that makes the bread rise.
- Sugar (1 tbsp) – Feeds the yeast and adds a hint of sweetness.
- Salt (1 tsp) – Enhances flavor and strengthens gluten structure.
- Olive Oil (2 tbsp) – Keeps the dough soft and adds richness.
These ingredients form the foundation of your bread. The flour, water, yeast, and sugar work together to create that airy, soft texture, while salt balances the flavor. Olive oil makes the crumb tender and prevents the crust from becoming too hard.
For best results, measure your ingredients precisely. Even small variations can affect texture. Use lukewarm water (about 110°F / 43°C) to ensure the yeast activates without being killed by heat. And always make sure your yeast is fresh — expired yeast can lead to dense, flat bread.
Cheesy Toppings for Maximum Flavor
The heart of cheesy bread lies in its topping, so choose your cheese wisely. Here’s a tried-and-true combination for irresistible flavor:
- Mozzarella (1½ cups shredded) – Melts beautifully for that iconic cheese pull.
- Cheddar (1 cup shredded) – Adds a sharp, tangy flavor.
- Parmesan (½ cup grated) – Provides a salty, nutty kick.
- Garlic (3 cloves minced) – Infuses the bread with a rich aroma.
- Butter (3 tbsp melted) – Helps brown the topping and adds flavor.
You can stick to just mozzarella if you prefer a milder taste, but mixing in cheddar and parmesan creates depth. Freshly grated cheese always melts better and tastes fresher than pre-shredded varieties, which often contain anti-caking agents.
Mix the cheeses together before sprinkling them on the bread to ensure every bite has a perfect blend of flavors. The garlic and butter mixture brushed over the dough before adding the cheese takes the flavor to the next level.
Optional Add-Ons for Extra Taste
If you want to get creative, here are some optional add-ons that can make your cheesy bread truly unique:
- Fresh Herbs – Parsley, basil, or oregano for freshness.
- Chili Flakes – For a spicy kick.
- Caramelized Onions – Adds sweetness and depth.
- Sliced Olives – Brings a salty, briny note.
- Sun-Dried Tomatoes – Adds tang and richness.
These extras can be mixed into the cheese topping or sprinkled on after baking for added texture and flavor. Keep in mind that less is more — overloading the bread with toppings can make it soggy.
Step-by-Step Guide to Making Cheesy Bread
Step 1 – Preparing the Dough
Start by activating your yeast. In a large mixing bowl, combine warm water, sugar, and yeast. Let it sit for about 5–10 minutes until the mixture becomes foamy. This means the yeast is alive and ready to work.
Next, add the olive oil, salt, and half of the flour. Mix until combined, then gradually add the remaining flour until a sticky dough forms. Transfer the dough to a floured surface and knead for about 8–10 minutes. Kneading develops the gluten, which is what gives bread its structure and chewiness.
If kneading feels tiring, think of it as a mini workout — your arms will thank you later. You’ll know the dough is ready when it’s smooth, elastic, and no longer sticks to your hands. At this stage, resist the urge to add too much flour, as it can make the bread dense instead of fluffy.
Place the dough in a lightly oiled bowl, cover with a clean kitchen towel, and prepare for the next stage: letting it rise.
Step 2 – Letting the Dough Rise
Once your dough is kneaded and resting in an oiled bowl, it’s time for one of the most important stages of bread-making — proofing. This is where the yeast works its magic, creating air pockets that give your bread a light, fluffy texture.
Cover the bowl with a clean kitchen towel or plastic wrap and place it in a warm, draft-free spot. Ideal temperature for rising is between 75°F and 85°F (24°C–29°C). If your kitchen is cool, you can place the bowl inside an oven with the light on or near a slightly warm stovetop.
Allow the dough to rise for about 1 to 1.5 hours, or until it doubles in size. This doubling is a sign that the yeast has fermented enough to give the bread structure and flavor.
While you wait, resist the urge to keep checking or poking the dough — this can release gases and slow the rise. A simple trick to check if it’s ready is the finger dent test: gently press a finger into the dough. If the indentation stays, your dough is proofed and ready for the next step.
This step is also when gluten relaxes, making it easier to shape the bread later. Plus, the fermentation process develops a more complex flavor. Patience here pays off — skipping or shortening this stage will leave you with dense, flat bread.
Step 3 – Shaping the Bread Base
Once your dough has risen, it’s time to give it shape. Lightly flour your work surface, then punch down the dough gently to release some of the built-up gas — think of it as giving the bread a little reset before baking.
For a classic cheesy bread loaf, roll the dough out into a rectangle about ½-inch thick. If you prefer a round loaf, simply shape it into a circle. The key is to keep the thickness even so the bread bakes uniformly.
Transfer the shaped dough onto a baking sheet lined with parchment paper. If you want an extra crisp base, you can sprinkle a little cornmeal on the baking sheet before placing the dough.
This stage is also a good time to create dimples on the surface using your fingertips — just like making focaccia. These little pockets help hold melted cheese and garlic butter later, ensuring flavor in every bite.
Let the shaped dough rest for another 15–20 minutes. This short resting period, known as the second rise, allows the dough to puff slightly before baking, creating a softer interior.
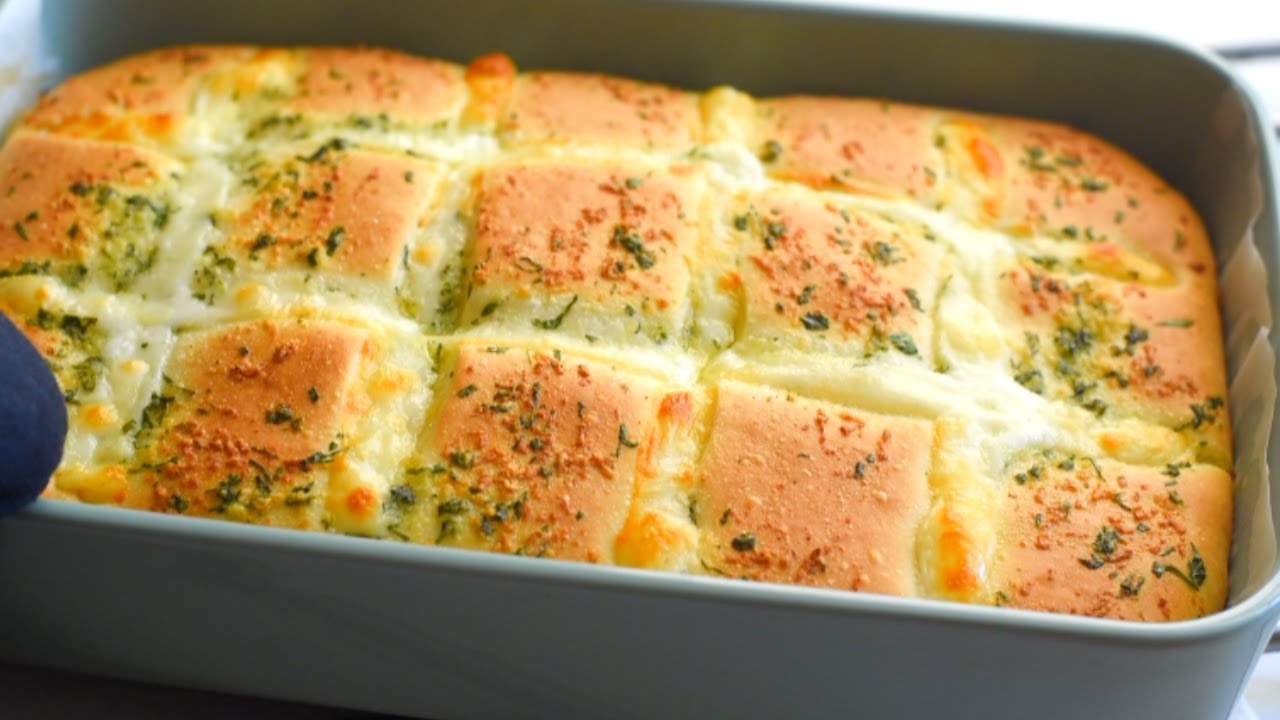
Step 4 – Adding the Cheesy Topping
Now comes the fun part — loading your bread with gooey, melty cheese. Start by preparing your garlic butter mixture: melt butter in a small bowl, stir in minced garlic, and a pinch of salt. Brush this generously over the surface of your dough.
Next, sprinkle your prepared cheese mixture evenly across the dough. Layer mozzarella for stretch, cheddar for sharpness, and parmesan for a nutty bite. Be generous, but don’t overload to the point where the cheese spills excessively over the sides — this can cause burning.
If you’re using optional toppings like herbs, chili flakes, or caramelized onions, sprinkle them now. Press them lightly into the cheese so they stick during baking.
Pro tip: For an extra golden top, reserve a handful of cheese to sprinkle over the bread halfway through baking. This prevents over-browning and keeps the top layer looking fresh and appetizing.
Step 5 – Baking to Golden Perfection
Preheat your oven to 400°F (200°C). Baking at a slightly higher temperature ensures that the cheese melts perfectly while the bread gets a crisp crust without drying out.
Place your cheesy bread in the oven and bake for 15–20 minutes, or until the edges are golden brown and the cheese is bubbling. Keep an eye on it during the last few minutes to prevent overcooking.
Once baked, remove it from the oven and let it cool for about 5 minutes before slicing. This short cooling time helps the cheese set slightly, making it easier to cut without losing all that melty goodness.
Slice into thick wedges or strips, serve warm, and watch them disappear in minutes. The smell alone will have people gathering around your kitchen before it even hits the table.
Tips for Perfect Cheesy Bread Every Time
Choosing the Right Cheese
The cheese you choose can make or break your cheesy bread. While mozzarella is the go-to for that iconic stretchy pull, it’s mild in flavor, so pairing it with a stronger cheese like sharp cheddar or gouda can elevate the taste. Parmesan or pecorino adds a salty, nutty element that balances out the creaminess of softer cheeses.
For the best melt, opt for block cheese that you shred yourself. Pre-shredded cheese often contains anti-caking agents, which prevent it from melting as smoothly. Freshly grated cheese not only melts better but also has a fresher taste.
If you’re feeling adventurous, try blends like:
- Mozzarella + Fontina for buttery meltiness.
- Cheddar + Monterey Jack for a sharper but creamy flavor.
- Provolone + Parmesan for an Italian-inspired loaf.
Don’t forget — the fat content in cheese also affects the outcome. Higher-fat cheeses melt more smoothly and create that luscious gooey texture you’re aiming for.
Balancing Texture and Flavor
A perfect cheesy bread has a soft, airy inside and a slightly crisp crust. Achieving this balance starts with your dough — avoid adding too much flour, as it can make the bread dense. Kneading is equally important for developing gluten, which helps the bread rise properly.
For flavor balance, don’t underestimate seasoning. Cheese is naturally salty, but adding garlic, herbs, or a light sprinkle of sea salt before baking can take the flavor from good to unforgettable.
Another trick is layering flavors. Brush the dough with garlic butter before adding cheese, sprinkle a bit of fresh herbs on top after baking, or even drizzle with olive oil for an aromatic finish. These small touches make a huge difference.
Avoiding Common Mistakes
Even simple recipes can go wrong without a little care. Here are mistakes to avoid:
- Rushing the rise – If you cut short the proofing time, your bread will turn out dense. Be patient.
- Using cold cheese – Cold cheese doesn’t melt evenly; let it sit at room temperature before adding it to the dough.
- Overloading toppings – Too much cheese or wet toppings can cause soggy bread. Balance is key.
- Baking at the wrong temperature – Too low, and the cheese will dry out before the bread is cooked. Too high, and you risk burning the cheese while the inside remains raw.
By keeping these tips in mind, you’ll be able to make consistently delicious cheesy bread every single time.
Serving Suggestions
Pairing Cheesy Bread with Meals
Cheesy bread is incredibly versatile and pairs beautifully with a variety of dishes. It’s a natural side for pasta dishes like spaghetti Bolognese, lasagna, or creamy Alfredo — the bread soaks up all those delicious sauces.
It’s also a hit alongside soups and stews, especially tomato basil soup, creamy potato chowder, or beef stew. The combination of soft bread and warm soup creates the ultimate comfort meal.
For a heartier option, pair cheesy bread with grilled meats like steak or chicken. The salty richness of the cheese complements the savory flavors of the protein perfectly.
Making it a Stand-Alone Snack
Cheesy bread doesn’t need a partner to shine. Serve it on its own with dipping sauces like marinara, ranch, or garlic butter for an irresistible snack or party appetizer.
If you want to make it more filling, you can turn cheesy bread into a cheesy bread sandwich by slicing it open and adding fillings like ham, turkey, or roasted vegetables.
For game nights or casual gatherings, cut the bread into bite-sized pieces and serve on a platter — it’s a guaranteed crowd-pleaser.
Storage and Reheating Tips
How to Keep Cheesy Bread Fresh
Cheesy bread is best enjoyed fresh from the oven, but you can store leftovers if needed. Allow it to cool completely before wrapping it tightly in aluminum foil or placing it in an airtight container. Store at room temperature for up to 2 days or refrigerate for up to 4 days.
Avoid leaving it uncovered, as the bread will dry out quickly. If you need to store it longer, freezing is the best option.
The Best Way to Reheat Without Losing Texture
The trick to reheating cheesy bread without making it soggy is to use the oven or toaster oven, not the microwave. Preheat your oven to 350°F (175°C), wrap the bread loosely in foil, and heat for about 10 minutes.
If reheating from frozen, let the bread thaw at room temperature before warming it in the oven. This helps maintain the soft texture inside while keeping the crust crispy.
For a quick single serving, use an air fryer at a low temperature for just a few minutes — it revives the bread beautifully without overcooking the cheese.
Healthier Variations
Using Whole Wheat or Gluten-Free Dough
If you want to make cheesy bread a little more wholesome, switching the flour can make a big difference without sacrificing taste. Whole wheat flour adds extra fiber and nutrients, giving the bread a nuttier, earthier flavor. However, because whole wheat flour can be heavier, it’s best to use a mix — about 50% whole wheat and 50% all-purpose — to keep the texture light.
For those with gluten sensitivities, gluten-free flour blends work surprisingly well for cheesy bread. Look for blends that already include xanthan gum or guar gum, as these help mimic the elasticity of gluten. You may also need to adjust the water content slightly since gluten-free flours can absorb more liquid.
One thing to keep in mind: alternative flours often require longer resting times to fully hydrate, so patience is key. The result will be a bread that’s not only delicious but also more accommodating to dietary needs.
Low-Fat Cheese Options
If you’re trying to cut down on calories or fat, you can still enjoy cheesy bread with some smart substitutions. Opt for part-skim mozzarella instead of full-fat — it still melts beautifully while reducing fat content. Reduced-fat cheddar is another good choice, though it may not be as sharp in flavor.
You can also add flavor with herbs and spices so you don’t miss the richness. Try incorporating basil, oregano, garlic powder, or smoked paprika into the cheese mix. This way, you get a punch of taste without relying solely on fat for flavor.
Another tip is to use less cheese but more layers of flavor — think roasted vegetables, fresh herbs, or even a drizzle of olive oil after baking. This keeps the bread satisfying without overloading it with cheese.
FAQs about Cheesy Bread Recipe
1. Can I make cheesy bread without yeast?
Yes, you can make a quick version using self-rising flour and baking powder, though the texture will be more like a biscuit than traditional bread.
2. What’s the best dipping sauce for cheesy bread?
Marinara is a classic, but garlic butter, ranch, or even spicy aioli are great options.
3. Can I make cheesy bread vegan?
Absolutely! Use vegan cheese and plant-based butter. There are many high-quality vegan mozzarella options that melt beautifully.
4. How do I keep the cheese from burning?
Cover the bread loosely with foil during the last half of baking if the cheese is browning too quickly.
5. Can I use pre-made pizza dough for cheesy bread?
Yes, store-bought pizza dough is a great shortcut. Just roll it out, top it, and bake as directed.
Conclusion
Cheesy bread is one of those recipes that feels indulgent but is simple enough for anyone to make at home. With its golden crust, soft fluffy interior, and irresistible cheese topping, it’s a crowd-pleaser in any setting — from casual family dinners to festive gatherings. By following the steps in this guide and using the tips provided, you can customize your loaf to match your tastes and dietary needs. Whether you stick to the classic mozzarella-cheddar-parmesan blend or experiment with unique toppings, one thing is certain: homemade cheesy bread will always taste better than store-bought.