Cheesecake and Red Velvet Cake Recipe: There’s something magical about combining two iconic desserts—cheesecake and red velvet cake—into one rich, indulgent treat. If you’re the type who can never decide between a smooth, creamy cheesecake and a velvety, slightly tangy red velvet slice, this recipe is your dream come true. In this guide, you’ll learn how to bake the ultimate layered dessert: a moist red velvet cake topped with a luscious cheesecake layer, all frosted with a silky cream cheese frosting. It’s impressive, it’s decadent, and best of all—it’s totally doable.
Let’s dive into the step-by-step instructions that will walk you through every detail to create this stunning showstopper.
The Appeal of Cheesecake and Red Velvet Cake
Cheesecake is one of those desserts that people either like or absolutely adore. It’s rich, smooth, slightly tangy, and melts in your mouth. On the other side, red velvet cake is moist, soft, and full of that subtle cocoa flavor with a signature red hue. It’s often paired with a cream cheese frosting that adds just the right amount of tang.
Now, what happens when you combine both? You get a next-level dessert that satisfies multiple cravings at once: the airy fluffiness of cake with the creamy decadence of cheesecake. It’s a dessert that looks fancy but is secretly very easy to pull off at home. Whether you’re baking for a birthday, a holiday, or just because—you can’t go wrong with this combo.
Ingredients You’ll Need
Let’s break down exactly what you’ll need before you start mixing and baking. Having everything prepped and ready makes the process smooth and enjoyable.
For the Red Velvet Cake Base:
- 2 ½ cups all-purpose flour
- 2 tbsp cocoa powder (unsweetened)
- 1 tsp baking soda
- ½ tsp salt
- 1 ½ cups granulated sugar
- 1 cup vegetable oil
- 2 large eggs
- 1 cup buttermilk
- 2 tsp vanilla extract
- 1 tsp white vinegar
- 2 tbsp red food coloring (gel preferred)
For the Cheesecake Layer:
- 16 oz (2 blocks) cream cheese, softened
- ½ cup granulated sugar
- 2 large eggs
- 1 tsp vanilla extract
- ¼ cup sour cream or Greek yogurt (adds creaminess)
For the Cream Cheese Frosting:
- 8 oz cream cheese, softened
- ½ cup unsalted butter, softened
- 2 ½ cups powdered sugar
- 1 tsp vanilla extract
Optional Garnishes:
- Red velvet cake crumbs
- White chocolate shavings
- Fresh berries
Baking Tools and Equipment
Before diving into the recipe, make sure you’ve got these tools on hand:
- Two 9-inch round cake pans
- Mixing bowls (at least two large)
- Hand mixer or stand mixer
- Rubber spatula
- Whisk
- Measuring cups and spoons
- Parchment paper
- Cooling rack
- Offset spatula (for frosting)
A springform pan is also helpful for baking the cheesecake layer, but not essential.
Step-by-Step Guide to Making Cheesecake and Red Velvet Cake
This dessert brings together the richness of cheesecake and the soft, cocoa-kissed flavor of red velvet cake. Follow these steps for a smooth, professional result.
Step 1: Preheat and Prepare Pans
Preheat your oven to 350°F (175°C) for the cake and 325°F (160°C) for the cheesecake. Use round cake pans for the red velvet layers and a springform pan for the cheesecake. Grease all pans well and line the bottoms with parchment paper to ensure easy release.
Step 2: Mix the Red Velvet Cake Batter
Whisk together flour, cocoa powder, baking soda, and salt. In another bowl, mix butter, sugar, eggs, oil, buttermilk, vanilla, vinegar, and red food coloring. Gradually add the dry ingredients to the wet, mixing just until smooth. The batter should be pourable but not runny. Use gel food coloring for a vibrant red hue.
Step 3: Bake the Red Velvet Cake Layer
Pour the batter into prepared pans and bake at 350°F (175°C) for 25–30 minutes. Test doneness with a toothpick—it should come out clean. Let the cakes cool in the pans for 10 minutes, then transfer to a wire rack to cool completely.
Step 4: Prepare the Cheesecake Layer
Beat cream cheese until smooth, then add sugar and vanilla. Mix gently. Add eggs one at a time, mixing on low speed to avoid incorporating too much air. This helps prevent cracks. A water bath is optional but recommended for even baking.
Step 5: Bake the Cheesecake Layer
Bake at 325°F (160°C) for 40–50 minutes until the center is slightly set. Turn off the oven, crack the door, and let it cool gradually inside before refrigerating for at least 4 hours.
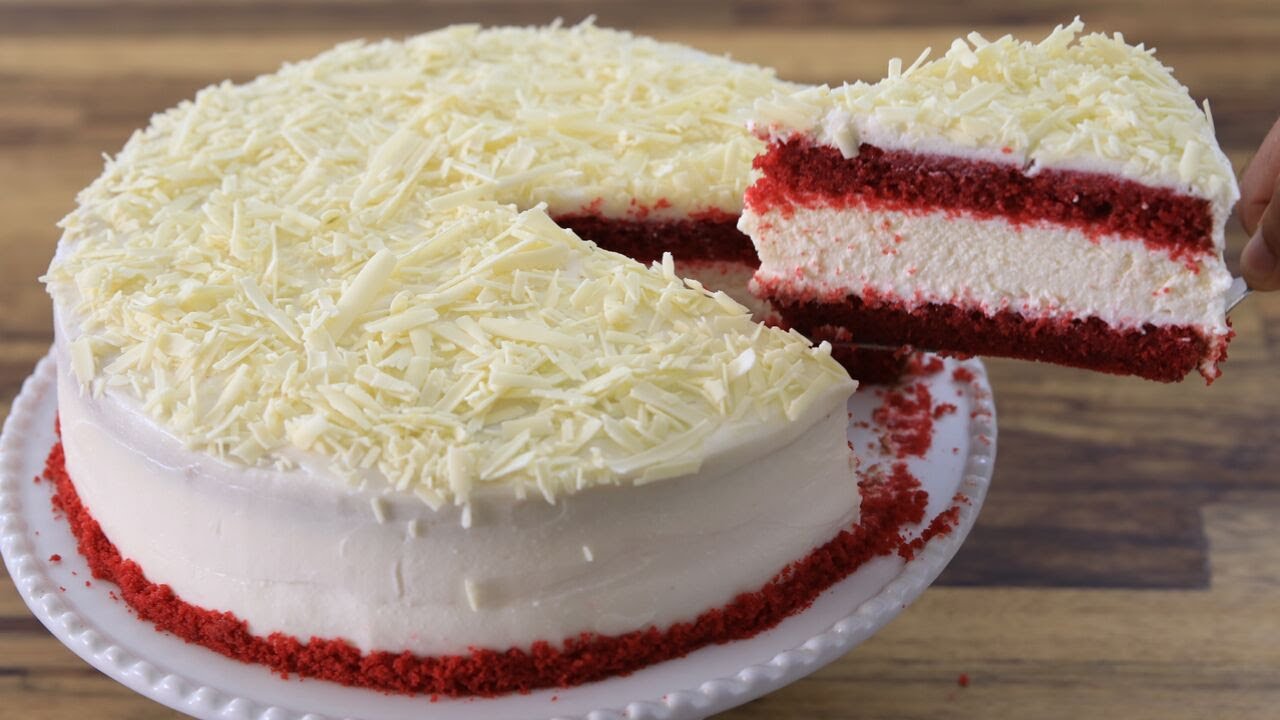
Step 6: Layering the Cake and Cheesecake
Chill both layers completely. Level the cake layers if needed. Place one cake layer down, add the cheesecake layer, then top with the remaining cake layer. Stack gently to keep layers even.
Step 7: Frosting and Decorating
Prepare cream cheese frosting by beating cream cheese, butter, powdered sugar, and vanilla until fluffy. Spread evenly over the cake. Decorate with crumbs, chocolate shavings, or berries.
Step 8: Chilling and Serving
Chill the assembled cake for at least 1 hour before slicing. Use a warm knife for clean cuts. Store covered in the refrigerator for up to 4 days.
Storage:
- Store leftovers in the refrigerator, covered, for up to 5 days
- Freeze individual slices for up to 2 months—just wrap tightly in plastic and foil
Now, all that’s left is to enjoy every delicious, layered bite.
Helpful Tips for Success
- Use room-temperature ingredients for smooth batters and better consistency.
- Don’t skip the chilling time—it makes layering and slicing so much easier.
- Use a springform pan for the cheesecake for easy removal.
- Level your cakes if necessary to get a flat, professional look.
- Make ahead of time—this dessert tastes even better the next day!
Mistakes to avoid:
- Overmixing the cheesecake batter
- Baking at too high a temperature
- Not greasing pans properly
- Rushing the cooling process
Want to switch things up? Keep reading.
Variations of the Recipe
Here are some creative ways to spin this recipe:
1. Mini Red Velvet Cheesecake Cupcakes
Use a muffin tin to make individual servings—perfect for parties and easier to serve.
2. Red Velvet Cheesecake Jars
Layer crumbled cake and cheesecake in mason jars for a trendy, portable treat.
3. Chocolate Ganache Topping
Replace the cream cheese frosting with a smooth layer of chocolate ganache for an extra-rich twist.
4. Gluten-Free Version
Use a 1:1 gluten-free flour blend for the red velvet layer—make sure it’s labeled for baking.
5. No-Frosting Naked Cake
Skip the frosting and go for a minimalist look with powdered sugar and fresh fruit.
Nutritional Information (Approximate Per Slice)
| Nutrient | Amount (per slice) |
|---|---|
| Calories | 450–550 |
| Total Fat | 32g |
| Saturated Fat | 18g |
| Sugar | 35g |
| Protein | 6g |
| Carbohydrates | 45g |
Note: These values will vary depending on portion size and specific ingredients used.
FAQs about Cheesecake and Red Velvet Cake Recipe
1. Can I freeze the cheesecake and red velvet cake?
Yes! You can freeze the layers separately or as a whole cake. Just wrap tightly in plastic and foil. Thaw overnight in the fridge before serving.
2. Can I use boxed red velvet cake mix?
Absolutely. If you’re short on time, a boxed mix works. Just follow the package directions and continue with the cheesecake layer from scratch.
3. How long does it stay fresh in the fridge?
Stored in an airtight container, it stays fresh for about 5 days in the refrigerator.
4. Can I make this gluten-free?
Yes! Just use a 1:1 gluten-free baking flour for the red velvet cake layer. The cheesecake part is naturally gluten-free.
5. What’s the best cream cheese for baking?
Use full-fat, block-style cream cheese—not whipped or spreadable types. Philadelphia is a popular, reliable brand for baking.
Conclusion
Cheesecake and red velvet cake—two beloved desserts that, when combined, create a mouthwatering masterpiece. With a little time, patience, and love, you can bake this stunning layered dessert from scratch right in your own kitchen. It’s perfect for birthdays, holidays, or whenever you’re feeling a little extra.
Don’t be intimidated by the layers or the process. Follow the steps, use quality ingredients, and trust the process. The reward is a jaw-dropping dessert that’s as delicious as it is beautiful.
So go on—bake it, slice it, serve it… and watch it disappear.