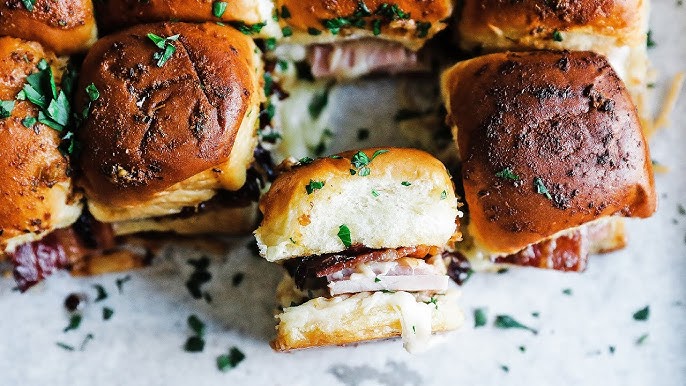
Cheeseburger Sliders Recipe: Cheeseburger sliders are more than just mini burgers—they’re tiny bundles of joy packed with all the flavor of a classic cheeseburger in a handheld, party-friendly size. There’s something so satisfying about grabbing a juicy little burger off a tray at a party or whipping up a quick batch for a fun weeknight dinner. Their small size means they’re perfect for sharing, experimenting with flavors, and stacking up on a plate without feeling too heavy.
Sliders are the kind of food that brings smiles. Whether you’re tailgating, hosting a game night, or just want something indulgent, these mini cheeseburgers deliver big-time flavor with just a few bites. Plus, they’re super customizable, so everyone gets exactly what they like.
Perfect for Any Occasion
Need party food that will have people asking for the recipe? Cheeseburger sliders are the answer. They’re a hit at birthday parties, barbecues, potlucks, or even as a fun twist on dinner. Want to impress guests without spending hours in the kitchen? This recipe is quick, easy, and guaranteed to please. You can prep everything ahead of time and just pop them in the oven or skillet when you’re ready to serve.
Another reason they’re perfect? Kids love them. Adults crave them. They work just as well for a lazy weekend lunch as they do for a busy weeknight dinner. Cheeseburger sliders are your new go-to comfort food, anytime, anywhere.
Ingredients You’ll Need
For the Sliders
To get started on your cheeseburger sliders, gather these basic ingredients. They’re easy to find, and you probably already have some in your kitchen.
- 1 pound ground beef (80/20 for best flavor)
- 12 slider buns or Hawaiian rolls
- 6 slices cheddar cheese (cut into halves)
- 1 small onion, finely diced
- 2 tablespoons butter (for toasting buns)
- 1 tablespoon olive oil
- Salt and pepper to taste
- Pickles (optional)
- Ketchup, mustard, or other sauces (optional)
Ground beef is the hero here, and going for an 80/20 mix (that’s 80% meat, 20% fat) ensures your patties stay juicy and flavorful. The cheese? Classic cheddar is perfect, but you can play around with your favorites. Soft slider buns or sweet Hawaiian rolls add that soft bite that makes these sliders so irresistible.
Optional Add-ons for Extra Flavor
Want to go the extra mile? Try adding these to your lineup:
- Cooked bacon strips
- Jalapeños (fresh or pickled)
- Sautéed mushrooms
- BBQ sauce
- Lettuce and tomato slices
These toppings can transform your sliders from simple to show-stopping. Whether you like it classic or with a spicy twist, sliders are the ultimate canvas for your flavor creativity.
Step-by-Step Instructions
Step 1: Preparing the Beef Patties
Start by dividing your ground beef into 12 equal portions. Roll each portion into a ball and gently flatten it into a small patty, about the same size as your buns. Don’t press too hard—lightly formed patties stay juicier. Season both sides generously with salt and pepper.
Want to kick it up? Mix in a little Worcestershire sauce, garlic powder, or diced onions directly into the beef for extra depth.
Let the patties sit while you prep the rest. Bringing them to room temperature helps them cook more evenly.
Step 2: Toasting the Slider Buns
This step is easy to skip—but don’t! Toasted buns give your sliders a delightful crunch and help keep them from getting soggy.
Heat a skillet over medium heat. Add the butter, and once it melts, place the buns cut side down until they’re golden and crispy. Remove and set aside. Now you’ve got the perfect base for those juicy patties.
Step 3: Cooking the Patties
Add olive oil to the same skillet and heat it up. Place the patties in the pan and cook over medium-high heat for about 2-3 minutes per side. Once you flip them, add half a slice of cheese to each patty and cover the skillet with a lid or foil for a minute to help the cheese melt.
Make sure the internal temperature hits at least 160°F for food safety if you’re not using a meat thermometer. Once the patties are done, transfer them to a plate and let them rest for a couple of minutes.
Step 4: Assembling the Sliders
Time to build! Place the bottom half of each bun on a tray or plate. Add a patty with melted cheese, then stack on your favorite toppings—maybe a pickle slice, a dab of ketchup, or a drizzle of mustard. Finish with the top bun and press down gently to bring it all together.
Now step back and admire your work—then dig in!
Tips to Make the Best Cheeseburger Sliders
Choosing the Right Ground Beef
When it comes to sliders, the beef you choose makes a huge difference. Always go for 80/20 ground beef—that’s 80% lean meat and 20% fat. Why? Because that fat is the key to juicy, flavorful patties. Too lean, and your sliders will be dry and crumbly. Too fatty, and they’ll shrink too much and be greasy.
Also, don’t overwork the beef when forming patties. Mix just enough to combine any seasoning and gently shape them. Overhandling the meat leads to tough sliders, and nobody wants that.
And one more thing—don’t skip seasoning! A simple sprinkle of kosher salt and black pepper goes a long way. Want a little extra depth? Add a dash of garlic powder, onion powder, or even a few drops of Worcestershire sauce.
Cheese Matters
Let’s talk cheese. While classic American or cheddar cheese works beautifully, there are other choices that can really elevate your sliders. Here are some to consider:
- Pepper Jack for a spicy kick.
- Swiss for a smooth, nutty flavor.
- Blue cheese if you’re feeling bold.
- Provolone for a milder, gooey melt.
Don’t be shy about experimenting. And be sure to add your cheese as soon as you flip the patties so it melts into that dreamy, gooey goodness we all love.
To help the cheese melt better, place a lid over the skillet for the last 30 seconds of cooking. This traps the steam and softens the cheese perfectly.
Creative Variations to Try
Bacon Cheeseburger Sliders
Add crispy bacon to your sliders for an irresistible crunch and smoky flavor. Cook bacon strips ahead of time until golden and crisp, then break them into smaller pieces to fit your slider buns. Stack them on top of your cheesy patty before adding the bun.
You can even use candied bacon for a sweet-savory twist that’ll blow your guests away. Just brush bacon with brown sugar and bake—it’s next-level slider magic.
Spicy Jalapeño Sliders
Love heat? Add jalapeños to your sliders for a spicy punch. Use fresh jalapeño slices or pickled jalapeños depending on your preference. They pair beautifully with Pepper Jack cheese and a drizzle of chipotle mayo or Sriracha.
Want to turn the heat up even more? Add a few dashes of hot sauce to the beef mix before forming patties, or grill the jalapeños for a smoky twist.
Other spicy toppings you can try:
- Spicy mustard
- Hot sauce aioli
- Habanero cheddar cheese
Whether you’re serving spice lovers or just want a fun variation, jalapeño sliders never disappoint.
Serving Suggestions
Sides that Complement Sliders
No slider feast is complete without some amazing sides. Whether you’re serving a crowd or having a cozy dinner, these pairings turn your sliders into a full-on meal:
- French fries – Classic and always a favorite. Try curly fries or sweet potato fries for a fun twist.
- Onion rings – Crunchy, golden, and oh-so-satisfying.
- Coleslaw – Adds a cool, tangy crunch to balance the richness of the beef.
- Potato salad – Creamy and comforting, perfect for BBQs and potlucks.
- Mac and cheese – A warm, cheesy side dish that’s a hit with kids and adults alike.
Want to go lighter? Serve your sliders with a fresh garden salad, cucumber tomato salad, or some grilled veggies to balance things out.
And don’t forget the drinks! Ice-cold soda, lemonade, or even a craft beer make the perfect slider companion.
How to Store and Reheat
Leftovers? No problem—cheeseburger sliders store well and are just as tasty the next day.
Storing:
- Let sliders cool completely.
- Wrap them individually in foil or plastic wrap.
- Store in an airtight container in the fridge for up to 3 days.
Reheating:
- Oven: Preheat to 350°F. Place wrapped sliders on a baking sheet and heat for 10–12 minutes.
- Microwave: Wrap in a damp paper towel and microwave for 30–60 seconds. They won’t be as crispy, but it works in a pinch.
- Skillet: Reheat sliders in a skillet over medium heat for a few minutes until heated through.
Want that fresh-toasted taste? Quickly toast the buns again in buttered skillet after reheating. Adds back the crisp!
FAQs about Cheeseburger Sliders Recipe
Q1: Can I bake the sliders instead of pan-frying them?
Yes! Arrange patties on a baking sheet and bake at 375°F for about 10–12 minutes. Add cheese in the last few minutes to melt.
Q2: What kind of buns are best for sliders?
Soft slider buns or Hawaiian rolls are perfect. They’re fluffy, slightly sweet, and just the right size.
Q3: Can I freeze sliders?
Absolutely. Cook the patties, cool completely, then freeze them. Assemble the sliders fresh when you’re ready to serve.
Q4: What’s the best cheese to use?
Cheddar, American, or Pepper Jack are great choices, but feel free to experiment with whatever melts well.
Q5: Can I make sliders ahead of time for a party?
Yes, you can cook the patties and prep toppings in advance. Just assemble and warm them up before serving.
Conclusion
Cheeseburger sliders are the ultimate crowd-pleasing, comfort-food favorite. They’re easy to make, endlessly customizable, and perfect for everything from game day to family dinner. Whether you go classic or load them up with bacon and jalapeños, these mini burgers pack serious flavor in every bite.
So fire up the skillet, grab your buns, and start building your new go-to meal. Once you’ve tried these cheeseburger sliders, they’re sure to become a regular on your menu!