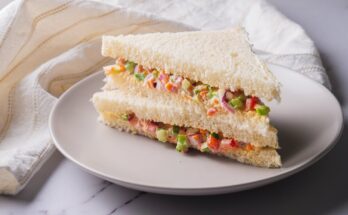
Cheese Straws Recipe: Cheese straws are the ultimate savory treat. Think buttery, flaky, cheesy goodness that melts in your mouth with just the right amount of crunch. Whether you’re throwing a party, need a midday snack, or want to impress guests with a homemade appetizer, cheese straws check all the boxes. They’re easy to make, incredibly customizable, and let’s face it—once you have one, you’ll be reaching for another.
These golden strips of cheesy bliss originated in the South but have taken over tables everywhere. And it’s no surprise why. Made with just a few basic ingredients—cheese, butter, flour, and spices—they’re the definition of simple perfection.
In this guide, you’ll get everything you need to master cheese straws, from ingredients and tools to detailed step-by-step instructions and even some flavor twists to keep things interesting.
Ingredients You’ll Need
To whip up a batch of classic cheese straws, you don’t need anything fancy. Most ingredients are likely already in your kitchen. Here’s what goes into the magic:
- Sharp Cheddar Cheese (2 cups, shredded) – Sharp is best for that bold flavor punch.
- All-Purpose Flour (1½ cups) – Forms the structure of your dough.
- Unsalted Butter (½ cup, chilled and cubed) – Adds richness and helps with flakiness.
- Salt (½ tsp) – Enhances flavor.
- Cayenne Pepper (¼ tsp) – For a gentle kick. Add more if you like heat.
- Paprika (½ tsp) – Optional, but great for color and depth.
- Cold Water (1–2 tbsp) – Helps bring the dough together.
Optional Add-Ins:
- Garlic powder, onion powder, black pepper
- Parmesan or Gruyère for extra flavor
- Fresh herbs like thyme or rosemary for an aromatic twist
These ingredients come together in harmony to create something far more exciting than the sum of its parts.
Tools and Equipment
Before you dive into baking, let’s get your workstation set up. You don’t need high-end gear, but the right tools can make the process smoother:
- Food Processor or Pastry Cutter – For mixing the dough quickly and evenly.
- Mixing Bowl – If mixing by hand.
- Rolling Pin – To flatten the dough.
- Parchment Paper or Silicone Baking Mat – For a non-stick surface.
- Baking Sheet – Preferably heavy-duty for even heat distribution.
- Sharp Knife or Pizza Cutter – To slice the dough into strips.
- Cooling Rack – To cool the straws evenly after baking.
Having these items ready ensures a seamless and fun baking experience from start to finish.
Step-by-Step Instructions
Step 1 – Prepare Your Ingredients
Start by grating your cheese if you haven’t done so already. Avoid pre-shredded cheese—it’s often coated with anti-caking agents that can interfere with texture. Use a block of sharp cheddar and grate it fresh for the best results.
Measure your dry ingredients and spices. This includes your flour, salt, cayenne pepper, and any optional seasonings. Keeping everything pre-measured makes the process more efficient and minimizes mess.
Make sure your butter is cold and cubed. If it’s too soft, the dough won’t have that flaky texture we’re after. You can even pop it in the freezer for 10 minutes beforehand.
Step 2 – Make the Dough
In a food processor, combine your flour, salt, cayenne, and other dry seasonings. Pulse a few times to mix evenly. Add in the cold butter and pulse until the mixture resembles coarse crumbs—like wet sand.
Next, add the shredded cheese and pulse again until well combined. Slowly drizzle in cold water, one tablespoon at a time, and pulse until the dough begins to clump together. You don’t want it sticky—just moist enough to hold its shape when pressed.
If you’re mixing by hand, use a pastry cutter or fork to cut the butter into the flour, then mix in the cheese and water gradually.
Once the dough is ready, shape it into a disc, wrap it in plastic wrap, and chill it in the fridge for 30 minutes. This makes it easier to roll out and helps with texture.
Step 3 – Roll and Cut the Dough
After the dough has chilled for at least 30 minutes, it’s time to roll it out. Lightly flour your work surface and your rolling pin to prevent sticking. Roll the dough out to about 1/8 to 1/4 inch thickness—any thinner and it might burn, too thick and it won’t get that signature crunch.
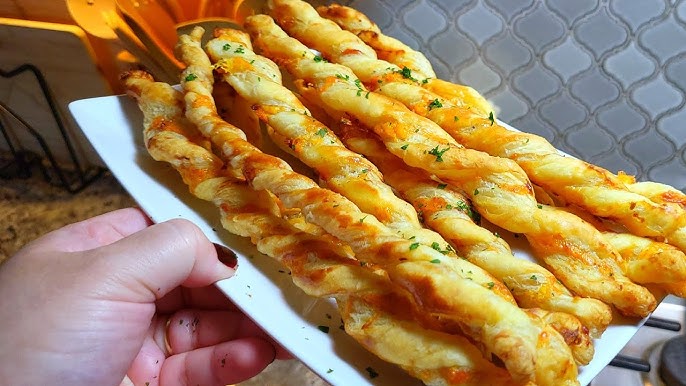
Now for the fun part—cutting. You can stick to the classic straight cheese straw by slicing the dough into strips about 1/2 inch wide and 4 to 6 inches long using a sharp knife, pizza cutter, or even a fluted pastry wheel if you want those pretty edges. For a twist—literally—grab each end of a strip and gently twist it into a spiral before placing it on your baking sheet.
Feeling creative? Use cookie cutters for different shapes like stars or hearts—especially fun for parties or holiday platters.
Place the strips on your parchment-lined baking sheet, spacing them about 1 inch apart to allow for even baking. If you want an extra golden finish, brush them lightly with a beaten egg before baking.
Step 4 – Bake to Perfection
Preheat your oven to 375°F (190°C) while your cheese straws are getting ready for the oven. Once it’s up to temp, bake the cheese straws for 12 to 15 minutes, or until they’re golden brown around the edges.
Keep an eye on them—ovens can vary, and cheese burns quickly. You’re looking for crispy, firm straws with slightly puffed edges and a deep golden hue.
For best results, bake one sheet at a time in the center of the oven. Rotate the tray halfway through baking to ensure even browning.
Once done, remove the tray and let the cheese straws cool on the baking sheet for a couple of minutes. Then transfer them to a wire rack to cool completely. They’ll crisp up more as they cool.
Step 5 – Cool and Serve
Once your cheese straws have cooled, it’s time to enjoy the fruits of your labor. These savory sticks are great served as-is, or you can plate them with dips like ranch, marinara, or even spicy mustard for a flavor kick.
If you’re serving at a party, arrange them in a tall glass or jar for a stunning, edible centerpiece. Hosting a brunch? Pair them with mimosas or Bloody Marys. Need a late-night snack? Cheese straws and a glass of wine are a match made in heaven.
Pro tip: Make extra. These go fast. Like, shockingly fast. You’ll thank yourself later.
Flavor Variations
The beauty of cheese straws is how easy they are to customize. Want a spicy snack? Add more cayenne or toss in some chili flakes. Craving a gourmet twist? Mix in herbs or swap the cheese. Here are a few fun flavor variations to try:
- Spicy Jalapeño Cheese Straws – Add finely chopped pickled jalapeños and extra cayenne.
- Herb & Garlic – Mix in garlic powder and chopped rosemary or thyme.
- Smoky Bacon – Add a bit of smoked paprika and finely crumbled cooked bacon.
- Parmesan Black Pepper – Swap cheddar for parmesan and load up on cracked black pepper.
- Sweet and Savory – Add a teaspoon of sugar and a pinch of cinnamon to cheddar for a sweet-savory combo.
Get creative! The possibilities are endless and allow you to tailor the recipe to any event or mood.
Serving Suggestions
Cheese straws are versatile and can elevate any occasion, from laid-back gatherings to elegant soirées. Here’s how you can serve them to impress and satisfy any crowd:
- Party Platter Hero: Arrange cheese straws on a charcuterie board with cured meats, olives, pickles, and an assortment of cheeses. They add crunch and a burst of flavor that complements richer, softer elements on the board.
- Soups and Salads Sidekick: Replace boring breadsticks with cheese straws next to creamy tomato soup, hearty minestrone, or a crisp Caesar salad. They provide a savory contrast and a satisfying texture.
- Breakfast Companion: Serve with eggs and bacon for a Southern twist on breakfast. Or pair them with a creamy scramble for an indulgent weekend brunch.
- Cocktail Pairing: Cheese straws go exceptionally well with cocktails and wine. A crisp white wine like Sauvignon Blanc or a sparkling wine like Prosecco complements the saltiness and richness perfectly. For beer lovers, try them with an IPA or a light lager.
- Dips and Spreads: Use cheese straws as dippers for hummus, artichoke dip, cheese fondue, or spinach dip. They’re sturdy enough to handle thick dips and tasty enough to hold their own.
Their crisp texture and cheesy flavor make them a crowd favorite, no matter how you choose to serve them.
Storage Tips
Cheese straws are best fresh out of the oven, but with proper storage, they can maintain their crunch and flavor for several days:
- Room Temperature: Store cooled cheese straws in an airtight container at room temperature. They’ll stay crisp for up to 3–5 days. Add a paper towel at the bottom to absorb moisture.
- Re-crisping Tip: If they start to lose their crunch, pop them in a 350°F (175°C) oven for 5 minutes to bring back the crispiness.
- Freezing: Yes, cheese straws freeze well! Let them cool completely, then place in a freezer-safe bag or container. Reheat in the oven for 8–10 minutes when ready to serve. This is especially handy for prepping ahead for parties or holidays.
- Avoid Refrigeration: It tends to make them soft and chewy—not ideal for a crispy snack.
Common Mistakes to Avoid
Even a simple recipe like cheese straws can go sideways if you’re not careful. Here are the top blunders to watch out for—and how to sidestep them:
- Using Pre-Shredded Cheese: These are coated in anti-caking agents that can mess with the texture. Always use freshly grated cheese.
- Overworking the Dough: It can make the straws tough instead of flaky. Mix until just combined.
- Too Much Water: Your dough should be just moist enough to hold together. Too much liquid makes it sticky and hard to work with.
- Skipping the Chill Time: Cold dough bakes better and results in a crisper texture. Don’t skip this step!
- Baking at Too High or Low Temperature: Stick to 375°F (190°C). Too low and they’ll be pale and soft; too high and they’ll burn before cooking through.
- Not Spacing the Strips Properly: Give them room to bake evenly and avoid sticking.
Avoid these pitfalls, and you’ll be cranking out bakery-worthy cheese straws every time.
Nutritional Info
Here’s a rough estimate of the nutrition in one cheese straw (based on a standard recipe and assuming about 24 straws per batch):
| Nutrient | Amount (per straw) |
|---|---|
| Calories | 80–100 |
| Total Fat | 7g |
| Saturated Fat | 4g |
| Cholesterol | 15mg |
| Sodium | 100–150mg |
| Carbohydrates | 4–6g |
| Protein | 2–3g |
Keep in mind, adding ingredients like bacon or extra cheese will alter these numbers. You can also lighten the recipe using reduced-fat cheese or whole wheat flour for a healthier version.
FAQs about Cheese Straws Recipe
Q1: Can I make cheese straws ahead of time?
Yes! Cheese straws can be baked and stored in an airtight container at room temperature for up to 3 days. For longer storage, freeze them and re-crisp in the oven when needed.
Q2: What’s the best cheese for cheese straws?
Sharp cheddar is the classic choice for bold flavor. But you can mix things up with Parmesan, Gruyère, or a spicy pepper jack for a twist.
Q3: Why are my cheese straws not crispy?
Too much moisture in the dough or underbaking can lead to soft straws. Make sure to bake until golden and cool completely before storing.
Q4: Can I use puff pastry instead of making dough from scratch?
Absolutely! Puff pastry makes a super quick and flaky alternative. Just sprinkle with cheese, twist, and bake.
Q5: Are cheese straws spicy?
They can be! A dash of cayenne or paprika adds a gentle kick. Dial it up or down to your taste.
Conclusion
Cheese straws are a delightful mix of buttery, cheesy, and crunchy goodness that can be whipped up with just a handful of ingredients. They’re the perfect party snack, appetizer, or everyday treat that appeals to both kids and adults. Whether you stick to the classic version or venture into spicy or herby territory, one thing’s for sure—cheese straws never disappoint.
So go ahead, gather your ingredients, and roll up your sleeves. Once you bake your first batch, they’ll become a staple in your kitchen, perfect for every occasion from holiday feasts to lazy Sunday snacks.