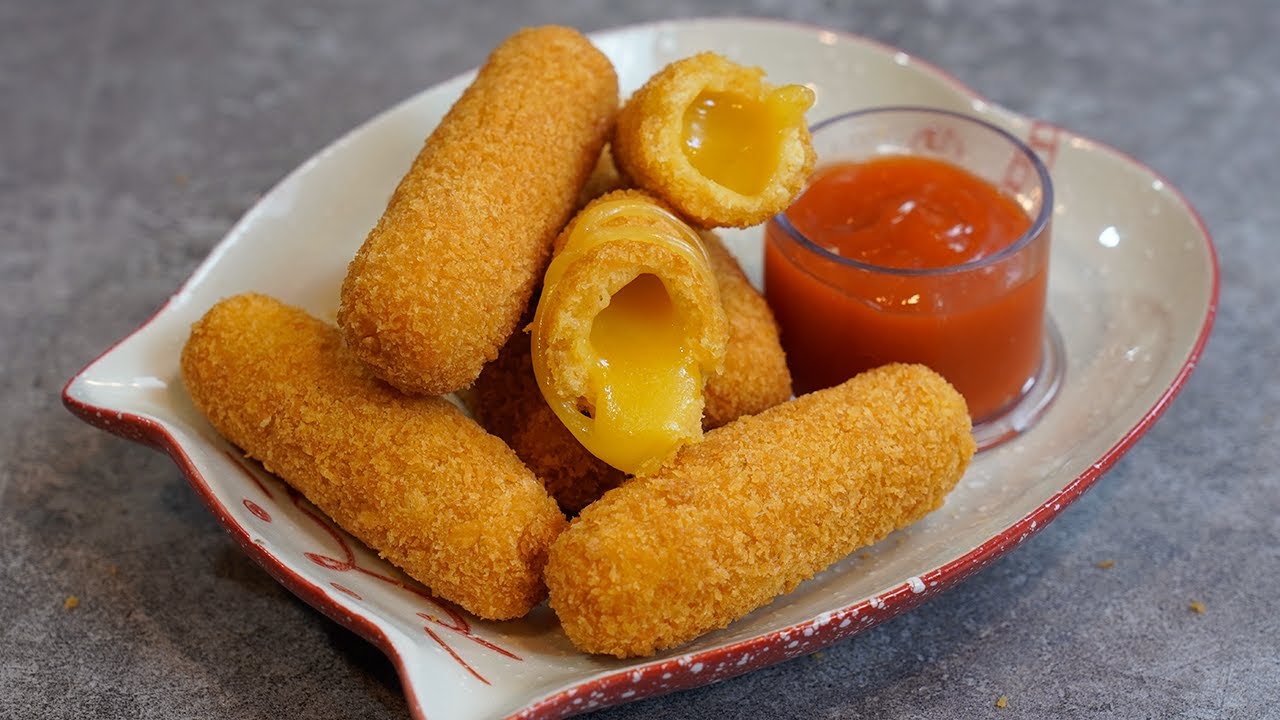
Cheese Sticks Recipe: Cheese sticks might just be the ultimate comfort snack. Gooey on the inside, crispy on the outside, and perfect with your favorite dipping sauce—what’s not to love? But when you make them at home, you’re not just getting that melty deliciousness. You’re also taking full control over flavor, ingredients, and freshness. Whether you want to use high-quality mozzarella, experiment with different cheeses, or avoid unnecessary preservatives and additives, homemade cheese sticks put the power back in your hands.
Store-bought cheese sticks can be convenient, but they often come with artificial coatings, mystery oils, and a texture that’s more chewy than crunchy. Homemade ones, on the other hand, give you that golden-brown, perfectly crisp crust every time—especially if you follow the right techniques.
Also, let’s be honest: making cheese sticks from scratch is just fun. From dunking them in breading to seeing the cheese stretch as you take your first bite, it’s a rewarding kitchen experience that satisfies like nothing else.
Benefits of Homemade Over Store-Bought
- Better Taste: Fresh cheese, crispier breading, and no artificial aftertaste.
- Customizable: Add herbs, spices, or even stuff them with extras like jalapeños or pepperoni.
- Healthier: Skip the preservatives, control the oil quality, and bake them if you’re cutting back on fried foods.
- Budget-Friendly: You can make a big batch for a fraction of the cost of buying frozen ones.
- Impressive for Guests: They’re a crowd-pleaser and great for parties or family gatherings.
List of Ingredients You’ll Need
Core Ingredients
Let’s break down what you need to make the perfect cheese sticks:
- Cheese (preferably mozzarella sticks) – You can use a block of mozzarella cut into sticks or pre-cut string cheese.
- All-purpose flour – This helps the egg stick to the cheese.
- Eggs – Used to bind the breadcrumbs to the cheese.
- Breadcrumbs – Regular or panko breadcrumbs will work. Panko gives a crunchier result.
- Seasonings – Garlic powder, onion powder, Italian seasoning, salt, and pepper.
- Oil for frying – Vegetable oil, canola oil, or peanut oil work best.
That’s your basic setup. It’s simple, but when done right, it creates magic.
Optional Add-ons for Extra Flavor
- Parmesan cheese – Mix it into the breadcrumbs for a salty, nutty twist.
- Smoked paprika or chili flakes – Add a little kick.
- Fresh herbs – Like chopped parsley or basil for garnish.
- Buttermilk – Use in place of eggs for a tangier taste.
Best Cheeses to Use
While mozzarella is the classic go-to (and for good reason—it’s super stretchy and melts like a dream), you can try these alternatives:
- Cheddar – Sharp and flavorful, but less stretchy.
- Pepper Jack – For a bit of spice.
- Provolone – Milder but creamy.
- Gouda – Adds a smoky flavor if using the smoked variety.
Each cheese brings its own texture and flavor, so don’t be afraid to mix and match.
Kitchen Tools and Equipment
Must-Have Tools
You don’t need a commercial kitchen to make killer cheese sticks. Here’s what you’ll need:
- Cutting board and knife – For slicing cheese if not using string cheese.
- Three shallow bowls – For flour, egg wash, and breadcrumbs.
- Tongs – For dipping and frying.
- Baking sheet with parchment paper – For freezing the breaded sticks before frying.
- Deep frying pan or deep fryer – To cook them golden brown.
- Paper towels or wire rack – To drain excess oil.
Alternatives If You Don’t Have Specialized Gear
- No deep fryer? A heavy-bottomed skillet works fine.
- No tongs? Use a fork or even your hands (but it gets messy).
- No parchment paper? Use foil or wax paper lightly greased with oil.
The key is to have a clean, organized setup before you start. It’ll make the process smoother and keep your coating from falling apart.
Step-by-Step Guide to Making Cheese Sticks
Step 1: Prepare the Cheese
First, unwrap your mozzarella string cheese or slice your cheese block into sticks about 3-4 inches long and ½ inch thick. Uniform size helps them cook evenly.
Tip: Place the cheese sticks in the freezer for 30-60 minutes before breading. This is crucial. It keeps the cheese from melting too quickly and leaking out while frying.
Also, dry them lightly with a paper towel. Excess moisture makes the breading slip off.
Step 2: Set Up Breading Stations
Grab three shallow bowls:
- First bowl: Add ½ cup all-purpose flour + a pinch of salt and pepper.
- Second bowl: Beat 2 eggs with a splash of water or milk.
- Third bowl: Mix 1 cup breadcrumbs with 1 tsp garlic powder, 1 tsp Italian seasoning, and optional ¼ cup grated Parmesan.
This setup makes your breading process fast and foolproof.
Step 3: Bread the Cheese Sticks
Now that your cheese is prepped and cold and your stations are set up, it’s time to coat those bad boys. Here’s the process you should follow:
- Roll the cheese stick in flour. Make sure it’s fully coated—this creates a dry surface that helps the egg stick.
- Dip into the egg wash. Coat it completely. This acts as the glue for your breadcrumbs.
- Roll in seasoned breadcrumbs. Press the breadcrumbs firmly onto the cheese stick. Don’t be shy—get in there and make sure it sticks!
- Repeat the egg and breadcrumb step. Yes, double-dipping is the secret. It forms a thicker, crunchier crust and ensures zero cheese leakage during frying.
Once they’re breaded, place each stick on a parchment-lined tray. Try not to stack them or they’ll stick together.
Pro Tip:
Pop the breaded cheese sticks back in the freezer for at least 1 hour. This is non-negotiable if you want them to hold their shape and avoid a gooey, leaky mess during cooking.
Step 4: Freeze Before Frying
We touched on this already, but it’s so important it deserves its own section. Freezing isn’t just a suggestion—it’s mandatory for success.
Why? Because cheese melts FAST. If your oil is hot and the cheese isn’t cold, it’ll start to ooze out before the crust has a chance to crisp up. Not good.
Here’s how to do it right:
- Lay your breaded sticks in a single layer on a baking sheet.
- Don’t stack or overcrowd them.
- Cover loosely with plastic wrap or foil.
- Freeze for 1–2 hours minimum, or even overnight for later use.
This step also makes it easier to fry in batches without stressing about cheese explosions. If you’re making a party-sized batch, this is the way to go.
Step 5: Fry to Perfection
Ready to fry? Let’s go!
Here’s how to get that perfect golden crunch:
- Heat oil in a deep frying pan or fryer to 350°F (175°C). Use a thermometer if possible to keep it accurate. Too hot and your crust will burn before the cheese melts; too cool and the breading soaks up oil like a sponge.
- Work in small batches. Fry 3–4 sticks at a time to avoid lowering the oil temperature.
- Fry each stick for 1 to 2 minutes, turning gently to brown all sides evenly.
- Remove with tongs or a slotted spoon and drain on paper towels or a wire rack.
You’ll know they’re done when they’re golden, crispy, and slightly puffed. Don’t overcook—just long enough for the outside to brown and the inside to get perfectly melty.
Caution: Be careful when biting into freshly fried cheese sticks. The cheese will be molten hot and could burn your mouth. Give them a minute to cool slightly before serving.
Baking Option for a Healthier Version
How to Bake Cheese Sticks Instead of Frying
If you’re trying to cut down on calories or just want a lighter snack, baking your cheese sticks is a great option. While you won’t get quite the same crunch as deep frying, you can still achieve a satisfyingly crispy result.
Here’s how to do it:
- Preheat your oven to 400°F (200°C).
- Line a baking sheet with parchment paper or a silicone mat and lightly coat it with cooking spray.
- Arrange your frozen cheese sticks in a single layer, spaced apart.
- Lightly spray the tops with cooking spray for better browning.
- Bake for 8 to 10 minutes, turning halfway through. Watch closely near the end to prevent cheese leaks.
Baking takes a bit longer, but it’s super easy and less messy. It also frees you up from dealing with hot oil and cleanup.
Tips for Achieving Crispiness in the Oven
- Use panko breadcrumbs. They stay crispier than traditional breadcrumbs.
- Double coat with egg and crumbs. Don’t skip this!
- Freeze well before baking. This gives the cheese time to melt slowly while the coating crisps.
- Use convection setting if your oven has it—it helps air circulate and crisps better.
Want them even crispier? Try this hack: mix 1 tablespoon of olive oil into the breadcrumbs before coating. It helps with browning and adds richness without the deep fry.
Air Fryer Method (Quick & Easy)
Time and Temperature Settings
If there’s one kitchen gadget that’s changed the game for snack lovers, it’s the air fryer. Making cheese sticks in the air fryer is not only quick and easy—it also gives you that perfect crispy exterior with significantly less oil. If you’re looking to enjoy your favorite comfort food without the guilt, this is the way to go.
Here’s a foolproof method:
- Preheat your air fryer to 390°F (200°C) – Preheating ensures the cheese sticks cook evenly and get that golden-brown crunch.
- Place the frozen cheese sticks in the air fryer basket in a single layer. Don’t overcrowd them, or they’ll steam instead of crisp.
- Spray lightly with cooking oil – This helps achieve an even crispiness on all sides.
- Cook for 6 to 8 minutes, flipping halfway through. Keep a close eye around the 6-minute mark to avoid cheese leakage.
Once done, let them rest for a minute, then serve with your favorite dip.
Air Fryer vs Traditional Frying
| Feature | Air Fryer | Deep Frying |
|---|---|---|
| Oil Usage | Minimal (1-2 tsp spray) | High (cups of oil) |
| Cooking Time | 6–8 minutes | 1–2 minutes |
| Crispiness | Slightly less crispy, but very satisfying | Maximum crunch and texture |
| Health Factor | Lower fat and calories | Higher fat content |
| Mess & Cleanup | Easy and clean | Greasy and time-consuming |
| Flavor | Slightly less rich, still very tasty | Richer, traditional flavor |
Air fryers provide a fantastic middle ground—quick, healthier, and still delicious. Plus, no need to worry about oil splatters or disposal.
Dipping Sauces to Pair With Cheese Sticks
Classic Marinara
When you think of cheese sticks, your taste buds probably scream “marinara sauce!” This pairing is a classic for a reason. The tangy tomato base perfectly complements the rich, gooey cheese.
Here’s a simple homemade version:
Ingredients:
- 1 cup crushed tomatoes
- 2 cloves garlic (minced)
- 1 tbsp olive oil
- ½ tsp dried oregano
- Salt and sugar to taste
Directions:
- Heat oil in a pan, sauté garlic until fragrant.
- Add tomatoes, oregano, salt, and a pinch of sugar.
- Simmer for 10–15 minutes. Blend if desired for smoothness.
This sauce is perfect for dipping, and you can store leftovers in the fridge for up to a week.
Garlic Ranch Dip
Love ranch? Elevate it with a touch of garlic and herbs. The creaminess of ranch cools down the heat from fried cheese sticks, making it a match made in heaven.
Quick Recipe:
- ½ cup mayo
- ½ cup sour cream
- 1 clove garlic (grated)
- 1 tsp chopped dill
- ½ tsp onion powder
- Salt and pepper to taste
Mix all ingredients and chill for 30 minutes before serving.
Spicy Mayo Blend
Want a little kick? Mix together:
- ½ cup mayonnaise
- 1 tbsp sriracha (or hot sauce of your choice)
- 1 tsp lemon juice
This spicy mayo adds a bold punch and works especially well with cheddar or pepper jack cheese sticks. Add some honey if you want a sweet-spicy twist.
Tips and Tricks for Perfect Cheese Sticks
How to Prevent Cheese from Leaking
The biggest frustration when making cheese sticks? That dreaded cheese blowout—where the gooey center leaks out, ruining your crispy coating.
Here’s how to avoid it:
- Freeze thoroughly after breading. The longer they’re frozen, the better they hold up during cooking.
- Double coat with breadcrumbs. Don’t skip the second dip—it acts like armor.
- Don’t overcook. Whether frying, baking, or air frying, stick to the recommended time and keep a close watch.
- Use low-moisture mozzarella. High-moisture cheese tends to melt and run more quickly.
Secrets for Extra Crispy Coating
- Panko breadcrumbs are your best friend. Their large flakes crisp up beautifully.
- Mix in Parmesan cheese or crushed cornflakes with your breadcrumbs for extra crunch and flavor.
- Add a tiny drizzle of oil to your breadcrumbs before coating the cheese. It preps the coating to brown better, even in an oven or air fryer.
Also, always let your fried cheese sticks drain on a wire rack instead of paper towels. Paper towels trap steam and make them soggy. A rack allows airflow, keeping them nice and crispy.
Storage and Reheating Tips
How to Store Leftovers
Made too many? No worries—cheese sticks are easy to store and reheat later.
To store uncooked sticks:
- Place them on a baking sheet in a single layer and freeze for 1 hour.
- Then transfer them to a zip-top freezer bag.
- Label with date and use within 1–2 months.
To store cooked cheese sticks:
- Let them cool completely.
- Store in an airtight container in the fridge for up to 3 days.
- Avoid stacking them, or place parchment between layers.
Best Way to Reheat Without Getting Soggy
Want that fresh-out-of-the-fryer crunch? Reheating is key.
- Air Fryer: Best option. Cook at 350°F (175°C) for 4–5 minutes.
- Oven/Toaster Oven: Bake at 375°F (190°C) for 6–8 minutes on a rack.
- Skillet: Pan-fry on medium heat, turning often, for a quick re-crisp.
- Avoid the microwave. It makes the coating soggy and the cheese rubbery.
For frozen cheese sticks, always reheat from frozen for best results—don’t thaw them first.
Creative Variations You’ll Love
Mozzarella & Pepperoni Cheese Sticks
If you’re a fan of pizza (and let’s be real, who isn’t?), then this variation is going to blow your mind. Adding pepperoni slices to your cheese sticks gives them a bold, savory twist that feels like a snack-sized pizza in every bite.
Here’s how to do it:
- Before breading your cheese stick, slice it lengthwise halfway through and tuck in a few mini pepperoni slices.
- Press it back together, making sure the cheese holds.
- Proceed with the flour, egg, and breadcrumb coating.
- Freeze and cook as normal.
These are perfect for game days, kids’ parties, or anytime you want a cheese stick that packs a little more punch.
You can even take it a step further and dip them in warm pizza sauce instead of marinara. It’s an addictive combo that disappears fast—so make extra!
Jalapeño Cheddar Cheese Sticks
Like it hot? Spice things up with jalapeño cheddar cheese sticks. This version combines the smooth sharpness of cheddar with the heat of fresh jalapeños.
How to make them:
- Use cheddar cheese sticks or slices from a block of sharp cheddar.
- Place a thin strip of jalapeño (seeds removed for milder heat) alongside the cheese.
- Wrap the combo in plastic wrap and freeze for 15–30 minutes before breading.
- Bread, freeze again, then fry or bake as usual.
For extra kick, serve with spicy ranch or chipotle mayo. These are a hit at adult parties or for anyone who likes their snacks with attitude.
Other creative options:
- Bacon-wrapped cheese sticks
- Truffle oil in breadcrumbs for gourmet flavor
- Herb-infused cheese like rosemary gouda
The possibilities are endless—get creative and make it your own!
Serving Suggestions
Great Pairings for Cheese Sticks
Cheese sticks are fantastic on their own, but pairing them with other items can turn them into a full snack spread or a party platter.
Here are some great ideas:
- Slider-style burgers with cheese sticks on the side
- Buffalo wings and cheese sticks for a game day combo
- Mini meatballs and cheese sticks with marinara for dipping both
- Fresh veggie sticks and ranch dip to balance the richness
- Loaded nachos and cheese sticks for a Tex-Mex twist
They also make a great side dish for:
- Tomato soup
- Grilled sandwiches
- Salads (trust us, it works!)
For entertaining, arrange them on a platter with several dipping sauces and toothpicks. It’s easy, fun, and disappears in minutes.
Turning Cheese Sticks into a Full Meal
Think cheese sticks are just an appetizer? Think again. With a few smart additions, you can easily make them the centerpiece of a full meal:
Cheese Stick Sub Sandwich:
- Toasted hoagie roll
- Marinara sauce
- 2–3 cheese sticks
- Fresh basil and arugula
Cheese Stick Tacos:
- Warm tortillas
- Sliced cheese sticks
- Pico de gallo and sour cream
- Avocado or guacamole
Cheese Stick Salad Bowl:
- Mixed greens
- Sliced cherry tomatoes
- Crispy cheese stick bites
- Balsamic glaze drizzle
Don’t limit yourself—cheese sticks can be the star of any plate when paired thoughtfully.
Nutritional Information (Approximate)
Calories, Fats, Carbs, and Proteins
Let’s talk numbers. While cheese sticks are definitely an indulgence, knowing the nutrition breakdown helps you enjoy them responsibly.
Here’s an average per fried mozzarella cheese stick (1 piece):
| Nutrient | Amount |
|---|---|
| Calories | 90–110 kcal |
| Total Fat | 6–8g |
| Saturated Fat | 3–4g |
| Carbohydrates | 6–10g |
| Protein | 5–7g |
| Sodium | 150–250mg |
Note: These numbers vary based on cheese type, breading thickness, and cooking method. Baking or air frying can cut the fat almost in half compared to deep frying.
Healthier Substitutions
Trying to enjoy cheese sticks while keeping things lighter? No problem. Here are a few swaps:
- Use low-fat or part-skim mozzarella
- Bake or air fry instead of deep frying
- Replace regular breadcrumbs with whole wheat panko
- Add flaxseed or chia seeds to the breadcrumb mix for extra fiber
- Pair with a yogurt-based dip instead of heavy mayo or sour cream sauces
You can also experiment with plant-based cheese and gluten-free coatings if you have dietary restrictions.
FAQs about Cheese Sticks Recipe
1. How long do homemade cheese sticks last?
Uncooked, frozen cheese sticks can last up to 2 months in the freezer. Cooked leftovers will stay fresh for 2–3 days in the fridge.
2. Can I prep them in advance?
Yes! Bread them and freeze them. When you’re ready to enjoy, just cook straight from frozen.
3. Why are my cheese sticks leaking?
Usually due to not freezing them long enough or skipping the double breading step. Make sure to follow the freezing instructions to the letter.
4. What’s the best cheese for maximum stretch?
Low-moisture mozzarella wins for stretchiness. String cheese is a great shortcut for consistency.
5. Can I make gluten-free cheese sticks?
Definitely. Use gluten-free flour and breadcrumbs. Many stores offer gluten-free panko now, and it works beautifully.
Conclusion
Homemade cheese sticks are more than just a fun snack—they’re a flavorful, customizable, and totally addictive comfort food that you can make your own. Whether you fry, bake, or air fry them, these cheesy bites are always a crowd-pleaser. With endless variations, creative serving ideas, and flavorful dips, there’s no reason not to make a big batch and share (or not share—we won’t judge!).
So the next time you’re craving that crunchy-on-the-outside, gooey-on-the-inside goodness, skip the frozen aisle and go homemade. Trust us—your taste buds will thank you.