Cheese Bites Recipe: There is something almost impossible to resist about cheese bites. They are small, warm, savory, and packed with that deep, comforting cheese flavor that instantly makes people reach for one more. In a world full of complicated appetizers and trendy snacks, cheese bites keep things refreshingly simple. They do not need fancy garnishes or hard-to-find ingredients to win people over. They work for parties, lunchboxes, holiday platters, movie nights, after-school snacks, and even quick breakfast sides. That kind of flexibility is what makes them such a reliable recipe to keep in your back pocket.
What really makes this cheese bites recipe special is the balance between convenience and satisfaction. You can make them with pantry staples, adapt them to your taste, and still end up with a snack that feels bakery-worthy. Think about them like the little black dress of homemade savory baking. They fit into almost any occasion and still manage to stand out. Crisp on the outside, soft or slightly chewy in the middle, and loaded with cheesy richness, they hit all the right notes without trying too hard.
Another reason people love cheese bites is that they are incredibly beginner-friendly. You do not need advanced baking skills to get them right. Once you understand a few simple principles like using the right cheese, not overmixing the dough, and baking until golden, the whole process becomes very straightforward. For home cooks who want a professional-looking result without stress, this recipe is a smart choice. It feels homemade, tastes comforting, and looks polished enough to serve to guests.
What Makes a Great Cheese Bites Recipe
A truly great cheese bites recipe is not just about dumping cheese into dough and hoping for the best. It is about getting the little details right so every bite feels intentional. The best cheese bites have a clear cheese flavor that comes through immediately, but they also have structure. You want them to hold their shape, bake evenly, and give you that satisfying bite instead of collapsing into greasy puddles or dry lumps. That sweet spot comes from the ratio of cheese, flour, fat, and seasoning working together in harmony.
Texture matters just as much as flavor. Some people want their cheese bites a little crisp on the edges with a tender center, while others prefer a softer, biscuit-like result. A professional version of this recipe aims for the best of both worlds: light crispness outside and a rich, fluffy bite inside. That texture makes them feel elevated, almost like a cross between a savory cookie and a mini cheese scone. It is the kind of snack that disappears fast from the plate because every bite feels complete.
The other part of a good recipe is consistency. You do not want a snack that turns out amazing once and disappointing the next time. Reliable cheese bites depend on measured ingredients, proper chilling if needed, and careful baking. Once you understand the rhythm of the recipe, it becomes easy to repeat. That is why a step-by-step approach matters so much. It turns what could be a rough kitchen experiment into a dependable, shareable, and genuinely impressive homemade recipe.
Flavor, Texture, and Simplicity
The magic of cheese bites comes from how these three things work together. Flavor gives the snack its identity, texture gives it character, and simplicity makes it practical enough to prepare again and again. Strong cheese alone is not enough if the dough is heavy. A perfect texture alone will not help if the seasoning is bland. And even the most delicious recipe can lose its charm if it is too complicated for everyday cooking. That is why the best version of cheese bites keeps the ingredient list manageable while still delivering plenty of taste.
Seasoning plays a bigger role than many people realize. A pinch of paprika, garlic powder, black pepper, or dried herbs can push the cheese flavor forward without overpowering it. Salt should be used carefully because cheese already brings natural saltiness. The goal is not to make the bites aggressively seasoned but to make them layered and memorable. A professional recipe tastes complete, not flat.
Simplicity also makes this recipe ideal for customization. Once you have the base right, you can shape it in different ways, use different cheeses, or add herbs and spices based on the occasion. It is like having a reliable blueprint that you can dress up or down.
Ingredients You’ll Need
Main Ingredients
Here are the core ingredients for classic homemade cheese bites:
- 2 cups all-purpose flour
- 1 ½ cups grated cheddar cheese
- ½ cup unsalted butter
- 1 egg
- 2 to 3 tablespoons milk
- 1 teaspoon baking powder
- ½ teaspoon salt
- ½ teaspoon black pepper
- ½ teaspoon garlic powder
- ¼ teaspoon paprika
These ingredients create a rich and savory base with enough structure to hold shape and enough fat to stay tender. The all-purpose flour gives the bites body, while the baking powder helps them rise just enough to avoid becoming dense. Cheddar cheese is a top choice because it has strong flavor and good melting behavior. Butter adds richness and contributes to a light, crumbly bite. The egg helps bind the dough, while the milk adjusts the consistency so it is workable but not sticky. The seasonings round everything out and prevent the cheese flavor from tasting one-dimensional.
Optional Add-Ins for Extra Flavor
Once you have the base recipe, you can take it in several delicious directions. Add-ins are where you can make the recipe feel more personal or more tailored to the occasion. For a brunch platter, chopped chives or green onions work beautifully. For a bolder party snack, red pepper flakes or smoked paprika can add a gentle kick. Dried Italian herbs, onion powder, parmesan, or a touch of mustard powder can also bring extra depth.
You do not want to overload the dough, though. Think of add-ins like accessories, not the whole outfit. A little goes a long way because the main attraction is still the cheese. A tablespoon or two of finely chopped herbs or a small pinch of stronger spices is usually enough. That keeps the bites balanced and makes the final flavor feel thoughtful rather than messy. This is one of the easiest ways to make a basic cheese bites recipe feel homemade in the best possible way.
Kitchen Tools That Make the Process Easier
You do not need a professional kitchen to make excellent cheese bites, but the right tools can make the process smoother. A large mixing bowl, measuring cups, a pastry cutter or fork, a cheese grater, and a baking tray are the essentials. Parchment paper is especially helpful because it keeps the bites from sticking and encourages even browning. It also makes cleanup easier, which is always a quiet little victory in the kitchen.
A cookie scoop or teaspoon can help you portion the dough evenly. This might sound minor, but evenly sized cheese bites bake more consistently and look more polished on the serving plate. That is the difference between something that feels casually homemade and something that looks intentionally prepared. A wire rack is also useful after baking because it helps steam escape and prevents the bottoms from becoming soggy.
If you prefer a very smooth dough, you can use a food processor, but it is not necessary. In fact, mixing by hand often gives you better control. You can feel the texture change and stop at exactly the right moment. That hands-on awareness is valuable because overworked dough can lead to tough cheese bites. So while tools help, your attention is still the most important ingredient in the room.
How to Choose the Best Cheese
Since cheese is the headline ingredient, choosing the right kind matters more than almost anything else in this recipe. Sharp cheddar is one of the best options because it offers bold flavor without making the dough too wet. Mild cheddar works too, but it can taste less pronounced, especially after baking. Parmesan adds a salty, nutty edge, while gouda brings a smoother, slightly sweet richness. Mozzarella can work in blends, but on its own it may not deliver enough strong flavor for a standout result.
The texture of the cheese matters too. Hard and semi-hard cheeses usually behave best because they grate easily and distribute well through the dough. Very soft cheeses can introduce too much moisture and change the structure. That does not mean they are off-limits, but they need to be used carefully. Think of each cheese as bringing a personality to the recipe. Sharp cheddar is confident and classic, parmesan is elegant and punchy, and gouda is mellow and luxurious.
Fresh grating is always the smarter move. Pre-shredded cheese often contains anti-caking agents that can interfere with melting and blending. Freshly grated cheese melts more smoothly and delivers cleaner flavor. That one simple upgrade can make your cheese bites taste noticeably better. It is a small step that creates a more professional result, and in a recipe built around cheese, details like that matter.
Best Cheese Varieties for Cheese Bites
The most reliable choices are sharp cheddar, parmesan, gouda, Monterey Jack, and gruyère. Sharp cheddar remains the most popular because it balances affordability, flavor, and structure. Parmesan is best used in combination with another cheese because it adds depth but can be too dry on its own. Gouda and Monterey Jack give a softer, meltier finish, while gruyère adds a slightly nutty, upscale flavor that works beautifully for entertaining.
A mix of cheeses can be even better than using just one. For example, cheddar and parmesan together create both richness and complexity. Cheddar and Monterey Jack produce a mellow but still cheesy bite. The trick is to keep one cheese as the base and the other as the accent. That way the flavor stays focused rather than confused. A good cheese blend should feel like harmony, not competition.
Preparing the Dough Properly
Good dough is the foundation of great cheese bites. This is where the recipe either starts to shine or quietly drifts off course. The dough should be soft enough to shape, but firm enough to hold its form during baking. If it is too dry, the bites may crumble. If it is too wet, they may spread too much or bake unevenly. That is why adding liquid gradually is so important. You want control, not guesswork.
The best approach is to mix the dry ingredients first, then cut in the butter until the texture resembles coarse crumbs. After that, stir in the grated cheese so it is evenly distributed before adding the egg and milk. This order helps prevent clumps and keeps the fat properly dispersed. The dough should come together without being heavily kneaded. Treat it gently. Think of it like handling a delicate conversation: too rough, and the result gets tense.
Resting the dough for 10 to 15 minutes can also help, especially in a warm kitchen. It gives the flour time to hydrate and can make shaping easier. Some bakers even chill the dough briefly for cleaner edges and less spreading. These small steps are not complicated, but they do improve the final product. In a simple recipe like this, thoughtful preparation is what separates decent cheese bites from truly memorable ones.
Common Mistakes to Avoid While Mixing
One of the biggest mistakes is overmixing. Once the flour meets the liquid, gluten starts to develop. Too much mixing creates a tougher texture, and cheese bites should feel tender, not stubborn. Another common issue is adding too much milk too quickly. The dough may seem dry at first, but cheese and egg also contribute moisture. Add liquid slowly and let the dough tell you what it needs.
Using warm butter can be another problem. Softened butter is fine in some variations, but melted butter usually makes the dough greasy and harder to manage. Skipping seasoning is also a mistake because cheese alone does not always create a full, layered flavor. Finally, avoid making the bites too large. Smaller portions bake more evenly and deliver a better cheese-to-dough ratio in every bite.
Step-by-Step Guide to Making Cheese Bites
Step 1 – Gather and Measure Ingredients
Start by gathering all your ingredients so the process goes smoothly. You will typically need flour, baking powder, salt, butter, shredded cheese, and milk or eggs, depending on the recipe. Measure everything carefully because the right balance helps the cheese bites turn out soft inside and lightly crisp outside. Line a baking tray with parchment paper and preheat your oven so it is ready when the dough is done.
Step 2 – Mix the Dough
In a large bowl, combine the dry ingredients first, then add the butter and mix until the texture looks crumbly. Stir in the shredded cheese so it spreads evenly through the mixture. Add the milk or other wet ingredients little by little, mixing gently until a soft dough forms. Avoid overmixing, or the cheese bites may become dense instead of light and tender.
Step 3 – Shape the Cheese Bites
Take small portions of the dough and roll or scoop them into bite-sized balls. Try to keep them the same size so they bake evenly. Place them on the prepared tray, leaving a little space between each one. For extra flavor, you can sprinkle a little cheese or herbs on top before baking.
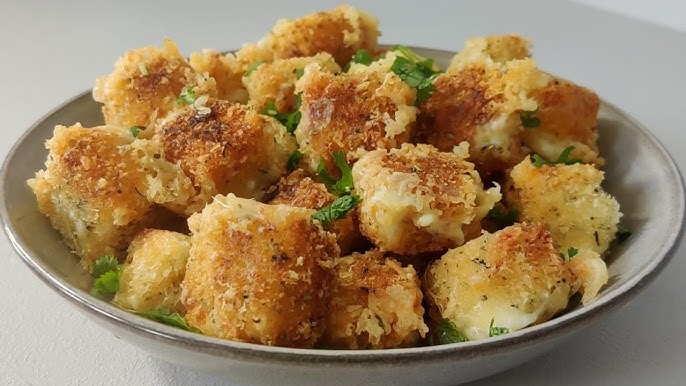
Step 4 – Bake Until Golden
Place the tray in the preheated oven and bake until the cheese bites are golden brown and slightly firm on the outside. This usually takes about 12 to 18 minutes, depending on their size. Keep an eye on them near the end so they do not overbake.
Step 5 – Cool and Serve
Remove the cheese bites from the oven and let them cool for a few minutes. This helps them firm up and makes them easier to handle. Serve them warm as a snack, appetizer, or party treat.
Tips for Crispy and Flavorful Cheese Bites
If you want your cheese bites to taste like they came from a good café instead of a rushed home kitchen, a few small adjustments can make a big difference. First, use freshly grated cheese for stronger flavor and better texture. Second, avoid overloading the dough with liquid. Slightly firmer dough usually bakes into a better bite. Third, let the bites have breathing room on the tray so the heat can circulate properly and create crisp edges.
Seasoning deserves a little more attention than it usually gets. A tiny amount of black pepper, smoked paprika, mustard powder, or dried herbs can transform the flavor from basic to memorable. Another smart trick is mixing two cheeses instead of one. That gives your recipe dimension without making it complicated. One cheese can bring sharpness while another brings melt and creaminess.
Temperature also matters. A properly preheated oven helps the bites rise and set quickly, which improves both texture and color. If the oven is not hot enough, the butter can melt out before the structure forms. That leads to flat or greasy bites. Think of heat as the stage lighting of baking. When it is right, everything looks and performs better.
Serving Ideas and Dipping Sauces
Cheese bites may be small, but they are incredibly versatile when it comes to serving. You can place them on a party board with olives, nuts, sliced vegetables, and dips for a relaxed appetizer spread. You can tuck them into lunchboxes for a savory snack that feels homemade and comforting. You can even serve them alongside tomato soup, creamy potato soup, or a crisp green salad to turn a simple meal into something more satisfying.
Dips can change the personality of the entire recipe. Marinara sauce gives the bites an Italian-style comfort-food vibe. Honey mustard adds sweet tang and works especially well with sharp cheddar. Garlic aioli makes the dish feel richer and more elevated, while spicy mayo gives it a modern kick. You can also keep things simple and serve them plain, because a well-made cheese bite really does stand on its own.
For entertaining, presentation helps. Serve them warm in a lined basket, on a wooden board, or in a simple ceramic dish with dipping sauce in the center. The goal is not to overdecorate but to make them look as inviting as they taste. A humble snack can still feel polished when served thoughtfully. That is one of the easiest ways to turn this recipe into something guests remember.
How to Store and Reheat Cheese Bites
One of the most practical things about this recipe is how well it stores. Once the cheese bites have cooled completely, place them in an airtight container and keep them in the refrigerator for up to 4 days. They can also sit at room temperature for a shorter period if your kitchen is cool and you plan to eat them the same day. Still, refrigeration is the safer option for maintaining freshness and texture.
To reheat, use an oven or air fryer rather than a microwave. The microwave warms them quickly, but it can soften the outside and make the texture less appealing. A few minutes in a 350°F (175°C) oven usually brings back the crispness beautifully. It is like waking the snack up instead of just heating it. That small effort gives you a much better eating experience.
For longer storage, freeze them in a single layer first, then transfer to a freezer-safe bag or container. This keeps them from sticking together and makes it easy to reheat only what you need. Proper storage turns this from a one-time snack into a smart make-ahead recipe. That is especially useful for busy households, party prep, or anyone who likes to keep homemade options ready to go.
FAQs about Cheese Bites Recipe
1. What type of cheese works best for cheese bites?
Cheddar is one of the best choices because it melts well and gives a rich, sharp flavor. You can also use mozzarella, parmesan, gouda, or a mix of cheeses depending on the taste and texture you want. A firmer cheese usually gives better structure.
2. Can I make cheese bites ahead of time?
Yes, you can prepare the dough ahead of time and keep it in the refrigerator for several hours before baking. You can also bake the cheese bites earlier in the day and reheat them briefly before serving. They are often best enjoyed warm.
3. How do I keep cheese bites from turning out dry?
Measure the ingredients carefully and avoid overbaking them. Too much flour or too little liquid can make them dry. Mixing the dough gently also helps keep the texture soft and tender.
4. Can I add extra flavors to cheese bites?
Yes, cheese bites are easy to customize. You can add garlic powder, black pepper, paprika, chili flakes, or dried herbs like parsley or oregano. These simple additions can make the flavor more interesting.
5. How should I store leftover cheese bites?
Store leftovers in an airtight container in the refrigerator for up to 3 days. Reheat them in the oven or air fryer for a few minutes to bring back some crispness. Avoid leaving them uncovered, or they may dry out.
Conclusion
What makes these cheese bites stand out is their flexibility. They fit into everyday snacking, party platters, lunch prep, and casual entertaining without needing much adjustment. You can keep them classic with cheddar and garlic powder, or add herbs, spices, and blended cheeses to create your own signature version. That adaptability gives the recipe lasting value. It is not just something you make once and forget. It is something you return to because it keeps proving itself useful.
For anyone searching for an easy yet professional snack recipe, this is a strong choice. The ingredients are accessible, the method is beginner-friendly, and the flavor delivers exactly what people hope for when they hear the words homemade cheese bites. Warm, savory, golden, and satisfying, they offer the kind of comfort that never really goes out of style.