Cheese Balls Recipe: Cheese balls are the kind of snack that nobody can say no to. Crispy on the outside, soft and cheesy on the inside, they are a real crowd-pleaser at parties, family gatherings, or even as a quick evening snack. Imagine biting into a golden-brown ball, and as you take that first bite, warm gooey cheese stretches and melts in your mouth—sounds irresistible, right? That’s the magic of cheese balls.
What Are Cheese Balls?
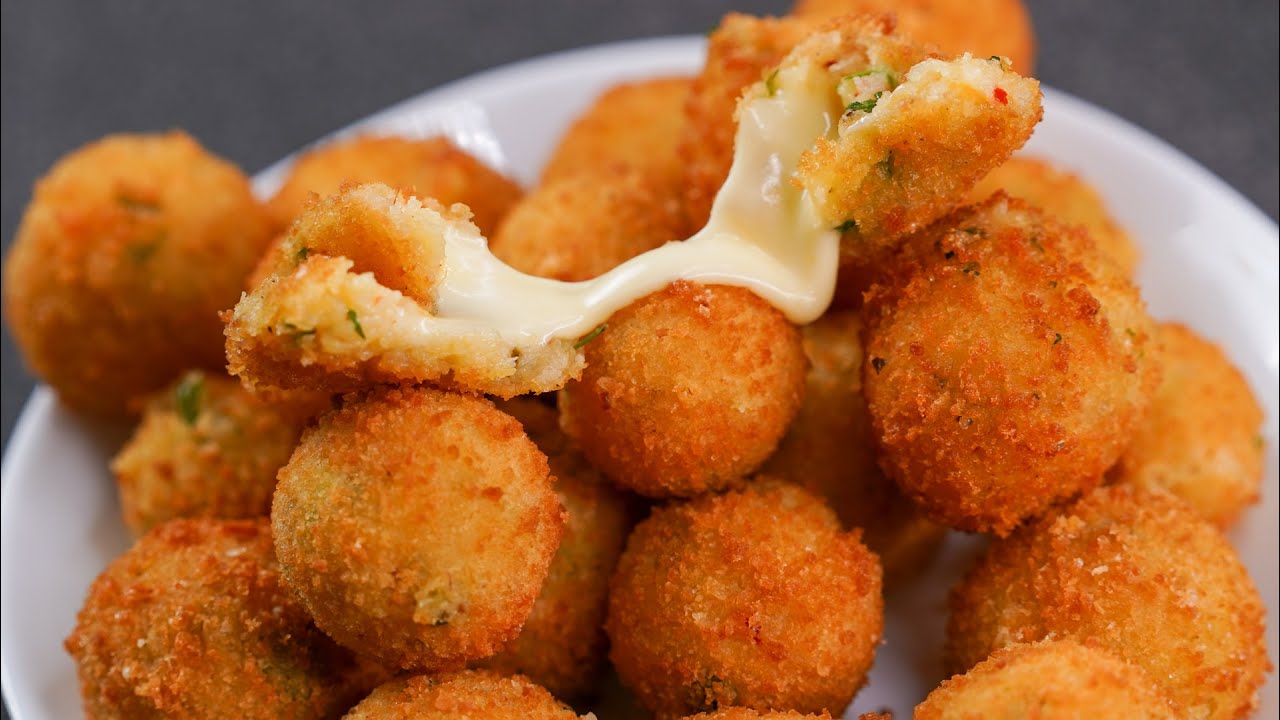
Cheese balls are small, bite-sized snacks made with a mixture of cheese, mashed potatoes (or breadcrumbs), herbs, and seasonings. The mixture is shaped into small balls, coated with breadcrumbs, and either fried or baked until golden and crispy. While cheese balls can vary across cultures—some stuffed with spices, others served with dips—the common thread is their universal appeal. Whether served as appetizers or paired with a hot cup of tea, cheese balls are always a hit.
Why Cheese Balls Are a Crowd Favorite
There’s a reason why cheese balls are loved worldwide: they’re versatile, customizable, and incredibly satisfying. You can serve them with ketchup, mayonnaise, mint chutney, or even spicy hot sauce. They can be made spicy, mild, or even with a surprise filling inside. Kids love them for their cheesy goodness, and adults appreciate them as a comforting, crunchy snack with a touch of indulgence. Plus, they’re easy to prepare in bulk, making them perfect for parties and gatherings.
Ingredients You’ll Need for Cheese Balls
Making cheese balls at home doesn’t require complicated or fancy ingredients. In fact, most of the items you’ll need are probably already sitting in your kitchen. The key is to strike the right balance between creamy, cheesy filling and the crispy, golden coating.
Core Ingredients for Classic Cheese Balls
Here’s the basic list of ingredients you’ll need:
- Cheese (mozzarella, cheddar, or processed cheese) – 1 cup, grated
- Potatoes – 2 large, boiled and mashed
- Breadcrumbs – 1 cup (plus extra for coating)
- Cornflour or all-purpose flour – 2 tbsp (for binding)
- Green chilies – 1–2, finely chopped (optional)
- Coriander leaves – 2 tbsp, finely chopped
- Salt – to taste
- Black pepper powder – ½ tsp
- Oil – for deep frying or baking
Optional Add-ons for Extra Flavor
If you want to experiment with flavors, here are some great add-ons:
- Chili flakes for heat
- Oregano or Italian seasoning for a herby twist
- Chopped onions or capsicum for crunch
- Chopped jalapeños for a spicy kick
- Sweet corn kernels for a pop of sweetness
Choosing the Right Cheese
The cheese is the star of the dish, so choosing the right one makes all the difference. Mozzarella is best if you want that gooey, stretchy cheese-pull effect. Cheddar brings a sharp, tangy flavor, while processed cheese works well for a mild and creamy texture. For the ultimate experience, you can even combine two or more types of cheese.
Step-by-Step Guide to Making Cheese Balls
Now that we have our ingredients ready, let’s get into the process of making cheese balls. Follow this step-by-step guide, and you’ll have perfect, crispy cheese balls in no time.
Step 1 – Preparing the Ingredients
Start by boiling the potatoes until they’re soft. Once cooked, peel and mash them thoroughly to ensure there are no lumps. Grate the cheese and keep it aside. Chop green chilies, coriander leaves, and any other optional add-ons you’d like to include. Having everything prepped makes the mixing process smooth and quick.
Step 2 – Making the Cheese Mixture
In a large mixing bowl, combine the mashed potatoes, grated cheese, green chilies, coriander, salt, pepper, and flour (or cornflour). Mix everything well until a dough-like consistency forms. The mixture should be firm enough to hold shape but soft enough to stay moist. If it feels too sticky, add more breadcrumbs.
Step 3 – Shaping the Cheese Balls
Take a small portion of the mixture and roll it between your palms to form a smooth ball. Repeat the process until you’ve used up all the mixture. To make them extra special, you can stuff a small cube of mozzarella in the center of each ball for a surprise cheesy core.
Step 4 – Coating for Crunch
Prepare a slurry by mixing 2 tbsp of cornflour with water. Dip each cheese ball into the slurry, then roll it in breadcrumbs until fully coated. For an extra crispy crust, repeat the dipping and coating process twice.
Step 5 – Frying or Baking Cheese Balls
Heat oil in a deep frying pan and carefully drop the cheese balls in batches. Fry them on medium heat until they turn golden brown and crispy. If you prefer a healthier version, you can bake them in a preheated oven at 200°C (392°F) for about 20–25 minutes, flipping halfway through.
Tips for Perfect Cheese Balls
Cooking cheese balls sounds simple, but a few small tricks can make a big difference between soggy, oily balls and crispy, golden delights. If you’ve ever had issues like cheese leaking out while frying, or the balls turning greasy instead of crunchy, these tips will save your recipe.
How to Keep Them Crispy
The secret to a crispy exterior is all in the coating. Always ensure the cheese balls are coated well with breadcrumbs. For extra crunch, try double-coating: dip the ball in cornflour slurry, coat with breadcrumbs, then repeat the process once more. This creates a thicker shell that locks in the moisture and keeps the outside nice and crisp.
Another trick is to chill the balls before frying. Place the prepared, coated cheese balls in the refrigerator for at least 30 minutes. This step helps the coating firm up and prevents them from breaking apart in hot oil. Also, make sure your oil is at the right temperature—too hot, and they’ll burn on the outside while staying raw inside; too cold, and they’ll soak up oil and turn soggy.
Preventing Cheese from Oozing Out
One of the most common problems with cheese balls is cheese leaking out during frying. To prevent this:
- Ensure the cheese is properly mixed with the mashed potatoes and seasonings.
- Don’t overload the center with cheese cubes; keep the filling balanced.
- Seal the balls properly before coating. If you notice cracks, smooth them out with a little extra potato mixture.
- Fry on medium heat instead of high—this gives the coating time to crisp up before the cheese starts melting inside.
By following these tips, you’ll get perfectly crispy cheese balls with gooey, cheesy centers every single time.
Variations of Cheese Balls Recipe
Cheese balls are so versatile that you can experiment with countless variations. Depending on your taste preferences and ingredients available, you can give them a spicy twist, pack them with veggies, or even make a baked version for guilt-free snacking.
Spicy Cheese Balls
If you’re a fan of heat, spicy cheese balls are a must-try. Add chopped jalapeños, chili flakes, or even a dash of hot sauce to the cheese mixture. You can also sprinkle paprika or cayenne pepper into the breadcrumbs for an extra fiery coating. Spicy cheese balls pair perfectly with a cooling dip like sour cream or garlic mayonnaise, balancing the heat with creamy goodness.
Veggie-Stuffed Cheese Balls
Want to sneak in some vegetables for a healthier snack? Try adding finely chopped carrots, capsicum, onions, or even spinach to the mixture. Sweet corn also works wonderfully, adding a pop of sweetness to contrast the saltiness of the cheese. Veggie-stuffed cheese balls are great for kids who usually run away from vegetables but can’t resist a cheesy treat.
Baked Cheese Balls
For those watching their calorie intake, baking cheese balls is a fantastic alternative to frying. Simply place the coated balls on a greased baking tray, spray or brush lightly with oil, and bake in a preheated oven at 200°C (392°F) for 20–25 minutes. They’ll come out just as crispy as fried ones, minus the extra oil. You can also try air frying for a quick, low-oil version.
By tweaking the recipe, you can keep enjoying cheese balls in new and exciting ways every time.
Serving Suggestions
Cheese balls are versatile not just in flavor but also in how you serve them. Whether you’re making them for a cozy evening snack or serving at a party, they pair beautifully with dips and sauces.
Best Dips and Sauces
Cheese balls taste amazing on their own, but the right dip can take them to the next level. Some of the best options include:
- Tomato ketchup – the all-time classic combo.
- Garlic mayonnaise – creamy, tangy, and flavorful.
- Mint chutney – a refreshing, herby dip perfect for cutting through the richness.
- Sweet chili sauce – a balance of sweet and spicy that pairs beautifully with cheese.
- Ranch or sour cream dip – adds a cooling, tangy contrast.
For parties, you can even serve a dip platter with multiple options so guests can pick their favorites.
Cheese Balls as Party Snacks
Cheese balls are the ultimate party snack because they’re bite-sized, easy to eat, and universally loved. You can serve them on skewers, arrange them on a platter with colorful dips, or even pair them with mocktails or cocktails. They also make an excellent starter before a main course meal. If you’re hosting a kids’ party, cheese balls will be the first dish to disappear from the table!
Storage and Reheating
Made a big batch of cheese balls and have leftovers? No problem! Cheese balls store well and can be reheated without losing much of their crispiness if done correctly.
How to Store Leftover Cheese Balls
- If you’ve fried them already, let them cool completely before storing. Place them in an airtight container and refrigerate for up to 2 days.
- If you want to store them longer, freeze the unfried, coated balls instead. Arrange them on a tray so they don’t stick together, freeze for a few hours, and then transfer to a freezer-safe bag or container. They’ll last up to a month.
Best Way to Reheat Without Losing Crispiness
When reheating, avoid microwaving as it makes the coating soggy. Instead:
- Reheat in a preheated oven at 180°C (356°F) for 8–10 minutes.
- Use an air fryer for 5–6 minutes to bring back the crunch.
- If you must reheat on the stove, lightly pan-fry them with a drizzle of oil until warmed through and crispy again.
This way, your leftover cheese balls will taste almost as good as freshly made ones.
Nutritional Value of Cheese Balls
Cheese balls are undeniably delicious, but let’s face it—they’re not the lightest snack out there. Still, understanding their nutritional profile can help you enjoy them in moderation without guilt. Plus, with a few tweaks, you can make them a healthier indulgence.
Calories and Macronutrients
On average, one medium-sized fried cheese ball contains:
- Calories: 90–120 kcal
- Carbohydrates: 10–12 g (mostly from potatoes and breadcrumbs)
- Protein: 3–5 g (from cheese and flour)
- Fat: 6–8 g (mainly from frying oil and cheese)
While cheese balls are rich in protein and calcium thanks to the cheese, they’re also high in fat and carbs, especially when deep-fried. This makes them more of an occasional treat rather than a daily snack.
Healthier Alternatives
If you want to cut down on calories while still enjoying cheese balls, here are some options:
- Baked or Air-Fried Cheese Balls: Significantly reduce oil and fat content.
- Whole Wheat Breadcrumbs: Swap regular breadcrumbs with whole wheat for extra fiber.
- Sweet Potato Instead of Potato: Adds more nutrients and a slightly sweet taste.
- Low-Fat Cheese: Reduces overall calorie count without compromising flavor too much.
- Adding Vegetables: Carrots, spinach, or peas can increase the nutritional value.
By making these small adjustments, you can transform cheese balls into a snack that’s both tasty and relatively healthier.
Common Mistakes to Avoid
Cheese balls might look easy, but there are a few mistakes that can ruin their texture or flavor. Knowing these pitfalls will help you get them right every single time.
Overfrying or Undercooking
Frying cheese balls at the wrong temperature is the most common issue. If the oil is too hot, the balls will brown too quickly on the outside but stay raw inside. If the oil is too cold, they’ll absorb excess oil and turn greasy. The sweet spot is medium heat—enough to crisp the outside while giving the inside time to cook properly.
Another mistake is frying for too long. Cheese melts fast, so overfrying can cause the cheese to leak out. Always keep an eye on the color; once they’re golden brown, they’re ready.
Wrong Cheese Choices
Not all cheese is suitable for cheese balls. Some hard cheeses don’t melt well, leaving you with a dry texture instead of gooey goodness. Stick to mozzarella for that stretchy melt or processed cheese for a creamy center. Cheddar is great for flavor but should be combined with a softer cheese for the best results.
Also, avoid pre-shredded packaged cheese if possible—they often contain anti-caking agents that prevent smooth melting. Freshly grated cheese gives a much better texture and taste.
By avoiding these mistakes, you’ll get perfectly cheesy, golden, and crispy balls every single time.
FAQs about Cheese Balls Recipe
Q1: Can I make cheese balls ahead of time?
Yes! You can shape and coat them in advance, then refrigerate for up to 24 hours or freeze for up to a month. Fry or bake them just before serving.
Q2: Which cheese is best for melting inside cheese balls?
Mozzarella is the best for a stretchy, gooey effect. For extra flavor, combine it with cheddar or processed cheese.
Q3: Can I freeze cheese balls before frying?
Absolutely. Place the coated balls on a tray, freeze until solid, then transfer to a container. Fry directly from frozen—no need to thaw.
Q4: How can I make cheese balls healthier?
Bake or air-fry instead of deep-frying, use whole wheat breadcrumbs, add vegetables, or use low-fat cheese.
Q5: Are cheese balls gluten-free?
Not usually, since breadcrumbs and flour contain gluten. However, you can use gluten-free breadcrumbs and cornstarch instead of flour to make them gluten-free.
Conclusion
The best part? They’re incredibly versatile. You can make them spicy, add veggies, or even bake them for a healthier twist. Paired with dips and sauces, cheese balls become an irresistible appetizer or snack that pleases both kids and adults alike.
So, the next time you’re looking for a quick, crowd-friendly recipe, give cheese balls a try. Just follow the step-by-step guide, keep the frying tips in mind, and you’ll have a plate of golden, cheesy goodness ready in no time.