Cheese Balls Recipe: Cheese balls are the ultimate comfort snack—crispy on the outside, gooey and cheesy on the inside. They’re a universally loved finger food that works great for parties, family gatherings, or even a solo indulgence while binge-watching your favorite shows. While cheese balls might sound fancy, they’re surprisingly easy to whip up in your kitchen with a few simple ingredients and a little patience.
Originating as a party staple in many Western countries, cheese balls have now become a beloved snack globally, with different cultures putting their own spin on the dish. Some prefer them fried to golden perfection, while others opt for a baked version for a slightly healthier option. In India, for example, you’ll find spicy cheese balls loaded with herbs and chili, while American versions might be stuffed with jalapeños or bacon bits.
Whether you’re a novice cook or a kitchen pro, this recipe guide will walk you through every single step of making cheese balls—from selecting the best cheese to getting that perfect golden crust. By the end of this article, you’ll not only know how to make cheese balls but how to make them absolutely irresistible.
Ingredients Needed
Making cheese balls doesn’t require a shopping cart full of exotic items. In fact, most of the ingredients are already in your kitchen. Here’s a breakdown of what you need:
Main Ingredients:
- Grated Cheese (Mozzarella, Cheddar, or a mix): 2 cups
- Boiled Potatoes (mashed): 2 medium-sized
- Breadcrumbs: 1 cup (plus more for coating)
- Cornflour or All-purpose Flour: 2 tablespoons
- Green Chilies (finely chopped): 2 (optional)
- Garlic (minced): 1 teaspoon
- Salt: to taste
- Pepper or Chili Flakes: 1 teaspoon
- Mixed Herbs/Oregano: 1 teaspoon
- Oil: for deep frying
Optional Add-ons:
- Chopped Coriander or Parsley: for freshness
- Onion (finely chopped): adds a sweet crunch
- Stuffing (Olives, Jalapeños, etc.): for surprise bites
These ingredients combine to give the cheese balls their signature taste and texture. If you’re vegan or lactose intolerant, you can substitute dairy cheese with plant-based cheese and skip the potatoes in favor of mashed tofu or chickpeas.
Equipment Required
Before you get your hands dirty (or cheesy), make sure you’ve got the right tools. Here’s a list of basic kitchen equipment you’ll need:
- Mixing bowls: At least two for prepping the cheese and coating
- Frying pan or deep fryer: For cooking the cheese balls
- Slotted spoon: To safely remove them from hot oil
- Plate with paper towels: To absorb excess oil
- Grater: If you’re using a block of cheese
- Spoons or ice cream scoop: For shaping the cheese balls uniformly
- Tongs: Optional but helpful for flipping or removing balls from hot oil
Having everything ready before you start helps ensure a smooth cooking experience and prevents any mid-recipe panic.
Step-by-Step Guide to Making Cheese Balls
Step 1: Gather All Ingredients
First things first—assemble everything you need on the kitchen counter. This includes your cheese (grated), mashed boiled potatoes, breadcrumbs, spices, and any add-ons you plan to include. Having everything within arm’s reach makes the process seamless and efficient.
Use fresh ingredients for the best flavor. Avoid using pre-shredded cheese, as it often contains anti-caking agents that affect the texture of the cheese balls. Also, make sure your potatoes are well-boiled and cooled before mashing, as hot potatoes can make the cheese melt prematurely during mixing.
Step 2: Prepare the Cheese Mixture
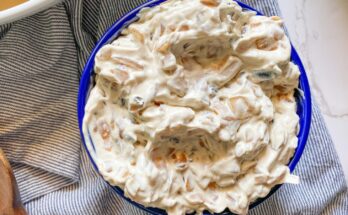
In a large mixing bowl, combine the grated cheese and mashed potatoes. Add the breadcrumbs, cornflour, green chilies, garlic, salt, pepper, and herbs. Mix everything well using your hands or a spatula until you get a firm, moldable dough.
If the mixture feels too sticky, add more breadcrumbs or a spoonful of flour. If it’s too dry, a splash of milk or water can help bring it together. You want a texture that holds its shape when rolled into a ball but isn’t too dry or crumbly.
Once the dough is ready, let it rest for about 5–10 minutes. This resting time helps the flavors meld and also firms up the mixture slightly, making it easier to shape.
Step 3: Shape the Balls
Now comes the fun part—shaping the cheese balls. Take small portions of the mixture and roll them between your palms to form smooth, round balls about the size of a walnut. Try to keep them all roughly the same size so they cook evenly.
If you want to get a bit creative, this is where you can insert a tiny surprise inside each ball—think a cube of mozzarella, a slice of jalapeño, or even a small olive. Just flatten the mixture slightly, place your filling in the center, and roll it back into a ball.
Place each finished ball on a tray lined with parchment paper or a clean plate. Once all your cheese balls are formed, pop them into the fridge for 10–15 minutes. Chilling them helps firm them up further and prevents them from falling apart during frying.
Step 4: Coat the Balls
To get that perfect crispy texture, you’ll want to coat your cheese balls before cooking. Set up a simple coating station with three bowls: one with flour, one with beaten egg (or a flour-water slurry for a vegetarian option), and one with breadcrumbs.
Here’s how to coat:
- Roll each ball in the flour to lightly dust it.
- Dip it in the egg or slurry, making sure it’s fully coated.
- Roll it in breadcrumbs until it’s evenly covered.
For an extra crispy bite, you can double coat the cheese balls by repeating the egg and breadcrumb step. This forms a thicker crust that stays crisp longer, especially if you’re serving the balls at a party or event.
Once coated, let the balls rest again for 5–10 minutes. This helps the coating stick better and prevents it from peeling off during frying.
Step 5: Fry or Bake
Time to cook those delicious morsels! You have two options: deep-frying for that classic crispy finish, or baking if you want a healthier version.
To Deep Fry:
- Heat oil in a deep pan on medium heat. Test it by dropping in a small breadcrumb—it should sizzle immediately.
- Carefully drop 3–4 cheese balls at a time (don’t overcrowd the pan).
- Fry until golden brown and crisp, turning them gently for even coloring.
- Remove with a slotted spoon and place on a paper towel to drain excess oil.
To Bake:
- Preheat your oven to 375°F (190°C).
- Arrange the coated balls on a baking tray lined with parchment paper.
- Spray or brush lightly with oil.
- Bake for 15–20 minutes or until golden brown, turning once halfway through.
While baking is great for those watching their calorie intake, nothing beats the crunch and ooze of a freshly fried cheese ball. Either way, make sure not to overcook them, as the cheese can start to leak out.
Tips and Tricks for Perfect Cheese Balls
Making cheese balls isn’t rocket science, but these little tips can turn them from good to great:
- Use Cold Ingredients: Cheese and potatoes should be chilled to prevent melting or breaking while shaping.
- Rest the Mixture: Letting the mixture rest allows the starch and cheese to bind better.
- Breadcrumb Quality Matters: Use fresh or panko breadcrumbs for better crunch.
- Double Coating = Extra Crispiness: As mentioned earlier, it makes a big difference in texture.
- Control the Oil Temperature: Too hot and they’ll burn outside and stay raw inside; too cold and they’ll soak up oil.
- Don’t Skip the Chill Time: This step is crucial to keeping the shape and preventing the balls from bursting.
Follow these hacks, and you’re guaranteed cheese balls that are crunchy, flavorful, and absolutely crowd-pleasing every time.
Serving Suggestions
So you’ve made a batch of hot, golden cheese balls—what’s next? Serving them right can elevate the entire experience. These versatile snacks pair well with a variety of sauces and accompaniments, and they can be styled for different occasions, from casual snacking to fancy party platters.
Best Dips and Sauces:
Pair your cheese balls with dips that enhance their flavor. Here are some go-to favorites:
- Classic Tomato Ketchup: A timeless match.
- Spicy Mayo: Mix mayo with a bit of hot sauce for a tangy kick.
- Garlic Aioli: Creamy with a rich garlic flavor, perfect for grown-up palates.
- Honey Mustard Dip: Sweet and tangy, it contrasts the salty cheese perfectly.
- Green Chutney: Especially for Indian-style cheese balls, this adds a fresh herbaceous punch.
- Sour Cream & Chive Dip: Cool and creamy, it balances the warmth of the fried cheese.
Presentation Ideas:
When serving at parties or gatherings, presentation matters. Try these ideas:
- Skewer & Serve: Stick toothpicks into each ball for easy pick-up.
- Mini Cup Liners: Place each cheese ball in a mini cupcake liner for a clean, classy look.
- Platter Plating: Arrange cheese balls around a bowl of dip with a sprinkle of chopped herbs or grated parmesan for a gourmet touch.
- Bento Box Style: Serve them in a sectioned tray with different dips for a tasting experience.
You can also sprinkle some chili flakes, fresh herbs, or grated parmesan over the top for that final flourish. Whether it’s game night, brunch, or a party, cheese balls can fit right in with the right serving twist.
Nutritional Information
While cheese balls are undeniably delicious, it’s good to be mindful of their nutritional profile, especially if you’re tracking calories or aiming for a balanced diet.
Here’s an approximate nutritional breakdown for one medium-sized cheese ball (fried):
| Nutrient | Approximate Value |
|---|---|
| Calories | 90–110 kcal |
| Protein | 3–4 g |
| Carbohydrates | 6–8 g |
| Fat | 5–7 g |
| Saturated Fat | 2–3 g |
| Fiber | 0.5–1 g |
| Sodium | 150–200 mg |
Nutritional Tips:
- Want a lighter version? Try baking instead of frying. You’ll reduce fat by up to 50%.
- Boost fiber by adding finely chopped veggies or using whole wheat breadcrumbs.
- Watch the salt: Cheese is naturally salty, so go easy when seasoning the mix.
- Add protein by mixing in some cottage cheese or tofu for a healthier kick.
Cheese balls are definitely a treat food, not something you’d eat every day, but in moderation, they can be part of a fun and tasty diet.
Storing and Reheating
Made more cheese balls than you can eat? No worries! These beauties store well and can be revived with a little reheating magic.
Storing:
- In the Fridge: Place cooled cheese balls in an airtight container. They’ll stay good for 2–3 days.
- In the Freezer: Lay the uncooked cheese balls on a tray, freeze for an hour, then transfer to a ziplock bag. They can be stored for up to a month.
Reheating:
- Oven: Best method. Bake at 350°F (175°C) for 10 minutes to regain that crispy crust.
- Air Fryer: Another great option—5–6 minutes at 375°F.
- Microwave: Not recommended unless you like them soft and slightly soggy.
For frozen cheese balls, no need to thaw—just increase the cooking time slightly. Whether reheated or freshly made, cheese balls maintain their gooey charm when warmed properly.
Variations of Cheese Balls
Tired of the same old cheese balls? Switch things up with these irresistible variations:
Spicy Cheese Balls:
Add chopped jalapeños, chili flakes, or hot sauce directly to the mixture. These are great for spice lovers and pair well with cooling dips like ranch or sour cream.
Stuffed Cheese Balls:
Place a surprise center in each ball—think cubes of mozzarella, bits of bacon, or even sautéed mushrooms. It’s like a flavor bomb in every bite.
Vegan Cheese Balls:
Use plant-based cheese, mashed chickpeas or sweet potatoes instead of dairy and potato, and bind with flour-water slurry instead of egg. Vegan cheese balls can be just as satisfying with the right seasoning.
Herbed Cheese Balls:
Mix in chopped fresh herbs like basil, thyme, and dill for a garden-fresh twist. Great for brunch spreads and wine pairings.
Indian-Style Cheese Balls:
Spice it up with garam masala, chopped coriander, and green chilies. Serve with mint chutney for a delicious desi treat.
The beauty of cheese balls is their versatility—once you’ve mastered the base, the sky’s the limit!
FAQs about Cheese Balls Recipe
1. Can I make cheese balls in advance?
Absolutely! You can prepare the cheese ball mixture and shape the balls ahead of time. Store them in the fridge for up to 24 hours or freeze them if you need to make them days in advance. When you’re ready to cook, just coat and fry or bake as usual—no defrosting needed for frozen ones.
2. What cheese is best for cheese balls?
Mozzarella is the go-to choice for that gooey, stretchy texture, but you can mix it with cheddar for a sharp flavor or processed cheese for a creamier result. Feel free to experiment with pepper jack, parmesan, or even blue cheese for a bold twist.
3. Can I freeze cheese balls?
Yes! Freeze them before cooking for best results. Lay them out on a tray so they don’t stick together, then store in an airtight bag or container. They can last up to a month. When ready to eat, fry or bake directly from frozen—just adjust the cooking time slightly.
4. How to make cheese balls without eggs?
Skip the egg and use a flour-water slurry instead (mix 2 tablespoons of flour with 3–4 tablespoons of water). This acts as a great binding and coating agent. It’s perfect for vegetarians or those with egg allergies.
5. What can I serve cheese balls with?
They go well with a range of dips—think ketchup, garlic mayo, mint chutney, ranch, or even sweet chili sauce. Pair them with fries, salad, or stuffed in a sandwich for a fuller meal. They’re versatile enough to be a snack, appetizer, or even a main course if served creatively.
Conclusion
There you have it—an in-depth, step-by-step guide to crafting the perfect cheese balls at home. Whether you’re making them for a cozy night in, serving them at a party, or prepping snacks for the week, cheese balls deliver big on flavor, crunch, and satisfaction. With their crispy outer shell and gooey, cheesy center, they’re guaranteed to be a crowd-pleaser every single time.
Remember to serve them hot and fresh with your favorite dips, and don’t forget to try out some of the creative variations to keep things exciting. Cooking should be fun, so feel free to experiment and put your own twist on the recipe.
Happy cooking, and may your cheese balls always be golden, crispy, and utterly addictive!