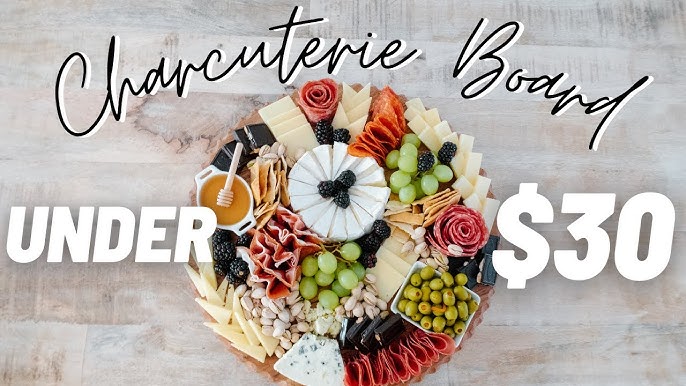
Charcuterie Board Recipe: There’s something incredibly satisfying about crafting a beautiful, delicious charcuterie board. It’s a crowd-pleaser, a centerpiece, and honestly, a fun excuse to snack. Whether you’re hosting a dinner party, planning a cozy movie night, or celebrating the holidays, a well-arranged charcuterie board can bring people together.
This step-by-step guide will walk you through how to build your perfect charcuterie board—from choosing the ingredients to assembling it like a pro. Don’t worry, you don’t need to be a chef or artist. All it takes is a little creativity and the right mix of flavors and textures.
What is a Charcuterie Board?
Originally a French tradition, “charcuterie” refers to the art of preparing and arranging cured meats. But over time, the concept has evolved into a flavorful display of not only meats but cheeses, fruits, nuts, spreads, and breads.
Modern charcuterie boards are like edible art. They’re designed to offer a variety of textures—salty, sweet, crunchy, soft—and flavors that balance each other out. It’s like creating your own mini buffet on a wooden board.
It’s perfect because you can personalize it endlessly—go fancy or keep it simple, go gourmet or budget-friendly. The flexibility is part of its charm.
Why Everyone Loves Charcuterie Boards
Let’s be honest—charcuterie boards are in. But there’s more to it than just the Instagram-worthy aesthetics. Here’s why people can’t get enough:
- They’re customizable: From keto to vegan, you can tailor it for any dietary need.
- They’re perfect for sharing: Great for gatherings or even a snacky dinner.
- They require no cooking: Minimal effort, maximum reward.
- They’re interactive: Guests love exploring the different flavor combos.
- They look impressive: Even with simple ingredients, the presentation can be stunning.
It’s a win-win. Delicious and easy to assemble.
Occasions Perfect for a Charcuterie Board
You don’t need a fancy excuse, but charcuterie boards fit right into:
- Holiday parties (Christmas, Thanksgiving, New Year’s)
- Date nights or anniversaries
- Bridal or baby showers
- Girls’ night in or wine tasting evenings
- Picnics and outdoor brunches
- Game nights and birthday parties
Basically, any time you want to impress without stress.
List of Ingredients You’ll Need
Here’s your ultimate shopping list to build a balanced, delicious charcuterie board. Mix and match based on your taste and how big your board is.
Meats
- Prosciutto
- Salami (Genoa, Soppressata, etc.)
- Capicola
- Chorizo
- Pepperoni
- Mortadella
Cheeses
- Brie
- Cheddar (sharp or mild)
- Goat cheese
- Gouda
- Blue cheese
- Manchego
- Camembert
Fruits
- Grapes
- Berries (strawberries, blueberries, raspberries)
- Apple or pear slices
- Figs (fresh or dried)
- Dates
- Pomegranate seeds
Nuts & Crunchy Add-Ons
- Almonds
- Pistachios
- Walnuts
- Cashews
- Pretzels
- Breadsticks
Spreads and Dips
- Fig or apricot jam
- Honey
- Grainy mustard
- Hummus
- Olive tapenade
- Pesto
Breads & Crackers
- Baguette slices
- Crostini
- Crackers (multigrain, rice, gluten-free)
- Pita chips
Garnishes & Extras
- Fresh herbs (rosemary, thyme)
- Edible flowers
- Pickles
- Olives
- Cherry tomatoes
Want to keep it simple? Pick 3 meats, 3 cheeses, 2 fruits, 1 nut, and 1 dip for a basic board.
Choosing the Right Board and Utensils
You don’t need a fancy marble slab. A cutting board, large serving tray, or even a baking sheet can work. That said, a wooden board is classic and gives a warm, rustic vibe.
Here’s what else you’ll need:
- Small bowls or ramekins (for dips, jams, olives)
- Cheese knives (1 for soft cheese, 1 for hard)
- Toothpicks or mini forks
- Napkins
The key is to pick a board large enough to avoid crowding, but not so big that it looks empty.
How to Select Meats for Your Charcuterie Board
The meat is the star of the show. Cured meats bring salt, spice, and richness. Go for variety in both flavor and shape—slices, rolled cuts, and even folded roses if you’re feeling fancy.
Popular Types of Cured Meats:
- Prosciutto: Thin, salty, and buttery. Always a favorite.
- Salami: Bold, peppery, and easy to find.
- Capicola: Slightly spicy with a beautiful marbled texture.
- Chorizo: Smoky and rich—adds deep flavor.
- Mortadella: Light, creamy, and subtle.
Arrange meats in loose folds or rolls to give the board movement and dimension.
How to Choose the Best Cheeses
Cheese offers creamy contrast to the meats. The trick? Balance textures and milk types (cow, goat, sheep). Go for at least one soft, one hard, and one wild card.
Hard Cheeses
- Aged Cheddar
- Gouda
- Parmigiano Reggiano
Soft Cheeses
- Brie
- Camembert
- Goat cheese (chevre)
Flavored or Aged Cheeses
- Blue cheese
- Truffle cheese
- Smoked cheeses
Place cheese evenly across the board so everyone can reach different types.
Pairing Fruits for Color and Sweetness
Fruits bring that fresh, juicy contrast that brightens up the salty, creamy flavors of your charcuterie board. They also add visual appeal, especially when you use a mix of colors and textures. Think of fruits as both a palate cleanser and an eye-catcher.
Fresh Fruits:
- Grapes: Classic and easy to grab. Try mixing green and red grapes for visual variety.
- Apple & Pear Slices: Crisp, sweet, and perfect with cheddar or brie. Tip: soak slices in lemon water to prevent browning.
- Berries: Strawberries, raspberries, and blueberries add bright color and a burst of flavor.
- Pomegranate Seeds: Great for winter boards—they’re tart and jewel-like.
Dried Fruits:
- Figs: Rich, sweet, and chewy. Excellent with goat cheese.
- Apricots: Mild and soft, perfect with sharp cheeses.
- Dates: Sweet and sticky—try them with blue cheese for a flavor bomb.
Mix both fresh and dried fruits to add more texture and balance to the board. You can also go seasonal—watermelon and melon in summer, apples and cranberries in fall, citrus and figs in winter.
Adding Crunch with Nuts and Crackers
Texture is key, and nuts bring that essential crunch. They also complement everything else—cheese, fruit, meat—you name it. Plus, they’re a great filler when you’ve got a gap in your layout.
Best Nuts for Charcuterie Boards:
- Almonds: Roasted or candied, they’re always a win.
- Pistachios: A pop of green and tons of flavor.
- Walnuts: Earthy and great with blue cheese or honey.
- Cashews: Creamy and soft, perfect with bold cheeses.
Make sure they’re shelled (nobody wants to work for their food), and avoid super salty ones so they don’t overpower the rest of your board.
Crackers & Bread Options:
- Crostini: Thin, toasted bread slices—great for spreading cheese.
- Multigrain Crackers: Nutty, crunchy, and sturdy.
- Water Crackers: Mild flavor that lets the toppings shine.
- Sourdough Slices or Mini Baguette Rounds: More filling and rustic.
Offer at least 2–3 types so guests can mix and match textures and flavors. Pro tip: Arrange crackers vertically in stacks or fan them out like cards for a nice look.
Spreads, Jams & Dips That Elevate the Board
These are the secret weapons of a charcuterie board. A swipe of fig jam or a dollop of honey can completely change the flavor game. Plus, they’re easy to add into small bowls, and they encourage people to explore new combos.
Best Spreads and Dips:
- Fig Jam: A sweet, earthy partner for strong cheeses.
- Honey: Especially delicious with blue cheese and nuts.
- Grainy Mustard: Adds a punchy, tangy twist to meats.
- Hummus: For plant-based options and a creamy texture.
- Pesto: Herbaceous and vibrant—great with mozzarella.
- Olive Tapenade: Salty and bold, perfect with bread and hard cheese.
Place spreads in small bowls or ramekins around the board. Not only does this organize your board, but it also keeps things neat and prevents soggy crackers.
How to Arrange a Charcuterie Board – Step-by-Step Guide
Okay, now for the fun part: putting it all together. This is where the magic happens. Here’s your easy, step-by-step breakdown to build a charcuterie board that’s both tasty and beautiful.
Step 1: Start With the Cheese
Place your cheeses on the board first. Space them out evenly, usually in corners or along the edges. If they’re soft (like brie or goat cheese), keep a small knife with them for easy spreading. Slice or crumble some of the harder cheeses to make them easy to grab.
Step 2: Add the Meats
Next, arrange your meats. Fold or roll them for a fuller, more textured look. Try fanning out salami slices or making “roses” out of prosciutto by folding them around a glass and flipping it. This adds volume and visual interest.
Step 3: Place Bowls for Dips and Spreads
Now add your little bowls of jams, honey, olives, mustard, or whatever dips you’ve chosen. Nestle them in spots between the cheese and meats. Space them evenly to balance the board visually.
Step 4: Fill in With Fruits, Nuts, and Garnishes
Add clusters of grapes, handfuls of nuts, and fruit slices in the spaces between other items. This helps to fill gaps and add that “overflowing” look that’s so inviting. Use herbs (like sprigs of rosemary) or edible flowers as garnishes.
Step 5: Add Bread, Crackers, and Final Touches
Finish by layering in crackers, breadsticks, or crostini. Place them in small piles or fan shapes. Add one last look and fill any open spaces to create a full, bountiful board.
Tips for a Visually Stunning Charcuterie Board
Want your board to stop people in their tracks? Here’s how to step it up:
- Use odd numbers: Three types of cheese or five bowls look more natural than even numbers.
- Balance color: Spread out fruits and garnishes so colors are evenly distributed.
- Layer textures: Mix hard and soft, smooth and crunchy.
- Work in clusters: Don’t scatter items. Group them to look intentional and full.
- Add height: Stack crackers, lean cheese wedges upright, or use small risers under bowls.
Take a picture before guests dig in—you’ll want to remember your masterpiece!
Charcuterie Board for Special Diets (Vegan, Gluten-Free)
One of the best things about charcuterie boards is their flexibility. You can build a stunning, delicious spread that works for any dietary preference or restriction—without sacrificing flavor or presentation. Whether your guests are vegan, gluten-free, or just looking for healthier options, here’s how to tweak your board to make everyone feel included.
Vegan Charcuterie Board Ideas:
You don’t need meat or cheese to make a killer board. Plant-based alternatives and colorful whole foods are your best friends here.
- Vegan “meats” like seitan slices, smoked tofu, or plant-based deli slices
- Nut-based cheeses like cashew brie or almond ricotta
- Fresh fruits & dried fruits (grapes, dates, figs, berries)
- Veggies: cucumber slices, cherry tomatoes, radish, baby carrots
- Dips: hummus, guacamole, baba ganoush, vegan tzatziki
- Crackers and breads that are dairy and egg-free
- Olives, pickled onions, and other briny bites
Don’t forget to label everything clearly—especially if serving alongside a traditional board.
Gluten-Free Charcuterie Board Options:
Gluten-free doesn’t mean flavor-free. There are plenty of options to keep your board safe and delicious.
- GF crackers made from rice, seeds, or almond flour
- Corn tortilla chips or GF pita chips
- Cheeses and meats (most are naturally gluten-free, but double-check labels)
- Fruits, nuts, olives, and jams—all naturally GF
Pro tip: Keep gluten-free items separate from regular ones to avoid cross-contamination. Use parchment paper dividers or create a mini separate board if needed.
Make-Ahead & Storage Tips
Want to save time before your guests arrive? Good news: you can prep most of your charcuterie board a few hours in advance, and even store leftovers without waste.
Make-Ahead Tips:
- Slice cheeses and meats ahead of time and store them in airtight containers.
- Wash and prep fruits (slice apples and pears just before serving to prevent browning or soak them in lemon water).
- Pre-fill bowls with jams, dips, and olives so they’re ready to drop into place.
- Assemble on the board 1–2 hours before serving and keep it refrigerated if needed.
Just don’t add crackers or bread until right before serving, as they can get soggy.
Storing Leftovers:
- Wrap leftover cheese in wax paper or a zip-top bag.
- Store meats separately in airtight containers.
- Fruits and nuts can be refrigerated in small bowls for snacking later.
- Crackers should be stored in a dry, airtight container.
Your board leftovers can easily turn into next-day lunches, sandwiches, or mini snack boxes.
FAQs about Charcuterie Board Recipe
1. How far in advance can I make a charcuterie board?
You can prep most of your board 1–2 hours ahead of time. Just keep it chilled until serving, and add bread or crackers at the last minute to prevent sogginess.
2. How much food do I need per person for a charcuterie board?
A good rule of thumb is 3–4 oz of meat and cheese per person for appetizers. If it’s the main event, plan for 6–8 oz per person.
3. Can I make a charcuterie board without meat?
Absolutely! Vegetarian and vegan charcuterie boards are totally a thing. Use plant-based meats, cheeses, dips, and plenty of fruits, veggies, and nuts.
4. What’s the best board or tray to use?
Wooden boards are classic, but you can use cutting boards, serving trays, slate boards, or even a clean baking sheet. Just pick something flat and food-safe.
5. What drinks pair well with charcuterie boards?
Wine is the go-to pairing—try a light red or crisp white. But beer, sparkling water, cider, or even mocktails can also work depending on your ingredients.
Final Thoughts
Creating a charcuterie board is about so much more than food—it’s about sharing experiences, sparking conversation, and impressing your guests with an edible work of art. Whether you’re building a simple board for a cozy night in or going all out for a celebration, you now have everything you need to do it like a pro.
Remember: there’s no wrong way to build a board. Let your personality and creativity shine. Use what you love, don’t stress over perfection, and most importantly—have fun with it. The more you build, the better you’ll get. Before you know it, you’ll be the go-to charcuterie expert in your friend group.
So go ahead, pour a glass of wine, play your favorite music, and build your masterpiece. Happy grazing!