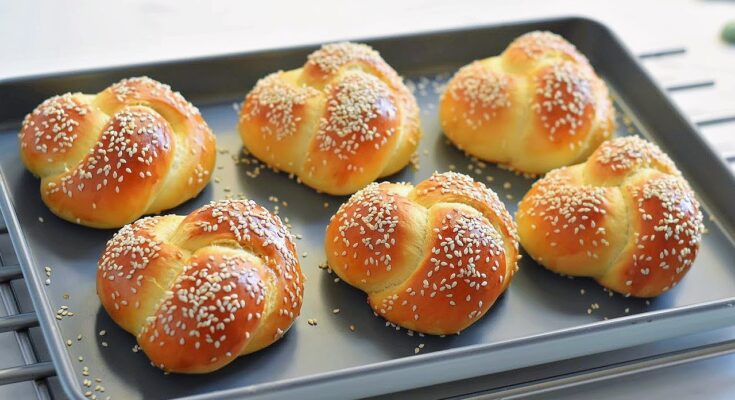
Challah Recipe: Challah is more than just bread; it’s a symbol of tradition, celebration, and community. Known for its golden crust, soft texture, and intricate braiding, Challah holds a cherished place in Jewish culture. Traditionally enjoyed on Shabbat and holidays, this bread also makes a stunning centerpiece for any table. Baking Challah at home allows you to infuse it with personal touches while enjoying the therapeutic art of bread-making.
Let’s dive into a detailed, step-by-step guide to baking Challah that’s perfect for beginners and seasoned bakers alike.
Ingredients
To make a classic Challah, you’ll need a handful of simple ingredients:
- 4 cups all-purpose flour
- 2 1/4 teaspoons active dry yeast (or one packet)
- 1/4 cup granulated sugar
- 1 teaspoon salt
- 3/4 cup warm water (not too hot, around 110°F)
- 2 large eggs
- 1/4 cup vegetable oil
- 1 egg (for egg wash)
The Role of Each Ingredient
- Flour: Forms the base of the dough.
- Yeast: Helps the bread rise and gives it a fluffy texture.
- Sugar: Adds a touch of sweetness and feeds the yeast.
- Salt: Enhances flavor and controls fermentation.
- Eggs: Contribute to the rich, tender texture.
- Oil: Keeps the bread soft and moist.
Tips for Choosing Ingredients
- Use fresh yeast for optimal rise.
- Opt for unbleached flour for better flavor.
- Use cage-free or organic eggs for a richer taste.
Tools You’ll Need
Here are the essentials:
- Mixing bowl.
- Wooden spoon or dough hook (if using a stand mixer).
- Measuring cups and spoons.
- Baking sheet.
- Parchment paper or silicone mat.
Optional but helpful tools include:
- Bench scraper for kneading and dividing dough.
- Pastry brush for applying the egg wash.
Preparing the Dough
Activating the Yeast
Start by dissolving the yeast and a teaspoon of sugar in warm water. Let it sit for 5–10 minutes until it becomes frothy. This step ensures the yeast is active.
Mixing the Ingredients
In a large mixing bowl, combine the flour, sugar, and salt. Make a well in the center and add the activated yeast, eggs, and oil. Stir until the dough starts to come together.
Kneading the Dough
Transfer the dough to a floured surface and knead for about 8–10 minutes. If using a stand mixer, knead for 5–7 minutes on medium speed. The dough should be smooth and elastic but slightly sticky.
Letting the Dough Rise
Place the dough in a greased bowl and cover with a damp cloth or plastic wrap. Let it rise in a warm place for 1–2 hours or until it doubles in size. A slightly warm oven can work if your kitchen is cold.
Shaping the Challah
Choosing Your Braid Style
- Three-Strand Braid: Perfect for beginners.
- Four-Strand Braid: Adds an extra touch of elegance.
- Round Challah: Traditional for Rosh Hashanah.
Divide the dough into equal pieces based on your chosen braid. Roll each piece into long ropes and braid them together, pinching the ends to seal.
Tips for Even Braiding
- Roll ropes of uniform thickness and length.
- Keep the dough slightly floured to prevent sticking.
Preparing for Baking
Applying an Egg Wash
An egg wash is key to giving Challah its signature golden and glossy crust. Beat one egg with a tablespoon of water and gently brush it over the surface of the braided dough. Be thorough but gentle to avoid deflating the dough.
Adding Toppings
If you want to elevate your Challah, sprinkle it with your choice of toppings before baking. Here are some popular options:
- Sesame seeds: Add a nutty flavor and texture.
- Poppy seeds: A traditional favorite.
- Everything bagel seasoning: For a modern twist.
- Cinnamon sugar: Perfect for a sweeter version.
Baking the Challah
Optimal Oven Settings
Preheat your oven to 350°F (175°C) and ensure it has reached the temperature before placing the dough inside. Bake the Challah on the middle rack for even heat distribution.
How to Know When It’s Done
Challah typically takes about 25–30 minutes to bake, but oven times may vary. You’ll know it’s done when:
- The crust is a rich golden brown.
- It sounds hollow when tapped on the bottom.
- An instant-read thermometer inserted into the center reads 190°F.
Troubleshooting Common Baking Issues
- Dough doesn’t rise: Check that your yeast wasn’t expired and the water wasn’t too hot or cold.
- Challah is too dense: The dough may have been under-kneaded or over-floured.
- Burnt crust: Lower the oven temperature slightly and tent the bread with foil halfway through baking.
Cooling and Storing
Proper Cooling Techniques
Once the Challah is out of the oven, transfer it to a wire rack to cool. Let it rest for at least 30 minutes before slicing to allow the interior to set.
How to Store for Freshness
- Room temperature: Wrap the Challah in plastic wrap or store it in a bread box for up to 3 days.
- Refrigerator: Avoid refrigerating as it can dry out the bread.
- Freezer: Wrap tightly in aluminum foil and freeze for up to 3 months. Thaw at room temperature and warm in the oven for best results.
Variations of Challah
Sweet Challah
Incorporate ingredients like raisins, chocolate chips, or a cinnamon swirl to create a dessert-like version of Challah.
Whole Wheat Challah
Substitute half or all of the all-purpose flour with whole wheat flour for a healthier option. You may need to adjust the liquid slightly as whole wheat flour absorbs more moisture.
Vegan Challah
Replace eggs with flaxseed or chia seed “eggs” (1 tablespoon ground seeds + 2.5 tablespoons water per egg) and use plant-based milk for the egg wash.
Serving Suggestions
Traditional Uses
Challah is traditionally served during Shabbat meals and Jewish holidays. It pairs beautifully with dishes like brisket, kugel, or matzo ball soup.
Ideas for Leftover Challah
- French Toast: The soft, slightly sweet bread is perfect for soaking up custard.
- Bread Pudding: Use stale Challah to create a rich dessert.
- Croutons: Cube and toast leftover bread for salads and soups.
Tips for Success
- Don’t rush the rise: Allow the dough to double in size during each proofing step for the best texture.
- Use the right temperature: Warm environments encourage proper fermentation, while extreme heat or cold can inhibit it.
- Practice braiding: It might take a few tries to perfect, but don’t stress—imperfect braids still taste amazing!
Why Homemade Challah is Worth It
Homemade Challah offers so much more than just a loaf of bread. It’s fresher, tastier, and free from preservatives. The process of making it is also deeply rewarding, whether you’re connecting with tradition or simply enjoying a fun kitchen project. Sharing a homemade loaf with loved ones is the ultimate act of love and care.
FAQs about Challah Recipe
1. What is Challah?
Challah is a traditional Jewish bread known for its soft, sweet texture and beautiful braided appearance. It is typically enjoyed during Sabbath meals and Jewish holidays like Rosh Hashanah.
2. What ingredients do I need for Challah?
To make Challah, you’ll need basic ingredients such as flour, yeast, eggs, sugar, oil, and salt. Some recipes might also include honey or raisins to enhance the flavor.
3. How do I braid Challah?
Braiding Challah can range from simple three-strand braids to intricate six-strand designs. For beginners, a three-strand braid is easiest: Divide the dough into three equal parts, roll each into a long rope, pinch the tops together, and braid them, securing the ends.
4. Can I make Challah without eggs?
Yes, there are egg-free Challah recipes available that use substitutes like flaxseed meal or commercial egg replacers to maintain the texture.
5. How long does it take to make Challah?
Making Challah usually takes about 3 to 4 hours, including the time needed for the dough to rise. However, the actual hands-on preparation time is much shorter, around 20 to 30 minutes.
6. Can Challah be made in advance?
Absolutely! Challah can be baked ahead of time and kept fresh for a couple of days wrapped at room temperature or frozen for longer storage.
7. What is the best way to store Challah?
To keep Challah fresh, wrap it in plastic wrap or store it in an airtight container at room temperature for a few days. You can also freeze it for up to a month.
Conclusion
Making Challah from scratch might seem intimidating, but with this step-by-step guide, it’s totally doable! From kneading the dough to braiding and baking, every step is a chance to infuse your loaf with care and creativity. Once you taste the warm, fluffy bread fresh out of the oven, you’ll know the effort was worth it. Don’t hesitate to try different variations and toppings to make it your own. Happy baking!


